Table of Contents
Advertisement
Save These Instructions!
Save These Instructions!
Save These Instructions!
Save These Instructions!
Save These Instructions!
Save These Instructions!
Save These Instructions!
RCS-TM80BG
REMOTE CONTROLLER-T (for EG)
INSTRUCTION MANUAL
REMOTE CONTROLLER-T (for F)
XXX
REMOTE CONTROLLER-T (for D)
XXX
REMOTE CONTROLLER-T (for I)
XXX
REMOTE CONTROLLER-T (for P)
XXX
REMOTE CONTROLLER-T (for GR)
XXX
REMOTE CONTROLLER-T (for ES)
XXX
©SANYO 2006
Contents
1. Important Safety Instructions .................. EG-1
2. Names and Operations .......................... EG-2
3. Setting the Present Time ........................ EG-5
1. XXXX ....................................................... XX-1
2. XXXX ....................................................... XX-2
3. XXXX ....................................................... XX-5
1. XXXX ....................................................... XX-1
2. XXXX ....................................................... XX-2
3. XXXX ....................................................... XX-5
1. XXXX ....................................................... XX-1
2. XXXX ....................................................... XX-2
EG
3. XXXX ....................................................... XX-5
F
1. XXXX ....................................................... XX-1
D
2. XXXX ....................................................... XX-2
3. XXXX ....................................................... XX-5
I
1. XXXX ....................................................... XX-1
P
2. XXXX ....................................................... XX-2
3. XXXX ....................................................... XX-5
GR
ES
1. XXXX ....................................................... XX-1
2. XXXX ....................................................... XX-2
3. XXXX ....................................................... XX-5
Gunma, Japan
4. Weekly Program Function ...................... EG-6
5. Outing Function .................................... EG-12
EG
6. Sleeping Function ................................. EG-14
XXXX
4. XXXX ....................................................... XX-6
5. XXXX ..................................................... XX-12
F
6. XXXX ..................................................... XX-14
XXXX
4. XXXX ....................................................... XX-6
5. XXXX ..................................................... XX-12
D
6. XXXX ..................................................... XX-14
XXXX
4. XXXX ....................................................... XX-6
5. XXXX ..................................................... XX-12
I
6. XXXX ..................................................... XX-14
XXXX
4. XXXX ....................................................... XX-6
5. XXXX ..................................................... XX-12
P
6. XXXX ..................................................... XX-14
XXXX
4. XXXX ....................................................... XX-6
5. XXXX ..................................................... XX-12
GR
6. XXXX ..................................................... XX-14
XXXX
4. XXXX ....................................................... XX-6
5. XXXX ..................................................... XX-12
ES
6. XXXX ..................................................... XX-14
Advertisement
Table of Contents

Related Manuals for Sanyo RCS-TM80BG


Summary of Contents for Sanyo RCS-TM80BG
- Page 1 4. XXXX ............XX-6 2. XXXX ............XX-2 5. XXXX ............. XX-12 3. XXXX ............XX-5 6. XXXX ............. XX-14 XXXX RCS-TM80BG 1. XXXX ............XX-1 4. XXXX ............XX-6 2. XXXX ............XX-2 5. XXXX ............. XX-12 REMOTE CONTROLLER-T (for EG) INSTRUCTION MANUAL 3.
- Page 2 • Use only specified air conditioners • Contact your dealer before moving the system Always use only air conditions specified by Contact your dealer or a professional service Sanyo. provider about moving and reinstalling the system. Electric shock or fire may result if an...
-
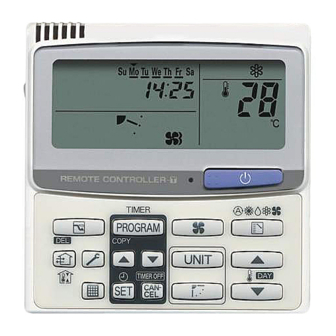
Page 3: Names And Operations
2. Names and Operations Operation Section (Refer to the page I) Start/Stop button Ventilation button Pushing this button starts, and pushing again Use this button when you installed a fan stops the unit. available in the market. Pressing this button turns on and off the fan. - Page 4 Display Section (Refer to the page II) 11. Upper and lower limit indication of the SETTING indication Appears when the timer program is being set. outing function : Indicates the upper limit of the UNIT indication temperature Indicates the unit No. of the indoor unit which : Indicates the lower limit of the is selected with the Unit Select button, or the temperature...
- Page 5 2. Names and Operations (Continued) Display Section (Refer to the page 4) Displays when an operation mode is entered Oil indication by the remote control unit, while another Appears when the engine oil needs to be operation mode has been already selected. This changed.
- Page 6 3. Setting the Present Time 1. Press and hold for more than 2 seconds to enter in the present day and time setting mode. Once you enter in the setting mode, , “ ”(day) and “time” flash. 2. Set “ ” to today’s day of the week. Press to move “...
- Page 7 4. Weekly Program Function Checking Weekly Timer Set the weekly program assigning a given timer to each day of the week. Maximum of 6 programs a day and 42 programs a week can be set. Select the day and the TIMER number you want to program. Program image diagram Vertical scale indicates the button...
- Page 8 • Changing the Program Timer To change the program setting, follow the steps below. 1. Select the program you want to change in the program confirmation mode, and press . The enters the setting mode of the program currently displayed. 2,3,4 1,2,3,4 4 * In the program setting mode,...
- Page 9 4. Weekly Program Function (Continued) 4. Set the program pattern. Pattern 1 (program step 3) There are 4 program patterns. Pressing repeats the following display patterns. Pattern 2 Pattern 1 The indoor unit starts operation at the programmed time. Pattern 2 The indoor unit stops operation at the Pattern 3 programmed time.
- Page 10 • Deleting the Program Timer To delete the program timer setting, follow the steps below. 1. Press to enter the program confirmation mode. 2. Press tto select the day of the program you want to delete. 3. Press to select a TIMER No. (from 1 to 6). 4.
- Page 11 4. Weekly Program Function (Continued) • Invalidating Program Timer If you want to adjourn the program operation for more than 1 week, you can invalidate all the timer settings. Once the timer settings are invalidated, the program will not be operated until the invalidation is cancelled. <<How to invalidate the program timer>>...
- Page 12 • Duplicating the Program Timer You can duplicate the preset program by day. Select the copy source. 1. If is pressed in program checking mode , it enters the copy mode (Selecting the copy source C1) of the program timer. While in the copy mode of the program timer, (day) of the copy source flash on the display.
- Page 13 5. Outing Function Outing function is a function that prevents the room temperature from increasing too much (or decreasing too much) when no one is in the room. General Performance of the Outing Function Outing function upper limit COOL / DRY 1 The air conditioner starts operation when the room temperature increases up to -1°C of the upper limit.
- Page 14 • Setting the Outing Function 1. Press and hold for 2 seconds to display the upper limit temperature setting screen. and the upper limit temperature start flashing. (The default value of the upper limit temperature is 38 °C.) 2. Press to select the upper limit temperature and press fix the value.
- Page 15 6. Sleeping Function * This function leads you to a comfortable sleep When the off time comes: and changes the room temperature during your • The indoor unit stops. sleep. * The temperature returns to the setting at * You can set the off timer every one hour from 1 the time when sleeping function operation to 10 hours.
- Page 16 • If button does not work. Or if the operation does not start even if is pressed. Check the following table. Display of the remote control unit Item Contents (Lighting/flashing indication) The Error indication flashes The clock is not set. (for several seconds).