Table of Contents
Advertisement
Advertisement
Table of Contents

Related Manuals for Orion AstroView 120 EQ


Summary of Contents for Orion AstroView 120 EQ
- Page 1 INSTRUCTION MANUAL Orion ® AstroView 120 EQ ™ #9026 Equatorial Refracting Telescope Customer Support (800) 676-1343 E-mail: support@telescope.com Corporate Offices (831) 763-7000 P.O. Box 1815, Santa Cruz, CA 95061 Providing Exceptional Consumer Optical Products Since 1975 IN 124 Rev. C 0900...
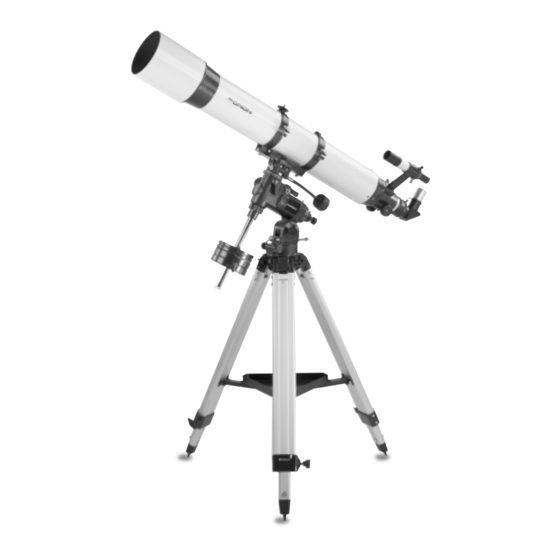
- Page 2 Counterweight lock thumbscrews “Toe saver” retaining bolt Right Ascension lock lever Azimuth fine adjustment knobs Polar axis finder scope Tripod leg Accessory tray bracket attachment point Accessory tray bracket Accessory tray Leg lock knob Figure 1. The AstroView 120 EQ Refractor...
-
Page 3: Table Of Contents
Orion telescope! Your new AstroView 120 EQ Refractor is designed for high-resolution viewing of astronomical objects. With its precision optics and equatorial mount, you’ll be able to locate and enjoy hundreds of fascinating celestial denizens, including the plan- ets, Moon, and a variety of deep-sky galaxies, nebulas, and star clusters. -
Page 4: Assembly
6. Orient the equatorial mount as it appears in Figure 1, at a latitude of about 40°, i.e., so the pointer next to the latitude scale (located directly above the Orion logo on one side of the mount) is pointing to the line at “40.” To do this, loosen one of the latitude adjusting T-bolts and then tighten the other latitude adjusting T-bolt until the pointer and the “40”... -
Page 5: Balancing The Telescope
3. Balancing the Telescope To ensure smooth movement of the telescope on both axes of the equatorial mount, it is imperative that the optical tube is properly balanced. We will first balance the telescope with respect to the R.A. -
Page 6: Aligning The Finder Scope
(b) When you let go with both hands, the tube should not drift up or down. (c) With the Dec. lock lever released, loosen the tube ring lock clamps a few turns and slide the telescope forward or back in the tube rings. -
Page 7: Setting Up And Using The Equatorial Mount
(NCP), which is an extension of the Earth’s rotational Front opening in R.A. axis Latitude scale Azimuth fine adjustment knobs Figure 7. The equatorial mount of the AstroView 120 EQ. Black nylon alignment screws Eyepiece Declination setting circle Right Ascension... - Page 8 3. Loosen the Dec. lock lever and rotate the telescope opti- cal tube until it is parallel with the R.A. axis. The pointer on the Dec. setting circle should read 90°. Retighten the Dec.
- Page 9 Using the Polar Axis Finder When using the polar finder in the field at night, you will need a red flashlight, like the Orion RedBeam LED (#5744), to illumi- nate the finder’s reticle. Shine the flashlight at an angle into the front opening in the R.A.
- Page 10 Earth, and Dec. is similar to latitude. The R.A. and Dec. values for celestial objects can be found in any star atlas or star catalog. So, the coordinates for the Orion Nebula listed in a star atlas will look like this: R.A.
-
Page 11: Using Your Telescope-Astronomical Observing
Figure 10. This illustration shows the telescope pointed in the four cardinal directions: (a) north, (b) south, (c) east, (d) west. Note that the tripod and mount have not been moved; only the telescope tube has been moved on the R.A. and Dec. axes. - Page 12 Red light does not spoil your eyes’ dark adaptation like white light does. A flashlight with a red LED light is ideal, such as the Orion RedBeam LED flashlight (#5744), or you can cover the front of a regular incandescent flashlight with red cellophane or paper.
- Page 13 (called the “terminator”). A full Moon is too bright and devoid of surface shadows to yield a pleasing view. Try using a Moon Filter (Orion part #5662) to dim the Moon when it is very bright. It simply threads onto the bottom of the eyepieces (you must first remove the eyepiece from the star diagonal to attach the Moon filter).
-
Page 14: Astrophotography
In addition to the motor drive, an illuminated reticle eyepiece is also needed (Orion #8481 is rec- ommended).The T-ring and camera adapter are not needed, since the camera is exposing through its own lens. -
Page 15: Terrestrial Viewing
The AstroView 120 Refractor may also be used for long-distance viewing over land. For this application we recommend substitution of an Orion 45° Correct-Image Diagonal (#8790) for the 90° star diagonal that comes standard with the telescope. The correct- image diagonal will yield an upright, nonreversed image and also provides a more comfortable viewing angle, since the telescope will be aimed more horizontally for terrestrial subjects. - Page 16 During this warranty period Orion Telescopes & Binoculars will repair or replace, at Orion’s option, any warranted instrument that proves to be defective, pro- vided it is returned postage paid to: Orion Warranty Repair, 89 Hangar Way, Watsonville, CA 95076.