Samsung HT-C6930W User Manual
7.1ch blu-ray home cinema system
Hide thumbs
Also See for HT-C6930W:
- User manual (74 pages) ,
- Upgrade instructions (1 page) ,
- User manual (74 pages)
Table of Contents
Advertisement
Available languages
Available languages
Advertisement
Table of Contents

Related Manuals for Samsung HT-C6930W


Summary of Contents for Samsung HT-C6930W
- Page 1 HT-C6930W 7.1CH Blu-ray Home Cinema System user manual imagine the possibilities Thank you for purchasing this Samsung product. To receive more complete service, please register your product at www.samsung.com/register...
-
Page 2: Safety Information
Safety Information Safety Warnings TO REDUCE THE RISK OF ELECTRIC SHOCK, DO NOT REMOVE THE COVER(OR BACK). NO USER-SERVICEABLE PARTS ARE INSIDE. REFER SERVICING TO QUALIFIED SERVICE PERSONNEL. CAUTION RISK OF ELECTRIC SHOCK DO NOT OPEN This symbol indicates “dangerous CAUTION : TO PREVENT ELECTRIC This symbol indicates important voltage”... -
Page 3: Precautions
Precautions • Ensure that the AC power supply in your house complies with the identifi cation sticker located on the back of your product. • Install your product horizontally, on a suitable base (furniture), with enough space around it for ventilation (7.5~10cm). -
Page 4: Cautions On Handling And Storing Discs
Disc Association. Handling and Storing Discs Copyright If you get fingerprints or dirt on the disc, clean it with a © 2010 Samsung Electronics Co., Ltd. All rights mild detergent diluted in water and wipe with a soft cloth. reserved. •... -
Page 5: Table Of Contents
Contents Safety Warnings SAFETY INFORMATION Precautions Cautions on Handling and Storing Discs Licence Copyright Icons that will be used in manual GETTING STARTED Disc Types and Characteristics Accessories Description Front Panel Rear Panel Remote control CONNECTIONS Connecting the Speakers Connecting External Devices/your TV via HDMI Connecting the FM Antenna Connecting the Video Out to your TV Connecting Audio from External Components... - Page 6 Background Front Display Power On/Off Sound Light Effect Support Software Upgrade Contact Samsung Playing a Disc BASIC FUNCTIONS Using the Disc menu / Title menu / Popup menu Using the Search and Skip Functions Slow Motion Play/Step Motion Play Repeat Playback...
-
Page 7: Getting Started
Getting Started Icons that will be used in manual Make sure to check the following terms before reading the user manual. Term Logo Icon Definition BD-ROM This involves a function available on a BD-ROM. This involves a function available on a BD-RE/-R disc recorded in the BD-RE/-R BD-RE format. -
Page 8: Disc Types And Characteristics
For Blu-ray Disc 3D Blu-ray Disc additional information, refer to the Disc Types and Characteristics section of this Manual. If you encounter compatibility problems, please contact the SAMSUNG customer care centre. ✎ NOTE PAL broadcast system in ... -
Page 9: Disc Types
Mongolia • This product can play back DVD-R disc recorded and fi nalsed with a Samsung DVD video recorder. China • Playback can be perfomed with DVD-RW discs in the Video Mode and fi nalsed only. -
Page 10: Disc Format
Getting Started Audio CD DivX(Digital Video Express) • An audio disc on which 44.1kHz PCM Audio is DivX is a video fi le format developed by Microsoft and is recorded. based on MPEG4 compression technology to provide • This product can play back CD-DA format audio audio and video data over the Internet in real-time. - Page 11 Supported File Formats Video File Support File Extension Container Video Codec Audio Codec Resolution 1920x1080 Divx 3.11/4.x/5.1/6.0 1920x1080 XviD *.avi 1920x1080 MP4v3 H.264 BP/MP/HP 1920x1080 VC-1 AP 1920x1080 DivX 5.1/6.0 1920x1080 *.mkv XviD 1920x1080 H.264 BP/MP/HP 1920x1080 VC-1 AP 1920x1080 *.wmv WMV (wmv9) VC-1 SM...
-
Page 12: Accessories
Getting Started • USB Host Specifi cation CBI (Control/Bulk/Interrupt) is not supported. • Digital Cameras that use PTP protocol or USB Host Specifi cation require additional program installation when connected to a PC are not supported. • Supports USB 1.1 or USB 2.0 compliant devices. •... -
Page 13: Description
Description Front Panel DISC TRAY Insert disc here. DISPLAY Displays the playing status, time, etc. REMOTE CONTROL SENSOR Detects signals from the remote control. OPEN/CLOSE BUTTON Opens and closes the disc tray. The mode switches as follows : FUNCTION BUTTON BD/DVD D. -
Page 14: Rear Panel
Getting Started Rear Panel FM ANT COMPONENT OUT DIGITAL WIRELESS HDMI IN HDMI OUT AUDIO IN iPod OPTICAL SPEAKER IMPEDANCE : 3 VIDEO OUT SPEAKER OUTPUT CONNECTORS Connect the front, centre, surround back, subwoofer speakers. The cooling fan supplies cool air to the product to prevent overheating COOLING FAN and always revolves when the power is on. -
Page 15: Remote Control
Remote control Tour of the Remote Control This is mode selection button. FUNCTION POWER TV SOURCE Press to select TV's video mode. Turn the product on and off. To open and close the disc tray. BD RECEIVER/TV SLEEP If you want to change to Home Cinema or TV mode on the remote control, Set a Sleep time to shut off the check this button's LED colour. -
Page 16: Installing Batteries In The Remote Control
York 15, 17, 18, 48, 54, Magnavox be possible, depending on your brand of TV. 59, 60, 62, 72, 89 Yupiteru The remote control will work with Samsung TVs Marantz 40, 54 Zenith 58, 79 Matsui Zonda by default. -
Page 17: Connections 17 Connecting The Speakers
Connections This section involves various methods of connecting the product to other external components. Before moving or installing the product, be sure to turn off the power and disconnect the power cord. Connecting the Speakers 6.6~9.8 feet (2~3m) Position of the product Place it on a stand or cabinet shelf, or under the TV stand. -
Page 18: Speaker Components
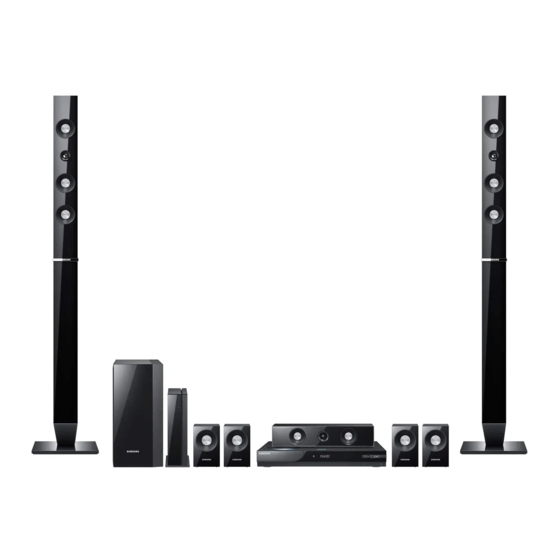
Connections Connecting the Speakers Speaker Components Assembled Speakers (L) (R) SCREW (Large): 2EA SCREW (Small): 8EA CENTRE SPEAKER STAND FRONT CENTRE STAND BASE (L) (R) (L) (R) FRONT SPEAKER SUBWOOFER SUBWOOFER SURROUND SURROUND BACK SURROUND SURROUND BACK SPEAKER CABLE SPEAKER SPEAKER SWA-5000... -
Page 19: Installing The Speakers On The Tallboy Stand
Installing the Speakers on the Tallboy Stand Turn the Stand Base upside-down and connect it to the Stand. Stand Base Stand Insert four small screws clockwise into the four holes marked using a screwdriver as shown in the illustration. Connect the upper Speaker to the assembled Stand. Speaker Stand Insert another large screw clockwise into the hole on the rear of the... - Page 20 Connections Connecting the Speakers Connecting The Speakers Press down the terminal tab on the back of the speaker. Insert the black wire into the black terminal (–) and the red wire into the red (+) terminal, and then release the tab. Connect the connecting plugs to the back of the product by matching the colours of the speaker plugs to the speaker jacks.
- Page 21 CAUTION Do not let children play with or near the speakers. They could get hurt if a speaker falls. When connecting the speaker wires to the speakers, make sure that the polarity (+/ –) is correct. Keep the subwoofer speaker out of reach of children so as to prevent children from inserting their hands or alien substances into the duct (hole) of the subwoofer speaker.
-
Page 22: Connecting External Devices/Your Tv Via Hdmi
Connections Connecting External Devices/your TV via HDMI HDMI is a standard digital interface for connection to such devices as a TV, projector, DVD player, Blu-ray player, set top box and more. HDMI removes any loss of signal from analogue conversion, enabling you to enjoy video and audio sound quality as it was originally created in the digital source. -
Page 23: Connecting The Fm Antenna
HDMI IN : Connecting to an External Component with an HDMI Cable Connect an HDMI cable (not supplied) from the HDMI IN jack on the back of the product to the HDMI OUT jack on your digital devices. Press the FUNCTION button to select HDMI. IN1 or HDMI. IN2 input. The mode switches as follows : BD/DVD D. -
Page 24: Connecting The Video Out To Your Tv
Connections Connecting the Video Out to your TV Blue Green METHOD 1 COMPONENT OUT METHOD 2 Yellow VIDEO OUT METHOD 1 : Component Video (BETTER QUALITY) If your television is equipped with Component Video inputs, connect a Component video cable (not supplied) from the Component Video Output (Pr, Pb and Y) Jacks on the back of the product to the Component Video Input Jacks on your TV. -
Page 25: Connecting Audio From External Components
Connecting Audio from External Components COMPONENT OUT COMPONENT OUT DIGITAL DIGITAL HDMI IN HDMI IN HDMI OUT HDMI OUT AUDIO IN AUDIO IN OPTICAL VIDEO OUT VIDEO OUT White Optical Cable (not supplied) Audio Cable (not supplied) If the external analogue component has only one Audio Out, connect either left or right. -
Page 26: Connecting To The Network
✎ NOTE Internet access to Samsung’s software update server may not be allowed, depending on the router you use or the ISP’s policy. For more information, contact your ISP (Internet Service Provider). For DSL users, please use a router to make a network connection. -
Page 27: Wireless Network
Wireless Network You can connect to network with a Wireless IP sharer. A wireless AP/IP router is required to make a wireless network connection. Set the network options. (See page 39) Broadband service Wireless IP sharer Networking with PC for AllShare function (See pages 62~63) ✎... -
Page 28: Setup 28 Before Starting (Initial Settings)
Setup Press the ◄► buttons to the select the Before Starting (Initial Settings) desired Network Settings: Wired, Wireless or Turn on your TV after connecting the product. PBC (WPS), then press the ENTER button. (When the product is connected to TV for the fi rst (See pages 39~42) time, product will turn on automatically and the The Network Test will start and Initial Settings... -
Page 29: Setting The Menu
MENU Button : Press this to move to the home menu. select Internet@TV from the home menu. RETURN Button : Return to the previous menu. Download desired content from Samsung AppS. The access step may differ depending on the ENTER / DIRECTION Button: selected menu. -
Page 30: Display
Setup TV Screen Size Display Lets you enter the actual screen size of your You can confi gure various display options such TV so that the product can adjust the image as the TV Aspect, Resolution, 3D, etc. according to the screen size and display an optimal 3D image. -
Page 31: Tv Aspect
TV Aspect BD Wise (Samsung Products only) Depending on the type of television you have, you BD Wise is Samsung's latest inter-connectivity feature. may want to adjust the screen setting. When you connect Samsung products with BD-Wise to each other via HDMI, the optimum •... - Page 32 Setup Resolution according to the output mode • Blu-ray Disc playback HDMI / connected HDMI / not connected Output Setup HDMI Mode Component/VIDEO Mode Component Mode VIDEO Mode Auto Optimal Resolution 576i(480i) 1080p, Movie Frame(24Fs) off 1080p@60F 576i(480i) 1080p/1080i, 1080p@24F 576i(480i) Movie Frame(24Fs) on 1080i, Movie Frame(24Fs) off...
-
Page 33: Hdmi Format
HDMI Format Progressive Mode You can optimize the colour setting from the Set to improve picture quality when viewing DVDs. HDMI output. Select a connected device Type. • Auto : Select this to have the product • TV : Select if connected to a TV via HDMI. automatically set the best picture for the DVD you're watching. -
Page 34: Audio
Setup Distance Audio If the speakers cannot be placed at equal Speaker Setting distances from the listening position, you can adjust the delay time of the audio signals from the front, centre, surround, surround back and DPL llz subwoofer speakers. •... -
Page 35: Musical Auto Calibration
✎ Musical Auto Calibration NOTE Setting the Musical Auto Calibration By setting the Musical Auto Calibration (MAC) function takes about 3 minutes. function just once when you relocate or install the The Musical Auto Calibration setup can be made product, you can have the product automatically when there is no disc in the product. -
Page 36: Digital Output
Setup ✎ Digital Output NOTE Be sure to select the correct Digital Output Set Digital output depending on the connected or you will hear no sound or a loud noise. receiver. (For more details, please refer to the If the HDMI device (Receiver, TV) is not compatible digital output selection) with compressed formats (Dolby digital, DTS), the... -
Page 37: Dynamic Range Control
This function is not available if the HDMI cable does not support CEC. If your Samsung TV has an n logo, then AV Sync it supports the Anynet+ function. Video may look slower than the audio when the Depending on your TV, certain HDMI output product is connected to a digital TV. -
Page 38: Clock
Setup Description of Device(Storage) Information on DivX(R) Registration the Product View DivX(R) VOD Registration Code to purchase • Total Size : Total size of the Device (Storage). and play DivX(R) VOD content. • Available Size : Available size of the Device (Storage). ✎... -
Page 39: Network Setup
Network Setup Network Setting To begin setting up the network connection for Internet Protocol Setup : Auto IP Address your product, follow these steps: Subnet Mask Gateway In the Home menu, press the ◄► buttons to : Auto select the Settings, and then press the DNS Server ENTER button. - Page 40 Setup Use the number buttons on your remote to After the network connection is set up, enter numbers. press the RETURN button to exit the Network Setting screen. When done with each fi eld, use the ► button to move successively to the next fi...
- Page 41 In the list of networks, press the ▲▼ When done, press the BLUE (D) button on buttons to select a network, and then press your remote, and then press the ENTER the ENTER button. button. If the PIN/Security pop-up appears, go to Wait until the connection confi...
-
Page 42: Network Status
Setup When done with each fi eld, use the ► BD-LIVE Internet Connection button to move successively to the next Set whether to allow internet connection when fi eld. BD-LIVE service is used. You can also use the other arrow buttons to •... -
Page 43: Security
Security General When you operate this menu for the fi rst time, Background password setup screen will be displayed. Enter the desired 4-digit password using the number Change the background theme of the menu screen. buttons. (Default password is set to 0000.) Parental Rating Settings Background... -
Page 44: Support
POWER button to turn on the updated product for your use. Never turn off or on the product manually during the update process. Samsung Electronics shall take no legal responsibility for product malfunction caused an unstable internet connection or consumer negligence during software upgrade. -
Page 45: Basic Functions
Basic Functions Disc Structure Playing a Disc The contents of disc are usually divided as below. Playback • Blu-ray Disc, DVD-VIDEO Press the OPEN/CLOSE ( ) button to open title 1 title 2 the disc tray. chapter 1 chapter 2 chapter 1 chapter 2 chapter 3... -
Page 46: Using The Search And Skip Functions
Basic Functions Using the Title Menu Using the Search and Skip Functions During playback, you can search quickly through a chapter or track, and use the skip function to TITLE MENU jump to the next selection. During playback, press the TITLE POPUP MENU button on the remote control. -
Page 47: Slow Motion Play/Step Motion Play
Slow Motion Play/Step Motion Play Repeat Slow Motion Play hzZyx To return to normal play, press the REPEAT button again. • In pause mode, press the SEARCH () Press the ▲▼ buttons to select Off, the button. press the ENTER button. If you press the SEARCH () button, the playback speed is reduced to ✎... -
Page 48: Using The Tools Button
Basic Functions Information about the primary / secondary Using the TOOLS button mode will be also displayed if the Blu-ray Disc During playback, you can operate disc has a BONUSVIEW section. TOOLS menu by pressing the TOOLS button. Use the ◄► button to switch between primary and secondary audio modes. -
Page 49: Changing The Camera Angle
• Caption Function User : The user can adjust the sharpness and noise reduction function respectively. Setting the BONUSVIEW • You must have some experience with video extraction and editing in order to use this feature properly. • To use the caption function, save the caption The BONUSVIEW feature allows you to view fi... -
Page 50: Listening To Music
Basic Functions Listening to Music ENTER button : Plays and pauses the selected track. ◄► buttons : Fast Play. (except for Audio CD (CD-DA)) Buttons on the Remote Control used for Music Playback STOP button : Stops a track. SKIP($) button : During playback, moves to the next page in the Music List or moves to the next track in the Playlist. -
Page 51: Repeat An Audio Cd/Mp3
Playing an Audio CD (CD-DA)/MP3 Repeat an Audio CD (CD-DA)/MP3 REPEAT Insert an Audio CD (CD-DA) or an MP3 Disc During the Playlist playback, press into the disc tray. the REPEAT button. • For an Audio CD (CD-DA), the fi rst track will Select the desired play mode by pressing be played automatically. -
Page 52: Sound Mode
Basic Functions If there is an undesired track in the playlist, Sound Mode press the YELLOW(C) button again. The selected track will be deleted. DSP(Digital Signal Processor) Function Press the ENTER button to play the selected tracks. This will regulate and stabilize the volume level The selected track will automatically play. -
Page 53: Playing Back A Picture
Dolby Pro Logic II Mode Using the TOOLS button You can select the desired Dolby Pro During the slide show playback, you TOOLS Logic II audio mode. can use various function by pressing the TOOLS button. PL II button. Press the When listening to music, you can experience Tools MUSIC... -
Page 54: Playing Back A Usb Storage
Basic Functions ✎ NOTE Playing back a USB Storage You must remove the USB storage device safely (by performing the “Safe to Remove Hardware” function) in order to prevent a You can use the USB connection to play multimedia possible damage to the USB memory. -
Page 55: Listening To Radio
Setting Mono/Stereo Listening to Radio Using buttons on the Remote Control MO/ST Press the MO/ST button. • Each time the button is pressed, the Press the FUNCTION button to select FM. sound switches between STEREO Tune in to the desired station. and MONO. -
Page 56: Using An Ipod
Make sure to connect the dock connector so that the label “SAMSUNG” faces upward. “Made for iPod” means that an electronic iPod accessory has been designed to connect specifi... - Page 57 Watching a Movie You can play video fi les stored in the iPod player by connecting it to the product. Connect the iPod dock connector to the iPod Jack on the rear panel of the product. In the iPod screen, move to Settings > Videos, then set the TV Out option and the TV signal.
-
Page 58: Network Services
Settings : You can set the system setup and create accounts, etc. Press the ◄► buttons to select Internet@ Samsung AppS : You can download various TV and press the ENTER button. chargeable or free-of-charge application services. In the start screen of the Internet@TV service, you will see the service agreement screen. - Page 59 Pressing the FULL SCREEN button on the Samsung Electronics shall take no legal remote while you are using the Screen Keypad responsibility for any interruption of the lets you to change the text fi elds to lower case, Internet@TV service caused by the service upper case, numbers and icons.
- Page 60 Network Services Account Login System Setup For a more enjoyable application experience, Reset register and log in to your account. Resets Internet@TV settings to factory default To do this, you must create an account fi rst. (For settings. instructions on creating an account, refer to Internet@TV ID on this page) ✎...
- Page 61 Service Manager Using the colour buttons with the Samsung Apps Delete and lock applications installed to Internet@ • RED(A) (Login) : To log in to the internet service. • GREEN(B) (Thumbnail View) : To change the Lock view mode. Lock the application. Accessing a locked •...
-
Page 62: Bd-Live
Check the size of the remaining memory. to your PC via the network (See pages 26~27) The memory device must have at least 1GB and install the SAMSUNG PC Share Manager on of free space to accommodate the BD-LIVE the PC. - Page 63 To select a device, use the RED(A) or Application Program at a Glance BLUE(D) button to select a fi le to play. (For playing back Video, Music or Photos fi les, see pages 45~53.) SAMSUNG PC Share Manager File Share Server Help...
-
Page 64: Other Information
Refer to the chart below when this product does not function properly. If the problem you are experiencing is not listed below or if the instruction below does not help, turn off the product, disconnect the power cord and contact the nearest authorized dealer or Samsung Electronics Service Centre. Symptom Check/Remedy I cannot eject the disc. - Page 65 Symptom Check/Remedy Aspect ratio cannot be changed. • You can play 16:9 BD/DVDs in 16:9 Wide mode, 4:3 Letter Box mode, or 4:3 Pan - Scan mode, but 4:3 BD/DVDs can be seen in 4:3 ratio only. Refer to the Blu-ray Disc jacket and then select the appropriate function.
- Page 66 Other information Symptom Check/Remedy PC Share Manager function I can see folders shared through the • Since it shows only fi les corresponding to the Image, Music, and Movie PC Share Manager, but I cannot see categories, fi les that do not correspond to these categories may not be the fi...
- Page 67 Specifi cations Weight 3.8 kg Dimensions 430 (W) x 61 (H) x 330 (D) mm General Operating Temperature Range +5°C to +35°C Operating Humidity Range 10 % to 75 % Signal/noise ratio 70 dB Usable sensitivity 10 dB FM Tuner Total harmonic distortion 0.5 % BD (Blu-ray Disc)
- Page 68 Centre : 0.58 kg , Subwoofer : 4.5 kg *: Nominal specifi cation - Samsung Electronics Co., Ltd reserves the right to change the specifi cations without notice. - Weight and dimensions are approximate. - Design and specifi cations are subject to change without prior notice.
- Page 69 Contact SAMSUNG WORLD WIDE If you have any questions or comments relating to Samsung products, please contact the SAMSUNG customer care centre. Contact Centre Contact Centre Area Web Site Area Web Site ` North America www.samsung.com/ch 0848 - SAMSUNG (7267864, Switzerland www.samsung.com/...
- Page 71 HT-C6930W 7.1CH Blu-ray Ev Sinema Sistemi kullanma kılavuzu olasılıkları hayal edin Bu Samsung ürününü aldığınız için teşekkürler. Daha fazla hizmet almak için lütfen ürününüzü www.samsung.com/register adresinde kaydedin.
- Page 72 Güvenlik Bilgileri Güvenlik Uyarıları ELEKTRİK ÇARPMASI RİSKİNİ AZALTMAK İÇİN, KAPAĞI (VEYA CİHAZIN ARKASINI) AÇMAYIN. KULLANICI TARAFINDAN ONARILABİLECEK PARÇA İÇERMEZ. SERVİS İÇİN YETKİLİ SERVİS PERSONELİNE BAŞVURUN. DİKKAT ELEKTRİK ÇARPMASI RİSKİ AÇMAYIN Bu sembol, ürünün içinde elektrik DİKKAT : ELEKTRİK ÇARPMASINI Bu sembol, ürünle birlikte verilen çarpması...
- Page 73 Önlemler • Evinizdeki AC güç kaynağının, ürününüzün arkasında yer alan tanımlama etiketiyle uyumlu olduğundan emin olun. • Ürününüzü, havalandırma için yeterli boşluk (7,5~10 cm) olacak şekilde, uygun bir taban (mobilya) üzerine yatay biçimde yerleştirin. • Ürünü amplifi katörlerin veya ısınabilen diğer ekipmanların üzerine koymayın. Havalandırma deliklerinin kapatılmadığından emin olun.
- Page 74 • Temizlerken, nazikçe diskin iç tarafından dış tarafına doğru silin. Telif Hakkı ✎ © 2010 Samsung Electronics Co., Ltd. Tüm Sıcak havanın ürünün içindeki soğuk parçalarla hakları saklıdır. temas etmesi halinde yoğuşma oluşabilir. Ürünün içinde yoğuşma oluştuğunda, ürün düzgün şekilde çalışamayabilir.
- Page 75 İçindekiler Güvenlik Uyarıları GÜVENLIK BILGILERI Önlemler Disklerin Kullanımı ve Saklanmasıyla İlgili Dikkat Edilecek Hususlar Lisans Telif Hakkı Kılavuzda kullanılacak olan simgeler BAŞLARKEN Disk Tipleri ve Özellikleri Aksesuarlar Tanım Ön Panel Arka Panel Uzaktan kumanda BAĞLANTILAR Hoparlörleri Bağlama HDMI ile Harici Cihazları/TV’nizi bağlama FM Antenini bağlama Video Çıkışının TV'nize Bağlanması...
- Page 76 AYAR Arka Plan Ön Ekran Güç Açma/Kapatma Sesi Işık Etkisi Destek Yazılım Yükseltme Samsung'a Başvurun Disk Oynatma TEMEL İŞLEVLER Disk menüsü / Başlık menüsü / Açılır menüsünün kullanılması Arama ve Atlama İşlevlerinin Kullanılması Yavaş Çekim Oynatma/Adım Adım Oynatma Tekrar Oynatma TOOLS düğmesinin kullanımı...
- Page 77 Başlarken Kılavuzda kullanılacak olan simgeler Kullanım kılavuzunu okumadan önce aşağıdaki terimleri kontrol edin. Terim Logo Simge Tanım BD-ROM Bu, bir BD-ROM’da bulunan bir işlev içerir. Bu, BD-RE biçiminde kaydedilmiş BD-RE/-R diskinde geçerli olan bir işlev BD-RE/-R içerir. DVD-VİDEO Bu, DVD-VİDEO’da geçerli olan bir işlev içerir. DVD-RW(V) DVD-R Bu, kaydedilen DVD+RW veya kaydedilen ve sonlandırılan DVD-RW(V)/...
- Page 78 Ek Blu-ray Disk 3D Blu-ray Disk bilgi için, bu Kılavuzun Disk Tipleri ve Özellikleri kısmına bakın. Uyumluluk sorunlarıyla karşılaşırsanız, lütfen SAMSUNG müşteri hizmetleri merkezine başvurun. ✎ Bazı diskler için veya açı değiştirme ve en boy oranı İngiltere, Fransa, Almanya, ayarlama gibi belirli işlemler gerçekleştirilirken,...
- Page 79 DVD-Video olarak Afrika’nın büyük bir bölümü, adlandırılır. Oynatma yeteneği, kayıt koşullarına Kuzey Kore, Moğolistan bağlı olabilir. • Bu ürün, Samsung DVD video kaydedici ile Çin kaydedilen ve sonlandırılan DVD-R diskleri oynatabilir. • Yalnızca Video Modunda kaydedilmiş ve sonlandırılmış DVD-RW diskler oynatılabilir.
- Page 80 Başlarken Ses CD'si DivX (Digital Video Express) • Üzerine 44,1kHz PCM Ses kaydedilen ses DivX, Microsoft tarafından geliştirilmiş bir video dosyası diskleri. biçimidir ve MPEG4 sıkıştırma teknolojisine dayanarak • Bu ürün, CD-DA biçimindeki CD-R ve CD-RW ses İnternet üzerinden gerçek zamanlı olarak ses ve video disklerini oynatabilir.
- Page 81 Desteklenen Dosya Biçimleri Video Dosyası Desteği Dosya Uzantısı Dosya Türü Video Codec’i Ses Codec’i Çözünürlük 1920x1080 Divx 3.11/4.x/5.1/6.0 1920x1080 XviD *.avi 1920x1080 MP4v3 H.264 BP/MP/HP 1920x1080 VC-1 AP 1920x1080 DivX 5.1/6.0 1920x1080 *.mkv XviD 1920x1080 H.264 BP/MP/HP 1920x1080 VC-1 AP 1920x1080 *.wmv WMV (wmv9)
- Page 82 Başlarken • USB Sunucu Özellikleri CBI (Kontrol/Yığın/Kesme) desteklenmez. • PTP protokolü kullanan veya bir bilgisayara USB Sunucu Özellikleri bağlandığında ek program kurulumu gerektiren dijital kameralar desteklenmez. • USB 1.1 veya USB 2.0 uyumlu cihazları destekler. • NTFS dosya sistemi kullanan cihazlar •...
- Page 83 Tanım Ön Panel DİSK TEPSİSİ Diski buraya yerleştirin. EKRAN Oynatma durumunu, süreyi vb. görüntüler. UZAKTAN KUMANDA SENSÖRÜ Uzaktan kumandadan gelen sinyalleri algılar. AÇMA/KAPATMA DÜĞMESİ Disk tepsisini açar ve kapatır. Modlar arasında aşağıdaki gibi geçiş yapılır: İŞLEV DÜĞMESİ BD/DVD D. IN HDMI.
-
Page 84: Arka Panel
Başlarken Arka Panel FM ANT COMPONENT OUT DIGITAL WIRELESS HDMI IN HDMI OUT AUDIO IN iPod OPTICAL SPEAKER IMPEDANCE : 3 VIDEO OUT HOPARLÖR ÇIKIŞ KONNEKTÖRLERİ Ön, orta, surround arka, subwoofer hoparlörleri bağlayın. Soğutma fanı, aşırı ısınmayı önlemek için ürüne soğuk hava sağlar ve SOĞUTMA FANI güç... -
Page 85: Uzaktan Kumanda
Uzaktan kumanda Uzaktan Kumandanın Tanıtılması Bu, mod seçme düğmesidir. veya FUNCTION POWER TV SOURCE TV’nin video modunu seçmek için bu düğmeye basın.. Ürünü açar ve kapatır. Ürünü kapatmak için bir Uyku BD RECEIVER/TV SLEEP süresi ayarlar. Ev Sineması veya TV modlarını uzaktan kumandadan değiştirmek istiyorsanız Disk tepsisini açar ve kapatır. - Page 86 18, 40, 48, 54, Hall Mark Sylvania 59, 60, 62 • Örnek : Bir Samsung TV için Hitachi 15, 18, 50, 59, 69 Symphonic 61, 95, 96 GÜÇ düğmesini basılı tutarken, 00, 15, 16, 17 ve...
- Page 87 Bağlantılar Bu bölüm, ürünün diğer harici komponentlere bağlanması ile ilgili çeşitli yöntemleri ele almaktadır. Ürünü taşımadan veya kurmadan önce gücü kapattığınızdan ve güç kablosunu çıkardığınızdan emin olun. Hoparlörleri Bağlama 6.6~9.8 feet (2~3m) Ürünün konumu Bir stand veya dolap rafı üzerine ya da TV standının altına yerleştirin. Dinleme Konumunun Seçilmesi Dinleme konumu, TV'ye TV ekran boyutunun 2,5 ila 3 katı...
- Page 88 Bağlantılar Hoparlörleri Bağlama Hoparlör Komponentleri Monte Edilen Hoparlörler (Sol) (Sağ) VİDA (B ) : 2 ADET ÜYÜK VİDA (K ) : 8 ADET ÜÇÜK ORTA HOPARLÖR STAND ÖN ORTA STAND KAİDESİ ÖN HOPARLÖR SUBWOOFER (Sol) (Sağ) (Sol) (Sağ) SUBWOOFER SURROUND SURROUND ARKA SURROUND SURROUND ARKA...
- Page 89 Hoparlörleri Tallboy Standına Kurma Stand Kaidesini ters çevirip Standa takın. Stand Kaidesi Stand Şekilde gösterildiği gibi bir tornavida kullanarak dört küçük vidayı işaretli dört deliğe saat yönünde çevirerek takın. Üst Hoparlörü monte edilen Standa bağlayın. Hoparlör Stand Bir tornavida kullanarak hoparlörün arkasındaki deliğe bir başka büyük vidayı...
- Page 90 Bağlantılar Hoparlörleri Bağlama Hoparlörleri Bağlama Hoparlörün arkasındaki terminal tırnağını bastırın. Siyah kabloyu siyah terminale (–) ve kırmızı kabloyu kırmızı terminale (+) takın ve sonra tırnağı bırakın. Bağlantı fi şlerini, hoparlör fi şleri ile hoparlör jaklarının renklerini eşleştirerek Siyah Kırmızı ürünün arkasına bağlayın. Ürün kapalı...
- Page 91 DİKKAT Çocukların hoparlörlerle veya hoparlörlerin yakınında oynamasına izin vermeyin. Bir hoparlörün düşmesi durumunda yaralanabilirler. Hoparlör kablolarını hoparlörlere bağlarken, kutupların (+/ –) doğru yönde olduğundan emin olun. Çocukların ellerini veya yabancı maddeleri subwoofer hoparlörün kanalına (deliğine) sokmasını önlemek için subwoofer hoparlörünü çocukların erişemeyeceği bir yere yerleştirin. ...
- Page 92 Bağlantılar HDMI ile Harici Cihazları/TV’nizi bağlama HDMI; TV, projektör, DVD oynatıcı, Blu-ray oynatıcı, set üstü kutu gibi cihazlara bağlantı kurmak için kullanılan standart bir dijital arabirimdir. HDMI, analog dönüştürmeden kaynaklanan sinyal kayıplarını gidererek, video ve ses kalitesinin dijital kaynakta orijinal şekilde yaratılan şekilde olmasını sağlar. DVD veya Blu-ray Oynatıcı...
- Page 93 HDMI GİRİŞİ : HDMI Kablosu ile bir Harici Komponente bağlanma Bir HDMI kablosu (birlikte verilmez) kullanarak, ürünün arkasındaki HDMI GİRİŞ jakını dijital cihazlarınızın HDMI ÇIKIŞ jakına bağlayın. HDMI. IN1 veya HDMI. IN2 girişini seçmek için FUNCTION düğmesine basın. Modlar arasında aşağıdaki gibi geçiş yapılır: BD/DVD D.
- Page 94 Bağlantılar Video Çıkışının TV'nize Bağlanması YÖNTEM 1 Kırmızı Mavi Yeşil COMPONENT OUT YÖNTEM 2 Sari VIDEO OUT YÖNTEM 1: Komponent Video (DAHA İYİ KALİTE) Ö Televizyonunuzda Komponent Video girişleri varsa, bir Komponent video kablosu (birlikte verilmez) kullanarak cihazın arkasındaki Komponent Video Çıkış (Pr, Pb ve Y) Jakları ile TV'nizin Komponent Video Giriş...
- Page 95 Harici Komponentlerden Ses Bağlantısı Yapılması COMPONENT OUT COMPONENT OUT DIGITAL DIGITAL HDMI IN HDMI IN HDMI OUT HDMI OUT AUDIO IN AUDIO IN OPTICAL VIDEO OUT VIDEO OUT Kırmızı Beyaz Optik Kablo (cihazla birlikte verilmez) Ses Kablosu (cihazla birlikte verilmez) Harici analogn komponentin yalnızca bir Ses Çıkışı...
- Page 96 (Bkz. sayfa 62~63) ✎ Kullandığınız yönlendiriciye veya ISS politikasına bağlı olarak, Samsung’un yazılım güncelleme sunucusuna internet üzerinden erişime izin verilmeyebilir. Daha fazla bilgi almak için ISS’nize (Internet Servis Sağlayıcı) başvurun. DSL kullanıcısıysanız lütfen ağ bağlantısı kurmak için bir yönlendirici kullanın.
- Page 97 Kablosuz Ağ Kablosuz IP paylaştırıcı ile ağa bağlanabilirsiniz. Kablosuz ağ bağlantısı kurmak için kablosuz AP/IP yönlendirici gerekir. Ağ seçeneklerini ayarlayın. (Bkz. sayfa 39) Geniş bant hizmeti Kablosuz IP paylaştırıcı Bilgisayar AllShare işlevi için bilgisayarla ağ kurma (Bkz. sayfa 62~63) ✎ ...
- Page 98 Ayar İstediğiniz Ağ Ayarlarını seçmek için ◄► Başlamadan Önce (Başlangıç Ayarı) düğmelerine basın: Kablolu, Kablosuz veya Ürünü bağladıktan sonra televizyonunuzu açın. PBC (WPS), daha sonra GİRİŞ düğmesine (Ürün televizyona ilk kez bağlandığında otomatik basın. (Bkz. Sayfa 39~42) olarak açılır ve Başlangıç Ayarları ekranı görüntülenir.) Ağ...
- Page 99 Ürünü Anynet+(HDMI-CEC) ile uyumlu bir You Tube Çok çeşitli İnternet Servislerinden faydalanmak internet radio Samsung Televizyona bağlamak için HDMI için lütfen Internet@TV hizmetini etkinleştirin. kablosunu kullanın. Televizyonda ürünün desteklediği bir dil kullanılıyorsa, tercih edilen dil seçeneğinde otomatik olarak o dil ayarlanır.
- Page 100 Ayar TV Ekran Boyutu Ekran Ürünün görüntüyü ekran boyutuna göre TV En Boy Oranı, Çözünürlük, 3D vb. gibi çeşitli ayarlayabilmesi ve en iyi 3D görüntüyü ekran seçeneklerini yapılandırabilirsiniz. görüntüleyebilmesi için televizyonunuzun gerçek ekran boyutunu girmenizi sağlar. (Bu ürün için izin verilen maksimum ekran boyutu 116 inç’tir.) Blu-ray Disk’i 3D Modunda 3D içerikleriyle izleme seçeneğinizi belirleyin.
- Page 101 TV En-Boy BD Wise (Yalnızca Samsung Ürünleri) BD Wise, Samsung’un en yeni bağlantı özelliğidir. Televizyonunuzun tipine göre, ekran ayarını değiştirmek isteyebilirsiniz. Samsung ürünlerini HDMI üzerinden BD-Wise kullanarak birbirine bağladığınızda, en iyi • 16:9 Normal çözünürlük otomatik olarak ayarlanacaktır. • Kapalı : Çıkış çözünürlüğü, diskin Bazı...
- Page 102 Ayar Çıkış moduna göre çözünürlük • Blu-ray Disk oynatma HDMI / bağlı HDMI / bağlı değil Çıkış Ayar HDMI Modu Komponent/VIDEO Modu Komponent Modu VIDEO Modu En İyi Çözünürlük 576i(480i) 1080p, Film Çerçevesi (24 Ç) kapalı 1080p@60F 576i(480i) 1080p/1080i, Film Çerçevesi (24 Ç) açık 1080p@24F 576i(480i) 1080i, Film Çerçevesi (24 Ç) kapalı...
-
Page 103: Kademeli Mod
HDMI Biçimi Kademeli Mod HDMI çıkışından renk ayarını en iyi hale DVD’leri izlerken görüntü kalitesini iyileştirmek için bu getirebilirsiniz. Bağlı cihaz tipini seçin. ayar yapılır. • • TV : HDMI ile bir televizyona bağlandığında Oto : Ürünün izlediğiniz DVD için en iyi seçin. - Page 104 Ayar Mesafe Hoparlörler dinleme konumundan eşit uzaklıklara Hoparlör Ayarı yerleştirilemiyorsa, ön, orta, surround, surround arka ve subwoofer hoparlörlerin gecikme süresini ayarlayabilirsiniz. DPL llz • Hoparlör Mesafesini 0,3 m ile 9,0m arasında bir • Kapalı : Surround Arka hoparlörleri gösterildiği uzaklığa ayarlayabilirsiniz. gibi yerleştirdiğinizde bunu seçin.
-
Page 105: Hdmi Ses
✎ Otomatik Müzik Kalibrasyonu Otomatik Müzik Kalibrasyonu işlevinin Ürünün yerini değiştirdiğinizde veya ürünü ayarlanması yaklaşık 3 dakika sürer. kurduğunuzda Otomatik Müzik Kalibrasyonu ASC ayarı, ürünün içinde disk olmadığında (MAC) işlevini yalnızca bir kere ayarlayarak yapılabilir. ürünün, ortamınıza göre optimize edilmiş bir 7.1 ... - Page 106 Ayar ✎ Dijital Çıkış Doğru Dijital Çıkışı seçtiğinizden emin olun Dijital çıkış, bağlı alıcıya göre ayarlanır. (Daha Aksi halde ya hiç ses duyamazsınız ya da ayrıntılı bilgi için lütfen dijital çıkış seçimine bakın.) yüksek bir gürültü duyarsınız. • HDMI cihazı...
- Page 107 Samsung TV’yi bağlayın. • Oto : Dinamik Aralık Kontrolü, Dolby TrueHD Bu ürünü bir Samsung TV uzaktan kumandası Soundtrack tarafından sağlanan bilgilere bağlı kullanarak çalıştırabilir ve TV’nin uzaktan kumandası üzerindeki OYNAT (►) düğmesine olarak otomatik olarak ayarlanır.
- Page 108 Ayar Cihaz Açıklamaları (Depolama) Ürün DivX(R) Kaydı Hakkındaki Bilgiler DivX® VOD içeriği satın almak ve oynatmak için • Toplam Boyut : Cihazın toplam boyutu (Depolama DivX® VOD Kaydı Kodunu görüntüler. Kapasitesi). • Kullanılabilir Boyut : Cihazın kullanılabilir, boş bölümünün boyutu (Depolama Kapasitesi). Ayarlar ✎...
- Page 109 Ağ Kurulumu Ağ Ayarı Ürününüz için ağ kurulumu yapmaya başlamadan Internet Protokolü Ayarları : Oto önce, aşağıdaki adımları izleyin: IP Adresi Alt Ağ Maskesi Ana menüde , Ayarlar öğesini seçmek için Ağ Geçidi : Oto ◄► düğmelerine ve ardından GİRİŞ DNS Sunucusu düğmesine basın.
- Page 110 Ayar Numara girmek için uzaktan kumandanızın Ağ bağlantısı kurulduktan sonra, Ağ Ayarları üzerindeki düğmelerdeki rakamları girin. ekranından çıkmak için RETURN düğmesine basın. Her alanı doldurduğunuzda, sırayla bir sonraki Alana geçmek için ► düğmesini kullanın. Aynı zamanda diğer ok düğmelerini yukarı, aşağı ve Kablosuz Ağ...
- Page 111 Ağ listesinde, bir ağı seçmek için ▲▼ İşlem bittiğinde uzaktan kumandanızın düğmelerine ve ardından GİRİŞ düğmesine basın. üzerindeki MAVİ (D) düğmeye basın ve ardından GİRİŞ düğmesine basın. PIN Kodu/Güvenlik sorusu açılırsa, Adım 7’ye gidin. Ağ Bağlantısı Ekranı Bağlantı onay mesajı görüntülenene kadar görüntülenirse, Adım 11’e gidin.
- Page 112 Ayar Her alanı doldurduğunuzda, sırayla bir BD-LIVE Internet Bağlantısı sonraki Alana geçmek için ► düğmesini BD-LIVE hizmeti kullanılırken internet bağlantısına kullanın. Aynı zamanda diğer ok düğmelerini izin verilip verilmeyeceğini ayarlayın. yukarı, aşağı ve geri hareket etmek için • kullanabilirsiniz. İzn Vr (Tümü) : Internet bağlantısına tüm BD-LIVE içerikleri için izin verilir.
- Page 113 Güvenlik Genel Bu menüyü ilk kez çalıştırdığınızda, parola ayarları Arka Plan ekranı görüntülenecektir. Rakam düğmelerini kullanarak istenilen 4 haneli sayısal parolayı girin. Menü ekranının arka plan temasını değiştirin. (Varsayılan parola 0000 olarak ayarlanmıştır.) Ebeveyn Dercelendirmesi Ayarlar Arka Plan Bu işlev, ailenizin seyredeceği Blu-ray Disk/DVD’lerin Ekran Ebeveyn Dercelendirmesi Kapalı...
- Page 114 Internet ile menüsüyle aynı şekilde çalışmaktadır. Yazılım Yükseltme • USB : www.samsung.com/bluraysupport web Bu menü, performans iyileştirmelerini veya ek sitesini ziyaret ederek en yeni yazılımı (RUF hizmetleri edinmek için yazılımı yükseltmenize olanak dosyası) indirip USB fl ash sürücüsüne sağlar.
- Page 115 Temel İşlevler Disk Yapısı Disk Oynatma Disk içeriği genellikle şu şekilde bölünmüştür. Oynatma • Blu-ray Disk, DVD-VIDEO Disk tepsisini açmak için AÇ/KAPAT ( ) başlık 1 başlık 2 düğmesine basın. bölüm 1 bölüm 2 bölüm 1 bölüm 2 bölüm 3 Diski, etiketi yukarı...
- Page 116 Temel İşlevler Başlık Menüsünün Kullanılması Arama ve Atlama İşlevlerinin Kullanılması Oynatma sırasında, bir bölüm veya parça içinde hızlıca arama yapabilir ve atlama işlevini TITLE MENU kullanarak seçtiğiniz bir sonraki bölüme Oynatma sırasında, uzaktan geçebilirsiniz. POPUP kumanda üzerindeki TITLE MENU düğmesine basın. İstenilen bir Sahneyi Arama ▲▼◄...
- Page 117 Yavaş Çekim Oynatma/Adım Adım Oynatma Tekrarla Kapalı Yavaş Çekim Oynatma hzZyx Normal oynatmaya dönmek için REPEAT • Duraklatma modunda, ARA () düğmesine düğmesine yeniden basın. basın. ▲▼ düğmelerine basarak Kapalı öğesini ARA () düğmesine basarsanız, oynatma hızı seçin, ardından GİRİŞ düğmesine basın. * 1/8 * 1/4 * 1/2'ye düşürülür •...
- Page 118 Temel İşlevler Blu-ray Disk'te bir BONUSVIEW bölümü varsa TOOLS düğmesinin kullanımı birincil / ikincil mod hakkında bilgiler de Oynatma sırasında, TOOLS düğmesine TOOLS görüntülenecektir. basarak disk menüsünü çalıştırabilirsiniz. Birincil ve ikincil ses modu arasında geçiş yapmak için ◄► düğmesini kullanın. •...
- Page 119 Altyazı İşlevi BONUSVIEW Özelliğini Ayarlama • Bu özelliği doğru kullanabilmek için video BONUSVIEW özelliği, fi lm oynatılmaya devam çıkarma ve düzenleme deneyiminiz olmalıdır. ederken küçük bir ekran penceresinde ek içeriği • Altyazı işlevini kullanmak için altyazı dosyasını (açıklamalar gibi) görüntülemenizi sağlar. Bu işlev (*.smi) DivX ortam dosyasınınkiyle (*.avi) aynı...
- Page 120 Temel İşlevler Müzik Dinleme GİRİŞ düğmesi: Seçilmiş olan parçayı çalar ve duraklatır. ◄► düğmeleri: Hızlı Çalma. (Ses CD’si (CD-DA) hariç) Müzik Çalmak için kullanılan Uzaktan Kumanda Düğmeleri DURDUR düğmesi: Parçayı durdurur. ATLA ($) düğmesi: Çalma işlemi sırasında, Müzik Listesinde bir sonraki sayfaya veya Oynatma Listesinde bir sonraki parçaya geçer.
- Page 121 Ses CD’si (CD-DA)/MP3 Çalma Ses CD’sini (CD-DA)/MP3 Tekrarlama REPEAT Disk tepsisine bir Ses CD’si (CD-DA) veya bir Oynatma Listesindeki bir çalma MP3 Diski takın. işlemi sırasında REPEAT düğmesine basın. • Ses CD’sinde (CD-DA) ilk parça otomatik olarak çalmaya başlar. REPEAT düğmesine art arda basarak •...
- Page 122 Temel İşlevler Oynatma listesinde istenmeyen bir parça Ses Modu varsa, SARI (C) düğmeye tekrar basın. Seçilen parça silinecektir. DSP (Dijital Sinyal İşlemcisi) İşlevi Seçilen parçaları çalmak için GİRİŞ düğmesine basın. Bu özellik, kanalları değiştirirken veya ekran geçişi Seçilen parça otomatik olarak çalınacaktır. sırasında büyük ses düzeyi değişikliklerine karşı...
- Page 123 Dolby Pro Logic II Modu TOOLS düğmesinin kullanımı İstediğiniz Dolby Pro Logic II ses Slayt gösterisi oynatma sırasında, TOOLS modunu seçebilirsiniz. TOOLS düğmesine basarak çeşitli işlevleri kullanabilirsiniz. PL II düğmesine basın. Müzik dinlerken, müziği canlı Araçlar MUSIC dinliyormuşçasına gerçek ses efektleri Slayt Gösterisini Durdur duyabilirsiniz.
- Page 124 Temel İşlevler ✎ USB Depolama Aygıtından Oynatma USB bellekte meydana gelebilecek olası zararları önlemek için USB depolama aygıtını güvenle kaldırmanız (“Donanımı Güvenle Kaldır” USB bağlantısını kullanarak, USB depolama aygıtından işlevini kullanarak) gerekir. MENU düğmesine basarak ana ekrana gidin, SARI (C) düğmeyi yüklenen multimedya dosyalarını...
- Page 125 Mono/Stereo Ayarı Radyo Dinleme MO/ST Uzaktan Kumanda düğmelerinin kullanılması MO/ST düğmesine basın. • FM seçeneğini seçmek için FUNCTION Düğmeye her basılışında, ses düğmesine basın. STEREO ile MONO arasında değişir. İstediğiniz istasyonu ayarlayın. • Sinyal alımının zayıf olduğu bir alanda, • Otomatik Ayarlama 1: # $ düğmesine net, parazitsiz bir yayın almak için MONO’yu basıldığında önceden ayarlanan bir yayın...
- Page 126 Ürün açılıp bir iPod bağladığınızda, ürün iPod'unuzun pilini şarj edecektir. Dock konnektörünü “SAMSUNG” etiketi yukarı iPod bakacak şekilde taktığınızdan emin olun. Made for iPod” (iPod için üretilmiştir) ibaresi bir elektronik aksesuarın özellikle iPod'a bağlanmak iPod üzere tasarlandığını...
- Page 127 Film izleme iPod çalarda kayıtlı video dosyalarını, aygıtı ürüne bağlayarak çalabilirsiniz. iPod dock konnektörünü ürünün arka panelindeki iPod Jakına bağlayın. iPod ekranında, Ayarlar > Videolar öğesine gidin, ardından TV Çıkışı seçeneğini ve TV sinyalini ayarlayın. iPod'u birlikte verilen iPod Dock'una yerleştirin. •...
- Page 128 Giriş Settings (Ayarlar): Sistem ayarlarını düzenleyebilirsiniz, hesap oluşturabilirsiniz vb. ◄► düğmelerine basarak Internet@TV'yi seçin ve GİRİŞ düğmesine basın. Samsung AppS: Çeşitli ücretli veya ücretsiz uygulama hizmetlerini indirebilirsiniz. Internet@TV hizmetinin başlangıç ekranında, hizmet sözleşmesi ekranını göreceksiniz. Internet@ TV hizmetini kullanabilmek için hizmet koşullarını...
- Page 129 Ekran Tuş Takımını ✎ kullanabilirsiniz. Ekran Tuş Takımı özelliğini kullanırken uzaktan Samsung Electronics, hiçbir koşulda Internet@ kumandadaki FULL SCREEN düğmesine TV hizmetinde hizmet sağlayıcısından basarak metin alanını küçük harf, büyük harf, kaynaklanan kesintilerle ilgili herhangi bir yasal sayısal ve simge olarak değiştirebilirsiniz.
- Page 130 Ağ Hizmetleri Hesap Oturumu Açma Sistem Ayarları Daha eğlenceli bir uygulama deneyimi için, Sıfırla kaydolun ve hesabınızda oturum açın. Internet@TV ayarlarını varsayılan fabrika ayarlarına Bunu yapmak için, ilk önce bir hesap sıfırlar. oluşturmanız gerekmektedir. (Hesap oluşturma ile ilgili talimatlar için, bu sayfadaki Internet@TV ID ✎...
- Page 131 Hizmet Yöneticisi Samsung Apps ile renk düğmelerinin kullanımı • KIRMIZI (A) (Oturum Aç): Internet hizmetinde Internet@ TV'ye yüklenen uygulamaları silin veya oturum açmak için. kilitleyin. • YEŞİL (B) (Küçük Resim Görünümü): Görünüm modunu değiştirmek için. Kilitle • MAVİ (D) (Sıralama Ölçütü): Uygulamaları...
- Page 132 AllShare işlevini kullanmak için, ürünü ağ üzerinden hizmetleri için bellek aygıtında en az 1GB boş bilgisayarınıza bağlamanız (Bkz. sayfa 26~27) ve alan olması gerekir. bilgisayarınıza SAMSUNG PC Share Manager yazılımını yüklemeniz gerekir. BD-LIVE hizmetini destekleyen bir Blu-ray disk takın. www.samsung.com adresinden Samsung web sitesini ziyaret edin.
- Page 133 Bir cihaz seçmek için, KIRMIZI (A) veya MAVİ Bir Bakışta Uygulama Programı (D) düğmeyi kullanarak oynatılacak dosyayı seçin. (Video, Müzik veya Fotoğraf dosyalarının SAMSUNG PC Share Manager File Share Server Help oynatılması hakkında bilgi için, bkz: sayfa Server : PC Share Manager 2 3 4 5 45~53.)
- Page 134 Sorun Giderme Ürün düzgün bir şekilde çalışmadığında aşağıdaki şemaya başvurun. Karşılaştığınız sorun aşağıda listelenmemişse veya aşağıdaki talimatlar size yardımcı olamıyorsa, ürünü kapatın, güç kablosunun bağlantısını kesin ve size en yakın yetkili satıcı veya Samsung Electronics Servis Merkezi ile bağlantı kurun. Semptom Kontrol/Çözüm...
- Page 135 Semptom Kontrol/Çözüm En-boy oranı değiştirilemiyor. • 16:9 BD/DVD’leri 16:9 Wide, 4:3 Letter Box veya 4:3 Pan - Scan modlarında oynatabilirsiniz, ancak 4:3 BD/DVD’ler sadece 4:3 oranında görülebilir. Blu-ray Diskin kılıfına bakın ve ardından uygun işlevi seçin. • Gücü kapatın ve disk takılı değilken ürün üzerindeki DURDUR ( I ) düğmesini •...
- Page 136 Diğer bilgiler Semptom Kontrol/Çözüm PC Share Manager işlevi PC Share Manager ile paylaşılan • Yalnızca Görüntü, Müzik ve Film kategorilerine karşılık gelen dosyaları gösterdiği klasörleri görebiliyorum, fakat için, bu kategorilere karşılık gelmeyen dosyalar görüntülenmez. dosyaları göremiyorum. AllShare işlevi Video kesintili bir şekilde •...
- Page 137 Spesifi kasyonlar Ağırlık 3,8 kg Boyutlar 430 (G) x 61 (Y) x 330 (D) mm Genel Çalışma Sıcaklığı Aralığı +5°C ila +35°C Çalışma Nem Aralığı %10 ila %75 Sinyal/gürültü oranı 70 dB FM Tuner Kullanılabilir hassaslık 10 dB Toplam harmonik bozulma %0,5 BD (Blu-ray Disk) Okuma Hızı: 4,917m/sn...
- Page 138 Orta: 0,58 kg, Subwoofer: 4,5 kg *: Nominal spesifi kasyon - Samsung Electronics Co., Ltd bu spesifi kasyonları önceden bildirim yapmadan değiştirme hakkını saklı tutar. - Ağırlık ve boyutlar yaklaşık olarak verilmiştir. - Tasarım ve özellikler önceden haber verilmeden değiştirilebilir.
- Page 139 DÜNYANIN HER YE RİNDEN SAMSUNG’a Ulaşın Samsung ürünleri ile ilgili olarak herhangi bir yorum ya da sorunuz varsa lütfen SAMSUNG müşteri hizmetleri merkezi ile temas kurun. Area Contact Centre Web Site Area Contact Centre Web Site ` North America www.samsung.com/ch...
- Page 140 İthalatçı Firma SAMSUNG Electronics İstanbul Pazarlama ve Ticaret LTD.ŞTİ. Flatofis İstanbul İş Merkezi,Otakçılar Cad. Bina No: 78, Kat:3, No: B3, 34050, Eyüp, İstanbul /Türkiye Tel : (0212) 468 06 00 Bu ürünün ortalama yaşam süresi 10 yıldır E M C : CTK Co.,Ltd.