Honeywell RTH2300 Owner's Manual
Hide thumbs
Also See for RTH2300:
- Quick installation manual (56 pages) ,
- Operating manual (48 pages) ,
- Owner's manual (32 pages)
Table of Contents
Advertisement
Available languages
Available languages
Quick Links
- 1 Installation
- 2 Advanced Installation
- 3 About Your New Thermostat Controls and Home Screen Quick Reference
- 4 Programming and Operation Setting the Clock
- 5 Adjusting Program Schedules
- 6 Overriding Schedules Permanently
- 7 Replace Batteries
- 8 Troubleshooting
- Download this manual
See also:
Operating Manual
Programmable
Thermostat
Owner's Manual
Read and save these
instructions.
For help please visit
yourhome.honeywell.com
Identify System Type
This thermostat is compatible with the following systems:
Gas, oil or electric furnace
•
Central air conditioner
•
Hot water system with or without pump
•
Millivolt system
•
Central heating and cooling system
•
Heat pump without auxiliary/backup heat
•
Do you need assistance? We are here to help.
RTH2300/RTH221
Series
Call 1-800-468-1502 for wiring assistance before returning
the thermostat to the store.
This thermostat cannot be used on heat pumps with
backup heat or on multistage systems.
Advertisement
Chapters
Table of Contents

Related Manuals for Honeywell RTH2300


Summary of Contents for Honeywell RTH2300
- Page 1 RTH2300/RTH221 Programmable Series Thermostat Owner’s Manual Read and save these instructions. For help please visit yourhome.honeywell.com Identify System Type This thermostat is compatible with the following systems: Gas, oil or electric furnace • Central air conditioner • Hot water system with or without pump •...
-
Page 2: Customer Assistance
50°F (10°C). Customer assistance For assistance with this product, please visit http://yourhome.honeywell.com. Or call Honeywell Customer Care toll-free at 1-800-468-1502. To save time, please note your model number and date code before calling. -
Page 3: Table Of Contents
Table of contents Installation Programming and operation Setting the clock .........11 Installation ..........3 Adjusting program schedules .....12 Advanced Installation ......8 Overriding schedules temporarily ..13 Overriding schedules permanently ..13 About your new thermostat Compressor protection .......14 Controls and Home screen Change filter ........14 quick reference ........10 Replace batteries .......15 Preset energy-saving schedules ..11... -
Page 4: Remove Old Thermostat
2 Remove Old Thermostat Remove old thermostat but leave wallplate with wires attached. If you have an older thermostat with a sealed mercury tube, turn to page 2 Do not remove wallplate yet for proper disposal instructions. Terminal designation 3 Label Wires with Tags MCR33823 Label the wires using the supplied wire labels as you disconnect them. -
Page 5: Mount Wallplate
5 Mount Wallplate Mount the new wallplate using the included screws and anchors. Used M32714 Drill 3/16-in. holes for drywall Drill 3/32-in. holes for plaster 6 Connect Wires Simply match wire labels. If labels do not match letters on the thermostat, check “Alternate Wiring” on page 6 and connect to terminal as shown here (see notes, below). -
Page 6: Install Batteries
Alternate Wiring M32734 If wires will be connected to both R and Rc terminals, remove metal jumper. Do not use C or X. Wrap bare end of wire with electrical tape. If you have a heat pump without auxiliary/backup heat connect O or B, not both. -
Page 7: Set Fan Operation Switch
8 Set fan operation switch Move the switch to the proper setting: RTHXXXX Gas or Oil: For gas or oil heating systems, leave the fan operation switch in this factory-set position (for systems that control the fan in a call for heat). -
Page 8: Advanced Installation
11 If your system type is... If your system type is: q Single Stage Heat and Cool q Heat Only or Cool Only Congratulations, you’re done! If your system type is: q Heat pump q Electric furnace q High efficiency furnace q Gas/oil steam q Hot water q Gravity system... -
Page 9: About Your New Thermostat
During the wait time, the message “Cool On” or “Heat On” is displayed on screen. About your new thermostat Your new Honeywell thermostat has been designed to give you many years of reliable service and easy-to-use, push-button climate control. Backlit display on RTH2300 •... -
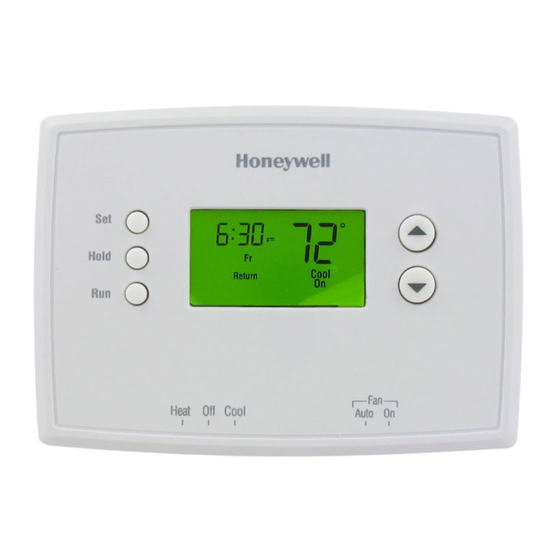
Page 10: About Your New Thermostat Controls And Home Screen Quick Reference
Thermostat controls Set: Press to set Temperature time/day/schedule. adjustment Press the up or Hold: Press down buttons to override until you reach programmed Hold the desired temperature temperature. control. NOTE: Make sure Run: Press to the SYSTEM switch resume program is set to the system Heat Off Cool Auto On... -
Page 11: Preset Energy-Saving Schedules
Set the time and day 1. Press the SET button, then press Set Time to set the clock time. 6 : 30 2. Press the SET button, then press Hold to select the day of the week. 3. Press RUN to save & exit. M33787 If the clock flashes, the NOTE:... -
Page 12: Adjusting Program Schedules
To adjust program schedules (RTH2300) 1. Press SET until Set Schedule is displayed. 2. Press to set your weekday Wake time (Mo-Fr), then press 6 : 30 SET. 3. Press to set the Hold Mo Tu We Th Fr temperature for this time period,... -
Page 13: Overriding Schedules Temporarily
Program schedule override (temporary) Press to immediately adjust Temporary 6 : 30 the temperature. This will temporarily override the temperature setting for Hold the current time period. “Temporary” will appear on the display M33796 and the current program period will flash. -
Page 14: Compressor Protection
On if you have a heat pump). When the safe wait time has elapsed, the message stops flashing and the compressor turns on. Change filter (RTH2300 only) If the filter reminder is turned Change Filter – Press & Hold Run to Reset 6 : 30... -
Page 15: Replace Batteries
Battery replacement Install two fresh AAA batteries when Pull at bottom to remove Lo Batt flashes on the screen. Lo thermostat from wallplate. Batt appears for 60 days before the batteries are depleted. Replace batteries once a year, or when you will be away for more than a month. -
Page 16: Troubleshooting
“Cool On” is Set the System switch to Cool, and set the temperature • not displayed level below the current room temperature. For assistance with this product, please visit http://yourhome.honeywell.com or call Honeywell Customer Care toll-free at 1-800-468-1502. -
Page 17: Limited Warranty
This warranty does not cover removal or reinstallation costs. This warranty shall not apply if it is shown by Honeywell that the defect or malfunction was caused by damage which occurred while the product was in the possession of a consumer. - Page 18 Automation and Control Solutions Honeywell International Inc. 1985 Douglas Drive North Golden Valley, MN 55422 yourhome.honeywell.com ® U.S. Registered Trademark. © 2015 Honeywell International Inc. 33-00102ES—01 M.S. 07-15 33-00102ES-01 Printed in U.S.A.
- Page 19 RTH2300/RTH221 Termostato Series Programable Manual del propietario Lea y guarde estas instrucciones. Para obtener ayuda, visite yourhome.honeywell.com Identifique el tipo de sistema Este termostato es compatible con los siguientes sistemas: Calefactor a gas, aceite o eléctrico • Aire acondicionado central •...
- Page 20 50 °F (10 °C). Asistencia al cliente Para obtener asistencia relacionada con este producto, visite http://yourhome.honeywell.com. O comuníquese con el número gratuito del servicio de atención al cliente, llamando al 1-800-468-1502. Para ahorrar tiempo, anote el número de modelo y el código de fecha antes de llamar.
-
Page 21: Instalación Instalación
Acerca Instalación Programación y funcionamiento Configuración del reloj .......11 Instalación ..........3 Ajuste de los cronogramas Guía de instalación avanzada ....8 del programa ........12 Anulación temporal de Acerca de su nuevo termostato los cronogramas.........13 Referencia rápida de los controles Anulación permanente y la pantalla de inicio ......10 de los cronogramas ......13 Cronogramas de ahorro de... - Page 22 2 Remueva su viejo termostato Retire el termostato existente pero deje la placa de montaje con los cables adheridos. Si el termostato existente tiene un tubo de mercurio No retirar la placa sellado, vaya a la página 2 para obtener instrucciones mural todavía sobre cómo desecharlo adecuadamente.
- Page 23 5 Coloque la placa de montaje Monte la nueva placa de montaje utilizando los tornillos y anclajes que se suministran. Used M32714 Taladre agujeros de 3/32 in. (2,4 mm) en yeso Taladre agujeros de 3/16 in. (4,8 mm) en paneles de yeso 6 Conecte los cables Simplemente haga corresponder las etiquetas de los cables.
- Page 24 Conexión alternativa Conecte MS32734 Si los cables se conectarán a los terminales R y Rc, retire el puente metálico. No utilice C o X. Envuelva los extremos pelados del cable con cinta aislante. Si tiene una bomba de calor sin calefacción auxiliar/de reserva conecte O o B, no ambos.
- Page 25 8 Configure el interruptor de funcionamiento del ventilador RTHXXXX Mueva el interruptor a la configuración adecuada: Gas o aceite: para los sistemas de calefacción GAS OR OIL de gas o aceite, deje el interruptor del ventilador ELECTRIC OR HEAT PUMP en esta posición configurada de fábrica (para sistemas que controlan el ventilador en una orden de calefacción).
-
Page 26: Guía De Instalación Avanzada
11 Si su tipo de sistema es... Si su tipo de sistema es: q Calor y frío de una sola etapa q Calefacción únicamente o Refrigeración únicamente ¡Felicitaciones, ya está listo! Si su tipo de sistema es: q Bomba de calor q Sistema de calefacción eléctrico q Sistema de calefacción de alto q Sistema de vapor a gas/aceite... -
Page 27: Acerca De Su Nuevo Termostato
Su nuevo termostato ha sido diseñado para brindarle muchos años de funcionamiento confiable y para brindarle un control climático fácil de usar y con sólo apretar un botón. Pantalla iluminada con luz de fondo en RTH2300. • Indica la temperatura ambiente (medida) en todo momento. -
Page 28: Acerca De Su Nuevo Termostato Referencia Rápida De Los Controles Y La Pantalla De Inicio
Controles del termostato Set (configuración): Ajuste de la temperatura Presione este botón para configurar la hora, el día o el Presione los cronograma. botones de Hold (suspender): desplazamiento Hold Presiónelo para anular el hacia arriba o control de temperatura hacia abajo hasta programada. -
Page 29: Cronogramas De Ahorro De Energía Predeterminados
Configuración de la hora y el día 1. Presione el botón “SET”, luego Set Time presione para configurar 6 : 30 la hora del reloj. Hold 2. Presione el botón “SET”, luego presione para seleccionar el día de la semana. M33787 3. -
Page 30: Ajuste De Los Cronogramas Del Programa
Para ajustar los cronogramas del programa (RTH2300) 1. Presione SET (configurar) hasta que Set Schedule (configurar el cronograma) se muestre en la pantalla. 6 : 30 2. Presione para configurar la hora para despertarse para el día Hold Mo Tu We Th Fr... -
Page 31: Anulación Temporal De Los Cronogramas
Programación de la anulación del cronograma (temporal) Presione para ajustar Temporary 6 : 30 inmediatamente la temperatura. Esto anulará temporalmente la configuración Hold de la temperatura para el período actual. M33796 La palabra “Temporary” (temporalmente) aparecerá en la pantalla y el período del programa 6 : 30 actual destellará. -
Page 32: Protección Del Compresor
Cambio del filtro (RTH2300 solamente) Si el recordatorio de cambio del Change Filter – Press & Hold Run to Reset filtro se activa durante la instalación,... -
Page 33: Reemplazo De La Batería
Reemplazo de la batería Instale dos pilas AAA nuevas cuando Lo Batt Hale de la parte inferior parpadee en la pantalla. El icono aparecerá para quitar el termostato 60 días antes de que las pilas estén de la placa para pared. completamente descargadas. -
Page 34: Localización Y Solución De Problemas
Para obtener asistencia relacionada con este producto, visite http://yourhome.honeywell.com o comuníquese con el número gratuito del servicio de atención al cliente, llamando al 1-800-468-1502. -
Page 35: Garantía Limitada
Garantía limitada de 1 año Honeywell garantiza este producto, a excepción de la batería, por el término de un (1) año contra cualquier defecto de fabricación o de los materiales, a partir de la fecha de compra por parte del consumidor. Si en cualquier momento durante el período de garantía se verifica que el producto tiene un defecto o que funciona mal, Honeywell lo... - Page 36 Automatización y control desenlace Honeywell International Inc. 1985 Douglas Drive North Golden Valley, MN 55422 yourhome.honeywell.com ® Marca Registrada en los E.U.A © 2015 Honeywell International Inc. 33-00102ES—01 M.S. 07-15 33-00102ES-01 Impreso en EE. UU.