Table of Contents
Advertisement
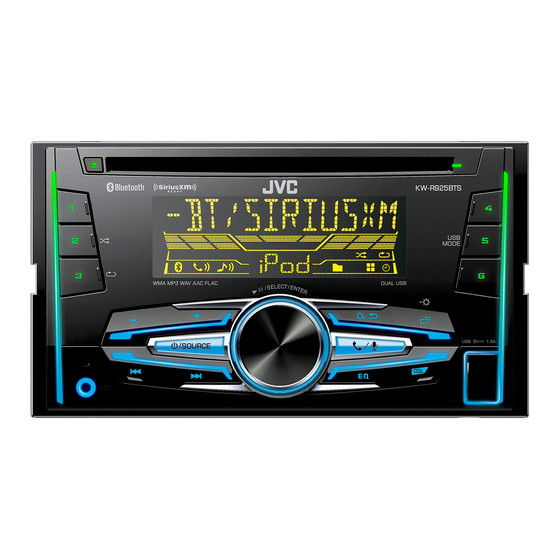
KW-R925BTS / KW-R920BTS
CD RECEIVER
INSTRUCTION MANUAL
RÉCEPTEUR CD
MANUEL D'INSTRUCTIONS
RECEPTOR CON CD
MANUAL DE INSTRUCCIONES
JS_JVC_KW_R925BTS_K_C.indd 1
For customer Use:
Enter below the Model No. and Serial No. which are
located on the top or bottom of the cabinet. Retain this
information for future reference.
Model No.
Serial No.
ENGLISH
FRANÇAIS
ESPAÑOL
B5A-0831-00 [K]
28/10/2015 10:11:51 AM
Advertisement
Table of Contents

Related Manuals for JVC KW-R925BTS


Summary of Contents for JVC KW-R925BTS
-
Page 1: Instruction Manual
ENGLISH FRANÇAIS ESPAÑOL KW-R925BTS / KW-R920BTS CD RECEIVER INSTRUCTION MANUAL RÉCEPTEUR CD MANUEL D’INSTRUCTIONS RECEPTOR CON CD MANUAL DE INSTRUCCIONES For customer Use: Enter below the Model No. and Serial No. which are located on the top or bottom of the cabinet. Retain this information for future reference. - Page 2 FCC NOTE JVC KENWOOD Corporation This equipment has been tested and found to comply with the limits for a Class B digital 2967-3, ISHIKAWA-MACHI, device, pursuant to Part 15 of the FCC Rules.
- Page 3 IC (Industry Canada) Notice CAUTION This device complies with Industry Canada licence-exempt RSS standard(s). This equipment complies with FCC/IC radiation exposure limits set forth for an uncontrolled Operation is subject to the following two conditions: environment and meets the FCC radio frequency (RF) Exposure Guidelines in Supplement C (1) This device may not cause interference, and to OET65 and RSS-102 of the IC radio frequency (RF) Exposure rules.
- Page 4 SOFTWARE LICENSE AGREEMENT Article 3 Conditions for Grant of License 1. When the User transfers the Product, it may also transfer the license to use the Licensed Software The software embedded in the Product (hereinafter the "Licensed Software") provided by Licensor embedded in the Product (including any related materials, updates and upgrades) on condition is copyrighted to or sublicensable by the Licensor, and this Agreement provides for the terms and that no original, copies or related materials continue in the possession of the User, and that the...
- Page 5 Important Notice concerning the Software Article 8 Termination In case the User falls under any of the events described in the following items, the Licensor may immediately terminate this -jansson Agreement or claim that the User compensates for the damage incurred by the Licensor due to such event: (1) when the User violated any provision of this Agreement;...
-
Page 6: Table Of Contents
INSTALLATION / CONNECTION How to read this manual • Operations are explained mainly using buttons on the faceplate of KW-R925BTS. • English indications are used for the purpose of explanation. You can select the display language from the menu. ( 5) •... -
Page 7: Basics
5 seconds. Pull out the insulation sheet when using for the first time. How to replace the battery Volume knob KW-R925BTS: USB cable from the rear of the unit On the faceplate On the remote control Turn on the power Press ( Not available ) •... -
Page 8: Getting Started
Turn the volume knob to select [24H/ 12H], then press the knob. For details on how to update the firmware, see: Turn the volume knob to select [12 HOUR] or [24 HOUR], then press the <http://www.jvc.net/cs/car/>. knob. Press to exit. -
Page 9: Radio
RADIO GETTING STARTED CLOCK CLOCK SYNC AUTO: The clock time is automatically set using the Clock Time (CT) data in FM Radio Broadcast Data System signal. ; OFF: Cancels. CLOCK DISP ON: The clock time is shown on the display even when the unit is turned off. ; OFF: Cancels. ENGLISH Select the display language for menu and music information if applicable. - Page 10 RADIO Select a stored station SSM 01 – 06 / SSM 07 – 12 / SSM 13 – 18: Automatically presets up to 18 stations for FM. “SSM” stops flashing when the first 6 stations are Press or one of the number buttons (1 to 6). stored.
-
Page 11: Cd / Usb / Ipod / Android
: iPod or ANDROID Do not leave the cable inside the car when not using. When connecting an Android device, “Press [VIEW] to install JVC MUSIC PLAY APP” is shown. Follow the instructions to install the ANDROID application. You can also install the latest version of JVC MUSIC PLAY application on your Android device before connecting. - Page 12 – Not applicable for iPod. AUTO MODE: Control Android device from this unit via JVC MUSIC PLAY application installed in the Android device. Alphabet search (applicable only for iPod): AUDIO MODE: Control Android device using the Android device itself via You can search for a file according to the first character.
-
Page 13: Pandora
[BY DATE]: According to the registered date. [A-Z]: Alphabetical order. Turn the volume knob to select the desired station, then press the KW-R925BTS: knob. You can also connect to the USB cable from the rear of the unit. To cancel, press and hold... -
Page 14: Iheartradio
( Not available ) knob to listen to the and / or (Accessory of the iPod/iPhone)* station. KW-R925BTS: You can also connect to the USB cable from the rear of the unit. Search and store a station Press Press repeatedly to select IHEARTRADIO/ Turn the volume knob to select a category, then press the knob. -
Page 15: Siriusxm® Radio
SiriusXM® Radio Only SiriusXM® brings you more of what you love Start listening to listen to, all in one place. Get over 140 channels, Press repeatedly to select SIRIUS XM. including commercial-free music plus the best sports, Press news, talk, comedy and entertainment. Welcome to the “... - Page 16 SiriusXM® Radio When you select a SmartFavorites channel, you can rewind and replay up SiriusXM Replay™ to 30 minutes of any of the missed news, talk, sports or music content. Press the volume knob. • Playback starts from the beginning of the song if [TUNE START] is set to “...
- Page 17 SiriusXM® Radio SiriusXM settings TUNE START * ON: All qualified music channels in the Smart Favorites will start playback from the beginning of the song. ; OFF: Cancels. Press and hold Turn the volume knob to select [SIRIUS XM], then press the knob. SIGNAL LVL NO SIGNAL/ WEAK/ GOOD/ STRONG: Shows the strength of the Turn the volume knob to select an item (see the following table), then...
-
Page 18: Bluetooth
Press to turn on the unit. – Hands-Free Profile (HFP) Search and select “JVC UNIT” on the Bluetooth device. – Advanced Audio Distribution Profile (A2DP) “BT PAIRING” flashes on the display. • For some Bluetooth devices, you may need to enter the Personal Identification Number –... - Page 19 – Bluetooth function of the connected device is turned on. – [AUTO CNNT] is set to [ON]. ( 18) – JVC MUSIC PLAY application is installed on Receive a call the Android device ( 7) and [AUTO MODE] is When there is an incoming call: selected ( 8).
- Page 20 BLUETOOTH® Default: XX On the faceplate On the remote control MIC LEVEL –10 — +10 (–4): The sensitivity of the microphone increases While talking on the first incoming call... as the number increased. Answer another incoming Press or the volume ( Not available ) NOISE RDCT –5 — +5 (0): Adjust the noise reduction level until the least call and hold the current...
- Page 21 BLUETOOTH® Make a call using voice recognition Make a call Press and hold to activate the connected phone. You can make a call from the call history, phonebook, or dialing the number. Speak the name of the contact you want to call or the voice Call by voice is also possible if your mobile phone has the feature.
- Page 22 You can only connect a maximum of two Bluetooth phones and one Bluetooth audio device at any time. pairing has been deleted, and the unit exits check mode. JVC Smart Music Control is designed to view JVC car receiver status and perform simple control • To cancel, press and hold to turn off the power, operations on Android smart phones.
- Page 23 BLUETOOTH® BLUETOOTH — Audio Internet radio via Bluetooth Listen to Pandora You can listen to Pandora on the Android device via Bluetooth on this unit. Preparation: Select [ON] for [PANDORA] in [SRC SELECT]. ( 4) Open the Pandora application on your device. Connect your Bluetooth audio player via Bluetooth connection.
-
Page 24: Audio Settings
AUDIO SETTINGS Use a portable audio player Connect a portable audio player (commercially available). 3.5 mm (1/8") stereo mini plug with “L” shaped connector (commercially available) Portable audio player Auxiliary input jack Select [ON] for [AUX] in [SRC SELECT]. ( 4) Press repeatedly to select AUX. - Page 25 AUDIO SETTINGS Default: XX SUB.W LEVEL * SPK-OUT * (Not applicable when 3-way crossover is selected.) 00 to +06 (+03): Adjusts the output level of the subwoofer EQ SETTING connected via speaker lead. ( 33) EQ PRESET Select a preset equalizer suitable to the music genre. (Select [USER] PRE-OUT * –50 to +10 (00): Adjusts the output level of the subwoofer to use the settings made in [EASY EQ] or [PRO EQ].)
- Page 26 For connections through an external amplifier. ( 33) – [FRQ 120HZ] is selected in [SUB.W LPF] and [THROUGH] is not available. – [R02] is selected in [FADER] and selectable range is [R15] to [00]. (For KW-R925BTS) Audio signal through lineout terminal Setting on...
- Page 27 AUDIO SETTINGS 2-way crossover setting items Crossover settings Below are the available setting items for 2-way SPK SIZE crossover and 3-way crossover. FRONT SIZE 3.5"/ 4"/ 4.75"/ 5"/ 6.5"/ 6.75"/ 7"/ 4×6"/ 5×7"/ 6×8"/ 6×9"/ 7×10" Caution Select a crossover type according to how the speakers TWEETER SML/ MID/ LRG/ NONE (not connected) are connected.
-
Page 28: Display Settings
DISPLAY SETTINGS AUDIO SETTINGS 3-way crossover setting items SPK SIZE TWEETER SML/ MID/ LRG MID RANGE 3.5"/ 4"/ 4.75"/ 5"/ 6.5"/ 6.75"/ 7"/ 4×6"/ 5×7"/ 6×8"/ 6×9" WOOFER * 6.5"/ 8"/ 10"/ 12"/ 15" OVER/ NONE (not connected) X ' OVER TWEETER HPF FRQ 1KHZ/ 1.6KHZ/ 2.5KHZ/ 4KHZ/ 5KHZ/ 6.3KHZ/... - Page 29 DISPLAY SETTINGS BRIGHTNESS Set the brightness for button and display illuminations for day and night DAY COLOR Store your own day and night colors for different zone. separately. 1 Select a zone. ( 24) 1 DAY / NIGHT: Select day or night. 2 RED / GREEN / BLUE: Select a primary color.
-
Page 30: References
Level meter with color synchronisation * IPOD REAR or ANDROID / Level meter ANDROID-F / ANDROID-R (back to the beginning) More information Visit also the following website <http://www.jvc.net/cs/car/> for: PANDORA / PANDORA-F / Station name Shared/Radio Album title Artist Track –... -
Page 31: More Information
• Detailed information and notes about the playable audio files are stated in an online manual • The song order displayed on the selection menu of this unit may differ from that of the iPod/ on the following website <http://www.jvc.net/cs/car/>. iPhone. -
Page 32: Troubleshooting
( 27) “PLEASE” and “EJECT” Press , then insert the disc correctly. Cannot playback at • Make sure JVC MUSIC PLAY APP is installed on the appear alternately. [AUTO MODE]. Android device. ( 7) •... - Page 33 TROUBLESHOOTING Symptom Remedy Symptom Remedy “ADD ERROR” New station creation is unsuccessful. “CHK ANTENNA” Check that the antenna and its connection are in good condition. “CHK DEVICE” Check the Pandora application on your device. “CHECK TUNER” Make sure the SiriusXM Vehicle Tuner is connected to the “NO SKIPS”...
-
Page 34: Specifications
Total Harmonic Distortion (1 kHz) 0.01 % 2 Reset the unit ( 3) Signal-to-Noise Ratio (1 kHz) 105 dB 3 Contact (USA only) Call: 1-800-252-5722 ( or ) visit: http://www.jvc.com Dynamic Range 90 dB Channel Separation 85 dB MP3 Decode... - Page 35 SPECIFICATIONS USB Standard USB 1.1, USB 2.0 (Full speed) Maximum Output Power 50 W × 4 or 50 W × 2 + 50 W × 1 (Subwoofer = 4 Ω) Compatible Devices Mass storage class Full Bandwidth Power 22 W × 4 File System FAT12/ 16/ 32 (at less than 1 % THD) Maximum Supply Current DC 5 V 1.5 A Speaker Impedance 4 Ω — 8 Ω...
- Page 36 Remove the key from the ignition switch, then disconnect the terminal of the car battery. For 2-way crossover setting For 3-way crossover setting Connect the wires properly. KW-R925BTS REAR : Rear output : Tweeter output See Wiring connection. ( 33) FRONT...
-
Page 37: Wiring Connection
Wiring connection Signal cord (not supplied) Output terminals ( 32) JVC Amplifier * (For KW-R925BTS) USB cable (DC 5 V 1.5 A) (approx. 1.2 m/4 feet) MIC (Microphone input Vehicle terminal) ( 14) dashboard Expansion port (12 V 500 mA) To the optional SiriusXM Vehicle Tuner Antenna terminal Fuse (10 A) - Page 38 • The Bluetooth® word mark and logos are registered trademarks owned by (INCLUDING, BUT NOT LIMITED TO, PROCUREMENT OF SUBSTITUTE GOODS OR SERVICES; Bluetooth SIG, Inc. and any use of such marks by JVC KENWOOD Corporation is under LOSS OF USE, DATA, OR PROFITS; OR BUSINESS INTERRUPTION) HOWEVER CAUSED AND ON license.