
Related Manuals for Sony HT-M7


Summary of Contents for Sony HT-M7
- Page 1 4-415-789-91(2) Home Theatre Operating Instructions System Manual de instrucciones HT-M7/HT-M5/HT-M3...
-
Page 2: Important Safety Instructions
11)Only use attachments/accessories specified by provided below. Refer to them whenever you call the manufacturer. upon your Sony dealer regarding this product. 12)Use only with the cart, stand, tripod, bracket, or Model No. table specified by the manufacturer, or sold with Serial No. -
Page 3: About This Manual
• The instructions in this manual are for models been damaged in any way, such as power-supply HT-M7, HT-M5 and HT-M3. In this manual, the cord or plug is damaged, liquid has been spilled HT-M7 is used for illustration purposes unless or objects have fallen into the apparatus, the stated otherwise. - Page 4 “x.v.Color (x.v.Colour)” and “x.v.Color (x.v.Colour)” logo are trademarks of Sony Corporation. “BRAVIA” is a trademark of Sony Corporation. “PlayStation” is a registered trademark of Sony Computer Entertainment Inc. MPEG Layer-3 audio coding technology and patents licensed from Fraunhofer IIS and Thomson.
-
Page 5: Table Of Contents
Table of Contents About This Manual ........3 Enjoying Surround Sound Supplied accessories ........6 Description and location of parts ....7 Selecting the sound field ......41 Getting started ..........15 Resetting sound fields to the default settings............42 Connections “BRAVIA” Sync Features 1: Installing the speakers...... -
Page 6: Inserting Batteries Into The Remote Control
– Other models • AM loop antenna (aerial) (1) • Speaker cords Notes – HT-M7 (6, red/white/blue/grey/purple × 2) • Do not leave the remote control in an extremely hot – HT-M5 (4, red/white/purple × 2) or humid place. – HT-M3 (2, red/white) •... -
Page 7: Description And Location Of Parts
Description and location of parts Front panel * Except for South Africa and Argentina models. A ?/1 (on/standby) (page 30, 42) L SURROUND SPEAKER (page 31) B INPUT SELECTOR (page 32, 33, 35, 37, 38, 39, 40, 46, 54) C INPUT SELECTOR indicator Flashes when you change the input source. - Page 8 Indicators on the display panel HDMI 96/24 PL II COAX LPCM SLEEP D.RANGE A Playback channel indicator D Input indicator The letters (L, C, R, etc.) indicate the channels Lights up to indicate the current input. being played back. Based on the speaker HDMI settings, the box around the letter(s) vary to show how the receiver downmixes the source...
- Page 9 K D.RANGE Lights up when dynamic range compression is activated (page 49). L SLEEP Lights up when the Sleep Timer is activated (page 14). * HT-M7 only. ** Except for South Africa and Argentina models.
- Page 10 Rear panel HT-M7 HT-M5...
- Page 11 COMPOSITE VIDEO INPUT/ OUTPUT jacks** (page 22, 26, VIDEO IN/OUT Yellow * You must connect the HDMI TV OUT or MONITOR OUT (HT-M7/HT-M5 only) jack to your TV to watch the selected input image (page 22). ** HT-M7/HT-M5 only. continued...
- Page 12 C ANTENNA section (page 29) FM ANTENNA jack AM ANTENNA terminal D SPEAKERS section (page 18, 19,...
- Page 13 Remote control Use the supplied remote control to operate this receiver and Sony TV. • RM-AAU136 (South Africa and • RM-AAU135 (Other models) Argentina models only) * The 5 and TV PROG + buttons have tactile dots. Use the tactile dots as references when operating the receiver.
- Page 14 Press V/v/B /b to select the settings, then press to enter/confirm the selection. Enters direct tuning mode. DISPLAY Views information on the display panel. To control a Sony TV K M-TURBO A TV ?/1 (on/standby) Turns the M-TURBO function on or off. Turns the TV on or off.
-
Page 15: Getting Started
To output multi channel digital audio, check the digital audio output setting on the connected equipment. For a Sony Blu-ray Disc player, check that “Audio (HDMI)”, “Dolby Digital”, and “DTS” are set to Digital Analog “Auto”, “Dolby Digital” and “DTS” respectively (as of September 2011). -
Page 16: Connections
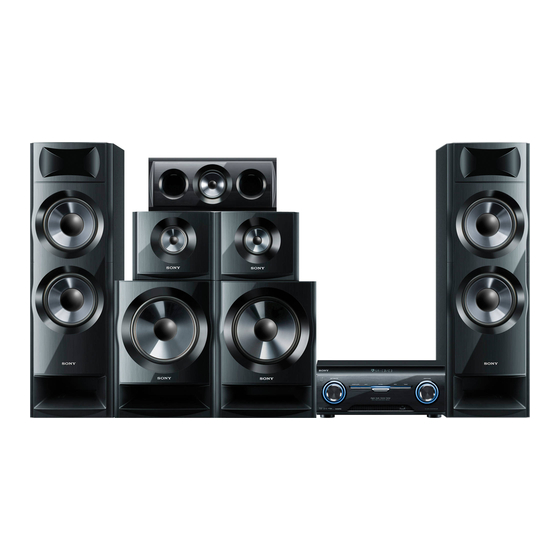
AFront speaker (left) BFront speaker (right) CCenter speaker DSurround speaker (left) ESurround speaker (right) * HT-M7 only. FSurround back speaker (left) Notes GSurround back speaker (right) • Do not install the speakers on a wall. HSubwoofer • (HT-M7 only) We recommend that you place the surround back speakers on a speaker stand (not supplied). - Page 17 Tips Installing the speakers on a flat • All the angles A should be the same. surface – HT-M7 only Attach the supplied foot pads to the bottom of the speakers and subwoofers to prevent vibration or movement. HT-M7: Center speaker, surround back speakers,...
-
Page 18: 2: Connecting The Speakers
2: Connecting the speakers Before connecting cords, be sure to disconnect the AC power cord (mains lead). HT-M7 Center Surround back speaker speaker Right Left Connector Right Left Right Left Surround speaker Front speaker Subwoofer A Speaker cord (supplied) - Page 19 HT-M5 Center Surround speaker Front speaker Subwoofer speaker Right Left Right Left Connector A Speaker cord (supplied) continued...
- Page 20 HT-M3 Center Surround speaker Front speaker Subwoofer speaker Right Left Right Left Connector A Speaker cord (supplied)
- Page 21 Grey SURROUND R Brown SURROUND BACK L SURROUND BACK R Green CENTER * HT-M7 only. To connect the speakers correctly Check the speaker type by referring to the speaker label* on the rear panel of the speakers. Character on Speaker type...
-
Page 22: 3: Connecting The Tv
Audio/Video Audio signals signals A HDMI cable (not supplied) Recommended connection Sony recommends that you use an HDMI- Alternative connection authorized cable or Sony HDMI cable. B Component video cord (not supplied) C Video cord (not supplied) D Audio cord (not supplied) -
Page 23: 4A: Connecting The Video Equipment
• Connect a TV monitor or a projector to the HDMI Digital, DTS, and Linear PCM. For details, TV OUT or MONITOR OUT (HT-M7/HT-M5 only) jack on the receiver. You may not be able to see “Digital audio formats supported by the record even if you connect recording equipment. - Page 24 When connecting cords • Before connecting cords, be sure to disconnect the AC power cord (mains lead). • It is not necessary to connect all the cords. Connect according to the availability of jacks on the connected equipment. • Use a High Speed HDMI cable. If you use a Standard HDMI cable, 1080p, Deep Color (Deep Colour) or 3D images may not be displayed properly.
- Page 25 Blu-ray Disc player, Satellite tuner, PlayStation 3 TV, etc. DVD player cable TV tuner Audio/video Audio/video Audio/video Audio/video signals signals signals signals A HDMI cable (not supplied) Sony recommends that you use an HDMI- authorized cable or Sony HDMI cable.
- Page 26 Connecting equipment with jacks other than HDMI jacks HT-M7/HT-M5 PlayStation 3 Blu-ray Disc player, DVD player Satellite tuner, cable TV tuner Audio signals Video signals Audio signals Video signals Video signals Audio signals Not used A Optical digital cord (not supplied)
- Page 27 HT-M3 PlayStation 3 Blu-ray Disc player, DVD player Satellite tuner, cable TV tuner Audio signals Video signals Audio signals Video signals Audio signals Video signals To the VIDEO IN To the VIDEO IN To the VIDEO IN of the TV. of the TV.
-
Page 28: 4B: Connecting The Audio Equipment
A Audio cord (not supplied) B Video cord (not supplied) * If you want to record, you must make this connection (page 37). ** HT-M7/HT-M5 only. Note (HT-M3 only) A Audio cord (not supplied) Be sure to connect the video output of the VCR or... -
Page 29: 5: Connecting The Antennas (Aerials)
Connecting a USB device 5: Connecting the antennas (aerials) (Except for South Africa and Argentina models) Before connecting antennas (aerials), be sure to disconnect the AC power cord (mains lead). FM wire antenna (aerial) (supplied) AM loop antenna (aerial) (supplied) USB device A USB cable (not supplied) * The shape of the connector varies depending on... -
Page 30: Preparing The Receiver
Initializing the receiver Preparing the Receiver Before using the receiver for the first time, Setting the voltage initialize the receiver by performing the selector following procedure. This procedure can also be used to revert back to the factory default settings. If your receiver has a voltage selector on the Be sure to use the button on the receiver to rear panel, check that the voltage selector is set... -
Page 31: Selecting Surround Speaker Position
Selecting surround Adjusting the speaker speaker position levels and balance (TEST TONE) Select the surround speaker position according to the speaker configuration. You can adjust the speaker levels and balance while listening to the test tone from your MENU seating position. V/v/B/b Press AMP MENU. -
Page 32: Basic Operations
Press V/v repeatedly to select Basic Operations “AUTO xxx * ”. The test tone is output from each speaker Playing an input source in sequence. * xxx represent a speaker channel. equipment Adjust the speaker levels and balance. Use the LEVEL menu (page 49) to adjust the speakers to have the same sounding test tone level for each speaker. -
Page 33: Naming Inputs
Press MASTER VOL +/– to Naming inputs adjust the volume. You can enter a name of up to 8 characters for You can also use MASTER VOLUME on inputs (except TUNER) to appear on the the receiver. display panel. Press MOVIE, MUSIC or It is more recognizable having the equipment named on the display than the jacks. -
Page 34: Playing A Usb Device
Compatible USB devices • Some of these USB devices may not be available for purchase in certain areas. You can use the following Sony USB devices • When formatting the above models, be sure to on this receiver. format using the model itself or the dedicated formatting software for that model. -
Page 35: Other Operations
Other operations Operating the USB device Press Operation Starts/pauses play. Fast reverses or forwards. ./> Goes to the previous/next file. FOLDER +/– Goes to the previous/next folder. REPEAT Enters repeat mode. • RPT. OFF/RPT. ONE/ RPT. ALL/RPT. FLD MOVIE, MUSIC, Notes on the USB device GAMING •... -
Page 36: Viewing Information On The Display Panel
• Compatibility with all encoding/writing Viewing information on softwares, recording devices, and recording media cannot be guaranteed. Incompatible the display panel USB device may produce noise or interrupted audio or may not play at all. • Some time may be needed to start playback The display panel provides various when: information of the receiver status such as... -
Page 37: Recording Using The Receiver
In this case, set the “AUTO.STBY” to “STBY OFF” (page 52). • (HT-M7/HT-M5 only) Audio input signals via HDMI IN, DIGITAL IN and COMPONENT VIDEO IN jacks cannot be... -
Page 38: Tuning To A Station
Tuning to a station Tuner Operations automatically (Automatic Tuning) Listening to FM/AM radio Press TUNER repeatedly (or You can listen to FM and AM broadcasts press FM or AM) to select the through the built-in tuner. Before operation, FM or AM band. make sure you have connected the FM and You can also use INPUT SELECTOR on AM antennas (aerials) to the receiver (page... -
Page 39: Presetting Fm/Am Radio Stations
Note Press the numeric buttons to All AM preset stations will be erased when you enter the frequency. change the tuning scale. Example 1: FM 102.50 MHz Select 1 b 0 b 2 b 5 (b 0*) Presetting FM/AM radio Example 2: AM 1,350 kHz Select 1 b 3 b 5 b 0 stations... -
Page 40: Tuning To Preset Stations
Press MEMORY. Press V/v repeatedly to select or b. “TUNER”, then press Press the numeric buttons to select a preset number. Press V/v repeatedly to select “NAME IN”, then press or b. You can also press PRESET + or PRESET – to select a preset number. The cursor flashes and you can enter a character. -
Page 41: Enjoying Surround Sound
x MOVIE B (Movie B) Reproduces a movie effect sound. Enjoying Surround Sound x MUSIC (Music) Selecting the sound field Reproduces music sound with multi channel output. This receiver can create multi channel x GAMING (Gaming) surround sound. You can select one of the Reproduces the sound processing of video optimized sound fields from the receiver’s games for better gaming experience. -
Page 42: Resetting Sound Fields To The Default Settings
MUSIC as TV, Blu-ray Disc/DVD player, AV amplifier, etc. that supports the Control for HDMI function. By connecting Sony equipment that is compatible with the “BRAVIA” Sync with an HDMI cable (not supplied), operation is simplified as follows: • One-Touch Play (page 44) •... -
Page 43: Preparing For The "Bravia" Sync
If your TV is not compatible with Preparing for the the “Control for HDMI-Easy Setting” function “BRAVIA” Sync MENU The receiver is compatible with the “Control for HDMI-Easy Setting” function. V/v/B/b • If your TV is compatible with the “Control for HDMI-Easy Setting”... -
Page 44: Playing Back Equipment With One-Touch Operation (One-Touch Play)
Playing back equipment Enjoying the TV sound with one-touch operation from the speakers connected to the receiver (One-Touch Play) (System Audio Control) By a simple operation (one-touch), equipment connected to the receiver with “BRAVIA” You can enjoy the TV sound from the speakers Sync function start automatically. -
Page 45: Turning Off The Receiver With The Tv
Turning off the receiver Enjoying optimum sound with the TV field for the selected scene (System Power-Off) (Scene Select) When you turn the TV off, using the POWER button on the TV’s remote control, the receiver The Scene Select function allows you to enjoy and the connected equipment turn off the optimum picture quality and switches the automatically. -
Page 46: Advanced Operations
Notes • Some audio input modes may not be set up Advanced Operations based on the input. • The Audio Return Channel (ARC) function Switching between does not work in the following cases. – Your TV is not compatible with the Audio digital and analog audio Return Channel (ARC) function. -
Page 47: Overview Of The Menus
Note Some parameters and settings may appear dimmed on the display panel. This means that they are either unavailable or fixed and unchangeable. Overview of the menus The following options are available in each menu. For details, see the referencing page in the parentheses. - Page 48 Menu Parameters Settings Default [Display] [Display] setting SPEAKER Surround speaker position FRONT, REAR FRONT [SPKR] [SUR SPK] (page 50) Front left speaker distance [FL DIST.] Front right speaker distance [FR DIST.] Center speaker distance [CNT DIST.] Surround left speaker distance [SL DIST.] Surround right speaker distance 3’3”...
- Page 49 For details, see “Naming inputs” [NAME IN] (page 33). xxx represent a speaker channel. – HT-M7 only: FL, FR, CNT, SL, SR, SBL, SBR, SW – HT-M3/HT-M5 only: FL, FR, CNT, SL, SR, SW HT-M7 only. USA, Latin America, Argentina and Mexico models only.
-
Page 50: Speaker Menu
• The delay time may vary depending on audio distance to the closest speaker. format, sound field and speaker distance settings. * HT-M7 only. x DUAL Lets you select the language you want to listen EQ menu to during digital broadcast when available. - Page 51 HDMI signals from the receiver’s HDMI TV • When you connect the receiver to an image OUT jack. Sony recommends this setting if display equipment (projector, etc.), sound may you use a “BRAVIA” Sync compatible Sony not be output from the receiver. In this case, TV.
-
Page 52: System Menu
SYSTEM menu Additional Information You can customize the settings of the receiver. Precautions x DIMMER Lets you adjust the brightness of the display On safety panel. • DIM ON Should any solid object or liquid fall into the The brightness of the display is reduced and cabinet, unplug the receiver and have it the indicators lights off. -
Page 53: Troubleshooting
Should any problem persist, consult your nearest Sony dealer. Note that if service On operation personnel changes some parts during repair, Before connecting other equipment, be sure to these parts may be retained. - Page 54 • Check that the speakers and equipment are • Video input signals via HDMI IN and connected securely. COMPONENT VIDEO IN (HT-M7/ • Check that the connecting cords are away HT-M5 only) jacks cannot be recorded. from a transformer or motor, and at least •...
- Page 55 • Audio signals (format, sampling There is no sound, or only a very low- frequency, bit length, etc.) transmitted level sound is heard from specific from an HDMI jack may be suppressed by speakers. the connected equipment. Check the setup •...
- Page 56 – Be sure to select the correct equipment • Copyright protection to prevent recording or input you want when you watch a is contained in the sources. In this case, program from the equipment connected you may not be able to record from the to the TV.
-
Page 57: Usb Device
• No stations have been preset or the preset The USB device cannot be connected stations have been cleared (when tuning by into the (USB) port. scanning preset stations is used). Preset the • The USB device is being connected upside stations (page 39). -
Page 58: Error Messages
• Make sure the connected equipment is of the system by the message. If any problem compatible with the Control for HDMI persists, consult your nearest Sony dealer. function. If an error message appears while you use a • Check the Control for HDMI settings on USB device, see “USB message list”... -
Page 59: Specifications
Measured under the following conditions: Clearing the memory Area Power requirements South Africa, 240 V AC, 50 Hz Reference sections Singapore To clear Middle East 127 V AC, 60 Hz All memorized settings page 30 Australia, Argentina 230 V AC, 50 Hz Customized sound fields page 42 Reference power output for front, center, surround,... - Page 60 Surround mode (reference) (4 ohms, 100 Hz, Measured under the following conditions: THD 10%) Area Power requirements SUBWOOFER: 250 W per channel South Africa, Latin 240 V AC, 50 Hz America, Singapore Measured under the following conditions: Mexico 127 V AC, 60 Hz Area Power requirements Argentina, Thailand,...
- Page 61 8.1 kg (17 lb 14 oz) AAC: 48 kbps – 320 kbps (STR-KM3) Sampling frequencies* MP3 (MPEG 1 Audio Speaker section Layer-3): 32 kHz/ • Front speaker for HT-M7/HT-M5 44.1 kHz/48 kHz (SS-MSP7M) WMA: 44.1 kHz Speaker system 2-way, 3-driver, Bass AAC: 44.1 kHz...
- Page 62 178 mm (17 in × 7 1/4 in × 7 1/8 in) (with foot) Mass (Approx.) 3.3 kg (7 lb 5 oz) • Surround back speaker for HT-M7/ Surround speaker for HT-M5/HT-M3 (SS-SRP7M) Speaker system Full range, Closed box Speaker unit...
-
Page 63: Index
Index Numerics 5 channel 16 Menu Satellite tuner 7 channel 16 AUDIO 50 connecting 25, 26, 27 EQ 50 Scene Select 45 HDMI 51 Sleep Timer 14 LEVEL 49 Sound fields Blu-ray Disc player SPEAKER 50 resetting 42 connecting 25, 26, 27 SYSTEM 52 selecting 41 TUNER 50... -
Page 64: Instrucciones De Seguridad Importantes
Registre 11) Utilice solamente complementos/accesorios esos números en el espacio suministrado a especificados por el fabricante. continuación. Menciónelos siempre que llame al distribuidor Sony respecto a este producto. Núm. modelo Núm. serie... - Page 65 La siguiente declaración FCC • Las instrucciones de este manual corresponden a es aplicable solamente a la los modelos HT-M7, HT-M5 y HT-M3. A menos versión de este modelo que se indique de otro modo, en este manual se fabricada para su venta en utiliza el modelo HT-M7 para fines ilustrativos.
- Page 66 Unidos y otros países. “x.v.Color (x.v.Colour)” y el logotipo “x.v.Color (x.v.Colour)” son marcas comerciales de Sony Corporation. “BRAVIA” es una marca comercial de Sony Corporation. “PlayStation” es una marca comercial registrada de Sony Computer Entertainment Inc. Tecnología de codificación de audio MPEG Layer-3 y patentes, bajo licencia de Fraunhofer IIS y Thomson.
- Page 67 Contenido Acerca de este manual........3 Para disfrutar del sonido Accesorios suministrados......6 envolvente Descripción y ubicación de las piezas... 7 Procedimientos iniciales ......15 Selección del campo de sonido ....41 Restauración de los campos de sonido a los ajustes predeterminados....43 Conexiones 1: Instalación de los altavoces.....
-
Page 68: Accesorios Suministrados
– Otros modelos • Antena cerrada de AM (1) • Cables de altavoz – HT-M7 (6, rojo/blanco/azul/gris/púrpura × 2) – HT-M5 (4, rojo/blanco/púrpura × 2) Notas – HT-M3 (2, rojo/blanco) •... -
Page 69: Descripción Y Ubicación De Las Piezas
altavoz de graves Descripción y ubicación de las piezas Panel frontal * Excepto modelos de Sudáfrica y Argentina. A ?/1 (encendido/en espera) (página 30, 43) L SURROUND SPEAKER (página 31) B INPUT SELECTOR (página 32, 33, 35, 37, 38, 40, 40, 47, 56) C Indicador INPUT SELECTOR Parpadea cuando se cambia la fuente de entrada. - Page 70 Indicadores de la pantalla HDMI 96/24 PL II COAX LPCM SLEEP D.RANGE A Indicador del canal de reproducción D Indicador de entrada Las letras (L, C, R, etc.) indican los canales que Se ilumina para indicar la entrada actual. se están reproduciendo. Dependiendo de los ajustes de los altavoces, las casillas situadas HDMI alrededor de las letras varían para mostrar el...
- Page 71 K D.RANGE Se ilumina cuando se activa la compresión de rango dinámico (página 51). L SLEEP Se ilumina cuando se activa el temporizador de apagado (página 14). * HT-M7 solamente. ** Excepto modelos de Sudáfrica y Argentina.
- Page 72 Panel posterior HT-M7 HT-M5...
- Page 73 Tomas de COMPOSITE VIDEO INPUT/OUTPUT** (página 22, 26, 28) VIDEO IN/OUT Amarillo * Para ver la imagen de la entrada seleccionada, conecte al televisor la toma HDMI TV OUT o MONITOR OUT (HT-M7/HT-M5 solamente) (página 22). ** HT-M7/HT-M5 solamente. continúa...
- Page 74 C Sección ANTENNA (página 29) Toma FM ANTENNA Terminal AM ANTENNA D Sección SPEAKERS (página 18, 19,...
- Page 75 Mando a distancia Utilice el mando a distancia suministrado para controlar este receptor y el televisor de Sony. • RM-AAU136 (Solo los modelos de • RM-AAU135 (Otros modelos) Sudáfrica y Argentina) * Los botones 5 y TV PROG + cuentan con puntos táctiles. Utilice los puntos táctiles como referencia cuando use el receptor.
- Page 76 M-TURBO refuerza los graves y crea un sonido más potente. Accede al modo de sintonización directa. L m/M, NX, ./> (RM-AAU135 solamente) Para controlar un televisor Sony Controla el dispositivo USB: Operación hacia atrás/hacia delante, reproducir/pausar, omitir. A TV ?/1 (encendido/en espera) TUNING +/–...
-
Page 77: Procedimientos Iniciales
En el caso de un reproductor de discos Blu-ray de Digital Analógico Sony, compruebe que “Audio (HDMI)”, “Dolby Digital” y “DTS” se hayan ajustado a “Auto”, Imagen de calidad alta “Dolby Digital” y “DTS” respectivamente (a fecha de septiembre de 2011). -
Page 78: Conexiones
Para disfrutar de los diferentes efectos de sonido, coloque los altavoces de la manera ilustrada a continuación. AAltavoz frontal (izquierdo) BAltavoz frontal (derecho) * HT-M7 solamente. CAltavoz central Notas DAltavoz de sonido envolvente (izquierdo) • No instale los altavoces en la pared. - Page 79 Instalación de los altavoces • Todos los ángulos A deben ser iguales. sobre una superficie plana – HT-M7 solamente Para evitar vibraciones o movimiento, fije las almohadillas para las patas a la parte inferior de los altavoces y los altavoces de graves.
-
Page 80: 2: Conexión De Los Altavoces
2: Conexión de los altavoces Antes de conectar los cables, asegúrese de desconectar el cable de alimentación de ca. HT-M7 Altavoz envolvente Altavoz trasero central Derecho Izquierdo Conector Derecho Izquierdo Derecho Izquierdo Altavoz de sonido envolvente Altavoz frontal Altavoz de graves... - Page 81 HT-M5 Altavoz Altavoz de sonido Altavoz frontal Altavoz de graves central envolvente Derecho Izquierdo Derecho Izquierdo Conector A Cable de altavoz (suministrado) continúa...
- Page 82 HT-M3 Altavoz de sonido Altavoz Altavoz frontal Altavoz de graves envolvente central Derecho Izquierdo Derecho Izquierdo Conector A Cable de altavoz (suministrado)
- Page 83 SURROUND R Marrón SURROUND BACK L Bronceado SURROUND BACK R Verde CENTER * HT-M7 solamente. Para conectar correctamente los altavoces Compruebe el tipo de altavoz consultando la etiqueta del altavoz* en el panel posterior de los altavoces. Letra en la etiqueta...
-
Page 84: 3: Conexión Del Televisor
A Cable HDMI (no suministrado) Conexión recomendada Sony recomienda utilizar un cable HDMI Conexión alternativa autorizado o un cable HDMI de Sony. B Cable de vídeo componente (no suministrado) C Cable de vídeo (no suministrado) D Cable de audio (no suministrado) -
Page 85: 4A: Conexión De Equipos De Vídeo
• Conecte un monitor de televisor o un proyector a la PCM lineal. Para obtener más información, toma HDMI TV OUT o MONITOR OUT (HT-M7/HT-M5 solamente) del receptor. Es consulte “Formatos de audio digital posible que no pueda grabar aunque conecte un compatibles con el receptor”... - Page 86 • Si desea más información, consulte el manual de instrucciones de cada uno de los equipos conectados. Cuando conecta los cables • Antes de conectar los cables, asegúrese de desconectar el cable de alimentación de ca. • No es necesario conectar todos los cables. Conecte de acuerdo con la disponibilidad de tomas del equipo conectado.
- Page 87 DVD televisión por cable Señales de audio/ Señales de audio/ Señales de audio/ Señales de audio/ vídeo vídeo vídeo vídeo A Cable HDMI (no suministrado) Sony recomienda utilizar un cable HDMI autorizado o un cable HDMI de Sony.
- Page 88 Conexión de equipos con tomas que no sean tomas HDMI HT-M7/HT-M5 Sintonizador de satélite, Reproductor de discos Blu-ray, PlayStation 3 decodificador de televisión por lector de DVD cable Señales de Señales de vídeo Señales de Señales de vídeo Señales de Señales de audio...
- Page 89 HT-M3 Sintonizador de satélite, Reproductor de discos Blu-ray, PlayStation 3 decodificador de televisión por lector de DVD cable Señales de Señales de Señales de Señales de Señales de Señales de audio vídeo audio vídeo audio vídeo Al VIDEO IN del Al VIDEO IN del Al VIDEO IN del televisor.
-
Page 90: 4B: Conexión Del Equipo De Audio
A Cable de audio (no suministrado) B Cable de vídeo (no suministrado) * Si desea grabar, debe realizar esta conexión (página 37). ** HT-M7/HT-M5 solamente. A Cable de audio (no suministrado) Nota B Cable de audio con miniclavija estéreo (suministrado para el modelo... -
Page 91: 5: Conexión De Las Antenas
Conexión de un dispositivo USB 5: Conexión de las antenas (Excepto modelos de Sudáfrica y Argentina) Antes de conectar las antenas, asegúrese de desconectar el cable de alimentación de ca. Antena monofilar de FM (suministrada) Antena cerrada de AM (suministrada) Dispositivo USB A Cable USB (no suministrado) * La forma del conector varía dependiendo del área... -
Page 92: Preparación Del Receptor
Inicialización del Preparación del receptor receptor Ajuste del selector de Antes de utilizar el receptor por primera vez, voltaje inicialícelo mediante el siguiente procedimiento. Este procedimiento también se Si su receptor dispone de un selector de voltaje puede utilizar para volver a los ajustes en el panel posterior, verifique que esté... -
Page 93: Selección De La Posición De Los Altavoces De Sonido Envolvente
Selección de la posición Ajuste de los niveles y el de los altavoces de balance de los altavoces sonido envolvente (TEST TONE) Seleccione la posición de los altavoces de Puede ajustar los niveles y el balance de los sonido envolvente de acuerdo con la altavoces escuchando el tono de prueba desde configuración de los altavoces. -
Page 94: Operaciones Básicas
Pulse V/v varias veces para Operaciones básicas seleccionar “AUTO xxx * ”. El tono de prueba se emite Reproducción en un secuencialmente desde cada uno de los altavoces. equipo fuente de entrada * xxx representa un canal de altavoz. Ajuste los niveles y el balance de los altavoces. - Page 95 Pulse MASTER VOL +/– para Designación de entradas ajustar el volumen. Puede introducir un nombre de hasta 8 También puede utilizar MASTER caracteres para las entradas (excepto TUNER) VOLUME en el receptor. y mostrarlo en la pantalla. Pulse MOVIE, MUSIC o Esto resulta útil para asignar a las tomas los nombres de los equipos conectados.
-
Page 96: Reproducción De Un Dispositivo Usb
• No se garantiza el funcionamiento de modelos no incluidos en esta lista. Este receptor admite los siguientes • Aun cuando se utilicen dichos dispositivos USB su dispositivos USB de Sony. funcionamiento no puede asegurarse en todo momento. • Algunos de estos dispositivos USB pueden no estar Dispositivo USB de Sony disponibles para su compra en determinadas áreas. -
Page 97: Otras Operaciones
Otras operaciones Uso del dispositivo USB Pulsar Operación Iniciar/pausar la reproducción. Avanza rápidamente hacia atrás o hacia adelante. ./> Se desplaza al archivo anterior/ siguiente. FOLDER +/– Se desplaza a la carpeta anterior/ siguiente. REPEAT Ingresa al modo de repetición. MOVIE, •... -
Page 98: Visualización De La Información De La Pantalla
El número máximo de archivos y carpetas de Visualización de la audio puede variar dependiendo de la estructura de archivos y carpetas. información de la No guarde otros tipos de archivos o carpetas innecesarias en un dispositivo USB. pantalla • No se puede garantizar la compatibilidad con todos los software de codificación/ La pantalla suministra diversas informaciones escritura, dispositivos de grabación y... -
Page 99: Grabación Con El Receptor
índice no aparece si se han introducido 53). únicamente espacios en blanco, o si es igual • (HT-M7/HT-M5 solamente) que el nombre de la entrada. La entrada de señales de audio a través de las tomas **Es posible que no se visualice la HDMI IN, DIGITAL IN y COMPONENT VIDEO información de transmisión. -
Page 100: Operaciones Del Sintonizador
RM-AAU135 solamente. RM-AAU136 solamente. Operaciones del sintonizador Para sintonizar una emisora Para escuchar radio automáticamente (Sintonización FM/AM automática) Puede escuchar transmisiones de FM y AM Pulse TUNER varias veces (o mediante el sintonizador incorporado. Antes pulse FM o AM) para de hacerlo, asegúrese de haber conectado las seleccionar la banda FM o AM. -
Page 101: Memorización De Emisoras De Radio De Fm/Am
Pulse V/v varias veces para Pulse D.TUNING. seleccionar “AM STEP” y, a Pulse los botones numéricos continuación, pulse o b. para introducir la frecuencia. Pulse V/v varias veces para Ejemplo 1: FM 102,50 MHz seleccionar la escala de Seleccione 1 b 0 b 2 b 5 (b 0*) sintonización de AM que desee. - Page 102 Pulse TUNER varias veces (o pulse FM o AM) para seleccionar la banda FM o AM. También puede utilizar INPUT También puede pulsar los botones SELECTOR en el receptor. numéricos para introducir la emisora memorizada. Para sintonizar la emisora Sintonice la emisora que desea seleccionada, pulse ENTER.
-
Page 103: Para Disfrutar Del Sonido Envolvente
• Para introducir un espacio en blanco, pulse b sin seleccionar ningún carácter. Para disfrutar del sonido Si comete un error envolvente Pulse B/b hasta que el carácter que desee cambiar destelle y, a continuación, pulse Selección del campo de V/v para seleccionar el carácter correcto. - Page 104 x GAMING (Gaming) Para desactivar el efecto de sonido envolvente Reproduce el procesamiento de sonido de los videojuegos para una gran experiencia de Pulse MOVIE varias veces para seleccionar juego. “MOVIE A”. Notas sobre los campos de sonido • Los campos de sonido para música y películas no funcionan con señales que tengan frecuencias de muestreo de más de 48 kHz.
-
Page 105: Restauración De Los Campos De Sonido A Los Ajustes Predeterminados
AV, etc., que sean compatibles con la función Control por HDMI. Es posible simplificar las operaciones si se conectan equipos de Sony compatibles con la función “BRAVIA” Sync mediante cables HDMI (no suministrado), como sigue: • Reproducción mediante una pulsación (página 45) -
Page 106: Preparándose Para Utilizar "Bravia" Sync
Si su televisor no es compatible Preparándose para con la función “Control por HDMI (ajuste fácil)” utilizar “BRAVIA” Sync MENU Este receptor es compatible con la función “Control por HDMI (ajuste fácil)”. V/v/B/b • Si su televisor es compatible con la función “Control por HDMI (ajuste fácil)”, usted puede definir la función Control por HDMI Pulse AMP MENU. -
Page 107: Reproducción Mediante Una Pulsación (Reproducción Mediante Una Pulsación)
Reproducción mediante Para disfrutar del sonido una pulsación del televisor por los altavoces conectados al (Reproducción mediante una receptor pulsación) (Control de audio del sistema) Mediante una simple operación (una pulsación), el equipo conectado al receptor Una simple operación le permitirá disfrutar del con la función “BRAVIA”... -
Page 108: Apagado Del Receptor Con El Televisor (Apagado Del Sistema)
• Su televisor debe ser compatible con la función Control de audio del sistema. Para disfrutar del campo • Si el televisor se enciende antes que el receptor, el de sonido óptimo para la televisor dejará de emitir sonido por un momento. escena seleccionada Apagado del receptor con (Selección de escena) -
Page 109: Operaciones Avanzadas
• OPT: especifica las señales de audio digital de entrada a la toma DIGITAL Operaciones avanzadas OPTICAL. • ANALOG: especifica las señales de Cambio entre audio audio analógico de entrada a las tomas AUDIO IN (L/R). digital y audio analógico Notas (INPUT MODE) •... - Page 110 Para volver a la pantalla anterior Pulse V/v varias veces para Pulse B o RETURN O. seleccionar el parámetro que desea ajustar y, a continuación, Para salir del menú o b. pulse Pulse AMP MENU. Pulse V/v varias veces para Nota seleccionar el ajuste que desea Algunos parámetros y ajustes pueden aparecer...
- Page 111 Menú Parámetros Ajustes Ajuste [Visualización] [Visualización] predeterminado SPEAKER Posición de los altavoces de FRONT, REAR FRONT [SPKR] sonido envolvente (página 51) [SUR SPK] Distancia del altavoz frontal izquierdo [FL DIST.] Distancia del altavoz frontal derecho [FR DIST.] Distancia del altavoz central [CNT DIST.] Distancia del altavoz de sonido envolvente izquierdo...
- Page 112 “Designación de entradas” (página 33). xxx representa un canal de altavoz. – HT-M7 solamente: FL, FR, CNT, SL, SR, SBL, SBR, SW – HT-M3/HT-M5 solamente: FL, FR, CNT, SL, SR, SW HT-M7 solamente. Solo modelos de Estados Unidos, Latinoamérica, Argentina y México.
- Page 113 Si ambos altavoces frontales no están situados * HT-M7 solamente. a igual distancia de la posición de escucha, ajuste la distancia al altavoz más cercano. x D. RANGE * HT-M7 solamente.
- Page 114 x AM STEP* x IN MODE Le permite cambiar AM STEP a 9 kHz o Le permite ajustar el modo de entrada de audio 10 kHz. Para obtener más información, para cualquiera de ellos. Para obtener más consulte “Cambio de la escala de información, consulte “Cambio entre audio sintonización de AM”...
- Page 115 Si el televisor tiene de la toma HDMI TV OUT (salida TV altavoces estéreo, el sonido emitido por el HDMI) del receptor. Sony recomienda esta receptor también será estéreo, al igual que el configuración cuando se utilice un televisor televisor, aunque usted esté...
-
Page 116: Información Adicional
Acumulación de calor Aunque el receptor se calienta durante el Información adicional funcionamiento, esto no es señal de mal funcionamiento. Si utiliza continuamente el Precauciones receptor con el volumen alto, la temperatura aumentará considerablemente en las partes superior, laterales e inferior de la caja. Para Seguridad evitar quemarse, no toque la caja. -
Page 117: Solución De Problemas
Como los altavoces frontales, problema persiste, consulte con el distribuidor altavoces de sonido envolvente/altavoces Sony más cercano. Tenga presente que si el envolventes traseros y los altavoces de graves personal de servicio cambia algunas piezas no son del tipo con blindaje magnético, le durante la reparación, puede que se retengan... - Page 118 • Compruebe que los cables de conexión grabarse por las tomas HDMI IN y estén separados de un transformador o COMPONENT VIDEO IN (HT-M7/ motor y alejados al menos 3 metros (10 HT-M5 solamente). pies) de un televisor o luz fluorescente.
- Page 119 • Ajuste el nivel de los altavoces (página • Si el equipo conectado no es compatible 31). con la tecnología de protección de los • Compruebe que los cables (suministrados) derechos de autor (HDCP), es posible que de los altavoces estén conectados la imagen y/o el sonido desde la toma correctamente y de forma segura (página HDMI TV OUT se emitan distorsionados...
- Page 120 – Dependiendo del equipo y del televisor Cuando el receptor está en el modo de conectados, es posible que necesite espera, no se emite sonido por el configurar el ajuste HDMI del equipo y televisor. del televisor. Consulte el manual de •...
- Page 121 • No se han presintonizado emisoras o las La reproducción no se inicia. emisoras presintonizadas se borraron • Apague el receptor y vuelva a conectar el (cuando se sintoniza mediante la búsqueda dispositivo USB y, a continuación, de emisoras presintonizadas). Presintonice encienda el receptor.
-
Page 122: Mensajes De Error
HDMI. sistema. Si no consigue resolver el problema, • Compruebe la configuración de Control consulte con el distribuidor Sony más cercano. por HDMI en el equipo conectado. Si aparece un mensaje de error mientras se está Consulte el manual de instrucciones del utilizando un dispositivo USB, consulte “Lista... -
Page 123: Especificaciones
PROTECT Especificaciones Se suministra corriente irregular a los altavoces, o el receptor está cubierto y los orificios de ventilación están bloqueados. El Sección del amplificador receptor se apagará automáticamente al Salida de potencia cabo de algunos segundos. Quite el objeto •... - Page 124 Salida de potencia de referencia para los altavoces Medidos en las siguientes condiciones: frontales, central, de sonido envolvente, Área Requisitos de envolventes traseros y altavoz de graves. alimentación Dependiendo de la configuración del campo de Estados Unidos ca 120 V, 60 Hz sonido y la fuente, puede no haber salida de Sudáfrica, ca 240 V, 50 Hz...
- Page 125 Dependiendo de la configuración del Antena Antena cerrada campo de sonido y la fuente, puede no haber salida de sonido. Sección de vídeo (HT-M7/HT-M5 solamente) Entradas Entradas/Salidas Analógica Sensibilidad: 800 mV/ Vídeo: 1 Vp-p, 75 ohm...
- Page 126 Sección de altavoces Dispositivo USB compatible Clase de almacenamiento • Altavoz frontal para HT-M7/HT-M5 masivo (SS-MSP7M) Corriente máxima 500 mA Sistema de altavoces 2 vías, 3 controladores, reflector de graves General Altavoz Requisitos de alimentación Altavoz de graves: 200 mm (8 pulgadas), tipo Área...
- Page 127 Dimensiones (anchura/altura/profundidad) Peso (Aprox.) 3,3 kg (7 libras y 5 onzas) (Aprox.) 280 mm × 405 mm × • Altavoz envolvente trasero para HT-M7/ 290 mm Altavoz de sonido envolvente para HT-M5/ (11 1/8 pulgadas × HT-M3 (SS-SRP7M) 16 pulgadas ×...
-
Page 128: Índice
Decodificador de televisión por cable TEST TONE 31 conexión 26, 27 Dispositivo USB PlayStation 3 conexión 29 conexión 25, 26, 27 Videograbadora reproducción 34 conexión 28 GAMING 42 Grabación 37 Grabadora de DVD conexión 28 ©2013 Sony Corporation Printed in Malaysia...