
Related Manuals for NETGEAR ReadyNAS Pro Pioneer Edition


Summary of Contents for NETGEAR ReadyNAS Pro Pioneer Edition
- Page 1 ReadyNAS Pro Pioneer Edition User Guide NETGEAR, Inc. 350 E Plumeria Drive San Jose, CA 95134 USA 202-10456-01 v1.0 December 2008...
-
Page 2: Technical Support
In the interest of improving internal design, operational function, and/or reliability, NETGEAR reserves the right to make changes to the products described in this document without notice. NETGEAR does not assume any liability that may occur due to the use or application of the product(s) or circuit layout(s) described herein. - Page 3 Product and Publication Details Model Number: Publication Date: Product Family: Product Name: Home or Business Product: Language: Publication Part Number: Publication Version Number: December 2008 Network Storage ReadyNAS Pro Network Attached Storage System Pioneer Edition Home English 202-10456-01 v1.0, December 2008...
- Page 4 v1.0, December 2008...
-
Page 5: Table Of Contents
Initial Setup ...1-7 Default IP Address, Login Name, and Password ...1-8 The RAIDar Setup Utility ...1-8 The FrontView Management Console ...1-9 NETGEAR ReadyNAS Community ...1-10 Chapter 2 Setting Up and Managing Your ReadyNAS Pro Customizing Network Settings ...2-1 Ethernet Interfaces ...2-2 Global Network Settings ...2-4... - Page 6 Adjusting System Settings ...2-22 Clock, System Time, and NTP Options ...2-22 Alerts, Alert Contacts, Alert Settings, and SMTP ...2-23 Language Settings ...2-24 Updating ReadyNAS Pro Pioneer Edition ...2-25 Configuration Backup ...2-28 Chapter 3 Managing User Access Understanding Disk Share Security Access ...3-1 Setting Up User and Group Accounts ...3-2...
- Page 7 Networked DVD Players and UPnP AV Media Adapters ...3-16 Remote Access ...3-16 Remote FTP Access ...3-17 Remote HTTP Access ...3-18 Chapter 4 Securing Your Data Configuring Backup Jobs ...4-1 Adding a New Backup Job ...4-1 Viewing the Backup Schedule ...4-6 Programming the Backup Button ...4-7 Viewing the Backup Log ...4-8 Editing a Backup Job ...4-8...
- Page 8 Appendix A Share Access from MAC and Linux Systems MAC OS X ... A-1 AFP over Bonjour ... A-2 AFP over AppleTalk ... A-3 MAC OS 9 ... A-5 Accessing Shares from Linux/Unix ... A-7 Appendix B Related Documents Index viii v1.0, December 2008 Contents...
-
Page 9: About This Manual
The NETGEAR® ReadyNAS Pro Pioneer Edition User Guide describes how to configure and troubleshoot a ReadyNAS Pro Pioneer Edition system. The information in this manual is intended for readers with intermediate computer and networking skills. Conventions, Formats, and Scope The conventions, formats, and scope of this manual are described in the following paragraphs: •... -
Page 10: How To Use This Manual
ReadyNAS Pro Pioneer Edition User Guide • Scope. This manual is written for the ReadyNAS Pro Pioneer Edition according to these specifications: Product Version Manual Publication Date How to Use This Manual The HTML version of this manual includes the following: •... -
Page 11: Revision History
Tip: If your printer supports printing two pages on a single sheet of paper, you can save paper and printer ink by selecting this feature. Revision History Version Part Number Date Number 202-10456-01 December 2008 About This Manual ReadyNAS Pro Pioneer Edition User Guide Description First publication v1.0, December 2008... - Page 12 ReadyNAS Pro Pioneer Edition User Guide About This Manual v1.0, December 2008...
-
Page 13: Getting Acquainted
Windows, Macintosh, and Linux systems. ReadyNAS Pro offers extensible robust high- availability data protection. Its fail-safe features include dual redundant Gigabit Ethernet ports and support for RAID 0, 1, 5, RAID 5 plus hot spare, RAID 6, and NETGEAR’s proprietary X-RAID2 for automatic volume expansion. -
Page 14: What Are The Benefits Of X-Raid And X-Raid2
ReadyNAS Pro Pioneer Edition User Guide entire system for abnormal situations or part failures and e-mails system alerts to the network administrator. In addition, the Frontview Add-on SDK provides developers the tools for uniquely extending ReadyNAS capabilities. For a full list of what is new compared with existing... -
Page 15: X-Raid2 Is Even More Flexible
The process occurs in the background, so access to the ReadyNAS Pro Pioneer Edition is not interrupted. Others may claim that they have “online” RAID expansion just like X-RAID2, but take a closer look and you’ll see it’s just not that simple. -
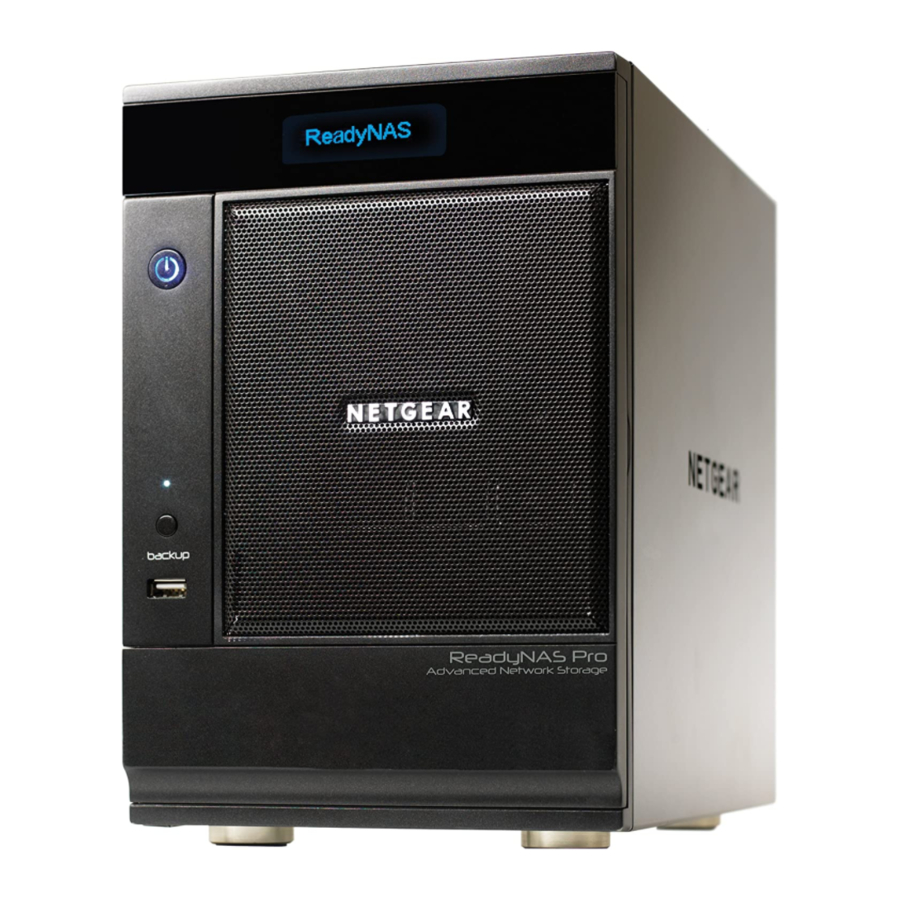
Page 16: Introducing The Status Displays, Ports, And Drive Bay
ReadyNAS Pro Pioneer Edition User Guide Introducing the Status Displays, Ports, and Drive Bay This section introduces the ReadyNAS Pro display, ports, and drive bay. Front and Side Panel Figure 1-1 1. OLED display, including the disk activity status light Note: The OLED goes to sleep to prevent burn-in;... -
Page 17: Drive Bay
ReadyNAS Pro Pioneer Edition User Guide Drive Bay Figure 1-2 1. Drive bay door 2. Six disk bays 3. Disk tray pop-out button 4. Disk tray pop-out latch 5. Disk tray 6. Disk tray lock 7. Recessed disk tray latch lock release Note: If you set the tray lock, you will need to use a push-pin or paper clip to open the tray. -
Page 18: Rear Panel
ReadyNAS Pro Pioneer Edition User Guide Rear Panel Figure 1-3 1. Disk exhaust fan 2. System exhaust fan 3. Two USB ports 4. Recessed button which provides access to the diagnostic startup menu: Normal, Factory Restore (which erases all data), OS Reinstall, Tech Support remote diagnostics, Skip Volume Check, Memory Test. -
Page 19: Choosing A Location For A Readynas Pro
Temperature operating limits are not likely to be exceeded. Initial Setup Follow the instructions in the NETGEAR Installation Guide that came with your unit to install your NETGEAR® ReadyNAS™ Pro. An electronic copy of the installation guide is on the product CD, on the NETGEAR web site, and on http://readynas.com. -
Page 20: Default Ip Address, Login Name, And Password
ReadyNAS Pro Pioneer Edition User Guide Default IP Address, Login Name, and Password The default IP configuration is set to DHCP; if the unit does not get an IP address, it defaults to 192.168.168.168. The default administrator user name is admin with the default password being netgear1 (case sensitive). -
Page 21: The Frontview Management Console
ReadyNAS Pro Pioneer Edition User Guide The FrontView Management Console The FrontView management console operates in two modes: Setup Wizard mode, and Advanced Control mode. When the unit is in its factory default state, FrontView is in Setup Wizard mode. -
Page 22: Netgear Readynas Community
NETGEAR ReadyNAS Community NETGEAR ReadyNAS Community web site is http://readynas.com. Find previews and reviews of new features, tutorials, and information you won’t get anywhere else. Well, maybe you will, but not easily and not in one happy place like this. Do give us feedback on the ReadyNAS Community Forum and let us know if you would like to see topics not covered here. -
Page 23: Setting Up And Managing Your Readynas Pro
From the Network menu, you can then navigate to your basic network settings screens such as Interfaces, Gateway, DNS, WINS, DHCP, and Route options. Figure 2-1 Setting Up and Managing Your ReadyNAS Pro ReadyNAS Pro Pioneer Edition User Guide v1.0, December 2008 Chapter 2... -
Page 24: Ethernet Interfaces
IP Assignment. Select either Use values from a DHCP server or Use values below. – If you elect to assign the IP address using Use values from a DHCP server, NETGEAR advises that you set the lease time on the DHCP server/router to a value of at least a day. - Page 25 NETGEAR advises that you leave the default setting otherwise. Figure 2-4 Performance Settings . In this section, you can the Enable jumbo frames option allows you to optimize the ReadyNAS Pro Pioneer Edition for large data transfers such as multiple streams of video playback. Figure 2-5 Note: Use this option only if your NIC and your gigabit switch support jumbo frames.
-
Page 26: Global Network Settings
The Hostname you specify is used to advertise the ReadyNAS Pro Pioneer Edition on your network. You can use the hostname to address the ReadyNAS Pro Pioneer Edition in place of the IP address when accessing the ReadyNAS Pro Pioneer Edition from Windows, or over OS X using SMB. -
Page 27: Wins
Simply select the Become a WINS server check box, and configure your Windows PC to specify the ReadyNAS Pro Pioneer Edition IP address as the WINS server. This can be useful if you wish to browse by hostname across multiple subnets (for example, over VPN). -
Page 28: Route: A Manual Routing Table
ReadyNAS Pro Pioneer Edition User Guide Select the Enable DHCP service check box if you want the ReadyNAS Pro Pioneer Edition device to act as a DHCP server. This is convenient in networks where DHCP service is not already available. - Page 29 ReadyNAS Pro Pioneer Edition User Guide this password is kept in a safe place. Anyone who obtains this password can change or erase the data on the ReadyNAS. Figure 2-10 As a safeguard, you are requested to enter a password recovery question, the expected answer, and an e-mail address.
-
Page 30: Selecting Services For Share Access
The Services screen allows you to manage various services for share access. This in effect controls the type of clients you wish to allow access to the ReadyNAS Pro Pioneer Edition. Three types of services are available: Standard File Protocols, Streaming Services, and Discovery Services. These different services are explained in the following sections. - Page 31 Linux platform but now available for various other Unix systems as well as Windows and Mac. Enabling rsync service on the ReadyNAS Pro Pioneer Edition allows clients to use rsync to initiate backups to and from the ReadyNAS Pro Pioneer Edition.
-
Page 32: Streaming Services
ReadyNAS Pro Pioneer Edition User Guide Streaming Services The built-in streaming services on the ReadyNAS Pro Pioneer Edition allow you to stream multi- media content directly from the ReadyNAS, without the need to have your PC or Mac powered on. -
Page 33: Discovery Services
Edition on your LAN. Understanding Volume Management Figure 2-14 The ReadyNAS Pro Pioneer Edition family offers two RAID volume technologies: Flex-RAID, utilizing the industry-standard RAID levels 0, 1, 5, and 6; and X-RAID2, NETGEAR-patented Setting Up and Managing Your ReadyNAS Pro ReadyNAS Pro Pioneer Edition User Guide v1.0, December 2008... -
Page 34: Overview Of Raid Levels And X-Raid2
ReadyNAS Pro Pioneer Edition User Guide expandable RAID technology. Your system comes preconfigured with X-RAID2. However, you can switch between the two modes through a factory default reset process described in “Configuring RAID” on page 6-7.” Overview of RAID Levels and X-RAID2 This section provides a basic overview of RAID and X-RAID2. - Page 35 It’s as simple as that. X- RAID2 lets you do this without reformatting your disks and shuffling your data back and forth. The process occurs in the background, so access to the ReadyNAS Pro Pioneer Edition is not interrupted.
-
Page 36: Volume Management For Flex-Raid
ReadyNAS Pro Pioneer Edition User Guide • X-RAID2: – One-volume technology, but supports volume expansion, either with the addition of more disks or the replacement of an existing disk with larger capacity disks. – You can start out with one disk, and add more disks as you need them or can afford them. - Page 37 After you have added a volume, you can return to the Volume tab and click the RAID Settings tab to display the current RAID information and configuration options for the volume. Setting Up and Managing Your ReadyNAS Pro ReadyNAS Pro Pioneer Edition User Guide v1.0, December 2008 2-15...
-
Page 38: Volume Management For X-Raid2
An additional disk failure would render this volume unusable. Note: The Remove operation is a maintenance feature. NETGEAR recommends that you do not use it in a live environment. Its function is equivalent to hot-removing the disk or simulating a disk failure. -
Page 39: Volume Maintenance
ReadyNAS is not permitted during this time. You will be notified by e-mail when the process is complete. After you receive your e-mail, the ReadyNAS Pro Pioneer Edition will have been expanded with the capacity from your new disk(s). Replacing All Your Disks for More Capacity When you need more disk space and 2 TB disks are available at an attractive price, you can expand your volume capacity by replacing the existing disks. -
Page 40: Working With Usb Volumes
Figure 2-19 You can switch between X-RAID2 and Flex-X-RAID modes. The process involves setting the ReadyNAS Pro Pioneer Edition to the factory default and using RAIDar to configure the volume during a 10-minute delay window during boot. See “Configuring RAID” on page 6-7 for more information. - Page 41 MP3 players without needing to power on a PC. An additional option to set the ownership of the copied files is available. Setting Up and Managing Your ReadyNAS Pro ReadyNAS Pro Pioneer Edition User Guide v1.0, December 2008 2-19...
-
Page 42: Setting Up Printers
USB Printers section of the Print Queue service screen. Figure 2-22 Print Shares over CIFS/SMB The ReadyNAS Pro Pioneer Edition can act as a print server for up to two USB printers for your Windows or Mac clients. To set up a printer in Windows: 1. -
Page 43: Ipp Printing
From time to time, printers might run out of ink or paper, or simply jam up, forcing you to deal with the print jobs stuck in a queue. The ReadyNAS Pro Pioneer Edition has a built-in print queue management to handle this. Simply select the USB Printers tab or click Refresh to display the printers and the jobs queued up for any “stuck”... -
Page 44: Adjusting System Settings
ReadyNAS Pro Pioneer Edition User Guide Adjusting System Settings Figure 2-25 System settings include clock, alert, performance, language, firmware update, configuration backup/restore, power, and shutdown settings. Clock, System Time, and NTP Options An accurate time setting on the Clock screen is required to ensure proper file timestamps. You can access the Clock screen by selecting System >... -
Page 45: Alerts, Alert Contacts, Alert Settings, And Smtp
Selecting the Power-off NAS when a disk fails or no longer responds option gracefully powers off the ReadyNAS Pro Pioneer Edition if a disk failure or a disk remove event is Setting Up and Managing Your ReadyNAS Pro 2-23 v1.0, December 2008... -
Page 46: Language Settings
ReadyNAS Pro Pioneer Edition User Guide detected. Selecting the Power-off NAS when disk temperature exceeds safe level gracefully powers off the ReadyNAS Pro Pioneer Edition when the disk temperature exceeds the nominal range. SMTP. The ReadyNAS Pro Pioneer Edition device has a built-in e-mail message transfer agent (MTA) that is set up to send alert e-mail messages from the device. -
Page 47: Updating Readynas Pro Pioneer Edition
FTP clients check box. Updating ReadyNAS Pro Pioneer Edition The ReadyNAS Pro Pioneer Edition device offers the option of upgrading the operating firmware either automatically using the Remote Update option or by manually loading an update image downloaded from the NETGEAR Support website. - Page 48 ReadyNAS Pro Pioneer Edition User Guide Updating from the NETGEAR Web Site The preferred and quicker method if the ReadyNAS Pro Pioneer Edition has Internet access is the Remote update option. Select Update from the main menu and then select the Remote tab. Click Check for Updates to check for updates on the NETGEAR update server.
- Page 49 ReadyNAS Pro Pioneer Edition User Guide ReadyNAS Pro Pioneer Edition by selecting the Local update tab. The update file can be a RAIDiator firmware image or an add-on package. Figure 2-33 Click Browse to select the update file and then click Upload and verify image. The process takes several minutes after which you are requested to reboot the system and proceed with the upgrade.
-
Page 50: Configuration Backup
Restoring the Factory Default Settings The Factory Default tab allows you to reset the ReadyNAS Pro Pioneer Edition device back to its factory default state. Choose this option carefully as All Data Will Be Lost unless you back up any data that you wish to keep prior to clicking Perform Factory Default. - Page 51 Use the Restore tab to brows for a configuration backup you would like to restore. Setting Up and Managing Your ReadyNAS Pro ReadyNAS Pro Pioneer Edition User Guide v1.0, December 2008 2-29...
- Page 52 ReadyNAS Pro Pioneer Edition User Guide 2-30 Setting Up and Managing Your ReadyNAS Pro v1.0, December 2008...
-
Page 53: Managing User Access
“Networked DVD Players and UPnP AV Media Adapters Understanding Disk Share Security Access The ReadyNAS Pro Pioneer Edition allows you to limit user and group accounts share access. Figure 3-1 Access to shares requires proper login authentication, and you can specify which users and/or groups you wish to offer access. -
Page 54: Setting Up User And Group Accounts
Each user is given a home share on the ReadyNAS Pro Pioneer Edition device that the user can use to keep private data such as backups of the user’s PC. This home share is accessible only by that user and the administrator in order to perform backups of the private shares. - Page 55 You can upload a CSV (Comma Separated Value) formatted file containing the group account information. The format of the file is: name1,gid1,quota1,member11:member12:member13 name2,gid2,quota2,member21:member22:member23 name3,gid3,quota3,member31:member32:member33 Please note the following: • Spaces around commas are ignored. Managing User Access ReadyNAS Pro Pioneer Edition User Guide v1.0, December 2008...
-
Page 56: Managing Users
ReadyNAS Pro Pioneer Edition User Guide • The name field is required. • Quota is set to default if not specified. • GID is automatically generated if not specified. • Empty fields are replaced with account defaults. • Group members are optional. - Page 57 In this example, user fred has a password set to hello123, belongs to the default group, receives no e-mail notification, has a UID assigned automatically, and has a default quota. Managing User Access ReadyNAS Pro Pioneer Edition User Guide v1.0, December 2008...
-
Page 58: Setting Accounts Preferences
ReadyNAS Pro Pioneer Edition User Guide barney,23stone,,barney@bedrock.com In this example, user barney has a password set to 23stone, belongs to the default group, receives e-mail notification sent to barney@bedrock.com, has a UID assigned automatically, and has a default quota. wilma,imhiswif,ourgroup,wilma@bedrock.com,225,50 In this example, user wilma has a password imhiswif, belongs to the group ourgroup, receives e- mail notification sent to wilma@bedrock.com, has a UID set to 225, and a quota set to 50 MB. -
Page 59: Adding Shares
Note: Enabling Public Access means the Guest account has access to the share. Once you finish adding the shares, refer to System for instructions on how to access them from different client interfaces. Managing User Access ReadyNAS Pro Pioneer Edition User Guide Chapter 5, “Accessing Shares from Your Operating v1.0, December 2008... -
Page 60: Managing Shares
ReadyNAS Pro Pioneer Edition User Guide Managing Shares Once you have added shares, you can manually fine-tune share access by selecting Share List. Figure 3-10 If you want to delete a share, select the check box on the far right of the share listing and click Delete. - Page 61 Default: Read-only • Write-enabled users: fred • Write-enabled groups: engr If you wish to limit this access only to hosts 192.168.2.101 and 192.168.2.102, set the following: • Default: Read-only Managing User Access ReadyNAS Pro Pioneer Edition User Guide v1.0, December 2008...
- Page 62 Windows Explorer address bar. Figure 3-13 Recycle Bin. The ReadyNAS Pro Pioneer Edition can have a Recycle Bin for each share for Windows users. The Enable Recycle Bin option is shown at the bottom of the CIFS screen. When this check box is selected, whenever you delete a file, the file gets inserted into the Recycle Bin folder in the share rather than being permanently deleted.
- Page 63 ReadyNAS Pro Pioneer Edition User Guide Figure 3-14 You can specify how long to keep the files in the Recycle Bin and how large the Recycle Bin can get before files get permanently erased. Advanced CIFS Permission. The Advanced CIFS Permission section offers options for setting the default permission of new files and folders created through CIFS.
-
Page 64: Web Browser
ReadyNAS Pro Pioneer Edition User Guide Figure 3-16 Advanced Share Permission. The Advanced Share Permission section offers the options to override the default ownership and permission of the share folder on the embedded file system and to permeate these settings to all files and folders residing on the selected share. The Set ownership and permission for existing files and folders option performs a one-time change. - Page 65 Files not created from this file manager can be modified within the file manager but cannot be deleted here. If the Share is also writable, the file manager displays options for creating, modifying, and deleting files, as follows. Managing User Access ReadyNAS Pro Pioneer Edition User Guide v1.0, December 2008 3-13...
-
Page 66: Ftp/Ftps
ReadyNAS Pro Pioneer Edition User Guide Figure 3-20 One useful application for a Web share is to set up an internal company website. You can copy HTML files to the Web share using Windows, Mac, NFS, or HTTP. When you set HTTP access to read-only, html files, including index.htm and index.html, can be viewed using any web browser. -
Page 67: Rsync
To do the same except with a login user and password hello, enter: # rsync -a user@<ipaddr>::backup /tmp Password: ***** Note: The ReadyNAS does not support Rsync over SSH. Managing User Access ReadyNAS Pro Pioneer Edition User Guide v1.0, December 2008 3-15... -
Page 68: Networked Dvd Players And Upnp Av Media Adapters
ReadyNAS Pro Pioneer Edition User Guide Networked DVD Players and UPnP AV Media Adapters Networked DVD players and UPnP AV Media adapters detect the ReadyNAS if either the Home Media Streaming Server or the UPnP AV services are enabled. The content of the Streaming Services media share on the ReadyNAS is available to these players for playback. -
Page 69: Remote Ftp Access
FTP user will consume a passive port. • Masquerade as: This field is for adjusting the hostname that the FTP server reports to an FTP client. Managing User Access ReadyNAS Pro Pioneer Edition User Guide v1.0, December 2008 3-17... -
Page 70: Remote Http Access
ReadyNAS Pro Pioneer Edition User Guide 2. Configure the FTP share access options. Figure 3-25 Change the Share Access Restrictions to allow FTP access to the share according to the user permissions you require. Remote HTTP Access 1. Go to Services > Standard File Protocols and enable FTP. - Page 71 ReadyNAS via a persistent fully qualified domain name a DDNS service provides rather than via an IP address. 2. Configure the HTTP/S share access options. Figure 3-27 Managing User Access ReadyNAS Pro Pioneer Edition User Guide v1.0, December 2008 3-19...
- Page 72 ReadyNAS Pro Pioneer Edition User Guide Change the Share Access Restrictions to allow HTTP access to the share according to the user permissions you require. 3. Enable WebDAV support: WebDAV is an HTTP connection method that can allow drag and drop file transfers similar to what users may experience with their standard Windows or Mac OSX computer.
-
Page 73: Securing Your Data
With the flexibility to support incremental backups over CIFS/SMB, NFS, and rsync protocols, and full backups over FTP and HTTP protocols, the ReadyNAS Pro Pioneer Edition can act as a simple central repository for both home and office environments. And with multiple ReadyNAS Pro Pioneer Edition systems, you can set up one ReadyNAS Pro Pioneer Edition to back up another directly. - Page 74 Once you have selected a backup source, you can enter the path from that source. If you selected a ReadyNAS Pro Pioneer Edition share, you can either leave the path blank to backup the entire share, or enter a folder path. Note that you should use forward slashes (/), in place of back slashes (\).
- Page 75 The Step 2 process is almost identical to Step 1 except that you are now specifying the backup destination. If you selected a remote backup source, you need to select a public or a private home share on the ReadyNAS Pro Pioneer Edition (either the source or destination must be local to the Securing Your Data ReadyNAS Pro Pioneer Edition User Guide v1.0, December 2008...
- Page 76 ReadyNAS Pro Pioneer Edition User Guide ReadyNAS Pro Pioneer Edition). If you selected a ReadyNAS Pro Pioneer Edition share for the source, you can either enter another local ReadyNAS Pro Pioneer Edition share for the destination, or you can specify a remote backup destination.
- Page 77 3. Remove files from backup destination. Select if you want to erase the destination path contents before the backup is performed. Be careful not to reverse your backup source and Securing Your Data ReadyNAS Pro Pioneer Edition User Guide v1.0, December 2008...
-
Page 78: Viewing The Backup Schedule
ReadyNAS Pro Pioneer Edition User Guide destination as doing so can delete your source files for good. It is safer to not select this option unless your device is running low on space. Do experiment with a test share to make sure you understand this option. -
Page 79: Programming The Backup Button
Simply select the backup jobs in the order that you want them run and click Apply. Pressing the Backup Button once starts the job(s). Securing Your Data ReadyNAS Pro Pioneer Edition User Guide page 1-4) to execute one or more pre- v1.0, December 2008... -
Page 80: Viewing The Backup Log
The following sections describe how to back up and remove disks from the ReadyNAS systems. On the ReadyNAS Pro Pioneer Edition, the Backup button is associated with the USB Port at the front of the system. By default, the Backup button copies the data from the Backup share onto the USB disk connected to the USB port at the front of the device. - Page 81 ReadyNAS Pro Pioneer Edition User Guide Securing Your Data v1.0, December 2008...
- Page 82 ReadyNAS Pro Pioneer Edition User Guide 4-10 Securing Your Data v1.0, December 2008...
-
Page 83: Optimizing Performance
• NETGEAR recommends that you select the Disable journaling only if the NAS has UPS protection. Without battery backup, there is a small chance that parity written to a disk in a RAID set might become out of sync with the data disks if a power failure suddenly occurs, possibly causing incorrect data to be recovered if one disk fails. -
Page 84: Adding A Ups To Protect Against Power Failures
The Optimize for OS X option provides the best performance in Mac OS X environments when connected to the ReadyNAS Pro Pioneer Edition through the SMB/CIFS protocol. This option, however, introduces compatibility issues with Windows NT 4.0; do not enable this option if this device will be accessed by Windows NT 4.0 clients. -
Page 85: Power Management
Power Management The ReadyNAS Pro Pioneer Edition offers disk spin-down, power timer (time off/time on), UPS event, and wake-on-LAN power management options to reduce system power consumption, both while the system is in use and when it is not in use. -
Page 86: Power Timer
ReadyNAS Pro Pioneer Edition User Guide Power Timer The ReadyNAS Pro Pioneer Edition can be scheduled to power off and power back on (on certain models) automatically (see Figure action and time. (The Power ON option is available on the ReadyNAS Pro Pioneer Edition NV through an add-on package.) -
Page 87: Managing Levels Of Service
This chapter presents system status, alerts, replacing failed disks, and scheduling topics. • “Viewing System Status • “Replacing a Failed Disk • “Using the System Diagnostic Menu Viewing System Status The Status menu contains links to the Health screen and Logs screen that provide system status information. -
Page 88: Logs
ReadyNAS Pro Pioneer Edition User Guide Figure 6-2 To recalibrate the fan, click Recalibrate. Logs Select Status > Logs to access the Clear Logs screen. The Clear Logs screen provides information about the status of management tasks, including a timestamp. -
Page 89: Replacing A Failed Disk
Replacing a Failed Disk Note: Be sure to check the Hardware Compatibility list on the NETGEAR support site for a list of disks that have been qualified for the ReadyNAS Pro to assure that you use a suitable disk. When a disk fails in your ReadyNAS device, you are notified of the failure by e-mail. The failed disk location can be seen in the FrontView status bar at the bottom by selecting Status >... - Page 90 ReadyNAS Pro Pioneer Edition User Guide 2. Press the button under the failed disk. The latch pops out. Figure 6-5 3. Pull out the disk tray and remove the screws. Figure 6-6 v1.0, December 2008 Managing Levels of Service...
-
Page 91: Resynchronizing The Volume
Using the System Diagnostic Menu The recessed reset switch on the back of the unit (see the illustration allows you to perform six functions: Managing Levels of Service ReadyNAS Pro Pioneer Edition User Guide v1.0, December 2008 “Rear Panel” on page 1-6) -
Page 92: Use The Os Reinstall Option To Re-Install The Firmware
ReadyNAS Pro Pioneer Edition User Guide 1. Normal: Bypass the diagnostic menu and perform a normal boot. 2. Factory Default: Reset the ReadyNAS back to factory default state, erasing all data on the disks. This option can be used to change between X-RAID2 and Flex-RAID mode. -
Page 93: Configuring Raid
6. Select either the Expandable Volume (X-RAID2) or the Volume (RAID 0,1,5, 6) radio button and click Create Volume Now. The volume and initialization process begins. Warning: If no action is taken within 10 minutes, the system defaults to X-RAID2. Managing Levels of Service ReadyNAS Pro Pioneer Edition User Guide v1.0, December 2008... -
Page 94: Shutdown
Figure 6-8 When you reboot or shut down the ReadyNAS Pro Pioneer Edition, you must close the browser window and use RAIDar to reconnect to FrontView. -
Page 95: Share Access From Mac And Linux Systems
ReadyNAS Pro Pioneer Edition User Guide Appendix A Share Access from MAC and Linux Systems This appendix presents examples of how shares on the ReadyNAS device can be accessed by the various MAC operating systems. MAC OS X To access the same share over AFP with OS X, select Network from the Finder Go > Network menu. -
Page 96: Afp Over Bonjour
ReadyNAS Pro Pioneer Edition User Guide AFP over Bonjour To access the AFP share advertised over Bonjour on Mac OS X, select Network from the Finder Go menu to see a listing of available networks. Figure A-2 Open the My Network folder to display the ReadyNAS hostname. -
Page 97: Afp Over Appletalk
ReadyNAS Pro Pioneer Edition User Guide Figure A-4 From the Volumes field, select the share you want to access and click OK. AFP over AppleTalk If you chose to advertise your AFP service over AppleTalk, a listing of available networks is displayed. - Page 98 ReadyNAS Pro Pioneer Edition User Guide Figure A-6 Select Guest and click Connect. Then, select the share you want to connect to and click OK. Figure A-7 If you have not set up a user name, enter the share name in place of the user name.
-
Page 99: Mac
ReadyNAS Pro Pioneer Edition User Guide MAC OS 9 To access the same share under Mac OS 9, select Connect to Server from the Finder menu, choose the NAS device entry from the AppleTalk section, and click Connect. Figure A-8 Enter a valid user account and password, and click Connect. - Page 100 ReadyNAS Pro Pioneer Edition User Guide Figure A-10 You should see the same files in the share that you do in Windows Explorer. Figure A-11 Share Access from MAC and Linux Systems v1.0, December 2008...
-
Page 101: Accessing Shares From Linux/Unix
Linux/Unix login settings. Refer to Appendix A, “Share Access from MAC and Linux Systems shares from various versions of the MAC OS. Share Access from MAC and Linux Systems ReadyNAS Pro Pioneer Edition User Guide for instructions on accessing v1.0, December 2008... - Page 102 ReadyNAS Pro Pioneer Edition User Guide Share Access from MAC and Linux Systems v1.0, December 2008...
-
Page 103: Appendix B Related Documents
This appendix provides links to reference documents you can use to gain a more complete understanding of the technologies used in your NETGEAR product. Document Internet Networking and TCP/IP Addressing: Wireless Communications: Preparing a Computer for Network Access: Virtual Private Networking... - Page 104 ReadyNAS Pro Pioneer Edition User Guide Related Documents v1.0, December 2008...
- Page 105 Numerics 1100 backup USB 4-8 accessing shares Linux/Unix A-7 MAC OS X A-1 over MAC OS 9 A-5 Web browser 3-12 account preferernces settings 3-6 Adding a Volume Flex-RAID 2-15 admin user password, setting of 2-6 Advanced Options 3-11 AFP 2-9 over AppleTalk A-3 over Bonjour A-2 share A-1...
- Page 106 ReadyNAS Pro Pioneer Edition User Guide discovery services Bonjour 2-11 Disk Spin-Down 5-3 DLNA 2-10 DNS Settings 2-4 DVD Players networked 3-16 Enable WebDAV support 3-20 EXT3 2-19 Factory Default Settings 2-28 failed disk ordering replacement disks 6-3 replacing on NV+ 6-3...
- Page 107 CIFS/SMB 2-20 IPP 2-21 RAID setup, reconfiguring 6-7 RAID Level X-RAID 2-13 RAID Level 0 2-12 ReadyNAS Pro Pioneer Edition User Guide RAID Level 1 2-12 RAID Level 5 2-12 RAID Settings 2-15 ReadyNAS health 6-1 updating 2-25 viewing Logs 6-2...
- Page 108 ReadyNAS Pro Pioneer Edition User Guide 1100 backup 4-8 Unicode 2-25 HTTP 2-25 WebDAV 2-25 updating remote method 2-26 updating ReadyNAS 2-25 UPnP 2-11 UPnP AV 2-10 UPnP AV Media Adapters networked 3-16 configuration of 5-4 performance, adding 5-2 USB 2-19...