Honeywell RTH8500 User Manual
Wi-fi touchscreen
Hide thumbs
Also See for RTH8500:
- Installation manual (65 pages) ,
- Quick installation manual (60 pages) ,
- User manual (60 pages)
Table of Contents
Advertisement
Available languages
Available languages
Advertisement
Chapters
Table of Contents

Related Manuals for Honeywell RTH8500


Summary of Contents for Honeywell RTH8500
-
Page 1: User Guide
User Guide Wi-Fi Touchscreen Programmable Thermostat RTH8500 Wi-Fi Series... -
Page 2: In The Box
In the box you will find • Thermostat • Wallplate (attached to thermostat) • Screws and anchors • Coin cell battery (inside the back of the thermostat) • Quick Start Guide • Thermostat ID Card • Wire labels • User Guide 69-2715EF—07... - Page 3 Honeywell’s Total Connect Comfort is the perfect solution if you travel frequently, own a vacation home, a business or manage an Investment property or if you are simply looking...
- Page 4 This thermostat works with common 24 volt systems such as forced air, hydronic, heat pump, oil, gas, and electric. It will not work with millivolt systems, such as a gas fireplace, or with 120/240 volt systems such as baseboard electric heat. This thermostat contains a Lithium battery which may contain Perchlorate material.
-
Page 5: Table Of Contents
Table of contents About your new thermostat Setting filter reminder intervals ....43 Cleaning the screen ........44 Home screen quick reference ..... 5 Unregistering thermostat......45 Preset energy-saving schedules ....6 Disconnecting Wi-Fi ........46 Installation Special features ........48 Setting functions and options .... - Page 6 Features of your Wi-Fi thermostat With your new thermostat, you can: • Connect to the Internet to monitor and control your heating/cooling system • View and change your heating/cooling system settings • View and set temperature and schedules • Receive alerts via email and get automatic upgrades Your new thermostat provides: • Smart Response Technology • Compressor protection...
-
Page 7: Home Screen Quick Reference
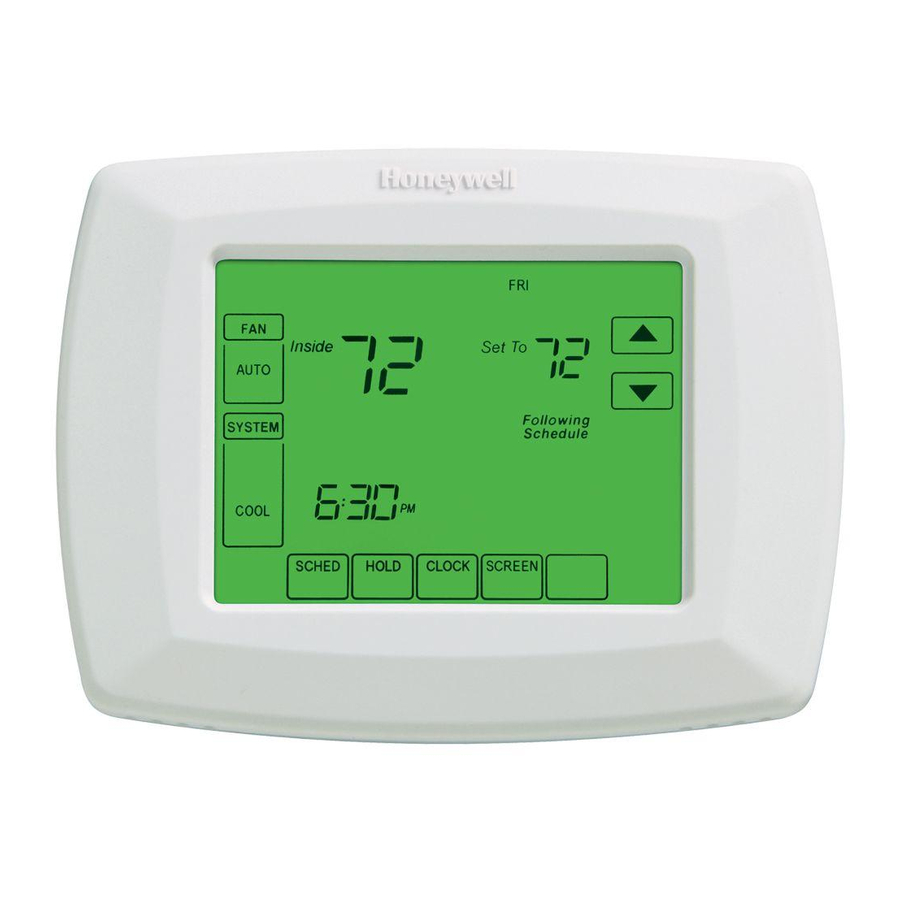
Home screen quick reference Once your Wi-Fi thermostat is installed, it will display the home screen. Portions of this display will change depending on how you are viewing it. To change settings, simply press the appropriate area lightly with your finger. Message center Wi-Fi status Inside... -
Page 8: Preset Energy-Saving Schedules
Preset energy-saving schedules This thermostat is pre-set with energy-saving program settings for four time periods. Using the default settings can reduce your heating/cooling expenses if used as directed. Savings may vary depending on geographic region and usage. Default Heat Settings Default Cool Settings WAKE °... -
Page 9: Installation
Setting up your thermostat Setting up your Wi-Fi programmable touchscreen thermostat is easy. It is preprogrammed and ready to go as soon as it is installed and registered. Install your thermostat. Connect it to your home wireless network. Register online for remote access. Before you begin, you may want to watch a brief installation video. -
Page 10: Installing Your Thermostat
Installing your thermostat You might need the following tools to install this thermostat: • No. 2 Phillips screwdriver • Drill and bits (3/16” for drywall, 7/32” for plaster) (optional) • Small pocket screwdriver • Hammer (optional) • Pencil • Electrical tape (optional) • Level (optional) 1 Switch OFF power to your heating/cooling system. - Page 11 Installing your thermostat 2 Remove old thermostat faceplate If you have an older thermostat with a and leave wires connected. sealed mercury tube, turn to page 2 for proper disposal instructions. 2a Take a picture of the wire connections for later reference. 2b If no wire is connected to a terminal labeled C or no C terminal exists on the old...
- Page 12 Installing your thermostat 3 Label wires. Do not label by wire color. the supplied sticky tags to label Sticky tag each wire as you disconnect it. Label wires according to the old thermostat terminal designations, not by wire color. Blank tags Note: If no tag matches a terminal designation, write the...
- Page 13 Installing your thermostat 5 Separate Wi-Fi thermostat and its Finger holds wallplate. Thermostat On your new thermostat, grasp the finger holds on the top and bottom of the wallplate with one hand and the thermostat (front) with the other hand. Pull pieces apart.
- Page 14 Installing your thermostat 6 Mount wallplate for Wi-Fi thermostat. Mount your new wallplate using screws and anchors included with the Wallplate thermostat. If necessary: Drill 3/16-in holes for drywall. HEAT PUMP CONVENTIONAL Drill 7/32-in holes for plaster. M31543 E/AUX Note: You may be able to use your existing wall anchors.
- Page 15 Installing your thermostat Important! The Wi-Fi thermostat requires a C wire to operate. The C, or common, wire brings 24 VAC power to the thermostat. Many older mechanical or battery operated thermostats do not require a C wire. If you don’t have a C wire, try: • Looking for an unused wire that is pushed into the wall.
- Page 16 Installing your thermostat Wiring (conventional system) Remove metal jumper only if you have both 7A Wire the Wi-Fi thermostat to your conventional system. R and RC wires a Starting with the C Wire, match the sticky tag on the wire to the terminal labels. HEAT PUMP You must have a C wire.
- Page 17 Installing your thermostat Wiring (heat pump system only) Labels don’t match? See alternate wiring key on pages 18–19. 7B Wire Wi-Fi thermostat to your heat pump. a Starting with the C Wire, match the sticky tag on the wire to the terminal labels. You must have a C wire.
- Page 18 Installing your thermostat Alternate wiring (conventional system) Use this if your wire labels don’t match the terminal labels. CONVENTIONAL Note: You must have Metal Jumper a C wire or equivalent. See page 13. See key to – on page 17. 69-2715EF—07...
- Page 19 Installing your thermostat Alternate wiring key (conventional system) Remove metal jumper connecting R and RC only if you must connect both R and RC. If your old thermostat had both R and RH wires, remove metal jumper. Connect the R wire to the RC terminal, and the RH wire to the R terminal. Do not use K terminal.
- Page 20 Installing your thermostat Alternate wiring (heat pump system only) Use this if your wire labels don’t match the terminal labels. HEAT PUMP Metal Jumper Note: You must have a C wire or equivalent. See page 13. E/AUX MCR33530A See key to –...
- Page 21 Installing your thermostat Alternate wiring key (heat pump system only) Leave metal jumper between R and RC terminals in place. If your old thermostat had both V and VR wires, check wifithermostat.com for help. If your old thermostat had separate O and B wires, attach the B wire to the C terminal. If another wire is attached to the C terminal, check wifithermostat.com for help.
- Page 22 Installing your thermostat 8 Install battery. Insert the coin cell battery (included), observing the correct polarity. Note: A correctly inserted battery will extend about halfway out of the battery slot on the thermostat, allowing for easier removal. Thermostat interior This battery maintains time and M31542 date during power outages.
- Page 23 Installing your thermostat Wallplate 9 Attach thermostat to wallplate. Align the thermostat to the wallplate and then snap into place. HEAT PUMP CONVENTIONAL M31543 Thermostat 69-2715EF—07...
- Page 24 Installing your thermostat 10 Switch heating/cooling system ON. Important! 10a Verify that the C wire is connected at the thermostat and at the heating/cooling system. 10b Make sure the heating/ cooling system door is firmly secured. 10c Switch power back ON for Circuit Heating/cooling your heating/cooling system...
- Page 25 Installing your thermostat 11 Set date and time. Year Touch buttons to change displayed time and date. Press and hold a button to quickly change a setting. Note:This thermostat will Month automatically update for daylight saving time (if observed in your area) and all date/time information is stored.
- Page 26 Installing your thermostat 12 Determine your heating/cooling system type. Important! Heating/cooling system type must be set so that your thermostat operates properly and does not damage your system. 12a If you have a traditional system (natural gas forced air with A/C), your hermostat is set up by default to control this system.
- Page 27 Installing your thermostat Congratulations! Your thermostat is operational. 13 Test your thermostat. Inside SYSTEM 13a Press the button to change to heating or cooling and begin operation. 13b For remote access to your thermostat, continue to “Connecting to your Wi-Fi network”...
-
Page 28: Connecting To Your Wi-Fi Network
Connecting to your Wi-Fi network To complete this process, you must have a wireless device connected to your home wireless network. Any of these device types will work: • Tablet (recommended) • Laptop (recommended) • Smartphone If you get stuck... at any point in this procedure, restart the thermostat by removing the thermostat from the wallplate, wait for 5 seconds, and snap it back onto the wallplate. - Page 29 Connecting to your Wi-Fi network 1 Connect to your thermostat. 1a Make sure the thermostat message center displays Wi-Fi SETUP. 1b On the wireless device (laptop, tablet, smartphone), view the list of available Wi-Fi networks Inside 1c Connect to the network called NewThermostat_123456 (the number will vary).
- Page 30 Connecting to your Wi-Fi network 2 Join your home network. 2a Open your web browser to access the Thermostat Wi-Fi Setup page. The browser should automatically direct you to the correct page; if it does not, go to http://192.168.1.1 2b Find the name of your home network on this page and select it.
- Page 31 Connecting to your Wi-Fi network Note: If your Wi-Fi network does not appear in the list on the Thermostat Wi-Fi Setup page: • Try performing a network rescan by pressing the Rescan button. This is helpful in areas with a lot of networks. • If you are connecting to a hidden network, then enter the network SSID in the textbox, select the encryption type from the drop down menu, and click on the Add button.
- Page 32 Connecting to your Wi-Fi network 3 Make sure your thermostat is connected. The message center on your thermostat will now display CONNECTING… for up to 30 Inside seconds. Look at the thermostat display. Verify that the message center displays one of the following: MORE CONNECTION SUCCESSFUL JOINED: [WI-FI NETWORK NAME]...
-
Page 33: Registering Your Thermostat Online
Registering your thermostat online To view and set your Wi-Fi thermostat remotely, you must have a Total Connect Comfort account. Use the following steps. 1 Open the Total Connect Comfort web site. Go to mytotalconnectcomfort.com View the Wi-Fi Thermostat Registration video at wifithermostat.com/videos 69-2715EF—07... - Page 34 Registering your thermostat online 2 Login or create an account. If you have an account, click Login – or – click Create An Account 2a Follow the instructions on the screen. Check your email for an activation message from My Total Connect Comfort. This may take several minutes.
- Page 35 • MAC ID Utilice la identificación MAC y la identificación CRC para inscribir este producto en mytotalconnectcomfort.com • MAC CRC ® U.S. Registered Trademark. © 2012 Honeywell International Inc. 69-2723EFS—01 M.S. 04-12 Note: These IDs are listed on the 69-2723EFS-01 Printed in U.S.A.
- Page 36 Registering your thermostat online 3b When the thermostat is successfully registered, the Total Connect Comfort registration screen will display a SUCCESS message. In the thermostat message center you will see: CONGRATULATIONS SETUP COMPLETE! 69-2715EF—07...
- Page 37 Registering your thermostat online Your thermostat will display wireless signal strength. You can now control your thermostat from anywhere through your laptop, tablet, or smartphone. Total Connect Comfort free app is available for Apple iPhone , iPad ® ® ® and iPod touch devices at iTunes ®...
-
Page 38: Setting The Clock
Setting the clock CLOCK 1 Press to display setting arrows. 2 Press to adjust the time. (You can advance the time more quickly by holding the MORE buttons.) DONE CANCEL 3 Press to save and exit (or press exit without changing the time). Note: This thermostat will automatically update for daylight saving time (if observed in your area) and... -
Page 39: Setting The Fan
Setting the fan 1 Press to select fan operation. again to select ON or AUTO (toggle 2 Press to re-select). The selected option blinks. Inside DONE 3 Press to save setting. Your selection appears under FAN. ON: Fan is always on. AUTO: Fan runs only when the heating or cooling system is on. -
Page 40: Selecting System Mode
Selecting system mode SYSTEM 1 Press to display options. SYSTEM 2 Press again to select an option. You may need to press two or three times to Inside make a selection—the selected option blinks. DONE 3 Press to save setting. Possible system modes: HEAT: Controls only the heating system. -
Page 41: Adjusting Program Schedules
Adjusting program schedules 1 Press SCHED, then EDIT. Screen displays day MORE buttons at top. 2 Press day buttons (MON–SUN) to select days. SLEEP 3 Press to set Wake time for selected day(s). 4 Press to set Heat and Cool temperature for this time period. -
Page 42: Overriding Schedules Temporarily
Overriding schedules temporarily 1 On the home screen, press immediately adjust the temperature. 2 Adjust the time to when you want the hold Inside to end (the default is the end of the current period). Temporary Hold The new setting will be maintained until the Hold Until time shown under Hold Until. -
Page 43: Overriding Schedules Permanently
Overriding schedules permanently HOLD 1 Press to permanently adjust the temperature. This will turn off the program schedule. Inside 2 Whatever temperature you set will be maintained 24 hours a day until you Permanent Hold CANCEL manually change it or press (or SCHED) to cancel “Hold”... -
Page 44: Setting Vacation Hold
Setting vacation hold Use this function to suspend the program schedule Inside while you are away for an extended period. 1 Press to set the temperature. Hold Until 2 Press to set the time of day you want the schedule to resume on the day you return. MORE HOLD 3 Press... -
Page 45: Setting Filter Reminder Intervals
Setting filter reminder intervals If activated during installation, the filter reminder Inside alerts you with a message above the time when it is time to replace your filter. RESET RESET Press after changing the filter, to restart the timer. CHANGE FILTER To change the reminder interval: MORE 1 Press MORE, then EDIT. -
Page 46: Cleaning The Screen
Cleaning the screen SCREEN 1 Press to lock the screen for cleaning. The screen will remain locked for 30 seconds so you can clean the screen without changing MORE any settings. DONE 2 After 30 seconds, press to resume SCREEN normal operation, or press again if you require more time for cleaning. -
Page 47: Unregistering Thermostat
Unregistering thermostat If you remove the thermostat from your Total Connect Comfort website account (for example, you’re moving and leaving the thermostat behind), the message center Inside will scroll UNREGISTERED FROM TOTAL CONNECT for 3 minutes. After that, it will alternate displaying MORE REGISTER AT TOTAL CONNECT, the MAC ID and the MAC CRC. -
Page 48: Disconnecting Wi-Fi
Disconnecting Wi-Fi Replacing your router If you disconnect the thermostat from your Wi-Fi network: Inside 1 Enter system setup (see page 51). 2 Change setting 900 to 0 (see page 58). The Message Center will display Wi-Fi MORE DISCONNECTED for 1 minute. After that it will display Wi-Fi SETUP. -
Page 49: Software Updates
Software updates Honeywell periodically issues updates to the software for this thermostat. The updates occur automatically through your Wi-Fi connection. All your settings are saved, so you will not need to make any changes after the update occurs. While the update is taking place, your thermostat screen goes blank and the message center shows UPDATING and the percentage of the update that has occurred. -
Page 50: Smart Response Technology
Smart Response Technology This feature allows the thermostat to “learn” how long the heating/cooling system takes to reach programmed temperature settings, so the temperature is reached at the time you set. For example: Set the Wake time to 6:00 am, and the temperature to 70°. -
Page 51: Compressor Protection
Compressor protection This feature forces the compressor to wait a few minutes before restarting, to prevent equipment damage. During the wait time, the message “Wait” is displayed on screen. 69-2715EF—07... -
Page 52: Auto Changeover
Auto changeover This feature is used in climates where both air conditioning and heating are used on the same day. When the system is set to AUTO, the thermostat automatically selects heating or cooling depending on the indoor temperature. Heat and cool settings must be at least 3 degrees apart. -
Page 53: Setting Functions And Options
Setting functions and options You can change options for a number of system functions. Available functions depend on the type of system you have. The functions, designated with four-digit numbers, along with available options are described on pages 52–58. This thermostat is pre-set for a single-stage heating/cooling system. Setting function 0170 for a heat pump will adjust the default settings. -
Page 54: System Setup
System setup How do I set my thermostat name? (See page 51 for instructions.) Function Settings & Options 0112 Device Name = Thermostat Basement Exercise Room Library Porch This name will Bathroom Family Room Living Room Rec Room identify the Bathroom 1 Fireplace Lower Level... - Page 55 System setup How do I change time and date settings? (See page 51 for instructions.) Function Settings & Options 0120 Year Setting = Year 20xx (first two digits) = Year 21xx 0130 Year Setting 01–99 (i.e., 2001–2099) (last two digits) 0140 Month Setting 01–12...
-
Page 56: System Setup
System setup How do I set my heating/cooling system type? (See page 51 for instructions.) Function Settings & Options Heat/cool: Gas, oil or electric heating with central air conditioning. 0170 Select System Heat pump: Heat pump without backup or auxiliary heat. Type Heat only with fan: Gas, oil or electric heat without central air If you are not sure of... - Page 57 System setup How do I customize my heating/cooling system? (See page 51 for instructions.) Function Settings & Options Note: Depending on system settings, functions on this page might not appear. Gas or oil heat: Use this setting if you have a gas or oil heating system 0180 Heating Fan (system controls fan operation).
- Page 58 System setup What other functions can I change? (See page 51 for instructions.) Function Settings & Options Backlight off, then on for approximately 8 seconds after keypress. 0280 Backlight Backlight always on low intensity, full bright after keypress. 0300 Manual changeover (Heat/Cool/Off). Manual/Auto Automatic changeover (Heat/Cool/Auto/Off).
- Page 59 System setup What other functions can I change? (See page 51 for instructions.) Function Settings & Options Off (no reminder) 0500 Filter Change Reminder after 10-day run time (about 1 calendar month) Reminder Reminder after 30-day run time (about 3 calendar months) The reminder Reminder after 60-day run time (about 6 calendar months) appears after...
- Page 60 System setup How do I change my Wi-Fi settings? (See page 51 for instructions.) Function Settings & Options 0710 Restore Original Disconnects thermostat from Wi-Fi and restores original settings (erases Settings customizations). Wi-Fi is on and can be connected to a Wi-Fi network. 0890 Wi-Fi On/Off Wi-Fi is off.
-
Page 61: Frequently Asked Questions
Frequently asked questions Q Will my thermostat still work if I lose my Wi-Fi connection? : A Yes, the thermostat will operate your heating and/or cooling system with or without Wi-Fi. Q How do I find the password to my router? : A Contact the manufacturer of the router or check the router documentation. - Page 62 Frequently asked questions Q Where can I find my MAC ID and MAC CRC codes? : A The MAC ID and MAC CRC will show in the message center of the thermostat. The numbers are also included on a card packed with the thermostat or on the back of the thermostat (visible when removed from wallplate).
- Page 63 Frequently asked questions Q I registered on the Total Connect Comfort website but was unable to login using my new account. : A Check your email and ensure that you received an activation email. Follow the instructions to activate your account and then login to the website. Q I have signed up on Total Connect Comfort website and have not received a confirmation email.
-
Page 64: Message Center Messages
Message center messages The Message Center at the top of the screen communicates Wi-Fi connection and registration status. It also displays the MAC ID and MAC CRC for registering the thermostat at mytotalconnectcomfort.com Displayed before you begin Wi-Fi setup. Displayed while connecting to the Wi-Fi network. Displayed after connecting to the Wi-Fi network. - Page 65 Message center messages Displayed when the thermostat is registered at mytotalconnectcomfort.com Displayed when the thermostat is removed from your Total Connect Comfort account. Wi-Fi signal strength. Displayed when the thermostat is connected to the Wi-Fi network and registered at mytotalconnectcomfort.com Displayed if there is no Wi-Fi signal.
- Page 66 Message center messages Displayed if the home Wi-Fi password is entered incorrectly. • Re-enter password for your home Wi-Fi network. • Repeat setup process and confirm your password for your home Wi-Fi network. Displayed if no IP Address is supplied by the router. • Wait for 30 minutes, connection can take several minutes. If still no connection, remove thermostat from wallplate, wait 5 seconds, and snap it back onto the wallplate. • Verify your router is correctly setup to automatically give IP addresses.
-
Page 67: Troubleshooting
Troubleshooting If you have difficulty with your thermostat, please try the following suggestions. Most problems can be corrected quickly and easily. Display is • Check circuit breaker and reset if necessary. • Make sure power switch at heating and cooling system is on. blank • Make sure furnace door is closed securely. • Make sure C wire is connected (see page 13). Cannot change • Check Function 0170: System Type to make sure it is set to match your heating and cooling equipment (see page 54). - Page 68 Troubleshooting Heat pump • Check Function 0190: Heat Pump Changeover Valve to make sure it is properly configured for your system (see page 55). issues cool air in heat mode, or warm air in cool mode Button on • This button will remain blank unless the furnace filter change reminder is activated (see page 43). lower right of screen is blank Red light is on...
- Page 69 Troubleshooting Heating or • Press SYSTEM to set system to Heat. Make sure the temperature is set cooling system higher than the Inside temperature. • Press SYSTEM to set system to Cool. Make sure the temperature is set lower does not than the Inside temperature. respond • Check circuit breaker and reset if necessary.
- Page 70 Glossary C wire The “C” or common wire brings 24 VAC power to the thermostat from the heating/cooling system. Some older mechanical or battery operated thermostats may not have this wire connection. It is necessary for establishing a Wi-Fi connection to your home network. Heat Pump heating/cooling system Heat pumps are used to heat and cool a home.
-
Page 71: Regulatory Information
Regulatory information FCC Compliance Statement (Part 15.19) (USA only) instructions, may cause harmful interference to radio This device complies with Part 15 of the FCC Rules. communications. However, there is no guarantee that Operation is subject to the following two conditions: interference will not occur in a particular installation. - Page 72 Regulatory information Thermostats Section 7.1.3 of RSS-GEN To comply with FCC and Industry Canada RF exposure Operation is subject to the following two conditions: limits for general population/ uncontrolled exposure, the 1 this device may not cause interference, and antenna(s) used for these transmitters must be installed 2 this device must accept any interference, including to provide a separation distance of at least 20 cm from interference that may cause undesired operation of the...
-
Page 73: Limited Warranty
This warranty does not cover removal or reinstallation costs. This warranty shall not apply if it is shown by Honeywell that the defect or malfunction was caused by damage which occurred while the product was in the possession of a consumer. - Page 74 J2X 5K8 wifithermostat.com ® U.S. Registered Trademark. Apple, iPhone, iPad, iPod touch and iTunes are trademarks of Apple Inc. All other trademarks are the property of their respective owners. © 2013 Honeywell International Inc. 69-2715EF—07 M.S. Rev. 11-13 Printed in U.S.A.
- Page 75 Guide de l’utilisateur Thermostat programmable à écran tactile Wi-Fi Série RTH8500WF Wi-Fi...
- Page 76 Vous trouverez dans la boîte • Thermostat • Plaque murale (fixée au thermostat) • Vis et ancres • Pile bouton (à l’intérieur de l’arrière du thermostat) • Guide de démarrage rapide • Carte d’identification de thermostat • Étiquettes de fils • Guide de l’utilisateur 69-2715EF—07...
- Page 77 — vous pouvez rester connecté à votre service confort où que vous soyez. Le Total Connect Comfort de Honeywell est la solution parfaite si vous voyagez fréquemment, possédez une maison de vacances ou une entreprise ou gérez un immeuble de placement, ou si tout simplement vous recherchez la tranquillité...
- Page 78 Ce thermostat fonctionne sur les systèmes de 24 V commun tels que les systèmes à air pulsé, eau chaude, thermopompe, mazout, gaz et électriques. Il ne fonctionne pas avec les systèmes à mV, tels que les cheminées à gaz, ou avec les systèmes de 120/240 V tels que les chauffages de plinthe.
- Page 79 Table des matières À propos du nouveau thermostat Dérogation permanente de la programmation ....... 41 Référence rapide de l’écran d’accueil ..5 Réglage du maintien Programmes d’économie pendant les vacances ......42 d’énergie préconfigurés ......6 Réglage des intervalles Installation de rappel de filtre ........
- Page 80 Caractéristiques de votre thermostat Wi-Fi Avec votre nouveau thermostat, vous pouvez : • Vous connecter à Internet pour surveiller et contrôler votre système de chauffage/refroidissement • Consulter et modifier vos réglages du système de chauffage/refroidissement • Consulter et régler la température et les programmes • Recevoir des alertes par courrier électronique et obtenir des mises à...
-
Page 81: Référence Rapide De L'écran D'accueil
Référence rapide de l’écran d’accueil Une fois votre thermostat Wi-Fi installé, il affichera l’écran d’accueil. Des parties de cet écran seront modifiées en fonction de la manière dont vous le consultez. Pour modifier des réglages, appuyez simplement légèrement sur la zone appropriée avec le doigt. Fenêtre de messages Statut Wi-Fi Inside... -
Page 82: Programmes D'économie D'énergie Préconfigurés
Programmes d’économie d’énergie préconfigurés Ce thermostat contient des programmes d’économie d’énergie préconfigurés pour quatre périodes. L’utilisation des réglages par défaut peut vous permettre de réduire vos dépenses de chauffage/refroidissement si vous suivez les instructions indiquées. Les économies peuvent varier en fonction de la région géographique et de l’usage. Réglages de chauffage Réglages de par défaut... - Page 83 Configuration de votre thermostat La configuration de votre thermostat programmable à écran tactile Wi-Fi est aisée. Il est préprogrammé et prêt à fonctionner dès qu’il est installé et enregistré. Installez votre thermostat. Connectez-le au réseau sans fil de votre domicile. Enregistrez-vous en ligne pour bénéficier de l’accès à...
-
Page 84: Installation De Votre Thermostat
Installation de votre thermostat Vous aurez besoin des outils suivants pour l’installation de ce thermostat : • un tournevis Phillips n° 2 • un marteau (optionnel) • un petit tournevis de poche • un ruban électrique (optionnel) • un crayon • un niveau (optionnel) • une perceuse et des mèches (3/16 po pour une cloison sèche, 7/32 po pour... - Page 85 Installation de votre thermostat 2 Retirez la plaque de l’ancien Si vous possédez un thermostat plus thermostat et laissez les fils ancien à tube de mercure scellé, allez à connectés. la page 2 pour les instructions de mise au rebut correctes. 2a Prenez une photo des connexions de câblage pour vous y référer plus tard.
- Page 86 Installation de votre thermostat 3 Étiquetez les fils. N’appliquez pas les étiquettes en fonction des couleurs des fils. Utilisez Étiquette les étiquettes autocollantes fournies autocollante pour étiqueter chaque fil lorsque vous le déconnectez. Étiquetez les fils conformément aux désignations de Étiquettes bornes de l’ancien thermostat et non vierges...
- Page 87 Installation de votre thermostat 5 Séparez le thermostat Wi-Fi de sa Alvéoles plaque murale. Thermostat Sur votre nouveau thermostat, saisissez les alvéoles du haut et du bas de la plaque murale d’une main et tenez le thermostat (avant) dans l’autre main.
- Page 88 Installation de votre thermostat 6 Montez la plaque murale du thermostat Wi-Fi. Montez votre nouvelle plaque murale à Plaque murale l’aide des vis et ancres fournies avec le thermostat. Au besoin : HEAT PUMP CONVENTIONAL Percez des trous de 3/16 po (4,8 mm) pour les cloisons sèches.
- Page 89 Installation de votre thermostat Important! le fonctionnement du thermostat Wi-Fi requiert l’utilisation d’un fil neutre (C). Le fil C, ou neutre, amène l’alimentation 24 V ca au thermostat. De nombreux thermostats mécaniques ou à piles plus anciens n’ont pas besoin d’un fil C. Si vous ne disposez pas d’un fil C, essayez : • de rechercher un fil inutilisé...
- Page 90 Installation de votre thermostat Câblage (système conventionnel) Retirez le cavalier métallique si les fils R 7A Branchez le thermostat Wi-Fi sur votre système et RC sont tous deux conventionnel. présents. a En commençant par le fil C, faites correspondre l’étiquette autocollante sur le fil à...
- Page 91 Installation de votre thermostat Câblage (système à thermopompe uniquement) Les étiquettes ne correspondent 7B Branchez le thermostat Wi-Fi à votre thermopompe. pas? Reportez-vous a En commençant par le fil C, faites correspondre l’étiquette au code de câblage autocollante sur le fil à l’étiquette de la borne. alternatif des pages Vous devez disposer d’un fil neutre (C).
- Page 92 Installation de votre thermostat Câblage alternatif (système conventionnel) Utilisez ceci si vos étiquettes de fils ne correspondent pas aux références de bornes. CONVENTIONNEL Cavalier Remarque : vous devez métallique disposer d’un fil C (neutre) ou équivalent. Voir page 13. MFCR33528 Reportez-vous aux points à...
- Page 93 Installation de votre thermostat Câblage alternatif (système conventionnel) Retirez le cavalier métallique reliant R et RC uniquement si vous devez connecter à la fois R et RC. Si votre ancien thermostat est pourvu de deux fils R et RH, retirez le cavalier métallique. Connectez le fil R à...
- Page 94 Installation de votre thermostat Câblage alternatif (système à thermopompe uniquement) Utilisez ceci si vos étiquettes de fils ne correspondent pas aux références de bornes. THERMOPOMPE Cavalier Remarque : vous devez métallique disposer d’un fil C (neutre) ou équivalent. Voir page 13. E/AUX MFCR33530A Reportez-vous aux points...
- Page 95 Installation de votre thermostat Code de câblage alternatif (système à thermopompe uniquement) Laissez le cavalier métallique reliant les bornes R et RC en place. Si votre ancien thermostat est pourvu de deux fils V et VR, consultez le site wifithermostat.com pour obtenir de l’aide.
- Page 96 Installation de votre thermostat 8 Installez la pile. Insérez la pile bouton (incluse), en respectant la polarité correcte. Remarque : Une pile bien insérée dépasse de moitié de la fente de la batterie sur le thermostat, permettant un retrait facile. Intérieur du thermostat Cette pile permet de conserver M31542...
- Page 97 Installation de votre thermostat Plaque murale 9 Fixez le thermostat à la plaque murale. Alignez le thermostat sur la plaque murale puis emboîtez-le. HEAT PUMP CONVENTIONAL M31543 Thermostat 69-2715EF—07...
- Page 98 Installation de votre thermostat 10 Mettez le système de chauffage/ refroidissement en marche. Important! 10a Vérifiez que le fil C est branché sur le thermostat et le système de chauffage/refroidissement. 10b Assurez-vous que la porte du système de chauffage/ refroidissement est bien fermée.
- Page 99 Installation de votre thermostat 11 Réglez la date et l’heure. Jour Année Touchez les boutons pour modifier l’heure et la date affichées. Appuyez sur un bouton et maintenez-le pour modifier rapidement un réglage. Mois Remarque : Ce thermostat se mettra à...
- Page 100 Installation de votre thermostat 12 Déterminez le type de votre système de chauffage/refroidissement. Important! Le type de système de chauffage/refroidissement doit être réglé de sorte que le thermostat fonctionne correctement et n’endommage pas le système. 12a Si vous avez un système traditionnel (gaz naturel air pulsé avec climatisation), votre thermostat est réglé...
- Page 101 Installation de votre thermostat Félicitations! Votre thermostat est maintenant prêt à fonctionner. 13 Testez votre thermostat. Inside SYSTEM 13a Appuyez sur le bouton pour passer au chauffage ou au refroidissement et mettre l’appareil en marche. MORE 13b Pour accéder à distance à votre thermostat, passez à...
-
Page 102: Connexion À Votre Réseau Wi-Fi
Connexion à votre réseau Wi-Fi Pour exécuter cette étape, vous devez avoir un appareil sans fil connecté à votre réseau sans fil. Tous ces types d’appareils sont valables : • Tablette (recommandé) • Ordinateur portatif (recommandé) • Téléphone intelligent Si vous êtes bloqué... à... - Page 103 Connexion à votre réseau Wi-Fi 1 Connectez votre thermostat. 1a Assurez-vous que le centre des messages du thermostat affiche Wi-Fi SETUP (Configuration Wi-Fi). 1b Sur votre appareil sans fil (ordinateur portatif, Inside tablette, téléphone intelligent), consultez la liste des réseaux sans fil disponibles 1c Connectez-vous au réseau appelé...
- Page 104 Connexion à votre réseau Wi-Fi 2 Joignez votre réseau domestique. 2a Ouvrez votre navigateur Web pour accéder à la page de configuration Wi-Fi du thermostat. Le navigateur devrait automatiquement vous diriger vers la page correcte; s’il ne le fait pas, entrez l’adresse http://192.168.1.1 2b Trouvez le nom de votre réseau domestique sur cette page et sélectionnez-le.
- Page 105 Connexion à votre réseau Wi-Fi Remarque : Si votre réseau Wi-Fi n’apparaît pas dans la liste de la page de configuration Wi-Fi du thermostat : • Essayez de scanner le réseau à nouveau en appuyant sur le bouton Rescan (nouveau balayage). Ceci est utile dans les endroits avec plusieurs réseaux. • Si vous êtes connecté...
- Page 106 Connexion à votre réseau Wi-Fi 3 Vérifiez si votre thermostat est connecté. Le centre des messages de votre thermostat affiche maintenant CONNECTING… (Connexion en cours) Inside pour 30 secondes maximum. Regardez l’écran du thermostat. Vérifiez que le centre des messages affiche l’un des messages MORE suivants : CONNECTION SUCCESSFUL (Connexion réussie)
-
Page 107: Enregistrement De Votre Thermostat En Ligne
Enregistrement de votre thermostat en ligne Pour visualiser et régler votre thermostat Wi-Fi à distance, vous devez posséder un compte Total Connect Comfort. Voici comment procéder. 1 Ouvrez le site web Total Connect Comfort. Allez sur le site www.mytotalconnectcomfort.com Visionnez la vidéo d’enregistrement du thermostat Wi-Fi à... - Page 108 Enregistrement de votre thermostat en ligne 2 Ouvrez une session ou créez un compte. Si vous possédez un compte, cliquez sur Login (Ouvrir une session) – ou – cliquez sur Create An Account (créer un compte) 2a Suivez les instructions à l’écran. Consultez votre messagerie recherchez le message d’activation provenant de My Total Connect Comfort.
- Page 109 : Utilice la identificación MAC y la identificación CRC para inscribir este producto en mytotalconnectcomfort.com • MAC ID ® U.S. Registered Trademark. © 2012 Honeywell International Inc. • MAC CRC 69-2723EFS—01 M.S. 04-12 69-2723EFS-01 Printed in U.S.A. Remarque : Ces identifiants figurent...
- Page 110 Enregistrement de votre thermostat en ligne 3b Lorsque le thermostat est convenablement enregistré, l’écran d’enregistrement Total Connect Comfort affiche le message SUCCESS (réussi). Dans la fenêtre de messages du thermostat apparaît : CONGRATULATIONS! SET UP COMPLETE. (Félicitations! Configuration terminée.) 69-2715EF—07...
- Page 111 Enregistrement de votre thermostat en ligne 3c Veuillez aussi noter que le thermostat affiche maintenant la puissance de son signal. Félicitations! Vous avez terminé. Vous pouvez maintenant contrôler votre thermostat de n’importe quel endroit au moyen de votre ordinateur portatif, de votre tablette ou de votre téléphone intelligent.
-
Page 112: Réglage De L'horloge
Réglage de l’horloge CLOCK 1 Appuyez sur (horloge) pour afficher les flèches de réglage. 2 Appuyez sur pour régler l’heure. (Vous MORE pouvez avancer plus rapidement en maintenant la pression sur les boutons ou t). DONE 3 Appuyez sur (terminé) pour enregistrer CANCEL et quitter (ou sur (annuler) pour quitter... -
Page 113: Réglage Du Ventilateur
Réglage du ventilateur 1 Appuyez sur (ventilateur) pour sélectionner le fonctionnement du ventilateur. 2 Appuyez à nouveau pour sélectionner Inside ON (en fonction) ou AUTO (basculez pour resélectionner). L’option sélectionnée clignote. DONE 3 Appuyez sur (terminé) pour enregistrer le réglage. Votre sélection apparaît sous FAN. MORE ON : le ventilateur est toujours en fonction. -
Page 114: Sélection Du Mode De Fonctionnement Du Système
Sélection du mode de fonctionnement du système SYSTEM 1 Appuyez sur (système) pour afficher les options. SYSTEM 2 Appuyez à nouveau sur pour sélectionner une option. Vous devrez peut-être appuyer deux ou trois fois pour effectuer une Inside sélection — l’option sélectionnée clignote. DONE 3 Appuyez sur (terminé) pour enregistrer le... -
Page 115: Réglage Des Programmes
Réglage des programmes SCHED EDIT Appuyez sur (programme) puis sur MORE (modifier). Les boutons des jours s’affichent sur le haut de l’écran. Appuyez sur les boutons (MON–SUN (lundi-dimanche)) SLEEP pour sélectionner les jours. Appuyez sur pour régler l’heure de réveil pour le(s) jour(s) sélectionné(s). -
Page 116: Dérogation Temporaire De La Programmation
Dérogation temporaire de la programmation 1 Sur l’écran d’accueil, appuyez sur pour ajuster immédiatement la température. 2 Réglez l’heure jusqu’à laquelle vous voulez Inside maintenir la température (l’heure par défaut est celle de la fin de la période actuelle). Temporary Hold Le nouveau réglage sera maintenu jusqu’à... -
Page 117: Dérogation Permanente De La Programmation
Dérogation permanente de la programmation HOLD 1 Appuyez sur (maintien) pour régler la température de façon permanente. Ceci désactive l’horaire de Inside programmation. 2 La température sélectionnée sera Permanent Hold maintenue 24 heures sur 24 jusqu’à la modification manuelle suivante ou une CANCEL pression du bouton (annuler) -
Page 118: Réglage Du Maintien Pendant Les Vacances
Réglage du maintien pendant les vacances Utilisez cette fonction pour suspendre un horaire de Inside programmation lorsque vous vous absentez pendant une période prolongée. 1 Appuyez sur pour régler la température. Hold Until 2 Appuyez sur pour régler l’heure à laquelle vous désirez que la programmation MORE reprenne le jour de votre retour. -
Page 119: Réglage Des Intervalles De Rappel De Filtre
Réglage des intervalles de rappel de filtre S’il a été activé au cours de l’installation, le rappel Inside de filtre affiche un message au-dessus de l’heure lorsqu’il est temps de remplacer le filtre. RESET RESET Appuyez sur (réinitialiser) après le remplacement du filtre pour relancer la minuterie. -
Page 120: Nettoyage De L'écran
Nettoyage de l’écran SCREEN 1 Appuyez sur (écran) pour verrouiller l’écran en vue du nettoyage. L’écran restera verrouillé 30 secondes pour que vous MORE puissiez le nettoyer sans modifier des réglages. DONE 2 Après 30 secondes, appuyez sur (terminé) pour reprendre le fonctionnement SCREEN normal, ou appuyez à... -
Page 121: Annulation De L'enregistrement Du Thermostat
Annulation de l’enregistrement du thermostat Si vous retirez le thermostat de votre compte Total Connect Comfort (par exemple, si vous déménagez et laissez le thermostat en place), la fenêtre de messages fera Inside défiler le message UNREGISTERED FROM TOTAL CONNECT (enregistrement sur Total Connect annulé) pendant 3 minutes. -
Page 122: Déconnexion Wi-Fi
Déconnexion Wi-Fi Remplacement du routeur Si vous déconnectez le thermostat de votre réseau Wi-Fi : 1 Entrez dans la configuration du système (voir page 51). Inside 2 Réglez la fonction 900 à 0 (voir page 58). La fenêtre de messages affichera Wi-Fi DISCONNECTED (Wi-Fi déconnecté) pendant 1 minute. - Page 123 Mises à jour du logiciel Honeywell introduit régulièrement des mises à jour du logiciel pour ce thermostat. Les mises à jour s’effectuent automatiquement par votre connexion Wi-Fi. Tous vos réglages sont sauvegardés; vous n’avez donc pas besoin de procéder à des changements après la mise à jour.
-
Page 124: Technologie Smart Response
Technologie Smart Response Celle-ci permet au thermostat « d’apprendre » combien de temps il faut à votre système de chauffage/refroidissement pour atteindre le réglage de température programmé, afin que la température voulue soit obtenue à l’heure programmée. Par exemple : réglez l’heure de réveil à 6 heures et la température à... -
Page 125: Protection Du Compresseur
Protection du compresseur Cette fonction force le compresseur à attendre quelques minutes avant un redémarrage, pour éviter d’endommager l’équipement. Pendant la durée d’attente, le message « Wait » (attendre) s’affiche à l’écran. 69-2715EF—07... -
Page 126: Commutation Automatique
Commutation automatique Celle-ci est utilisée dans les climats où le conditionnement d’air et le chauffage sont utilisés le même jour. Lorsque le système est réglé sur AUTO, le thermostat sélectionne automatiquement le chauffage ou le refroidissement en fonction de la température intérieure. L’écart entre les réglages de chauffage et de refroidissement doit être d’au moins 3 degrés. -
Page 127: Fonctions Et Options De Configuration
Fonctions et options de configuration Vous pouvez modifier des options pour plusieurs fonctions du système. Les fonctions disponibles dépendent de votre type de système. Les fonctions, désignées sous forme d’un nombre à quatre chiffres, ainsi que les options disponibles sont décrites aux pages 52–58. Ce thermostat est préréglé... - Page 128 Configuration du système Comment définir le nom de mon thermostat? (Voir la page 51 pour les instructions.) Fonction Réglages et Options 0112 Device Name = Thermostat (Nom de l’appareil) Basement Exercise Room Library Porch Bathroom Family Room Living Room Rec Room Ce nom identifiera le Bathroom 1 Fireplace...
- Page 129 Configuration du système Comment modifier l’heure et la date? (Voir la page 51 pour les instructions.) Fonction Réglages et Options 0120 Réglage de l’année = Année 20xx (deux premiers = Année 21xx chiffres) 0130 Réglage de l’année 01–99 (2001–2099) (deux derniers chiffres) 0140 Réglage du mois...
- Page 130 Configuration du système Comment définir mon type de système de chauffage/refroidissement? (Voir la page 51 pour les instructions.) Fonction Réglages et Options Continuer à utiliser l’horaire programmé. 0165 Restaurer la Restaurer le programme du thermostat aux réglages d’économie programmation par d’énergie défaut Chauffage/refroidissement : chauffage au gaz, au mazout ou électrique...
- Page 131 Configuration du système Comment personnaliser mon système de chauffage/refroidissement? (Voir la page 51 pour les instructions.) Fonction Réglages et Options Remarque : en fonction des réglages du système, des fonctions de cette page peuvent ne pas apparaître. Chauffage au gaz ou au mazout : utilisez ce réglage en cas de système 0180 Commande du de chauffage au gaz ou au mazout (le système contrôle le fonctionnement...
- Page 132 Configuration du système Quelles autres fonctions puis-je modifier? (Voir la page 51 pour les instructions.) Fonction Réglages et Options Rétroéclairage éteint, puis allumé pendant environ 8 secondes après 0280 Rétroéclairage pression d’une touche. Rétroéclairage toujours allumé à basse intensité, luminosité maximum après pression d’une touche.
- Page 133 Configuration du système Quelles autres fonctions puis-je modifier? (Voir la page 51 pour les instructions.) Fonction Réglages et Options Arrêt (pas de rappel) 0500 Rappel de Rappel après 10 jours de fonctionnement (environ 1 mois calendrier) remplacement du Rappel après 30 jours de fonctionnement (environ 3 mois calendrier) filtre Rappel après 60 jours de fonctionnement (environ 6 mois calendrier) Le rappel après le...
- Page 134 Configuration du système Comment modifier mes paramètres Wi-Fi? (Voir la page 51 pour les instructions.) Fonction Réglages et Options 0710 Restauration des Déconnecte le thermostat du réseau Wi-Fi et restaure les réglages réglages originaux d’origine (efface les personnalisations). Le Wi-Fi est en marche et le thermostat peut être connecté à un réseau Wi-Fi 0890 Wi-Fi Le Wi-Fi est en marche.
-
Page 135: Questions Fréquemment Posées
Questions fréquemment posées Mon thermostat fonctionnera-t-il toujours si je perds ma connexion Wi-Fi? Oui, le thermostat actionnera votre système de chauffage et/ou de refroidissement avec ou sans Wi-Fi. Comment puis-je trouver le mot de passe de mon routeur? Contactez le fabricant du routeur. Pourquoi ne vois-je pas ma page de configuration Wi-Fi? Vous êtes probablement uniquement connecté... - Page 136 Questions fréquemment posées Où puis-je trouver mes codes MAC ID et MAC CRC? Les codes MAC ID et MAC CRC seront affichés dans la fenêtre de messages du thermostat. Les numéros figurent également sur une carte jointe au thermostat ou sur l’arrière du thermostat (visibles lorsque celui-ci est retiré...
- Page 137 Questions fréquemment posées Je suis enregistré sur le site Total Connect Comfort mais je n’ai pas pu ouvrir de session en utilisant mon nouveau compte. Consultez votre messagerie et vérifiez si vous avez reçu le message d’activation. Suivez les instructions d’activation de votre compte, puis ouvrez une session sur le site web. Je me suis enregistré...
- Page 138 Messages de la fenêtre de messages La fenêtre de messages du sommet de l’écran indique la connexion Wi-Fi et le statut d’enregistrement. Il affiche également les codes MAC ID et MAC CRC pour l’enregistrement du thermostat sur le site mytotalconnectcomfort.com Affiché...
- Page 139 Messages de la fenêtre de messages Affiché lorsque le thermostat est enregistré sur le site mytotalconnectcomfort.com Affiché lorsque le thermostat est retiré de votre compte Total Connect Comfort. Force du signal Wi-Fi. Affiché lorsque le thermostat est connecté au réseau Wi-Fi et enregistré sur le site mytotalconnectcomfort.com Affiché...
- Page 140 Messages de la fenêtre de messages Affiché si le mot de passe Wi-Fi du réseau domestique n’a pas été entré correctement. • Saisissez de nouveau le mot de passe du réseau Wi-Fi de votre maison. • Répétez le processus de configuration et confirmez le mot de passe du réseau Wi-Fi de votre maison. Affiché si aucune adresse IP n’a été fournie par le routeur. • Patientez pendant 30 minutes, la connexion peut prendre plusieurs minutes.
-
Page 141: Dépannage
Dépannage En cas de difficultés avec le thermostat, essayer les suggestions suivantes. La plupart des problèmes peuvent être réglés rapidement et facilement. Rien n’apparaît à • Vérifiez le disjoncteur et réinitialisez-le si nécessaire. • Assurez-vous que l’interrupteur de marche-arrêt du système de l’écran chauffage et de refroidissement est sur marche. • Assurez-vous que la porte de l’appareil de chauffage est bien fermée. • Vérifiez si le fil C est connecté (voir page 13). Impossible • Vérifiez la fonction 0170 : Type de système pour vous assurer qu’elle soit configurée en fonction de votre équipement de chauffage et de... - Page 142 Dépannage « Wait » (attendre) • La fonction de protection du compresseur est activée. Attendez 5 minutes que le système se remette en marche en toute sécurité sans s’affiche à l’écran. endommager le compresseur. La thermopompe • Vérifiez la fonction 0190 : Vanne de commutation de thermopompe pour vous assurer qu’elle soit configurée en fonction de votre équipement de émet de l’air chauffage (voir page 55).
- Page 143 Dépannage Le système de • Appuyez sur SYSTEM (système) pour régler le système sur Heat (chauffage). chauffage ou de Vérifiez si le réglage de température est supérieur à la température intérieure. refroidissement • Appuyez sur SYSTEM pour régler le système sur Cool (refroidissement). ne répond pas Vérifiez si le réglage de température est inférieur à...
- Page 144 Glossaire Fil C Le fil « C », ou neutre, amène l’alimentation 24 V ca au thermostat à partir du système de chauffage/ refroidissement. Certains anciens thermostats mécaniques ou à pile peuvent ne pas être dotés de ce fil. Il est nécessaire à l’établissement d’une connexion Wi-Fi à votre réseau domestique. Système de chauffage/refroidissement à...
- Page 145 Informations réglementaires Déclaration de conformité à la FCC (partie 15.19) sont conçues pour fournir une protection raisonnable (États-Unis uniquement) contre les interférences nuisibles dans une installation Cet appareil est conforme à la partie 15 du règlement résidentielle. Cet équipement génère, utilise et peut de la FCC.
- Page 146 Informations réglementaires Thermostats Section 7.1.3 de RSS-GEN Pour être conformes aux limites d’exposition aux Le fonctionnement est soumis aux deux conditions radiofréquences établies par FCC et Industrie Canada suivantes : pour le grand public/l’exposition non contrôlée, la ou les 1 Ce dispositif ne doit pas causer d’interférences, et antennes utilisées pour ces transmetteurs doivent être 2 Ce dispositif doit accepter toutes les interférences, y installées à...
-
Page 147: Garantie Limitée
Garantie limitée d’un an Honeywell garantit ce produit, à l’exception des piles, contre tout défaut de pièce ou de main-d’œuvre, durant une période d’un (1) an à partir de la date d’achat par le consommateur si le produit est utilisé et entretenu convenablement. En cas de défectuosité ou de mauvais fonctionnement pendant la période de garantie, Honeywell remplacera ou réparera le produit, à... - Page 148 ® Marque de commerce déposée américaine. Apple, iPhone, iPad, iPod touch et iTunes sont des marques de commerce de Apple Inc. Toutes les autres marques de commerce sont propriété de leurs propriétaires respectifs. © 2013 Honeywell International Inc. 69-2715EF—07 M.S. Rev. 11-13 Imprimé aux États-Unis...