Table of Contents
Advertisement
Advertisement
Table of Contents

Related Manuals for Sanyo DC-DA380


Summary of Contents for Sanyo DC-DA380
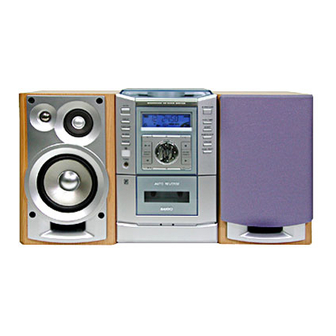
- Page 1 INSTRUCTION MANUAL DC-DA380 Micro Component System...
- Page 2 PRECAUTIONS CAUTION – INVISIBLE LASER RADIATION WHEN OPEN AND INTERLOCKS DEFEATED. AVOID EXPOSURE TO BEAM. ADVARSEL – USYNLIG LASER STRÅLING VED ÅBNING, NÅR SIKKERHEDSAFBRYDERE ER UDE AF FUNKTION, UNDGÅ UDS ÆTTELSE FOR STRÅLING. VARNING – OSYNLIG LASER STRÅLNING NÄR DENNA DEL ÄR ÖPPNAD OCH SPÄRR ÄR URKOPPLAD.
- Page 3 CONNECTIONS FM indoor aerial AM loop aerial FM outdoor aerial R ch Speaker L ch Speaker Amplifies subwoofer (not supplied) Video/Auxiliary equipment To an AC outlet Note: Unwind the aerial wires, then connect them Do not connect the mains lead to an AC outlet until all connections to the AM LOOP terminals.
- Page 4 CONTROLS General 1. Power button (z/ON) 2. Display 3. Volume control (VOLUME) 4. Clock/Timer button (CLOCK/TIMER) 5. Memory button (MEMORY) 6. Bass expander button (BASSXPANDER) 7. Surround button (SURROUND) 8. Sound preset button (SOUND PRESET) 9. Headphones socket (PHONES) 10. Remote sensor (IR) 11.
-
Page 5: Inserting Batteries
REMOTE CONTROL Number buttons (1 - 9, 0) Controls These buttons are used to select the track numbers on a disc or preset radio stations. If the function is “CD”, the buttons select the track numbers on a disc. If the function is “TUNER”, the buttons select preset radio stations. With any other function, the buttons will not function. -
Page 6: Before Operation
ADJUSTING THE CLOCK (Main unit only) NOTE: 5. Turn the VOLUME control to set the “minutes”. When the unit is first connected to the AC power line, the clock display blinks on the display. Example: To set “PM 6:30”, First, press the z/ON button to turn the power off. Only the clock display blinks. -
Page 7: Programmed Play
CD PLAY Use compact discs bearing the symbol shown. In Search (forward/reverse) addition to conventional 12 cm CDs, this system If the g or h button is pressed during play, the player will can be used to play 8 cm CDs without an adapter. search at high speed in the forward or reverse direction while the button is being pressed. -
Page 8: Listening To Tapes
LISTENING TO TAPES 5. Press the a or b button to begin playback. “a” or “b” appears. If a cassette is loaded, you can turn the unit on and begin play a: For forward play immediately by pressing the a or b button. b: For reverse play. -
Page 9: Listening To Other Sources
1. Press the MEMORY button. SANYO does not approve of, and cannot be held responsible for, 2. While “PROG.” is blinking, press the U button to select “bc-1” or any unlawful use of this machine. -
Page 10: Timer Operation
TIMER OPERATION Using the timer To release the timer (Main unit only) After turning the power on, press the CLOCK/TIMER button twice. “ ” Set the on and off times, and function to be used. Operation will start with or “ REC”... -
Page 11: Maintenance
MAINTENANCE Cleaning the tape heads Cleaning the CD player lens To ensure continued high performance, use cotton swab to clean the The lens should never be touched. If dust is on the lens, blow it off using heads, pinch roller and capstan of the deck after about every 10 hours a camera lens blower. - Page 12 SANYO Electric Co., Ltd. (AU) 1AD6P1P1337-P Printed in China...