Table of Contents
Advertisement
Advertisement
Table of Contents

Related Manuals for Sony VAIO PCG-C1X


Summary of Contents for Sony VAIO PCG-C1X
- Page 1 PCG-C1X/C1F PCG-C1X/C11F (UC/UK) SERVICE MANUAL US/Canadian Model PCG-C1X UK Model (PCG-C1F) Notebook Computer English 9-974-499-11 Sony Corporation 99C1603-1 Printed in USA Information Technologies Company © 1999. 3 9-974-499-11 Published by VAIO Customer Link Division (Japan)
- Page 2 Sony and VAIO are trademarks of Sony. Intel logo and Intel Inside logo are registered trademarks of Intel Corporation. CAUTION: Danger of explosion if battery is incorrectly replaced.
- Page 3 BLOCK DIAGRAM ............4-1 (to 4-2) CHAPTER 5. FRAME HARNESS DIAGRAM ......... 5-1 (to 5-2) CHAPTER 6. EXPLODED VIEW AND PARTS LIST 6-1. Main Unit ....................6-1 6-2. Display Unit ....................6-3 6-3. FDD Assembly ................... 6-5 (to6-6) — 3 — PCG-C1X/C1F (U/E)
- Page 5 CHAPTER 1. OPERATION Section 1-1. VAIO C1 PictureBook ® ™ Computer Read Me First PCG-C1X ® PCG-C1X/C1F (U/E)
- Page 6 NOTICE This product contains software owned by Sony and licensed by third parties. Use of such software is subject to the terms and conditions of license agreements enclosed with this product. Some of the software may not be transported or used outside the United States. Software specifications are subject to change without notice and may not necessarily be identical to current retail versions.
- Page 7 Contents Welcome ....................5 Features....................5 Unpacking Your C1 PictureBook Computer........7 Supplementary Information ............9 About the Software on Your Computer........12 For Answers to Your Software Questions ........18 Specifications...................20...
-
Page 9: Welcome
AC power. See “To charge the battery pack” in the User Guide for specific information on your model. Sony audio and video quality: The 8.9-inch XGA-width (1024 x 480) TFT LCD with XWIDE™ display technology supports high-quality MPEG1 video. Take advantage of today’s advanced multimedia applications, games, and entertainment software. -
Page 10: Vaio C1 Picture Book Computer Read Me First
VAIO C1 PictureBook Computer Read Me First Communications: Access popular online services, send e-mail, browse the Internet, use fax features, and incorporate digital images into your electronic communications. 100 free hours of Internet access: Use the Internet for up to 100 free hours when you sign up with GTE (no credit card required). -
Page 11: Unpacking Your C1 Picturebook Computer
Unpacking Your C1 PictureBook Computer Unpacking Your C1 PictureBook Computer Remove the following hardware items from the box: AC adapter C1 PictureBook Computer Rechargeable battery USB cable for FDD VGA adapter cable Floppy disk drive Phone cable Pointing device spare caps Manuals Read Me First (this manual) contains specifications, software descriptions, and quick tips on specific hardware and software issues. - Page 12 VAIO C1 PictureBook Computer Read Me First Other Setting up your VAIO C1 PictureBook Computer (poster) Packet containing special product offers...
-
Page 13: Supplementary Information
Supplementary Information Supplementary Information For the most recent version of this manual, see the online version of Read Me First. You can access this document from the Windows Start Menu by selecting Programs/VAIO Documentation. Power Management Tips If you find that an application exhibits unexpected behavior (such as reduced video quality) after returning from a reduced power consumption mode, you should close that application before your computer enters a power-saving mode. - Page 14 VAIO C1 PictureBook Computer Read Me First Moisture condensation may have occurred. Do not use the computer for at least one hour and then turn on the computer. When the internal backup battery is low on power, it may not be able to boot your system properly.
-
Page 15: Hardware Temperature
VDOWave3 Codec decoder. The file name is VDODecode30.exe and is located in C:\Program Files\Sony\Smart Capture\Decoder. In order for the recipient of a video image to view your file, the recipient must first install the VDOWave3 Codec decoder by running the executable file (VDODecode30.exe). -
Page 16: About The Software On Your Computer
VAIO C1 PictureBook Computer Read Me First About the Software on Your Computer Your C1 PictureBook Computer is ready to help you work, play, learn, and communicate as soon as you turn it on. This section gives you an overview of the activities you can perform with your software titles. For support information, see “For Answers to Your Software Questions.”... - Page 17 Internet, without wasting time wading through it. Maximize your time online with CompuServe. Digital Media Park™ Sony Electronics An integrated suite of multimedia cataloging and playback programs, including Media Bar, Media Library, and Media Showcase. Manage your music by cataloging your entire CD collection.
- Page 18 VAIO C1 PictureBook Computer Read Me First EarthLink Sprint TotalAccess™ EarthLink Network, Inc. An Internet Service Provider that supplies access, information, and assistance to its customers, introducing them to the Internet. Member benefits include e-mail, newsgroups, a Personal Start Page, a free 6MB web site, a member magazine, and 24-hour technical support.
- Page 19 Sony Electronics This image management software displays images from your hard drive, a Sony Digital Still Camera, or a Sony Mavica® Camera. The images appear in a convenient light-table format, so that you can easily view the contents of an entire folder.
- Page 20 You can even pay your bills online. Smart Capture Sony Electronics Smart Capture is the software that allows you to operate your computer ’s built-in camera. Smart Capture lets you use the built-in camera as a digital or video camera, recording still images, motion, and sound.
- Page 21 The System Recovery CD program allows you to restore the software titles that shipped with your computer if they become corrupted or are erased accidentally. It can be used only to restore the hard disk of the Sony computer you purchased.
-
Page 22: For Answers To Your Software Questions
VAIO C1 PictureBook Computer Read Me First For Answers to Your Software Questions ® ® Acrobat Reader, Adobe PhotoDeluxe Business Edition (Adobe Systems Incorporated) website http://www.adobe.com/ phone 206-628-2746 (fee-based support) 206-628-5737 e-mail techdocs@adobe.com hours M-F, 6 AM-5 PM PT ® America Online (America Online) website... -
Page 23: Sony Service Center
Standard Care support is free for all registered users for 90 days from the date of their first call. hours M-F, 9 AM - 7 PM ET Sony Service Center For the Sony Service Center nearest you, call 1-888-4SONYPC (1-888-476-6972). -
Page 24: Specifications
VAIO C1 PictureBook Computer Read Me First Specifications Model PCG-C1X Processor 266 MHz Pentium® ™ with MMX technology Hard Disk Drive 4.3 GB Integrated Camera 270,000 pixels (effective 250,000 pixels) Image Device 1/6 inch 270,000 pixel CCD Lens 2 elements in 2 groups f = 2.8 mm, F = 2.8... - Page 25 Specifications Model PCG-C1X Supplied Accessories Floppy disk drive Rechargeable battery AC adapter Phone cable VGA adapter cable Pointing device spare caps USB cable for FDD † Service 90-day limited express service Extendible to one year from original date of purchase upon registration †...
- Page 28 © 1999 Sony Electronics Inc. Reproduction in whole or in part without written permission is prohibited. All right reserved. Printed in Japan. 3-866-328-11...
- Page 29 Section 1-2. ® ™ VAIO C1 PictureBook Computer User Guide PCG-C1X ® 1-13 PCG-C1X/C1F (U/E)
-
Page 30: Notice To Users
Notice to Users reduce energy consumption. It is an open system in which business proprietors can © 1999 Sony Electronics Inc. All rights participate voluntarily. The targeted reserved. This manual and the software products are office equipment such as described herein, in whole or in part, may... -
Page 31: Regulatory Information
To prevent fire or shock hazard, do not expose your notebook computer Trade Name: SONY to rain or moisture. To avoid electrical shock, do not open Model No: PCG-C1X the cabinet. Refer servicing to Responsible Party: qualified personnel only. Sony Electronics Inc. - Page 32 1-888-4SONYPC (1-888-476-6972), or write to the Sony Customer Information Center, FCC Part 68 One Sony Drive, Park Ridge, NJ 07656, for repair and/or warranty information. If the This equipment complies with Part 68 of trouble is causing harm to the telephone the FCC rules.
- Page 33 For the Sony Service Center nearest you, it is sent and an identification of the call 1-888-476-6972 in the United States, or business, other entity, or individual 1-800-961-7669 in Canada.
-
Page 34: Industry Canada Notice
INDUSTRY CANADA NOTICE Danger of explosion if battery is incorrectly replaced. Replace only NOTICE: The Industry Canada label with the same or equivalent type identifies certified equipment. This recommended by the certification means that the equipment manufacturer. Discard used meets certain telecommunications network batteries according to the protective, operational and safety manufacturer’s instructions. - Page 35 any combination of devices subject only to Avertissement: L’utilisateur ne doit pas the requirement that the sum of the Ringer tenter de faire ces raccordements lui-même; Equivalence Number of all the devices il doit avoir recours à un service does not exceed 5. d’inspection des installations électriques, ou à...
-
Page 37: Table Of Contents
Contents Welcome Ergonomic Considerations ............. 2 Using Your C1 PictureBook Computer Locating the Controls and Connectors ......... 5 Front.......................5 Left ......................6 Right.......................7 Bottom ....................7 Connecting a Power Source ............8 Using the AC Adapter.................8 Using Battery Power................9 Starting Your C1 PictureBook Computer........12 Shutting Down Your C1 PictureBook Computer...... - Page 38 Connecting the CD-ROM Drive ...........39 Connecting a Digital Video Camera Recorder......42 Customizing Your C1 PictureBook Computer Displaying the Sony Notebook Setup Screen......43 To display the Sony Notebook Setup screen .........43 Notebook Setup Tabs ................44 Controlling Power Management..........45 Power Management Profiles ............45 Power Management Commands .............46...
- Page 39 Contents Using the Smart Utilities Using Smart Capture..............57 Capturing a still image..............57 To send a still image via e-mail using a MAPI-compliant ® ® e-mail software such as Microsoft Outlook 98......60 ® To send a still image via e-mail if you use America Online or other non-MAPI-compliant e-mail software ......61 Capturing a video clip...............61 To play back captured video clips...........63...
- Page 41 Computer with integrated digital camera. Sony has combined leading- edge technology in audio, video, computing, and communications to provide you with state-of-the-art personal computing. This manual offers a quick introduction and reference to your Sony computer. Using Your VAIO C1 PictureBook Computer shows you how to use the standard components of your system.
-
Page 42: Vaio C1 Picture Book Computer User Guide
VAIO C1 PictureBook Computer User Guide Ergonomic Considerations You will be using your C1 PictureBook Computer as a portable device in a variety of environments. Whenever possible, you should attempt to apply the following ergonomic considerations to both stationary and portable environments. - Page 43 Welcome Furniture and posture – Sit in a chair with good back support and armrests. Adjust the level of the chair so your feet are flat on the floor. A footrest may make you more comfortable. Sit in a relaxed, upright posture and avoid slouching forward or leaning far backward.
-
Page 45: Locating The Controls And Connectors
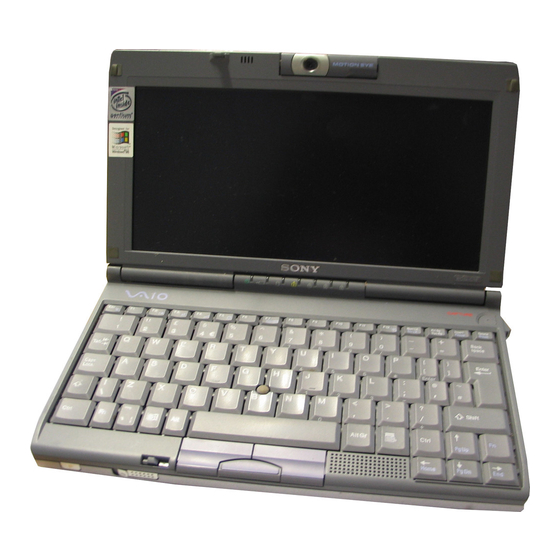
Using Your C1 PictureBook Computer This section describes how to start using your computer and how to use your computer’s internal and external devices, such as the pointing device and floppy disk drive. Locating the Controls and Connectors Front Built-in camera Battery indicator Microphone Hard disk drive indicator... -
Page 46: Left
VAIO C1 PictureBook Computer User Guide Left Power switch Headphone connector Infrared port S200 i.LINK™ (IEEE1394) CAPTURE button USB connector LCD lock lever Monitor connector Programmable Power Key (PPK) Microphone connector... -
Page 47: Right
Using Your C1 PictureBook Computer Right PC card slot (page 25) Phone line jack (page 34) Bottom Battery release lever (page 11) DC In connector (page 8) Battery connector... -
Page 48: Connecting A Power Source
VAIO C1 PictureBook Computer User Guide Connecting a Power Source You can use either AC power or a rechargeable battery pack as a power source. Using the AC Adapter Plug the cable attached to the AC adapter into the DC In connector on the computer. -
Page 49: Using Battery Power
Using Your C1 PictureBook Computer Using Battery Power You can use a battery pack as a source of power. The PCGA-BP11 battery pack that comes with your computer is not fully charged at the time of purchase. Follow the steps below to insert and charge the battery pack. You can also purchase the high-capacity PCGA-BP12 battery pack as a separate option. - Page 50 VAIO C1 PictureBook Computer User Guide To charge the battery pack Connect the AC adapter to the computer. Insert the battery pack. The computer automatically charges the battery (the battery indicator light flashes in a double blink pattern as the battery charges). When the battery is 85% full, the battery indicator light turns off.
-
Page 51: To Remove The Battery Pack
Using Your C1 PictureBook Computer Both the battery and power indicators blink when the battery is running out of power. Keep the battery pack in the computer while it is directly connected to AC power. The battery pack continues to charge while you are using the computer. If your battery level falls to less than 10%, you should either attach the AC adapter to recharge the battery or shut down your computer and insert a fully charged battery. -
Page 52: Starting Your C1 Picturebook Computer
VAIO C1 PictureBook Computer User Guide Starting Your C1 PictureBook Computer Slide the LCD lock lever in the direction of the arrow, and lift the cover. Camera LCD lock lever Be careful not to grab the camera lens when lifting the cover. Slide the power switch on the left side toward the front of the computer until the green power indicator light turns on. -
Page 53: Shutting Down Your C1 Picturebook Computer
Using Your C1 PictureBook Computer Shutting Down Your C1 PictureBook Computer To avoid potential loss of data, follow these steps to shut down your computer. Click the Start button on the Windows 98 taskbar. Click Shut Down at the bottom of the Start menu to display the Shut Down Windows dialog box. -
Page 54: Registering Windows 98
VAIO C1 PictureBook Computer User Guide Registering Windows ® The first time you turn on your computer, you need to complete a few steps to register and configure the Windows 98 software that is already installed on your computer. You must register Windows 98 before you can use the computer. The on-screen instructions guide you through the registration and configuration process. -
Page 55: Registering Your Computer
Using Your C1 PictureBook Computer Registering Your Computer You can take advantage of Sony’s commitment to quality customer support and receive the following benefits by registering your computer with Sony: Extended Limited Warranty – Protect your investment. Extend your Warranty nine months for a total of 12 months from the original date of purchase when you register your computer. -
Page 56: Using The Keyboard
VAIO C1 PictureBook Computer User Guide Using the Keyboard Your keyboard is very similar to a typewriter’s, but the keyboard has additional keys that perform specific computer-related tasks. Escape Key Function keys Print Screen key Correction keys Shift key Fn key Ctrl key Applications key Fn key... - Page 57 Using Your C1 PictureBook Computer Description Escape key The Esc (Escape) key is used to cancel commands. Print Screen key The Print Screen key takes an electronic snapshot of the screen and places it in the Windows Clipboard. You can then paste the screen shot into a document and print it.
-
Page 58: Combinations And Functions With The Windows 98 Key
VAIO C1 PictureBook Computer User Guide Combinations and Functions with the Windows 98 Key Combination Function + F1 Displays Windows Help. + Tab Switches the selected button on the taskbar. Displays Windows Explorer. Displays the Windows Find: All Files window to find a file or folder. -
Page 59: Indicators
Using Your C1 PictureBook Computer Indicators Indicator Function Information Turns on when the PPK Timer is set. Turns off when the PPK Timer is not set or the PPK Timer setting is inactive. (Such as when the computer’s power is off or in System Hibernation mode.) Battery Indicates the status of the battery attached at the rear of the computer. -
Page 60: Combinations And Functions With The Fn Key
VAIO C1 PictureBook Computer User Guide Combinations and Functions with the Fn Key Combinations/ Functions Feature Puts the system into System Suspend mode, a (ESC) power management state. To return the system System Suspend to the active state, press any key or press the power switch on your computer. -
Page 61: Using The Pointing Device
Using Your C1 PictureBook Computer Using the Pointing Device The pointing device on the keyboard allows you to point to, select, drag, and scroll objects on the screen. Pointer Pointing device Left button Right button Center button Action Description Point Press the pointing device in a direction to place the pointer on an item or object. - Page 62 VAIO C1 PictureBook Computer User Guide To replace the pointing device cover You can take off the pointing device cover and replace it with the additional pointing device cover supplied with your computer. Pointing device cover (supplied)
-
Page 63: Using The Floppy Disk Drive
Using Your C1 PictureBook Computer Using the Floppy Disk Drive You can connect the floppy disk drive to the USB connector on your computer. To connect the floppy disk drive Plug one end of the USB cable into the USB connector on the computer and the other end into the USB connector on the floppy disk drive. - Page 64 VAIO C1 PictureBook Computer User Guide To remove a diskette When you finish using a diskette, wait until the LED indicator turns off and then press the Eject button to remove the diskette. Eject button LED indicator...
-
Page 65: Using Pc Cards
Bus and ZV (Zoomed Video) port. Some PC cards may require that you disable idle devices when using the PC card. You can use Sony Notebook Setup to disable devices. See “Displaying the Sony Notebook Setup Screen” on page 43 for details. - Page 66 VAIO C1 PictureBook Computer User Guide Remove the PC card slot protector. Insert the PC card into the PC card slot, front label facing up. Gently push the card into the slot until the card is fixed into the connector. The release button comes out.
- Page 67 Using Your C1 PictureBook Computer For some PC cards, if you alternate between normal power operation and the system suspend or system hibernation power management modes while the card is inserted, you may find that a device connected to your system is not recognized. Reboot your system to correct the problem.
-
Page 68: Using Infrared Communication Devices
VAIO C1 PictureBook Computer User Guide Using Infrared Communication Devices Your computer includes an infrared port, located on the left side of the computer. You can use this port to communicate with other infrared- equipped devices with compatible protocols, such as a digital still camera or other computers. - Page 69 Using Your C1 PictureBook Computer When you transfer files directly from devices other than the internal hard disk drive, such as a CD-ROM drive or hard disk drive on a network, set the System Suspend and System Hibernation timers to off. Check the Status tag of the Infrared Monitor in the Windows Control Panel to determine if the infrared device is detected.
-
Page 70: Using Power Saving Modes
VAIO C1 PictureBook Computer User Guide Using Power Saving Modes When you use a battery as the source of power for your computer, you can take advantage of power management settings to conserve battery life. In addition to the normal operating mode, which allows you to turn off specific devices, your computer has two distinct power saving modes: System Suspend and System Hibernation. -
Page 71: System Hibernation Mode
Using Your C1 PictureBook Computer System Hibernation Mode The state of the system is saved on the hard drive and power is turned off. The power indicator light is off in this mode. To activate System Hibernation mode Press Fn+F12. You can also use the PowerPanel utility to enter System Hibernation mode. -
Page 73: Connecting Peripheral Devices
Connecting Peripheral Devices You can add functionality to your computer by connecting any of these peripherals: Phone line (page 34) Printer (page 35) External display (page 36) External mouse (page 38) CD-ROM drive (page 39) Digital video camera recorder (page 42) Before you connect peripherals, turn off the computer and all peripherals. -
Page 74: Connecting A Phone Line
VAIO C1 PictureBook Computer User Guide Connecting a Phone Line You need to connect a phone line to take advantage of online services and the Internet. In order to register your VAIO C1 PictureBook Computer or register your software online, you must connect to a phone line. -
Page 75: Connecting A Printer
Connecting Peripheral Devices Connecting a Printer You can connect a Windows 98-compatible printer or other parallel port device to your computer. To connect a printer Plug the USB printer cable (optional) into the USB connector. Computer Power cord Printer Parallel connector USB connector USB Printer cable (optional) -
Page 76: Connecting An External Display
VAIO C1 PictureBook Computer User Guide Connecting an External Display You can connect an external display to your VAIO C1 PictureBook Computer. For example, you can use the computer with either of the following: Computer display (monitor) (page 36) Projector (page 37) To connect a computer display Use the symbol to locate the Monitor connector. - Page 77 Turn off your computer and then press both sides of the connector of the VGA adapter. To connect a projector You can use a projector as an external display, such as the Sony LCD Projector. Use the symbol to locate the Monitor connector. Plug the RGB signal cable to a VGA adapter and into this connector.
-
Page 78: Connecting An External Usb Mouse
VAIO C1 PictureBook Computer User Guide Connecting an External USB Mouse You can connect an external USB mouse PCGA-UMS1 (optional) to your computer. To connect an external mouse Plug the mouse cable into the USB connector. Computer USB Mouse USB Mouse See the manual that came with your mouse for more information on installation and use. -
Page 79: Connecting The Cd-Rom Drive
Connecting Peripheral Devices Connecting the CD-ROM Drive You can use the optional PCGA-CD5 CD-ROM drive with your computer. To connect the CD-ROM drive Remove the PC card slot protector from the PC card slot. See “Using PC Cards” on page 25 for details. Connect the CD-ROM drive cable to the PC card supplied with the CD-ROM drive. - Page 80 VAIO C1 PictureBook Computer User Guide Insert the PC card into the PC card slot with the label side facing up. See “Using PC Cards” on page 25 for details. The pick-up cover is attached to the lens of the CD-ROM drive at the factory. Before using the CD-ROM drive, remove the pick-up cover.
- Page 81 Connecting Peripheral Devices Gently press on the CD-ROM drive lid until it clicks shut. Power/Busy indicator Press here to close lid...
-
Page 82: Connecting A Digital Video Camera Recorder
(not supplied) The Sony digital video camera recorder (DCR-PC7) is pictured; your digital video camera recorder may need to be connected differently. On Sony digital video cameras, connectors labeled “DV In/Out” or “i.LINK” are compatible. See the manual that came with your digital video camera recorder for more information on installation and use. -
Page 83: Displaying The Sony Notebook Setup Screen
You can customize the settings of your C1 PictureBook Computer. The following sections briefly describe how to change your computer’s default settings. You can also refer to the Sony Notebook Setup Help for more detailed information. Displaying the Sony Notebook Setup Screen To display the Sony Notebook Setup screen Click the Start button on the Windows 98 taskbar. -
Page 84: Notebook Setup Tabs
Basic mode of display. Advanced mode includes Audio, Built-in Modem, Infrared, Enable Ports, and View Resources tabs. For more information about each option, click Help on the Sony Notebook Setup screen to display the help file. -
Page 85: Controlling Power Management
Customizing Your C1 PictureBook Computer Controlling Power Management The PowerPanel utility allows you to control the power management of your computer and provides key information about system activity and battery life. The following sections briefly describe how to conserve your computer’s battery power. -
Page 86: Power Management Commands
VAIO C1 PictureBook Computer User Guide Icon Description – Communications Extends battery life by initiating a quick display timeout. The Internal modem remains powered. You can also establish settings for LCD (Video) Standby, Hard Disk Sleep, and System Suspend to optimize power management for your system. Power Management Commands PowerPanel also provides power management commands that you can use to activate specific power management functions and to control... - Page 87 Customizing Your C1 PictureBook Computer Icon Description – PC Card Controls the PC card sockets. Click this button to open the PC Card (PCMCIA) Properties dialog box. You can view the properties for the PC cards. To activate PowerPanel Double-click the (PowerPanel) icon on the taskbar.
-
Page 88: Displaying Battery Information
VAIO C1 PictureBook Computer User Guide Displaying Battery Information You can display detailed information for the battery in your computer. The following sections briefly describe how to display your computer’s general battery information. You can also refer to the BatteryScope Help for more detailed information. -
Page 89: Battery Icon Descriptions
Customizing Your C1 PictureBook Computer Battery Icon Descriptions Battery icon Battery status Discharging Charging No battery Displaying Detailed Battery Information You can obtain detailed information about the batteries. Double-click the battery icon on the toolbar to display the BatteryScope window. The screen appears displaying the Battery tab, which contains information such as the estimated time-to-empty and charging time. -
Page 90: Starting Your Favorite Software With Programmable Power Key (Ppk) Setup
VAIO C1 PictureBook Computer User Guide Starting Your Favorite Software with Programmable Power Key (PPK) Setup The PPK Setup software enables you to start your favorite software by simply pressing the programmable power key. Programmable power key This section briefly describes how to use the programmable power key. You can also refer to the PPK Setup Help for more detailed information. -
Page 91: Using The Programmable Power Key With Other Keys
Customizing Your C1 PictureBook Computer Using the Programmable Power Key with Other Keys You can also choose to start other applications by pressing the programmable power key in combination with the Alt, Ctrl, or Shift keys. To select the key combination, right-click the application you want to start and select an item from the menu. -
Page 92: Selecting The Display Mode
VAIO C1 PictureBook Computer User Guide Selecting the Display Mode When you connect an external display, you can toggle the display mode between the LCD on your computer and an external display. Click the Start button on the Windows 98 taskbar. Point to Settings and click Control Panel. -
Page 93: Using The Dual Display Function
Customizing Your C1 PictureBook Computer Using the Dual Display Function The dual display function allows you to distribute portions of your desktop across separate displays. For example, if you have an external monitor attached to the monitor connector, your LCD display and the monitor can function as a single desktop. -
Page 94: Setting The Colors And Resolution For Each Display
VAIO C1 PictureBook Computer User Guide Check the Set Dual-Display option and click OK. The System Settings Change dialog box appears. Click Yest to restart your system. Repeat steps 1 to 3 to display the Display Properties. Click the display icon number 2. Click Yes. -
Page 95: Changing The Pointing Device Settings
Customizing Your C1 PictureBook Computer Changing the Pointing Device settings Using the Press-select function You can depress the pointing device to indicate click or right-click, instead of using the left or right button. Click the Start button on the Windows 98 taskbar. Point to Settings and click Control Panel. - Page 96 Scroll: You can scroll by moving the pointing device while holding down the center button, without using the scroll bar. Zoom: To drag the zoomed picture, move the pointing device while holding down the center button. Zoom: To change the zoom percentage, click while holding down the center button.
-
Page 97: Using The Smart Utilities
Using the Smart Utilities Using Smart Capture Your computer includes an integrated digital camera. You can use the camera to capture still images and record video clips. Do not touch the camera lens. Do not point the camera at the sun. Capturing a still image Click the Start button on the Windows 98 taskbar. - Page 98 VAIO C1 PictureBook Computer User Guide Turn the lens toward the subject. Adjust the focus using the focus ring. Press the CAPTURE button halfway down. The image freezes for a moment. To select a different image to capture, release the CAPTURE button and press it again.
- Page 99 Using the Smart Utilities Depress the CAPTURE button fully. The still image appears in the still viewer window. Still image When the lens is pointed towards you, Smart Capture is in mirror mode. In mirror mode, you can take a picture of yourself. A mirror-image appears in the Smart Capture window of the display while you are viewing.
-
Page 100: To Send A Still Image Via E-Mail Using A Mapi-Compliant E-Mail Software Such As Microsoft Outlook 98
VAIO C1 PictureBook Computer User Guide To send a still image via e-mail using a MAPI-compliant e-mail ® ® software such as Microsoft Outlook Make sure your e-mail software is compatible with the Messaging Application Programming Interface (MAPI). See the manual that came with your e-mail software to determine if it is MAPI compliant. -
Page 101: To Send A Still Image Via E-Mail If You Use America Online Or Other Non-Mapi-Compliant E-Mail Software
Using the Smart Utilities ® To send a still image via e-mail if you use America Online other non-MAPI-compliant e-mail software ® If you use an online service provider such as America Online or other non-MAPI-compliant e-mail software, you should not use the MAIL button to send still images. - Page 102 VAIO C1 PictureBook Computer User Guide Turn the camera lens toward the subject. Adjust the focus using the focus ring. Hold down the CAPTURE button to import the video clip. Video is recorded while the button is depressed. You can import up to 60 seconds of video.
-
Page 103: To Play Back Captured Video Clips
Using the Smart Utilities Release the CAPTURE button when finished. Imported video image The captured video clip appears in the video window. When the lens is pointed towards you, Smart Capture is in mirror mode. In mirror mode, you can take a picture of yourself. A mirror-image appears in the Smart Capture window of the display while you are viewing. -
Page 104: To Send A Video Clip Via E-Mail Using A Mapi-Compliant E-Mail Software Such As Microsoft Outlook 98
VAIO C1 PictureBook Computer User Guide To send a video clip via e-mail using a MAPI-compliant e-mail ® ® software such as Microsoft Outlook Note that if this is the first time you are sending a video clip to an individual, you must also attach a VDO Codec to your message as described in step 9 below. -
Page 105: To Send A Video Clip Via E-Mail If You Use America Online Or Other Non-Mapi-Compliant E-Mail Software
Using the Smart Utilities Address your e-mail, compose your message, and then send the e-mail. The video clip is attached as a compressed AVI file (file extension .AVI). The VDO Codec is attached as an executable file (file extension .exe). The recipient of your video clip can execute the VDO Codec by double clicking on the VDODecode30.exe file. - Page 106 Attach the VDO Codec to your message if this is the first time you have sent this e-mail recipient a video clip. The VDO Codec is located at C:/Program Files/Sony/Smart Capture/Decoder. The file name is VDODecode30.exe. The recipient of your video clip can execute the VDO Codec by double clicking on the VDODecode30.exe file.
-
Page 107: Using Smart Write
Using the Smart Utilities Using Smart Write Smart Write allows you to create document memos that include sound and video. Click the Start button on the Windows 98 taskbar. Point to VAIO and then click Smart Write. Type your memo using the keyboard. To insert an image Click Turn the camera lens toward the subject, and click... -
Page 108: Using Smart Publisher
Using Smart Publisher Smart Publisher allows you to send memos to the Internet. You must be connected to the Internet before you can send a memo. Click the Start button on the Windows 98 taskbar. Point to VAIO, point to Stationary, and then click Smart Publisher. Click New. -
Page 109: Using Smart Label
Using the Smart Utilities Using Smart Label Smart Label allows you to create memos on your desktop that include sound and video. To create a voice memo Click the Start button on the Windows 98 taskbar. Point to VAIO and then click Smart Label. Double-click on the bottom right corner of the display, and speak into the microphone. - Page 110 VAIO C1 PictureBook Computer User Guide To play back a voice memo Click the label, then click to play. Click to pause, to stop. To import images using the camera Right-click at the bottom right corner of the display. Click Use camera. Turn the camera lens toward the subject, and press the CAPTURE button.
-
Page 111: Getting Help
Getting Help Sony provides several support options for your Sony computer. When you have questions about your computer and the preinstalled software, check these sources for answers, in the following sequence: V AIO C1 Contains a complete list of the items that ship with... - Page 112 You can use this automated service to request a list of available topics and then select the topics that you want to receive. To contact the Sony fax-on-demand service, call 1-888-4SONYPC (1-888-476-6972). (Requires a fax machine or your fax software.)
-
Page 113: Troubleshooting
Getting Help Troubleshooting This section describes how to solve common problems you may encounter when using your computer. When you reconnect devices, be sure to turn off the computer as described in “Shutting Down Your C1 PictureBook Computer” on page 13. Turning off the computer using other methods may result in data loss. - Page 114 Remove the floppy disk drive, PC card, and any other peripheral devices from the computer. Turn the computer on again. Press the F2 key when the Sony logo appears. The BIOS setup menu screen appears. Press the arrow keys to select the Exit menu.
- Page 115 Getting Help When I press the pointing device without pressing the left button, it clicks Check that you have not selected the press-select function. See “Changing the Pointing Device settings” on page 55 for details. My computer “locks up” Try restarting the computer. On the Windows taskbar, click the Start button, click Shut Down, and then click Restart the computer.
- Page 116 VAIO C1 PictureBook Computer User Guide When I click an application icon a message appears, such as “You must insert the application CD into your CD-ROM drive,” and the software does not start Some titles require specific files that are located on the application’s CD-ROM.
- Page 117 Getting Help Check that the phone number the program is dialing is correct. Check that the software you are using is compatible with the computer modem. (All preinstalled programs are compatible.) Call the software publisher. My modem connection is slow The computer’s modem uses K56flex technology/V.90.
- Page 118 My PC card is not working Make sure the PC card is compatible with Windows 98. Use the Sony Notebook Setup utility to disable devices you are not currently using. The game images or video images are not clear Right-click the application bar of the PowerPanel software, choose CPU speed settings, and remove the check from the Auto box.
- Page 119 Getting Help The images captured with the camera are not clear Shooting under fluorescent light may produce reflections. Red or green noise may occur if the captured images include dark portions. If you import a still image of resolution 640 x 480, the image may appear grainy.
-
Page 120: Using The System And Application Recovery Cds
If you choose the Full Restore without Format option, you may need to reinstall applications that were not included with the computer when you purchased it. If you have any questions on using the System Recovery CD(s), contact Sony Customer Support. - Page 121 Slide the power switch forward and hold it for more than four seconds to turn off the computer. Turn on the computer and press the F2 key when the Sony logo appears. The BIOS setup menu screen appears. Press the arrow keys to select the Exit menu.
-
Page 122: Using The Application Recovery Cd(S)
80. You must be in Windows to run the Application Recovery CDs. The application will not run from DOS. If you have any questions on using the Application Recovery CDs, contact Sony Customer Support. Some applications on the Application Recovery CDs must be decompressed before the installation process begins. -
Page 123: Notes On Use
Notes on Use This section describes safety guidelines and precautions to help protect your computer from potential damage. On Handling the LCD Screen Do not leave the LCD facing the sun as it can damage the LCD. Be careful when using the computer near a window. Do not scratch the LCD. - Page 124 VAIO C1 PictureBook Computer User Guide To disconnect the cord, pull it out by the plug. Never pull the cord itself. Unplug your computer from the wall outlet if you will not be using the computer for a long time. When the AC adapter is not used, unplug it from the AC outlet.
- Page 125 In this case, allow at least an hour before turning on your computer. If any problems occur, unplug your computer, and contact your Sony Service Center. On Upgrading the System It is recommended that your memory upgrade be performed by an authorized Sony Service Center or a qualified technician.
- Page 126 VAIO C1 PictureBook Computer User Guide On Cleaning CD-ROMs Fingerprints and dust on the surface of a disc may cause read errors. Proper care of the disc is essential to maintain its reliability. Do not use solvents such as benzine, thinner, commercially available cleaners, or anti-static spray, as they may cause damage to the disc.
- Page 127 Notes on Use On Maintenance Make sure to disconnect the AC adapter before cleaning the computer. Avoid rubbing the LCD screen as this can damage the screen. Use a soft, dry cloth to wipe the LCD screen. Clean the computer with a soft cloth lightly moistened with a mild detergent solution.
-
Page 129: Limited Warranty Statement
SONY warrants this computer hardware product (“the Product”) against defects in material or workmanship as follows: 1. Labor: For a period of ninety (90) calendar days from the original date of purchase from SONY or a SONY authorized reseller, SONY will repair defects in material or workmanship in the Product at no charge, or pay the associated labor charges to a SONY authorized personal computer service facility. - Page 130 SONY with a credit card authorization to bill your credit card in the event you fail to return the original parts in the postage-paid envelope we provide. The credit card will only be charged for SONY’s list price for the part if the original part has not been returned within thirty (30) days.
-
Page 131: Garantie Restreinte
Seul le prix courant de SONY pour cette pièce sera porté à votre carte de crédit si la pièce ne lui est pas retournée dans un délai de trente (30) jours. - Page 132 Soutien technique : Bien que le soutien technique ne soit pas offert gratuitement au titre de cette garantie restreinte, SONY a prévu une ligne téléphonique à cet effet. Des frais peuvent être exigés à moins que le soutien technique gratuit et temporaire ne soit expressément indiqué par écrit comme caractéristique de votre Produit.
-
Page 133: Battery Limited Warranty
Product against defects in material or workmanship for thirty (30) days from your purchase date. If this Product is determined to be defective, SONY will replace the Product at no charge to you. This Limited Warranty contains your exclusive remedy. SONY shall not be liable for any incidental or consequential damages for breach of any express or implied warranty on this product. -
Page 135: Index
Index buttons Finish About This Computer tab Open AC adapter Start (Windows 98) AC power AC Profile power setting accessing online support cameras adding digital video recorder hardware canceling commands peripherals Caps Lock printers indicator light adjusting CAPTURE button brightness Capturing a still image air circulation Capturing a video clip... - Page 136 VAIO C1 PictureBook Computer User Guide setup screen troubleshooting starting display – troubleshooting dual display connecting mode CD-ROM drive options coin-operated telephones selecting digital video recorder disposal of lithium ion battery external keyboard drives external mouse CD-ROM floppy disk drive floppy disk monitor dual display function...
- Page 137 Index audio CDs CD-ROM discs diskettes lock lever Hard Disk Standby power setting reducing glare hard drive selecting to display output indicator light troubleshooting headphone lever connector help lighting Limited Warranty lithium ion battery i.LINK disposal IEEE1394 safety precautions indicator lights loading battery battery pack...
- Page 138 VAIO C1 PictureBook Computer User Guide Notebook Setup tabs power setting Num Lock AC Profile indicator light Maximum Battery Life numeric keypad area Power Management Off System Hibernation System Suspend online Video Standby help power sources Open button connecting opening power standby CD-ROM drive lid Hard Disk Standby...
- Page 139 Smart Capture Smart Label key combinations Smart Publisher License Agreement Smart Utilities registering Smart Write setup Sony Fax-on-Demand service Setup Wizard screen Sony Notebook Setup screen Start button speakers taskbar connectors troubleshooting Start button starting computer startup problems switching display...
-
Page 140: Electric Parts Arrangement Diagram
Keyboard Unit Cursol sensor Camera Board MBX-24 Board LEX-16 Board SWX-33 Board CNX-46 Board Nickel-hydrogen Battery MM-5 (32) Board Speaker PC Card connector DC Fan • Note that HDDs (Hard Disc Drives) are easily damaged by shock of impact. PCG-C1X/C1F (U/E) - Page 141 2-3. Removal 1. MBX-24 board Display and Palm rest MBX-24 Board Spring Bolt M 2 10 Spring Bolt M 2 10 2. DC Jack, HDD Note The DC jack is soldered. DC Jack Insulating Sheet Screw M 3 4 PCG-C1X/C1F (U/E)
- Page 142 3. Nickel-hydrogen battery and DC fan Nickel-hydrogen Battery DC Fan Spring Bolt M 2 6 4. PC card connector, MM-5 (32) board and CNX-46 board PC Card connector Dummy card CNX-46 Board MM-5 (32) Board +PS 2 12 PCG-C1X/C1F (U/E)
- Page 143 Keyboard Unit Cursol sensor Screw +M 2 4 6. Speaker, SWX-33 board and LEX-16 board Switch holder Double-faced adhesive paper (Speaker) LED Lump Speaker SWX-33 Board LEX-16 Board Screw +M 2 4 Screw +M 2 4 (MBX-SWX) (MBX-LEX) PCG-C1X/C1F (U/E)
- Page 144 Blind Rubber (Lower) Blind Rubber (Right) Spring Bolt M 2 6 LCD Bezel Spring Bolt M 2 6 Spring Bolt M 2 6 8. LCD cabinet Spring Bolt M 2 4 Spring Bolt LCD Cabinet M 2 4 PCG-C1X/C1F (U/E)
- Page 145 10.Camera cabinet and LCD cable Spring Bolt M 2 4 Point Spring Bolt M 2.6 4 Camera cabinet Spring Bolt M 2 4 Shaft retainer (C) Spring Bolt M 2 3 to VC-212 GND Plate Board LCD Cable PCG-C1X/C1F (U/E)
- Page 146 Be sure to replace the CD-204 and VC-212 boards together. P 1.7 8 Hood Assy Screw P 1.7 2.5 Camera Cover Spring Bolt M 2.6 4 F Ring Tilt Unit C CD-204 Board VC-212 Board Do not remove the connector. PCG-C1X/C1F (U/E) (END)
-
Page 148: Main Unit
• PCG-C1X/C1F series (for testing the IEEE 1394 interface and IrDA) 3-3. Start-up of the Self-Diagnostics Program Connect a floppy-disk drive, CD-ROM drive, battery and AC adaptor, Port Replicator to the PCG-C1X/C1F (hereinafter referred to as the main unit). Insert a floppy disk for self-diagnostics in the floppy-disk drive and a CD-ROM for self-diagnostics in the CD-ROM drive. - Page 149 Move the cursor to the desired item, and press Enter. • Diagnostics for PCG-C1X/C1F When Diagnostics 1 is selected from the Start menu, the screen shown below will appear. ********** Diagnostics for PCG-C1X/C1F ********** 1:Audio test Group... 2:Battery test... Once you select an item, the self-diagnostics for that item will be performed.
-
Page 150: Test Items
• IrDA test Group . . . Communication test for IrDA. The PCG-C1X/C1F for communication is required. • LED test . . . LEDs for the Power, Battery, hard-disk drive, Information, NumLock, CapsLock and ScrlLock will light one after another, in that order. -
Page 151: Tests That Are Not Supported
Press it once. • IEEE 1394 Interface test . . . Communication test of the IEEE 1394. A PCG-C1X/C1F series unit on which Windows will run is required. • Modem loopback test . . . Perform data transmission and reception between modems. -
Page 154: Block Diagram
PRIMARY RO-26 BOARD TRACK BATTERY FLASH Point4 AUDIO 256Kx8 ULTRA I/O ES1879S FDC37N958FR MODEM CONN KB CONN KEYBOARD SUPER I/O MODEM KBC w/ EC ROM INTERFACE COM2 IrDA RCVDL56ACFL POWER CONTROL ACCESS BUS PHONE RJ11 (J/UC Only) PCG-C1X/C1F (U/E) (END) -
Page 155: Frame Harness Diagram
MIC IN CN800 CN404 NiMH DC FAN J1801 HEADPHONE BATTERY CN1101 MM-5 (32) IC1000 BOARD IRDA SIDE A CN2401 CN2400 SWX-33 USB-FD SPEAKER BOARD OPTION BOARD DRIVE SIDE A DRIVE BUTTON Fromt FDD ASSY SW1100 PPK BUTTON PCG-C1X/C1F (U/E) (END) -
Page 156: Exploded View And Parts List
(C1F)•••MODEM COVER PLATE * 42 4-639-331-01 INSULATOR, MICROPHONE 1-959-014-11 HARNESS (DC JACK) 4-635-952-01 INSULATING SHEET (WJ) 4-639-088-02 HINGE (R) 4-640-231-01 INSULATING SHEET (DC JACK) 4-640-230-01 GASKET (CABINET) 4-636-345-01 TAPE (WJ), INSULATING 4-640-694-11 BOLT (M2), SPRING 7-628-253-55 SCREW +PS 2X12 PCG-C1X/C1F (U/E) -
Page 157: Display Unit
4-639-105-01 CLAW 4-639-106-01 STAY 4-639-107-01 PLATE, GND 4-639-110-01 BEARING (C) * B1 4-640-695-11 BOLT (M2.6), SPRING 4-640-694-01 BOLT (M2), SPRING 3-937-315-01 SCREW (DIA. 1.7X8), FITTING 7-627-552-08 SCREW, PRECISION +P 1.7X2.5 TO MBX-10 BOARD CN1300 TO MBX-10 BOARD CN1301 PCG-C1X/C1F (U/E) -
Page 158: Fdd Assembly
6-3. FDD Assembly Ref.No. Part No. Description ACCESSORIES & PACKING MATERIALS ************************************** 1-475-933-11 1-761-123-11 USB (PWB) Ref.No. Part No. Description 3-948-339-31 SCREW, TAPPING 1-777-926-31 CORD, CONNECTION 4-636-398-01 CUSHION 4-639-030-02 CASE, TOP 1-783-867-11 CABLE, VGA 1-958-977-11 CABLE, USB 4-639-031-01 CASE, BOTTOM 1-528-905-11 BATTERY PACK, LITHIUM ION 4-639-032-01 A-8044-957-A FDD 1000 UNIT (S)