Table of Contents
Advertisement
Quick Links
Advertisement
Table of Contents

Related Manuals for Emerson Barbie Petal BAR900


Summary of Contents for Emerson Barbie Petal BAR900
- Page 1 Petal MP3 Player with Photo Viewer See page 30 for your hidden GEMSTONE FUN button surprise! OWNER'S MANUAL BAR900 Barbie and associated trademarks and trade dress are owned by, and used under license from, Mattel, Inc. ©2007 Mattel, Inc. All Rights Reserved.
-
Page 2: Safety Instructions
Read these instructions. Keep these instructions. Follow all instructions. Heed all warnings. Do not use this unit near water. Clean only with a dry cloth. Disconnect the MP3 player from the computer before cleaning. Do not block any ventilation openings. Install in accordance with manufacturer’s instructions. - Page 3 FCC WARNING: This equipment may generate or use radio frequency energy. Changes or modifications to this equipment may cause harmful interference unless the modifications are expressly approved in the instruction manual. The user could lose the authority to operate this equipment if an unauthorized change or modification is made.
- Page 4 Selecting fine audio equipment such as the unit you’ve just purchased is only the start of your musical enjoyment. Now it’s time to consider how you can maximize the fun and excitement your equipment offers. This manufacturer and the Electronic Industries Association’s Consumer Electronics Group want you to get the most out of your equipment by playing it at a safe level.
- Page 5 Emerson Radio Corp. has produced this audio product under license from Mattel. We have taken great care to make sure your unit was in perfect working order when it left our factory. It has been designed to give you many years of enjoyment and trouble-free operation.
-
Page 6: Accessories Included
Volume up button Rom; located between the folding packaging card. - Press to increase the volume incrementally. Volume down button BAR900 - Press to decrease the volume incrementally. GEMSTONE “FUN” button - Press to access the voice recording. RESET hole... -
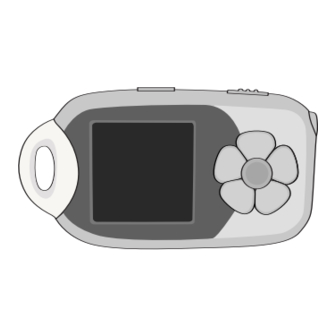
Page 7: Location Of Controls
1. Menu Button 2. Display 3. Lanyard Hole 4. RESET Access (Bottom of Unit) 5. Hold Switch 6. Skip/Search o Button 7. Headphones 8. Play/Pause ®p/Power Button 9. Skip/Search n Button 10. GEMSTONE FUN (Record) Button 11. Volume - Button 12. -
Page 8: Power Source
1. Connect the USB Cable to the USB port on the computer; connect the cable to the USB port on the MP3 player. Press the Play/Pause ®p/Power button; the battery indicator at the top right of the display will blink to indicate it is being charged. -
Page 9: Using The Lanyard
TO ATTACH THE LANYARD Insert the cord through the Lanyard hole. Loop the cord around the locking piece and pull until tightened. DOWNLOADING AND TRANSFERRING FILES SUPPORTED OPERATING SYSTEMS This unit is compatible with the following Operating Systems: Windows ME, 2000, XP and Vista or Mac 10.2.6 or higher Please refer to the following pages to learn how to: •... -
Page 10: Transferring Files
TRANSFERRING FILES You can download digital music files from the Internet or use encoding software to convert music that you have on an audio CD into MP3 or WMA format. Once these files are stored on your computer you can easily copy them to your player. - Page 11 TRANSFERRING AUDIO FILES TO YOUR DIGITAL AUDIO PLAYER USING A MAC COMPUTER Make sure to use a Mac computer with an operating system of 10.2.6 or higher to transfer audio files. 1. Turn on your computer. 2. Turn on your digital audio player. 3.
- Page 12 For Windows XP, you can also utilize Windows Media Player 10 software to convert music on an audio CD into MP3 or WMA format as follows: Open the Windows Media Player 10 Browser, then click on the “Rip” icon on the top tool bar. Insert a Music CD into CD-Rom your computer.
- Page 13 TRANSFERRING MP3/WMA FILES AND WMA FILES WITH DRM 9 or 10 USING WINDOWS MEDIA PLAYER 10 (FOR WINDOWS XP ONLY) To transfer MP3 files/WMA files/WMA files with DRM 9 or 10 to the player, follow the procedure described below using Windows Media Player 10. Before beginning the procedure please turn the unit on and connect the unit to the computer as previously described.
-
Page 14: Safely Remove Hardware
SAFELY REMOVING YOUR PLAYER FROM THE COMPUTER (FOR WINDOWS ME OR 2000) NOTE: To avoid damage to your player or data loss, always follow the procedure listed below before disconnecting your player from the USB port on your computer. Using your mouse, double click the "Safely Remove Hardware"... -
Page 15: Operation
TURNING THE POWER ON/OFF Turn the unit on by pressing the Play/Pause ®p/Power button; the Barbie opening screen will appear in the display temporarily. Then the menu will appear in the display. To turn the unit off, press and hold the Play/Pause ®p/Power button; a Barbie screen will appear in the display and the unit will turn off. - Page 16 OPERATION (CONTINUED) NAVIGATING THE MENUS With the unit on (see page 14), use the Skip/Search n 1 or o 2 button to navigate through the menus (i.e, in the Main Menu, select between Music, Record, Voice, Photo, Settings or About). Then, press the Play/Pause ®p/Power button 3 to confirm.
-
Page 17: To Listen To Mp3S/Wmas
TO LISTEN TO MP3s/WMAs With the unit on (see page 14), use the Skip/Search n 1 or o 2 button to navigate to Music, followed by the Play/Pause ®p/Power button 3 to confirm. TO PAUSE PLAYBACK During playback, if you wish to pause the file momentarily, press the Play/Pause ®p/Power button;... -
Page 18: To Select/Browse Through The Files
TO SELECT/BROWSE THROUGH THE FILES With the unit on (see page 14), use the Skip/Search n 1 or o 2 button to navigate to Music, followed by the Play/Pause ®p/Power button 3 to confirm. Use the Skip/Search n 1 or o 2 button to navigate to the desired file, followed by the Play/Pause ®p/Power button 3 to confirm;... -
Page 19: Setting The Play Mode
SETTING THE PLAY MODE With the unit on (see page 14), use the Skip/Search n 1 or o 2 button to navigate to Music, followed by the Play/Pause ®p/Power button 3 to confirm. Use the Skip/Search n 1 or o 2 button to select the desired Play Mode, followed by the Play/Pause ®p/Power button 3 to confirm. -
Page 20: Setting The Equalizer
SETTING THE EQUALIZER With the unit on (see page 14), use the Skip/Search n 1 or o 2 button to navigate to Music, followed by the Play/Pause ®p/Power button 3 to confirm. Use the Skip/Search n 1 or o 2 button to select the desired Equalizer setting (Normal, Rock, Jazz, Classical or Pop) followed by the Play/Pause... -
Page 21: High-Speed Music Search
FORWARD/REVERSE SKIP During playback, press the Skip/Search n button 1 to advance the player to the beginning of the next file. Press the Skip/Search n button 1 repeatedly to advance the player to higher- numbered files. During playback, press the Skip/Search o button 2 to move the player back to the beginning of the previous file. -
Page 22: To Create A Voice Recording
TO CREATE A VOICE RECORDING With the unit on (see page 14), use the Skip/Search n 1 or o 2 button to navigate to Record, followed by the Play/Pause ®p/Power button 3 to confirm. NOTES: • Speak/sing into the MIC (microphone) on the bottom of the unit while recording. - Page 23 SETTING THE RECORDING OPTIONS With the unit on (see page 14), use the Skip/Search n 1 or o 2 button to navigate to Record, followed by the Play/Pause ®p/Power button 3 to confirm. FORMAT: Use the Skip/Search n 1 or o 2 button to navigate to Format, followed by the Play/Pause ®p/ Power button 3 to confirm.
-
Page 24: To Listen To A Recording
TO LISTEN TO A RECORDING With the unit on (see page 14), use the Skip/Search n 1 or o 2 button to navigate to Voice, followed by the Play/Pause ®p/Power button 3 to confirm. Select the desired option from the pop- up menu: Play (to begin playback), Delete (to delete your selection) or Cancel (to cancel your selection) by... -
Page 25: To View Photos
TO VIEW PHOTOS– With the unit on (see page 14), use the Skip/Search n 1 or o 2 button to navigate to Photo, followed by the Play/Pause ®p/Power button 3 to confirm. ZOOM IN/OUT If you have selected Manual mode in Step 2 above, you can zoom in/out on your photos by pressing the Volume + 1 or - 2 buttons. -
Page 26: Setting The Brightness
SETTING THE BRIGHTNESS With the unit on (see page 14), use the Skip/Search n 1 or o 2 button to navigate to Settings, followed by the Play/Pause ®p/Power button 3 to confirm. Use the Skip/Search n 1 or o 2 button to select a brightness level between Low, Mid and High, followed... -
Page 27: Setting The Screen Saver
SETTING THE SCREEN SAVER With the unit on (see page 14), use the Skip/Search n 1 or o 2 button to navigate to Settings, followed by the Play/Pause ®p/Power button 3 to confirm. Use the Skip/Search n 1 or o 2 button to select the desired screen saver activation time (select OFF to keep the screen light always on) -
Page 28: Setting The Power Savings
SETTING THE POWER SAVINGS With the unit on (see page 14), use the Skip/Search n 1 or o 2 button to navigate to Settings, followed by the Play/Pause ®p/Power button 3 to confirm. Use the Skip/Search n 1 or o 2 button to select the desired Power Savings time (the unit will stay on before turning off due to inactivity),... - Page 29 SETTING THE PHOTO SLIDE TIME With the unit on (see page 14), use the Skip/Search n 1 or o 2 button to navigate to Settings, followed by the Play/Pause ®p/Power button 3 to confirm. Use the Skip/Search n 1 or o 2 button to select the desired Photo Slide time (will stay on the display when...
-
Page 30: To View The System Info
Windows format tool. IMPORTANT: • Do not select NTFS from the File System menu. If you do, the MP3 Player will not work and will need to be formatted again. • Please back-up the files on this unit before formatting. - Page 31 • Hope Has Wings • Where'd You Get That NOTE: These songs are protected and can't be deleted from the MP3 player. The songs will only show up on the MP3 player, they can't be downloaded via a computer. Barbie...
-
Page 32: Troubleshooting Guide
If you experience a problem with this unit, check the chart below before calling for service. SYMPTOM Unit will not turn on. No sound. The computer is not recognizing the player. WMA files with DRM can’t playback. No buttons work. Unit acting erratically. - Page 33 Repair Facility, or replace the product in our discretion. For repair or replacement, pack your unit in a padded box, enclose your check or money order payable to Emerson Radio Corp. in the amount of $9.00 (not required by California residents) to cover shipping and handling costs, and enclose a copy of your proof of purchase.
- Page 34 Refrigerator / Freezer Compressor parts only, additional 4 years • Home Office Products: 1 Year To obtain the name and address of the nearest Authorized EMERSON Service Centre or for more information on this warranty visit www.emersonelectronics.ca mail your inquiry to: SYNNEX Canada Limited, EMERSON Customer Service 200 Ronson Drive, Toronto, ON M9W 5Z9;...
- Page 35 ® BAR900-080307-01 Printed in China...