Yamaha MW10 Owner's Manual
Usb mixing studio
Hide thumbs
Also See for MW10:
- Service manual (71 pages) ,
- Mode d'emploi (36 pages) ,
- Manual de instrucciones (36 pages)
Table of Contents
Advertisement
Advertisement
Table of Contents

Related Manuals for Yamaha MW10


Summary of Contents for Yamaha MW10
- Page 2 Compliance with FCC regulations does MW10 Owner's Manual Connecting the Plug and Cord • This applies only to products distributed by Yamaha-Kemble Music (U.K.) Ltd. (2 wires). (FCC DoC) not guarantee that interference will not occur in all installations. If this product is found to be the source of interference, which can be determined by turning the unit “OFF”...
- Page 3 • If this device or the AC power adaptor should be dropped or damaged, immediately turn off the power switch, disconnect the electric plug from the outlet, and have the device inspected by qualified Yamaha service personnel. Connections • Before connecting the device to other devices, turn off the power for all devices.
- Page 4 • Copying of the supplied software or reproduction of this manual in whole or in part by any means is expressly forbidden without the written consent of the manufacturer. • Yamaha makes no representations or warranties with regard to the use of the software and documentation and cannot be held responsible for the results of the use of this manual and the software.
-
Page 5: Table Of Contents
In order to take full advantage of the many features and capabilities provided by the MW10, we urge you to read this owner’s manual thoroughly before using your MW10 system, and keep the manual in a safe, accessible location for future reference. -
Page 6: Before Turning On The Mixer
Example: Instruments, microphones, and CD players first, then the mixer, and finally the power amplifier or powered speakers. When turning off the power to the system, reverse the order described above. MW10 Owner's Manual Computer System Requirements Windows Computer Memory... -
Page 7: Quick Guide
• Always quit all applications running on the computer before turning the MW10 power on or off, or connecting or disconnecting the USB cable. • Wait at least 6 seconds between turning the MW10 on or off, and between connecting or disconnecting the USB cable. -
Page 8: Powering Up The System
MW10 Owner's Manual Step Powering Up the System Turn the power to all gear that is to be connected to the MW10 off/standby (except the computer), and set the ST Master Level Control, Channel LEVEL Controls, and GAIN Controls to their minimum settings. -
Page 9: Adjusting Level And Equalization
Conversely, signals below that "cutoff frequency" are attenuated. When an MW10 high-pass filter is turned on, signals below 80 Hz are attenuated. This can be useful for minimizing low-frequency breath noise from a vocalist, as well as handling noise, or rumble transmitted via the microphone stand. -
Page 10: Recording With Cubase Le
Recording with Cubase LE This section describes the procedure for recording via the MW10 mixer to the Cubase LE software we installed earlier. For details on operation of the Cubase LE software refer to the pdf-format manual provided with the software. - Page 11 Inspector on the left side of the display. If the Inspector is not showing, click the [Show Inspector] button ( ) in the upper left area of the project window. [Show Inspector] button [Stereo Switch] button Inspector MW10 Owner's Manual Quick Guide...
- Page 12 [Record Enable] button is on. Play the instrument to be recorded and, while watching the mixer window level meter, adjust the MW10 GAIN controls, Channel LEVEL Controls, and ST Master LEVEL Control so that the meter never goes above 0.0 dB.
-
Page 13: Mixing With Cubase Le
[Record Enable] button off. When a pair of headphones are plugged into the MW10 PHONES jack, you can adjust the headphone listening level via the MW10 C-R/PHONES control and the 2TR IN/USB control. - Page 14 [File] menu and select [Export] [Audio Mixdown]. MW10 Owner's Manual Enter a file name and select a file type. If you intend to use the file to create an audio CD, select the WAV file type (AIFF on a Macintosh), Stereo Interleaved, 16 bit, and 44.1 kHz.
-
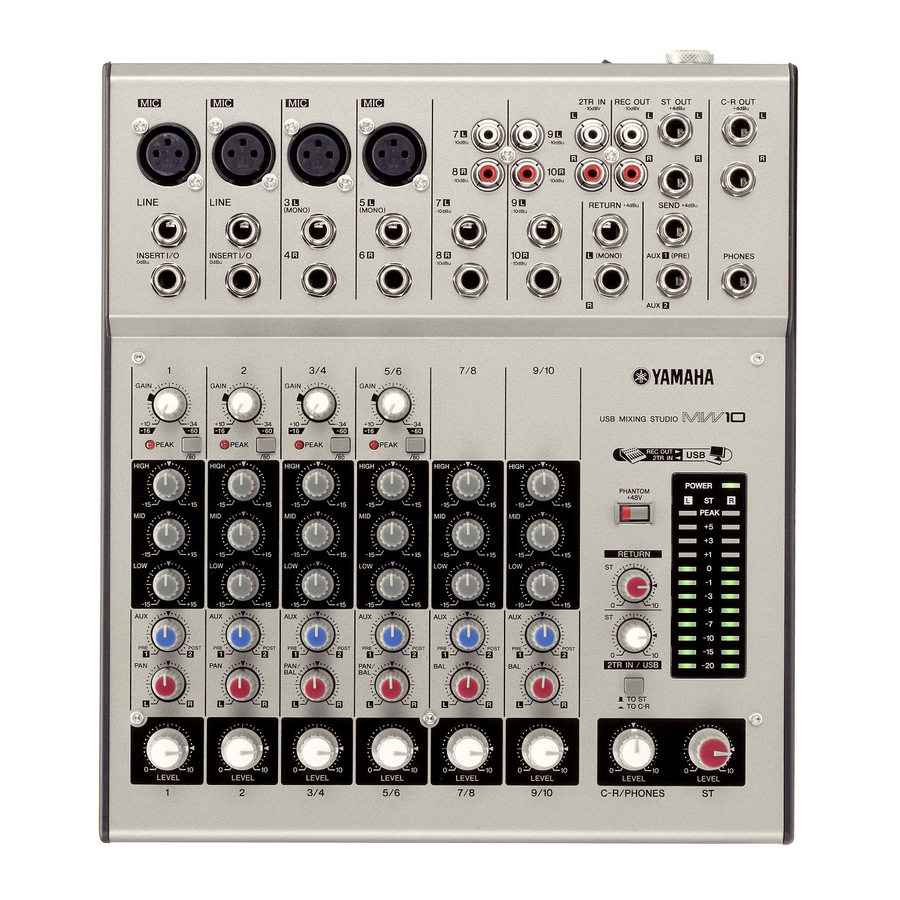
Page 15: Front & Rear Panels
To reduce noise, set the LEVEL Control knobs for unused channels all the way to the left (to the minimum setting). Front & Rear Panels Type Base Frequency Maximum Cut/Boost Shelving 10 kHz Peaking 2.5 kHz ±15 dB Shelving 100 Hz MW10 Owner's Manual... -
Page 16: Master Control Section
MW10 Owner's Manual 3 2TR IN/USB Control Adjusts the level of signals received via 2TR IN, as well as the level of signals received by the MW10 from the computer via the USB interface. 4 2TR IN/USB Switch (TO ST/TO C-R) -
Page 17: Input/Output Section
ST Master LEVEL Control. You use these jacks, for Tip: In example, to connect to an external recorder. n These connectors output the same signal that sent to the computer via the USB interface. Front & Rear Panels MW10 Owner's Manual... -
Page 18: Phones Jack
RETURN, LINE INPUT (stereo channels) * These jacks will also accept connection to monaural phone plugs. If you use monaural plugs, the connection will be unbalanced. MW10 Owner's Manual 9 RETURN L (MONO), R Jacks These are unbalanced phone-type input jacks. The signal received by these jacks is sent to the Stereo bus. -
Page 19: Rear Section
3 USB Connector Connects to the computer via the supplied USB cable. When connecting or disconnecting the USB cable be sure to turn the 2TR IN/USB control all the way down. Front & Rear Panels MW10 Owner's Manual... -
Page 20: Setting Up
Setup Examples Rhythm Machine Microphone Guitar MW10 Owner's Manual n Where an input channel provides both a MIC INPUT To avoid causing damage to speakers, power up the devices in the following order: Peripheral devices powered speakers). -
Page 21: Troubleshooting
• Are you using a USB hub? USB hubs can interfere with proper operation, so try connecting the MW10 directly to a USB port on the computer. If the computer has multiple USB ports, try a different USB port. - Page 22 Refer to your computer’s owner’s manual for information on installing and setting up extra memory. There is a delay when playing a software synthesizer via a MIDI keyboard (latency). • Check the URL listed below for the latest information. http://www.yamahasynth.com/ MW10 Owner's Manual...
-
Page 23: Appendix
290.5 mm 1.8 kg Operating temperature: 0 to 40 °C, Storage temperature: -20 to 60 °C Appendix UNIT –3 –128 –100 –87 (91 dB S/N) –85 (89 dB S/N) –64 (68 dB S/N) 64.2 23.8 –70 –70 MW10 Owner's Manual... - Page 24 C-R OUT (L, R) 150 ohms PHONES 100 ohms Where 0 dBu=0.775 Vrms and 0 dBV=1 Vrms Digital Input/Output Specifications Connector Format USB Audio 1.1 MW10 Owner's Manual Input Appropriate Sensitivity* Impedance Impedance –72 dBu (0.195 mV) 3 k ohms 50–600 ohms mic...
-
Page 25: Dimensional Diagrams
Appendix Dimensional Diagrams Unit: mm MW10 Owner's Manual... -
Page 26: Block Diagram And Level Diagram
Appendix Block Diagram and Level Diagram MW10 Owner's Manual... -
Page 27: Software License Agreement
(14) days from the date of receipt, as evidenced by a copy of the receipt. Yamaha's entire liability and your exclusive remedy will be replacement of the defective media if it is returned to Yamaha or an authorized Yamaha dealer within fourteen days with a copy of the receipt. - Page 28 THE USE, MISUSE OR INABILITY TO USE THE SOFTWARE, EVEN IF YAMAHA OR AN AUTHORIZED DEALER HAS BEEN ADVISED OF THE POSSIBILITY OF SUCH DAMAGES. In no event shall Yamaha's total liability to you for all damages, losses and causes of action (whether in contract, tort or otherwise) exceed the amount paid for the SOFTWARE.
- Page 29 Empfangsdatum und bei normalem Gebrauch frei von Herstellungs- und Materialfehlern sind. Der volle Umfang der Verantwortung von Yamaha und Ihre einzige Abhilfemöglichkeit ist der Ersatz des defekten Mediums oder der defekten Medien durch Einsendung an Yamaha oder einen autorisierten Vertragshändler von Yamaha innerhalb von vierzehn Tagen zusammen mit einer Kopie des Kaufbelegs/Lieferscheins. Yamaha ist nicht zum Ersatz von Medien verpflichtet, die durch Unfälle, Misbrauch oder fehlerhafte Anwendung beschädigt wurden.
- Page 30 DRITTER bezeichnet wird, erkennen Sie die Bestimmungen aller mit der SOFTWARE DRITTER mitgelieferten Vereinbarungen an und erkennen an, dass der Hersteller der SOFTWARE DRITTER verantwortlich ist für etwaige Garantien oder Haftungen für die SOFTWARE DRITTER. Yamaha ist in keiner Weise verantwortlich für die SOFTWARE DRITTER oder deren Gebrauch durch Sie.
-
Page 31: Contrat De Licence De Logiciel
Votre seul recours opposable à Yamaha consiste dans le remplacement du support reconnu défectueux, à condition qu’il soit retourné à Yamaha ou à un revendeur Yamaha agréé dans un délai de quatorze jours avec une copie du reçu. Yamaha n’est pas tenu de remplacer un support endommagé... - Page 32 • Yamaha ne vous fournira aucun service ni maintenance concernant le LOGICIEL DE FABRICANT TIERS. • En aucun cas Yamaha ne pourra être tenu responsable, par vous-même ou une autre personne, de quelque dommage que ce soit, notamment et de manière non limitative, de dommages directs, indirects, accessoires ou consécutifs, de frais, pertes de bénéfices, pertes de données ou d’autres dommages résultant de l’utilisation correcte ou incorrecte ou de l’impossibilité...
- Page 33 Yamaha o a un distribuidor autorizado de Yamaha dentro del período de catorce días con una copia del recibo. Yamaha no se hará responsable de sustituir el soporte si se ha dañado por accidente, abuso o mal uso. EN LA MEDIDA PERMITIDA POR LA LEY APLICABLE, YAMAHA DENIEGA EXPRESAMENTE TODAS LAS GARANTÍAS IMPLÍCITAS CON RESPECTO AL SOPORTE MATERIAL,...
- Page 34 SOFTWARE, INCLUSO SI SE HA ADVERTIDO DE LA POSIBILIDAD DE DICHOS DAÑOS A YAMAHA O A UN DISTRIBUIDOR AUTORIZADO. En ningún caso la responsabilidad total de Yamaha en concepto de todos los daños, pérdidas y derechos de acción (contractuales, torticeras o de cualquier otra índole) podrá...
- Page 35 For details of products, please contact your nearest Yamaha representative or the authorized distributor listed below. Pour plus de détails sur les produits, veuillez-vous adresser à Yamaha ou au distributeur le plus proche de vous figurant dans la liste suivante.
-
Page 36: Mixer Setup
Source: Source: Session Information Title: Date: Place: Mixer Setup Source: Source: Source: U.R.G., Pro Audio & Digital Musical Instrument Division, Yamaha Corporation Notes: Source: Source: Yamaha Web Site (English only) http://www.yamahasynth.com/ Yamaha Manual Library http://www.yamaha.co.jp/manual/ © 2005 Yamaha Corporation WG35780 606MWZCx.x-0xB0...