Table of Contents
Advertisement
Quick Links
Advertisement
Table of Contents

Related Manuals for ABB ACQ580-P Series


Summary of Contents for ABB ACQ580-P Series
- Page 1 — ABB DRIVES FOR WATER ACQ580-xP 3R Irrigation Drive Package Supplement Installation Manual for ACQ580-xP 3R Irrigation Drive Package ACQ580-0P…+C192+F289 3R Irrigation drive package (230V, 25-100 HP; 480V, 40-200 HP) ACQ580-3P…+C192+F289 3R Irrigation drive package (480V, 40-150 HP)
-
Page 2: Table Of Contents
Table of Contents Safety instructions ........... Use of warnings and notes in this manual . -
Page 3: Safety Instructions
Safety instructions These are the safety instructions which you must obey when you install and operate the drive and do maintenance on the drive. If you ignore the safety instructions, injury, death or damage can occur. Use of warnings and notes in this manual ... -
Page 4: Electrical Safety In Installation, Start-Up And Maintenance
Depending on the wiring and parametrization of the drive, the stop key on the control • panel may not stop the drive. Do not attempt to repair a malfunctioning drive; contact your local ABB representative in • regard to malfunctioning drive. -
Page 5: Additional Instructions And Notes
Make sure that the voltage between the drive DC terminals (UDC+ and UDC-) and the • grounding terminal (PE) is close to 0 V. 6. Install temporary grounding as required by the local regulations. 7. Ask for a permit to work from the person in control of the electrical installation work If the drive does not operate according to these steps, refer to the ACQ580-01 Hardware Manual 3AXD50000044862 3AXD50000045935... -
Page 6: Printed Circuit Boards
External wiring can supply dangerous voltages to the terminals of relay outputs (RO1, RO2 • and RO3). The Safe torque off function does not remove the voltage from the main and auxiliary • circuits. The function is not effective against deliberate sabotage or misuse. Printed circuit boards ... -
Page 7: General Safety In Operation
ABB and its affiliates are not liable for damages and/or losses related to such security breaches, any unauthorized access, interference, intrusion,... -
Page 8: Contents
Contents This manual is the Installation Manual for ACQ580 irrigation drive packages. Complete technical 3AXD50000044862 details are available in the ACQ580-01 Hardware Manual ( ) or ACQ580-31 3AXD50000045935 Hardware Manual ( ). Complete programming information is available in the 3AXD50000035867 ACQ580 pump control program firmware manual ( Drive identification ... - Page 9 ACQ580-3P…+C192+F289, ULH 3R irrigation drive package A C Q 5 8 0 4 + C 1 9 2 + F 2 8 9 + Product series Construction Size Voltage Standard Options Options All option codes must be in alphanumeric order A C Q 5 8 0 Product series Base Drive Construction...
-
Page 10: Installation
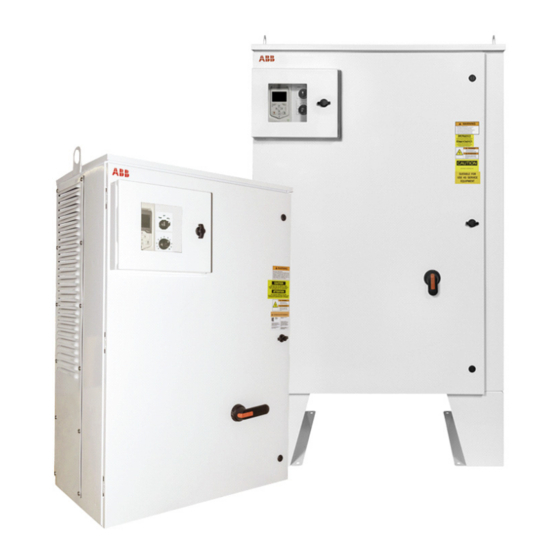
This information is unique to ACQ580 Irrigation Drive Packages (ACQ580-xP…+C192+F289). This includes an ACQ580 AC adjustable frequency drive with ABB irrigation specific software packaged in a UL type 3R enclosure with a molded case circuit breaker input disconnect, Service Entrance rating for three phase four wire power system, input voltage surge suppressor and condensation heater. -
Page 11: Installing The Wiring
M3R-32W wall mount, back view M3R-40W wall mount, back view 40.5 32.5 60.3 52.3 Installing the wiring WARNING · Metal shavings or debris in the enclosure can damage electrical equipment and create a hazardous condition. Where parts, such as conduit plates require cutting or drilling, first remove the part. - Page 12 M3R-32W Circuit Breaker Control Terminals Disconnect T1 T2 T3 L1 L2 L3 Input Power Terminals Input Cable Ground Lug Entry/Exit Figure 1. Example shown is ACQ580-0P-096A-4+C192+F289 (R5 frame) with optional hand-off-auto switch (+G302) and speed potentiometer (+G303). M3R-40W Motor Terminals Circuit Breaker Disconnect...
-
Page 13: Power Connection Terminals
Power connection terminals The following table shows the maximum wire size and required tightening torque for incoming power, grounding and motor terminals. Table 2. Terminal connection table Terminal Wire Range & Tightening Torque Output Base Enclosure Input/Circuit Breaker Ratings Type Code Drive Motor Terminals... -
Page 14: Irrigation Specific Home Screens
Irrigation specific home screens Three home screen options that been configured specifically for irrigation. The primary home screen includes the exclusive total flow, acre foot calculation. Primary home screen Tertiary home screen Secondary home screen How to start up the drive using First start assistant with the irrigation specific software ... - Page 15 1 – First start assistant guided settings: Language, date and time, and motor nominal values Have the motor or pump name plate data at hand. Power up the drive. The First start assistant guides you through the first start-up. The assistant begins automatically. Wait until the control panel enters the view shown on the right.
- Page 16 Refer to the motor or pump nameplate for the following nominal value settings of the motor. Enter the values exactly as shown on the motor or pump nameplate. Example of a nameplate of an induction (asynchronous) motor: ABB Motors motor M2AA 200 MLA 4 IEC 200 M/L 55 Ins.
- Page 17 If the pump type of Submersible/Turbine was selected, adjust the quick ramp settings for seconds and Hz by pressing • Scroll the view with Press (Next) to continue. If the pump type of Booster Pump was selected, adjust the ramp ...
- Page 18 Adjust the setpoint to your needs. • Go to the edit view of a selected item by pressing Press (Next) to continue. If you want to set up flow calculations, select Yes and press (Next). If you do not want to set up flow calculations, select Exit to hand mode and press (Next).
-
Page 19: Irrigation Primary Settings
3 – Hand/Off/Auto operation The drive can be in remote control or local control, and in local control there are additionally two different modes. Remote control: Drive is controlled from the I/O or the fieldbus. • Top row of the view shows Auto. Local control: Drive is controlled from the control panel. -
Page 20: Irrigation Total Flow Accumulated Feature
Ramps Advanced functions • • Quick ramps External events Acceleration time Supervision Deceleration time Timed functions Stop mode Confirmation for HAND/OFF Ramp time target frequency Clock, region, display • Limits • Select drive Minimum frequency Language Maximum frequency Date & time Maximum current Units Drive name... -
Page 21: Default I/O Connection Diagrams
Default I/O connection diagrams I/O connection diagram X1 REFERENCE VOLTAGE AND ANALOG I/O SIGNAL CABLE SHIELD (SCREEN) OUTPUT FREQUENCY/SPEED REF 0-10 V, HAND ANALOG INPUT CIRCUIT COMMON REFERENCE VOLTAGE 10 VDC SHLD ANALOG INPUT CIRCUIT COMMON OUTPUT FREQUENCY 0-20mA MOTOR CURRENT 0-20 mA ANALOG OUTPUT CIRCUIT COMMON AUX VOLTAGE OUTPUT +24 VDC 250 mA MAX... -
Page 22: Optional Floor Kit Mounting
The ACQ580 irrigation drive package is factory programmed in the following parameters: Parameter Parameter name Value 12.25 AI2 unit selection 19.11 Ext1/Ext2 selection 20.01 Ext1 commands In1 Start, In2 Dir 20.04 Ext1 in2 source 20.06 Ext2 commands In1 Start, In2 Dir 20.08 Ext2 in 1 source 20.09... -
Page 23: Floor Kit Identification
Floor kit identification Table 3. ACQ580-xP+C192 floor kits Light Duty Enclosure Frame Designation Floor Kit 6-Pulse; 208/240 Volt Ratings Floor-Kit-3R-Irrigation-12Hx18D M3R-32W 30-40 (3AUA0000163767) Floor-Kit-3R-Irrigation-12Hx24D 60-75 M3R-40W (3AUA0000235652) 6-Pulse; 480 Volt Ratings 40-60 Floor-Kit-3R-Irrigation-12Hx18D M3R-32W (3AUA0000163767) Floor-Kit-3R-Irrigation-12Hx24D 125-150 M3R-40W (3AUA0000235652) ULH;... - Page 24 Step 3: Remove vent plate on the right and left sides of the enclosure to access the inside of the unit for hardware assembly. The plates may be remounted using two screws for safe keeping. Step 4: Assemble feet with mounting hardware. Step 5: Using the lifting eyes, lift the enclosure and place onto mounting studs, then assemble hardware.
-
Page 25: Enclosure M3R-40W
Enclosure M3R-40W; Floor-Kit-3R-Irrigation-12Hx24D Step 1: Prepare ground mounting surface for enclosure. Step 2: Using a lifting device, carefully lay the enclosure on its back. Drill ten (10) hoes with 7/16” drill bit. Step 3: Remove vent plate on the right and left sides of the enclosure to access the inside of the unit for hardware assembly. - Page 26 Step 4: Assemble feet with mounting hardware. Step 5: Using the lifting eyes, lift the enclosure and place onto mounting studs, then assemble hardware.
-
Page 27: Dimensions & Weights
Dimensions & weights M3R-32W 32.5 26.0 23.0 52.3 49.0 M3R-40W 40.5 34.0 28.9 60.3 57.0... -
Page 28: Ambient Conditions
Table 4. Dimensions & Weights Hight Height Width Width Depth Weight (6- Weight Frame Dim ref (H1) (H2) (W1) (W2) pulse) (ULH) size M3R-32W 52.30 49.00 32.50 26.00 23.00 M3R-32W 52.30 49.00 32.50 26.00 23.00 M3R-40W 60.30 57.00 40.50 34.00 28.90 M3R-40W 60.30... -
Page 29: Applicable Standards
(clean) section of the enclosure and one in the back (dirty) section of the enclosure. The fans should be replaced after every 60,000 hours of run time. Input voltage surge suppressor maintenance ABB recommends replacing the input voltage surge suppressor (TVSS) installed in the ACQ580 irrigation drive package every three (3) years. - Page 30 Product and service inquiries Address any inquiries about the product to your local ABB representative, quoting the type designation and serial number of the unit in question. A listing of ABB sales, support and service contacts can be found by navigating to www.abb.com/searchchannels.
- Page 31 © Copyright 2022 ABB. All rights reserved. Specifications subject to change without notice.