
Related Manuals for LG DP546


Summary of Contents for LG DP546
- Page 1 OWNER’S MANUAL DVD Player Please read this manual carefully before operating your set and retain it for future reference. DP546...
-
Page 2: Safety Information
Getting Started Safety Information CAUTION CAUTION: This product employs a Laser System. RISK OF ELECTRIC SHOCK To ensure proper use of this product, please read DO NOT OPEN this owner’s manual carefully and retain it for future CAUTION: TO REDUCE THE RISK OF ELECTRIC reference. - Page 3 Getting Started This device is equipped with a portable battery or accumulator. Safety way to remove the battery or the battery from the equipment: Remove the old battery or battery pack, follow the steps in reverse order than the assembly. To prevent contamination of the environment and bring on possible threat to human and animal health, the old battery or the battery put it in the appropriate...
- Page 4 Getting Started Notes on Discs y Do not touch the playback side of the disc. Hold the disc by the edges so that fingerprints do not get on the surface. Never stick paper or tape on the disc. y After playing, store the disc in its case. Do not expose the disc to direct sunlight or sources of heat and never leave it in a parked car exposed to direct sunlight.
-
Page 5: Table Of Contents
Table of Contents Table of Contents Getting Started Operating Safety Information General Playback Introduction – Playing a Disc – About the “7” Symbol Display – Playing a File – Symbols Used in this Manual – On-Screen Display – Supplied Accessories –... -
Page 6: Introduction
Getting Started Introduction Playable Discs DVD-VIDEO Discs such as movies that can be About the “7” Symbol Display purchased or rented. “7” may appear on your TV display during DVD±R operation and indicates that the function explained - Video mode and finalized only in this owner’s manual is not available on that specific media. -
Page 7: File Compatibility
Getting Started File Compatibility Photo Files Photo size: Less than 2M recommended. Overall y Progressive and lossless compression photo image files are not supported. Available File extensions: “.avi”, “.mpg”, ”.mpeg”, “.mp3”, “.wma”, “.jpg”, “.jpeg”, “.divx” Notes of USB Device y The file name is limited to 20 characters. y This unit supports USB device with FAT16 or y Depending on the size and number of the files, FAT32 format. -
Page 8: Remote Control
Getting Started Remote Control • • • • • • • • • • c • • • • • • • • • • DVD MENU: Accesses or exits the DVD menu. TITLE: Accesses the disc’s title menu, if available. w/s/a/d: Navigates the menus. -
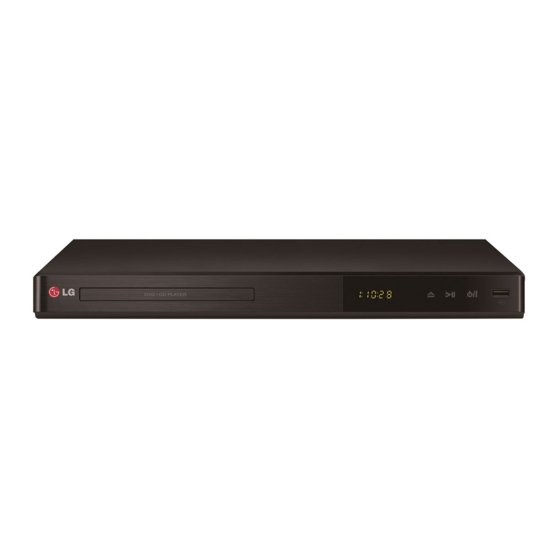
Page 9: Front Panel
Getting Started Front Panel a Disc Tray e T (Play/Pause) b Display window f 1/! (Power) c Remote sensor g USB Port d R (Open/Close) Rear Panel b c d e VIDEO COAXIAL REAR CENTER FRONT R WOOFER DIGITAL AUDIO 5.1ch AUDIO OUT AUDIO OUT VIDEO OUT... -
Page 10: Connecting
Connecting Connecting to your TV Connecting to an Amplifier Connecting Video / Audio Cable Connecting Audio Cable Connect the VIDEO/AUDIO OUT on the unit to Connect the AUDIO OUT (L/R) on the unit to 2CH VIDEO/AUDIO IN on TV with Video/Audio cable, AUDIO IN on amplifier with Audio cable, such as such as VIDEO with yellow, AUDIO Left/Right with AUDIO Left/Right with white/red. -
Page 11: Connecting Coaxial (Digital Audio) Cable
Connecting Connecting COAXIAL (digital Connecting 5.1 CH Audio audio) Cable Cables Connect one of the unit’s DIGITAL AUDIO (COAXIAL) Connect a amplifer with analog 5.1 channel input jacks to the corresponding jack on your amplifier. jacks. VIDEO COAXIAL REAR CENTER FRONT Rear of the Unit R WOOFER DIGITAL... -
Page 12: System Setting
System Setting Settings [DISPLAY] Menu TV Aspect When the unit is turned-on at the first time, you have to select the desired language. (Optional) Select which screen aspect to use based on the shape of your TV screen. Adjust the Setup Settings [4:3]: Select when a standard 4:3 TV is You can change the settings of the unit in the connected. -
Page 13: [Audio] Menu
System Setting [AUDIO] Menu Speaker Setup Selects an option according to the analog audio Set the player’s Audio options according to various connection. disc output type you use. (Optional) Dolby Digital / DTS / MPEG [2 Ch]: Selects when 2 Channel stereo system is connected to this unit. -
Page 14: [Lock] Menu
System Setting [LOCK] Menu [OTHERS] Menu Firstly, you have to create the 4-digit password on B.L.E (Black Level Expansion) [Area Code] to use the LOCK menu. To select the black level of playback pictures, set If you forget your password your preference and monitor’s ability. -
Page 15: Operating
Operating Operating General Playback On-Screen Display You can display and adjust various information and settings about the content. Playing a Disc 1. While playback, press DISPLAY to show various playback information. 1. Press OPEN/CLOSE (B), and place a disc on the 2. -
Page 16: General Operation
Operating Advanced Playback General Operation Do this Movie Playback Press PLAY (z) Do this Pause Press PAUSE/STEP (M) Display disc Press DVD MENU. (DVD Only) menu Stop Press STOP (Z) Play Press REPEAT during playback. To Skip to the next Press C or V during repeatedly select an option to be repeated,... - Page 17 Operating Note Music y If you use this function, the “CD_REC” folder Do this will be created automatically in the USB Flash Drive then the music file(s) is saved in Play Press REPEAT during playback. repeatedly To select an item to be repeated, y If you remove USB Flash Drive, turn off or Press REPEAT repeatedly.
-
Page 18: Photo
Operating Photo Do this View photo Use w/s/a/d to highlight files as a slide (`) icon then press ENTER (b) show to start slide show. Adjust slide You can change slide show show speed speed using a/d when (J) icon is highlighted. Rotate a photo Use w/s to rotate the photo in full screen counterclockwise or clockwise while viewing a photo... -
Page 19: Troubleshooting
Troubleshooting Troubleshooting Troubleshooting Issue Cause Solution No power The power cord is disconnected. Plug the power cord into the wall outlet securely. The power is on, but No disc is inserted. Insert a disc. the unit does not work. The unit does not start An unplayable disc is inserted. -
Page 20: Appendix
Appendix Area Code List Choose an area code from this list. Area Code Area Code Area Code Area Code Afghanistan Fiji Monaco Singapore Argentina Finland Mongolia Slovak Republic Australia France Morocco Slovenia Austria Germany Nepal South Africa Belgium Great Britain Netherlands South Korea Bhutan... -
Page 21: Language Code List
Appendix Language Code List Use this list to input your desired language for the following initial settings: [Disc Audio], [Disc Subtitle] and [Disc Menu]. Language Code Language Code Language Code Language Code Afar 6565 French 7082 Lithuanian 7684 Sindhi 8368 Afrikaans 6570 Frisian... -
Page 22: Specifications
Appendix Specifications Trademarks and Licenses Power 110 - 240 V ~, 50 / 60 Hz requirements Power consumption Dimensions (360 x 39.5 x 200) mm Manufactured under license from Dolby (W x H x D) Laboratories. Dolby and the double-D symbol are trademarks of Dolby Laboratories.