Table of Contents
Advertisement
Available languages
Available languages
Quick Links
OPERATOR'S MANUAL
MANUEL DEL OPERADOR
10A - 19" 2-IN-1
ELECTRIC MOWER
10A - 19" 2-IN-1
CORTADORA DE PASTO ELÉCTRICA
Model No.
151.37214
o
Modelo n
151.37214
WARNING:
To reduce the risk of injury, the user must read and understand the operator's manual
before using this product.
ADVERTENCIA:
Sears Brands Management Corporation, Hoffman Estates, IL 60179 USA
Visit the Craftsman web page: www.craftsman.com
Visite el sitio web de Craftsman: www.craftsman.com
Para reducir el riesgo de lesiones, el usuario debe leer y comprender el manual del operador
antes de usar este producto.
Save this manual for future reference
Guarde este manual pare futuras consulta
3084514
Advertisement
Table of Contents

Related Manuals for Craftsman 151.37214


Summary of Contents for Craftsman 151.37214
- Page 1 Sears Brands Management Corporation, Hoffman Estates, IL 60179 USA Visit the Craftsman web page: www.craftsman.com Visite el sitio web de Craftsman: www.craftsman.com Save this manual for future reference Guarde este manual pare futuras consulta 3084514...
-
Page 2: Table Of Contents
Un producto defectuoso puede reemplazarse por uno nuevo, de manera gratuita, considerando que se presente una PRUEBA DE VENTA. Para conocer la cobertura de la garantía y obtener un reemplazo gratuito, visite el sitio Web www.craftsman.com/ warranty Esta garantía no cubre el aspa de corte, la cual es una pieza desechable que puede desgastarse debido al uso normal dentro del periodo de garantía. -
Page 3: General Safety Rules
GENERAL SAFETY RULES ■ Wear safety glasses or goggles that aremarked to WARNING! comply with ANSI Z87.1 standard when operating this READ AND UNDERSTAND ALL INSTRUCTIONS. product. Failure to follow all instructions listed below and on ■ Use the right appliance. Do not use the lawn mower the machine may result in electric shock, fi... -
Page 4: Specific Safety Rules
GENERAL SAFETY RULES ■ Ground Fault Circuit Interrupter (GFCI) protection should be provided on the circuit(s) or outlet(s) to be used for the lawn mower. Receptacles are available having built- in GFCI protection and may be used for this measure of safety. ■... -
Page 5: Symbols
SYMBOLS Some of the following symbols may be used on this product. Please study them and learn their meaning. Proper interpretation of these symbols will allow you to operate the product better and safer. SYMBOL NAME DESIGNATION/EXPLANATION Volts Voltage Amperes Current Hertz Frequency (cycles per second) - Page 6 SYMBOLS The following signal words and meanings are intended to explain the levels of risk associated with this product. SYMBOL SIGNAL MEANING Indicates an imminently hazardous situation, which, if not avoided, DANGER will result in death or serious injury. Indicates a potentially hazardous situation, which, if not avoided, WARNING could result in death or serious injury.
-
Page 7: Features
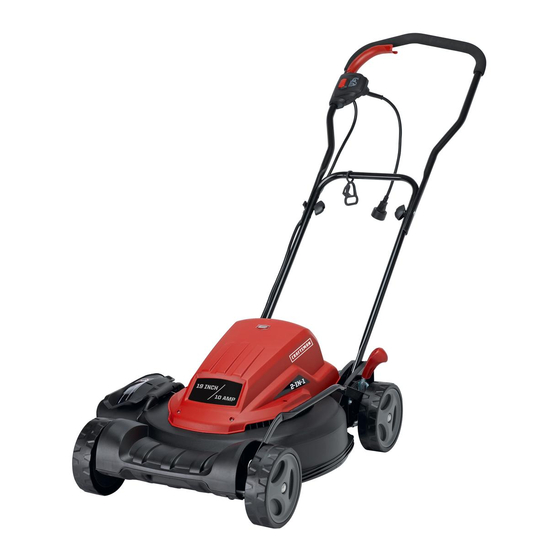
FEATURES PRODUCT SPECIFICATIONS Electric Mower Voltage………………………………………………………………………………....120V~6Hz Motor Amperage……………………………………………………………………………………………………………10A Motor Speed………………………………………………………………………………………………………...3600 r/min Cutting Width………………………………………………………………………………………………...18 inch (460mm) Cutting HeightAdjustment……………………………………………………………6 Levels (1.5"/38mm - 4"/101.6mm) Deck Width……………………………………………………………………………………………...…...19 inch (480mm) Wheel Size………………………………………………………………………………………………….6.7 inch (170mm) Weight…………………………………………………………………………………………………………31 lbs (14.00kg) KNOW YOUR LAWN MOWER C - Foldable push handle - ergonomic steel handle makes mowing easy. -
Page 8: Electrical
ELECTRICAL It is possible to tie the extension cord and power DOUBLE INSULATION cord in a knot to prevent them from becoming Double insulation is a concept in safety in electric disconnected during use. Make the knot as shown in power tools, which eliminates the need for the usual fi... -
Page 9: Assembly
ASSEMBLY KNOW YOUR LAWN MOWER ASSEMBLING HANDLE See Fig 3 See Fig 3-4 ■ Take the mower out of the box,put it on the ground This product requires assembly. ■ Pull up and back on the lower handle and upper ■... -
Page 10: Operation
OPERATION MOWING TIPS WARNING! ■ Make sure the lawn is clear of stones, sticks, wires, Do not allow familiarity with this type of product to and other objects that could damage the lawn mower make you careless. Remember that a careless fraction blades or motor. -
Page 11: Maintenance
MAINTENANCE WARNING! WARNING! Before performing any maintenance, make sure the When servicing, use only identical replacement parts. mower is unplugged from the power supply. Failure Use of any other parts may create a hazard or cause to heed this warning could result in serious personal product damage. - Page 12 MAINTENANCE BALANCING THE BLADE STORING THE MOWER See Fig 10-B See Fig 12 ■ Disconnect the mower from the power supply. When sharpening, care should be taken to keep the blade balanced. An unbalanced blade will cause ■ Turn mower on its side and clean grass clippings that excessive vibration when the mower is running.
-
Page 13: Troubleshooting
TROUBLESHOOTING Problem Possible Cause Solution Handle locks not tightened. Tighten handle locking knobs. Reconnect the cord and use the cord retainer to keep the cord close to the motor/blade control.Connect Extension cord not connected the extension cord to a live 120V to the mower plug. - Page 14 CRAFTSMAN 10A - 19" 2-IN-1 ELECTRIC MOWER – MODEL NUMBER 151.37214 The model number will be found on a label attached to the motor housing. TO PURCHASE REPLACEMENT PARTS, CALL 1-888-331-4569 14 ― English...
- Page 15 CRAFTSMAN 10A - 19" 2-IN-1 ELECTRIC MOWER – MODEL NUMBER 151.37214 The model number will be found on a label attached to the motor housing. TO PURCHASE REPLACEMENT PARTS, CALL 1-888-331-4569 Key Number Drawing Number Description Quantity GM65BX.00.02.X1.01 Motor Cover Assembly GM65BX.00.03.X1.01...
- Page 16 See this section for all of the fi gures referenced in the operator’s manual. Consulte esta sección para ver todas las fi guras a las que se hace referencia en el manual del operador. Fig. 1 A - Cord retainer(Retén del cable) B - Cutting Height Adjustment Lever(Palanca de ajuste de la altura de corte) C - Foldable push handle(Manilla plegable)
- Page 17 Fig. 3 Fig. 4 Fig. 5 Fig. 6 (BAJA) HIGH(ALTA)
- Page 18 Fig. 7 Switch button Lever Switch (Botón interruptor) (Interruptor de la palanca) Fig. 8 Fig. 9 FAN ASSEMBLY(CONJUNTO DE PIEZAS DEL VENTILADOR) WEDGE A BLOCK (CONJUNTO DE PIEZAS DEL VENTILADOR) BLADE (ASPA) BOLT (PERNO)
- Page 19 Fig. 10 Fig. 11 AXLE(EJE) RETAINING HUBCAP WHEEL (TAPA DE RETENCIÓN) (RUEDA) Fig. 12 HANDLE LOCKING KNOBS (PERILLAS DE BLOQUEO DE LA MANILLA) UPPER HANDLE (MANILLA SUPERIOR) LOWER HANDLE ASSEMBLY (PARTE INFERIOR DEL ASIDOR) HANDLE MOUNTING BRACKETS (ABRAZADERAS DE SOPORTE DE LA MANILLA)
-
Page 20: Reglas Generales De Seguridad
REGLAS GENERALES DE SEGURIDAD ■ Use siempre lentes de seguridad con protección ¡ADVERTENCIA! lateral. Los lentes de uso cotidiano solo tienen cristales LEA Y ASEGÚRESE DE COMPRENDER TODAS resistentes a impactos. NO son lentes de seguridad. LAS INSTRUCCIONES. El incumplimiento de las Siga esta regla y reducirá... -
Page 21: Reglas De Seguridad Específicas
REGLAS GENERALES DE SEGURIDAD condiciones. Al utilizar un alargador, asegúrese de SJTW-A o SJTOWA. Estos cables son aptos para utilizar uno lo sufi cientemente potente como para uso en exteriores y reducen el riesgo de descargas llevar la corriente necesaria que el producto necesita. eléctricas. -
Page 22: Símbolos
SÍMBOLOS Algunos de los siguientes símbolos podrían aparecer en este producto. Estúdielos y aprenda su signifi cado. La interpretación adecuada de estos símbolos le permitirá utilizar el producto de mejor manera y con más seguridad. SÍMBOLO NOMBRE NOMBRE/EXPLICACIÓN Volts Voltaje Amperes Corriente Hertz... - Page 23 SÍMBOLOS Las siguientes palabras y signifi cados están diseñados para explicar los niveles de riesgo asociados a este producto. SÍMBOLO SEÑAL SIGNIFICADO Indica una situación peligrosa inminente, la cual, de no evitarse, PELIGRO causará la muerte o lesiones severas. Indica una situación peligrosa potencial, la cual, de no evitarse, ADVERTENCIA podría causar una muerte o lesiones severas.
-
Page 24: Características
CARACTERÍSTICAS ESPECIFICACIONES DEL PRODUCTO Voltaje de la cortadora de pasto eléctrica…………………………………………………………………..120V~6Hz Amperaje del motor………………………………………………………………………………………………………..10A Velocidad del motor………………………………………………………………………………………………..3600 r/min Ancho de corte………………………………………………………………………………………...460mm (18 pulgadas) Ajuste de la altura de corte………………………………………………………… 6 niveles (1.5"/38mm - 4"/101.6mm) Ancho de la cubierta………………………………………………………………………………….480mm (19 pulgadas) Tamaño de la rueda……………………………………………………………………………….…170mm (6,7 pulgadas) Peso…………………………………………………………………………………………………………..14 Kg (31 libras) C - Manilla plegable: manilla de acero ergonómica que... -
Page 25: Especifi Caciones Eléctricas
ESPECIFICACIONES ELECTRICAS Para evitar que se desconecte, se puede amarrar DOBLE AISLANTE el alargador y el cable de alimentación haciendo un El aislamiento doble en las herramientas eléctricas nudo. Haga el nudo como se indica en la fi gura 2 y elimina la necesidad del cable tradicional de tres patas luego conecte el enchufe del cable de alimentación con conexión a tierra. -
Page 26: Armado
ARMADO CONOZCA SU CORTADORA DE PASTO ENSAMBLAJE DE LA MANILLA Consulte la Figura 3. Consulte la Figura 3-4. ■ Saque la cortadora de la caja y colóquela en el suelo. Este producto requiere armado. ■ Levante y empuje la manilla inferior y superior ■... -
Page 27: Funcionamiento
FUNCIONAMIENTO ■ Para reducir la probabilidad de que la cortadora ¡ADVERTENCIA! de pasto se desconecte del alargador, asegúrese de No permita que estar acostumbrado a usar este tipo de utilizar el contenedor de cable incluido. productos genere descuidos en usted. Recuerde que ■... -
Page 28: Mantenimiento
MANTENIMIENTO ¡ADVERTENCIA! ¡ADVERTENCIA! Antes de realizar actividades de mantenimiento, Al realizar mantenimiento, utilice solo piezas de asegúrese de que la cortadora de pasto esté repuesto idénticas. El uso de cualquier otra pieza desconectada de la fuente de alimentación. No hacer puede resultar peligroso o provocar daños en el caso a esta advertencia podría causar lesiones producto. - Page 29 MANTENIMIENTO ■ Saque la rueda y coloque una nueva. ¡ADVERTENCIA! ■ Vuelva a colocar la tapa de la rueda. Al extraer el aspa, inspecciónela cuidadosamente. Si está doblada o dañada, reemplácela inmediatamente con una nueva. El no reemplazar un aspa dañada o ALMACENAMIENTO DE LA CORTADORA doblada podría causar un accidente y posibles lesiones Consulte la Figura 12.
-
Page 30: Resolución De Problemas
RESOLUCIÓN DE PROBLEMAS Problema Posible causa Solución Los cerrojos de bloqueo no están Apriete las perillas de bloqueo de apretados. la manilla. Vuelva a conectar el cable y utilice el contenedor para mantenerlo cerca del control del motor/aspa. El alargador no está conectado Vuelva a conectar el alargador a al enchufe de la cortadora. - Page 31 CORTADORA DE PASTO ELECTRICA CRAFTSMAN 10A 2 EN 1 DE 19", MODELO NUMERO 151.37214 El número de modelo se encuentra en la etiqueta adjunta a la carcasa del motor. PARA ADQUIRIR PIEZAS DE REPUESTO, LLAME AL 1-888-331-4569 14 ― Español...
- Page 32 CORTADORA DE PASTO ELECTRICA CRAFTSMAN 10A 2 EN 1 DE 19", MODELO NUMERO 151.37214 El número de modelo se encuentra en la etiqueta adjunta a la carcasa del motor. PARA ADQUIRIR PIEZAS DE REPUESTO, LLAME AL 1-888-331-4569 Número clave Número de dibujo Descripción...
- Page 33 Para respuestas a preguntas o problemas, y ordenar piezas o pedir servicio para la reparación de su equipo. To help us help you, register your product at www.craftsman.com/registration Para poderte ayudar mejor, registra tu producto en www.craftsman.com/registration Join the Craftsman Club today!