Table of Contents
Advertisement
Available languages
Available languages
Cover Stitch Machine Operation Manual
Manual de instrucciones de la máquina de
puntada de recubierto
CONTENTS: ENGLISH
I. Names of parts and their functions ............. 3
II. Preparation before threading ..................... 8
III. Threading .................................................. 9
IV. Types of stitches ..................................... 11
Tri-cover stitch ............................................. 11
Two needle three threads cover stitch ........ 12
Chain stitch sewing ..................................... 14
V. Sewing ..................................................... 15
VI. Maintenance ........................................... 19
VII. Machine specifications .......................... 19
INDICE: ESPAÑOL
II. Preparación antes del enhebrado ............ 26
III. Enhebrado .............................................. 27
IV. Tipos de puntadas ................................... 29
Puntada de recubierto triple ....................... 29
Puntada de recubierto de
dos agujas con tres hilos ................. 30
Costura de puntada de cadena .................. 32
V. Costura .................................................... 33
VI. Mantenimiento ........................................ 37
VII. Especificaciones de la máquina ............ 37
Advertisement
Table of Contents

Related Manuals for Brother 2340CV


Summary of Contents for Brother 2340CV
-
Page 1: Table Of Contents
Cover Stitch Machine Operation Manual Manual de instrucciones de la máquina de puntada de recubierto CONTENTS: ENGLISH I. Names of parts and their functions ... 3 II. Preparation before threading ... 8 III. Threading ... 9 IV. Types of stitches ... 11 Tri-cover stitch ... -
Page 2: Important Safety Instructions
3. Never operate this sewing machine if it has a damaged cord or plug, if it is not working properly, if it has been dropped or damaged, or dropped into water. Return the sewing machine to the nearest authorized dealer or service center for examination, repair, electrical or mechanical adjustment. - Page 3 FOR USERS IN THE UK, EIRE, MALTA AND CYPRUS ONLY. If your sewing machine is fitted with a 3 pin non rewireable BS plug then please read the following. IMPORTANT If the available socket outlet is not suitable for the plug supplied with this equipment, it should be cut off and an appropriate three pin plug fitted.
- Page 4 • Continuous operation of the sewing machine can cause heat to build in the motor area, but not enough to adversely affect its performance. It is important to keep fabric and paper away from the ventilating holes on the back and sides of the machine so air can get to these holes.
-
Page 5: Names Of Parts And Their Functions
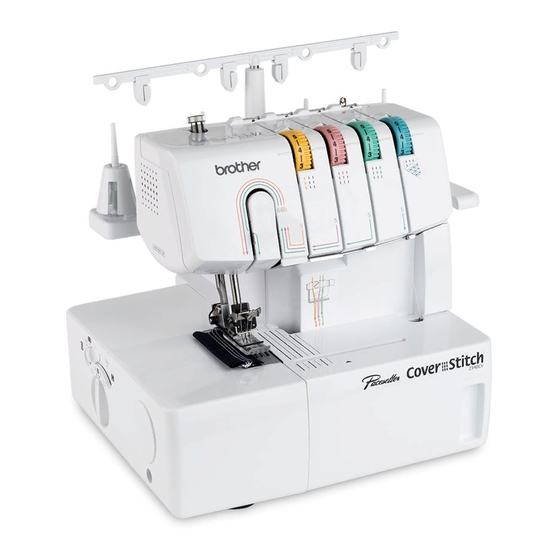
I. Names of parts and their functions Accessories included 1 Thread tree 2 Thread plate 3 Presser foot pressure adjustment screw 4 Spool pin 5 Spool cushion 6 Spool support 7 Thread take-up cover 8 Material plate cover 9 Needles 0 Differential feed raito adjustment dial A Stitch length adjustment dial B Presser foot... -
Page 6: Powering The Machine
Powering the machine NOTE: (For U.S.A. only) This foot controller can be used for sewing machine model 2340CV. Turning direction of motor Opening and closing the front cover How to attach and remove the presser foot CAUTION Always be sure to turn off the power before carrying out this operation. -
Page 7: Stitch Length
Stitch length Instructions for the differential feed mechanism Feed ratio Main feed (rear) Differential feed (front) 0.7 – 1.0 1.0 – 2.0 To change the stitch length, (1) Locate the stitch length adjustment dial on the left side of the machine. (2) Turn the stitch length adjustment dial forward to lengthen the stitch to a maximum of 4 mm (5/32 inch). -
Page 8: Presser Foot Pressure
Presser foot pressure 10mm inch) • An example where adjustment is required When stretch material is sewn without using the differen- tial feed, the material will be wavy. To make the material more smooth, adjust the feed ratio from 1.0 toward 2.0. (The feed ratio required depends on the elasticity of the material.) The more elastic the material, the further toward 2.0 the... - Page 9 4 Groove NOTE: Countermeasures for material breakage. It can reduce the occurrence of material breakage by using SCHIMETZ 130/705H SUK (90/#14) BALL POINT. This machine uses a standard home sewing machine needle. The recommended needle is SCHMETZ 130/705H (90/#14). To remove the needle (1) Turn the main power switch to the OFF position.
-
Page 10: Preparation Before Threading
II. Preparation before threading Thread tree Thread spool The procedure for placing the spool of thread on the spool pin differs according to the shape of the spool. Type A If you are sewing with loosely spun nylon thread, we recom- mend that you cover the spool with the net supplied to prevent the thread from slipping off the... -
Page 11: Threading
III. Threading Needle threading • Pass each thread from 333 to 444 as shown in this illustration. • Pass the thread through the proper thread guide. • Slide and hold the thread tension release button to the right, then pass the thread through the tension disc which is in the channel next to the tension adjustment dial. -
Page 12: Looper Threading
Looper threading • Pass each thread from 3 to 4 as shown in this illustration. • Pass the thread through the proper thread guide. • Slide and hold the thread tension release button to the right, then pass the thread through the tension disc which is in the channel next to the tension adjustment dial. -
Page 13: Types Of Stitches
IV. Types of stitches Tri-cover stitch (Three needles four threads cover stitch) Stitching direction Use four threads, three front needles and the looper thread to sew a 6 mm (15/64 inch) cover stitch. Use: Ideal for hemming and for decorative stitching. Threading •... -
Page 14: Two Needle Three Threads Cover Stitch
Two needles three threads cover stitch 6 mm (15/64 inch) (Wide) 3 mm (1/8 inch) (Narrow) Use three threads, two front needles and the looper thread to sew a 6 mm (15/64 inch) or 3 mm (1/8 inch) cover stitch. Use: Ideal for hemming and for decorative stitching. - Page 15 Tension adjustments (1) First, set each thread tension dial to the number shown below. A Tension selection mark 6 mm (15/64 inch) (Wide) Left needle dial (yellow) Right needle dial (green) 3 mm (1/8 inch) (Narrow) Left needle dial (yellow) Right needle dial (green) –...
-
Page 16: Chain Stitch Sewing
Chain stitch sewing (One needle two threads double chain stitch) Use two threads. The center needle thread and looper thread. Use: For straight stitching, basting and decorative chain stitch. Needle and threading • For details on installing and removing the needle, refer to “Needle”... -
Page 17: Sewing
V. Sewing Sewing flat fabric (for example, trial sewing) NOTE Removing the fabric from the machine (1) Raise the presser foot, and then place the fabric at the needle drop position. (2) Lower the presser foot, turn the handwheel toward you a few times by hand, and then lightly step on the foot controller to start sewing. - Page 18 (3) While firmly taking the fabric with your hand, push the thread release button to the right for the needle thread currently being used to open the thread tension disc. NOTE: Do not take the seam. Be careful when taking the fabric since the light bulb is very hot.
- Page 19 Sewing a cover stitch Sewing tubular garments (for example, cuffs) (1) Determine how much of the fabric will be folded up. (2) Fold up the fabric the desired amount, and then iron it in place. (3) Use a ruler to measure, and then use a fabric marker to mark the top of the fabric to see where the edge of the folded fabric is positioned.
- Page 20 Actual examples of two needles three threads cover stitch sewing 1) Hems of T-shirts (Simple stitch) 3) Attaching tape (edges of collars, etc) (Binding) 5) Attaching elastic (Hem with sewn-in elastic) Actual examples of three-needles four-threads cover stitch sewing 1) Plain stitching 4) Circular hemming 2) Stitches (Top stitched seams/Ribbing/Yokes)
-
Page 21: Maintenance
VI. Maintenance Change the light bulb VII. Machine specifications Stitch One needle two thread double chain stitch Two needles three thread cover stitch (Wide 6 mm (15/64 inch)/Narrow 3 mm(1/8 inch)) Three needles four thread cover stitch (6 mm (15/64 inch)) Sewing speed 1,000 stitches per minute... - Page 22 FELICITACIONES POR HABER ELEGIDO ESTA COMPACTA MÁQUINA DE PUNTADA DE RECUBIERTO Su máquina es de una eficacia y calidad excelentes; así pues, a fin de disfrutar completamente de todas las características incorporadas, le sugerimo estudie el manual. Si se necesitara mayor información sobre el uso de esta máquina, el proveedor autorizado más cercano estará...
-
Page 23: Nombres De Las Partes Y Sus Funciones
I. Nombres de las partes y sus funciones Accesorios incluidos 1 Arbol del hilo 2 Placa del hilo 3 Tornillo de ajuste de la presión del prensatelas 4 Portabobina 5 Protector del carrete 6 Soporte de la bobina 7 Tapa de toma de hilo 8 Tapa de tejido 9 Agujas 0 Palanca diferencial de ajuste de la velo-... -
Page 24: Abre Y Cierre De La Tapa Delantera
Encendido de la máquina Para cambiar la dirección del motor Abre y cierre de la tapa delantera Cómo colocar y retirar el prensatelas PRECAUCIÓN Asegúrese siempre de desconectar la ali- mentación antes de realizar esta operación. Preparación de la máquina •... - Page 25 Largo de puntada Instrucciones para el mecanismo de alimentación con diferencial Velocidad de Alimentador alimentación principal (detrás) 0,7 – 1,0 1,0 – 2,0 Para cambiar el largo de las puntada: (1) Busque el disco de ajuste del largo de las puntadas en al lado izquierdo de la máquina.
- Page 26 Presión del prensatelas 10mm • Ejemplo en que se requiere ajuste Al coser tejidos elásticos sin utilizar una alimentación con diferencial, el tejido va a ser oleado. Para remediar el problema y mejorar la apariencia del tejido, ajuste la velocidad de alimentación de 1,0 hacia 2,0. (El ajuste de la velocidad de alimentación depende de la elasticidad del material.) Cuanto más elástico el tejido, más hacia 2,0 se debe...
- Page 27 Aguja 6 7 8 NOTA: Una vez introducidas correctamente las agujas delanteras, puede ver la parte superior de la aguja en la ventana (5) encima de la posición de cada aguja. PRECAUCIÓN Asegúrese siempre de desconectar la ali- mentación antes de realizar esta operación. PRECAUCIÓN No deje caer la aguja y el tornillo de instala- ción de la aguja en la máquina;...
-
Page 28: Preparación Antes Del Enhebrado
II. Preparación antes del enhebrado Arbol del hilo Carrete de hilo El procedimiento de colocación del carrete de hilo en el portabobina varía según sea la forma del carrete. Tipo A Si está cosiendo con un hilo de hilvanar, le recomendamos cu- brir el carrete con la malla provis- ta para que el hilo no se deslice del carrete. -
Page 29: Enhebrado
III. Enhebrado Enhebrado de la aguja • Pase cada hilo de 333 a 444 tal como se muestra en la ilustración. • Pase el hilo por la guía de hilo correspondiente. • Deslice y retenga el botón de liberación de la tensión del hilo hacia la derecha y pase el hilo por el disco de tensión, que es el canal situado al lado del disco de ajuste de la tensión. - Page 30 Enhebrado del áncora • Pase cada hilo de 3 a 4 tal como se muestra en la ilustración. • Pase el hilo por la guía de hilo correspondiente. • Deslice y retenga el botón de liberación de la tensión del hilo hacia la derecha y pase el hilo por el disco de tensión, que es el canal situado al lado del disco de ajuste de la tensión.
-
Page 31: Tipos De Puntadas
IV. Tipos de puntadas Puntada de recubierto triple (puntada de recubierto de cuatro hilos y tres agujas) Dirección de la puntada Utilice tres agujas delanteras con cuatro hilos y el hilo del áncora para coser una puntada de recubierto de 6 mm. Uso: ideal para dobladillos y costura decorativa. -
Page 32: Dos Agujas Con Tres Hilos
Puntada de recubierto de dos agujas con tres hilos 6 mm (Ancha) 3 mm (Estrecha) Utilice tres hilos, dos agujas delanteras y el hilo del áncora para coser una puntada de recubierto de 6 mm o de 3 mm. Uso: ideal para dobladillos y costura decorativa. Agujas y enhebrado •... - Page 33 Ajustes de tensión (1) En primer lugar, ajuste cada disco de tensión del hilo en el número indicado más abajo. A Marca de selección de tención 6 mm (Ancha) Disco de la aguja izquierda (amarillo) Disco de la aguja derecha (verde) 3 mm (Estrecha) Disco de la aguja izquierda (amarillo)
-
Page 34: Costura De Puntada De Cadena
Costura de puntada de cadena (puntada de cadena doble de una aguja y dos hilos) Utilice dos hilos: el hilo de la aguja central y el hilo del áncora. Uso: para costura recta, costura de hilvanado y costura de cadena decorativa. Agujas y enhebrado •... -
Page 35: Costura
V. Costura Costura de tejido plano (por ejemplo, costura de prueba) NOTA Retirada del tejido de la máquina (1) Levante el prensatelas y, a continuación, coloque el tejido en la posición de entrada de la aguja. (2) Baje el prensatelas, gire un poco hacia usted la polea con la mano y luego pise ligeramente el pedal para comenzar a coser. - Page 36 (3) Mientras sujeta firmemente el tejido con la mano, presione hacia la derecha el botón de liberación del hilo de la aguja que está utilizando actualmente para abrir el disco de tensión del hilo. NOTA: No retire la costura. Tenga cuidado al retirar el tejido ya que la lamparita está...
- Page 37 Costura de puntada de recubierto Costura de prendas tubulares (por ejemplo, puños) (1) Determine cuánto tejido se va a doblar. (2) Doble el tejido que desee y, a continuación, plánchelo. (3) Utilice una regla para medirlo y después utilice un marcador para tela para marcar el derecho del tejido y ver dónde está...
- Page 38 Ejemplos reales de puntada de recubierto de tres hilos y dos agujas 1) Dobladillo de camisetas (puntada simple) 3) Colocación de cintas (bordes de cuellos, etc.) (juntas) 5) Colocación de gomas (dobladillo con costura de goma) Ejemplos reales de puntada de recubierto de cuatro hilos y tres agujas 1) Puntada básica 4) Dobladillo circular 2) Puntadas...
-
Page 39: Mantenimiento
VI. Mantenimiento Cambio de la bombilla de luz VII. Especificaciones de la máquina Puntada Puntada de cadena doble de un aguja y dos hilos Puntada de recubierto de dos agujas y tres hilos (Ancha 6 mm/Estrecha 3 mm) Puntada de recubierto de tres agujas y cuatro hilos (6 mm) Velocidad de costura 1.000 puntadas por minuto... - Page 40 ENGLISH / ESPAÑOL 884-500 XB1148-001 0308 Printed in Taiwan...