Table of Contents
Advertisement
Advertisement
Table of Contents

Related Manuals for Yamaha SU200


Summary of Contents for Yamaha SU200
- Page 1 OWNER'S MANUAL BEDIENUNGSANLEITUNG MODE D'EMPLOI...
-
Page 2: Special Message Section
For longer extension cords, consult a local electrician. This product should be used only with the components supplied or; a cart, rack, or stand that is recommended by Yamaha. If a cart, etc., is used, please observe all safety markings and instructions that accom- pany the accessory product. - Page 3 DATA BACK-UP AND STORAGE • Yamaha recommends that you regularly save data using a Memory Card (SmartMedia) , and storing the Memory Cards in a safe, cool, dry place. YAMAHA CANNOT BE HELD RESPONSIBLE FOR THE ACCIDENTAL LOSS OF IMPORTANT MUSIC DATA! Yamaha cannot be held responsible for damage caused by improper use or modifications to the instrument, or data that is lost or destroyed.
-
Page 4: Using The Manual
filtering, and other impressive effects both to samples and to realtime audio input. The SU200 is compact and easy to use, and is great for capturing and using familiar and interesting sounds. -
Page 5: What Is Sampling
You can record a sample into each pad, and play the sample back by pressing the pad. The SU200 can store up to 24 samples (3 banks 8 pads) in its internal memory. - Page 6 SU200 Features The SU200 provides more than just standard sampling. This page introduces you to some of the special features included on the SU200. Loop-Track Play: Play loop samples in unison, all at the same tempo (BPM) Pages 18, 32) Although each sample has its own tempo setting, you can use this feature to play out multiple samples all at the same tempo.
-
Page 7: Table Of Contents
Contents Controls, Connectors, and the LCD ... 8 Power connections ... 12 The SU200 Design ... 14 Quick Start ...16 Playing Samples ... 16 Using the Effects and Filter ... 17 Using Loop-Track Play ... 18 Applying Effects or Filter to Realtime Audio Input ... 19 Recording a Sample ... -
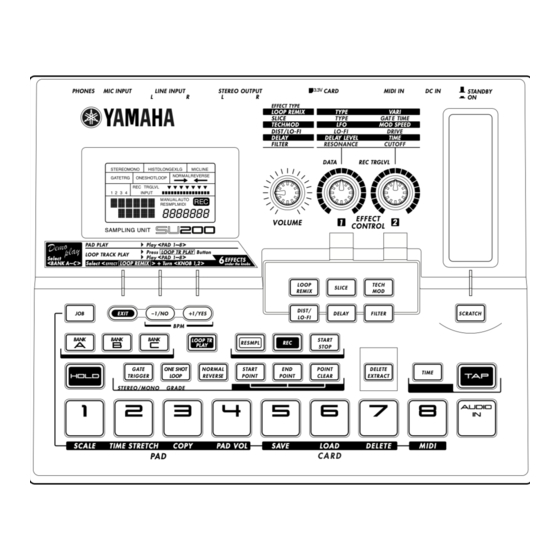
Page 8: Controls, Connectors, And The Lcd
Controls, Connectors, and the LCD Front Panel PHONES MIC INPUT LINE INPUT ~~~~~~ ~~~~~ 8888888 SAMPLING UNIT EXIT –1/NO BANK BANK BANK GATE ONE SHOT TRIGGER LOOP STEREO/MONO GRADE SCALE TIME STRETCH COPY Controls, Connectors, and the LCD 3.3V STEREO OUTPUT CARD EFFECT TYPE LOOP REMIX... - Page 9 Liquid Crystal Display (LCD) ... Page11 VOLUME Control Knob ... Page 13 EFFECT CONTROL Knobs 1 and 2 ... Page 17 Ribbon Controller ... Page 17 [LOOP REMIX] Button...Pages 17, 36 [SLICE] Button ...Pages 17, 36 [TECH MOD] Button ...Pages 17, 36 [DIST/LO-FI] Button ...Pages 17, 36 [DELAY] Button ...Pages 17, 36 [FILTER] Button ...Pages 17, 36...
- Page 10 Accepts insertion of a memory card. You use memory cards to save and load samples. STEREO OUTPUT Jacks (R, L) The SU200’s audio outputs. As the SU200 does not include an internal amp or speakers, you need to connect these outputs to an external audio device in order to play out the sound.
- Page 11 LINE input is connected. • MIC ... The SU200 takes audio input from the microphone connected to the MIC INPUT • LINE ... The SU200 takes input from the audio device (CD player, etc.) connected to one or GATE/TRG ... Page 28 ONESHOT/LOOP ...
-
Page 12: Power Connections
Power connections While the SU200 can run from either an optional AC adaptor or batteries, Yamaha recommends use of the more environmentally safe AC adaptor. Follow the instructions below according to the power source you intend to use. Using an Optional AC Power Adaptor Make sure that the SU200’s STANDBY/ON switch is set to STANDBY. -
Page 13: Switching On The Power
Adjust the volume by turning the VOLUME knob. Also adjust the volume at the external audio device. When you are ready to turn off the SU200: Switch off the power to the output audio device (or lower its volume) before switching off the SU200. -
Page 14: The Su200 Design
Effector/Filter Block Applies an effect or filter to the sound output from the sampler block. The SU200 provides six effect types: some of them standard effects, and others newly designed specifically for use with sample play- back. - Page 15 The SU200 has three main operating modes. Pad-Play Mode The SU200 enters this mode immediately following power-on. This is the mode you use to play and edit your samples. All operating procedures presented in this manual assume that you are starting from Pad-Play mode.
-
Page 16: Quick Start
Playing Samples The SU200 comes with samples recorded for all pads. You are now ready to start using the pads to play these prerecorded samples. Make the necessary connections. Connect up headphones or an output audio device. (See page 10.) Press the [STANDBY/ON] switch on the SU200’s rear panel. -
Page 17: Using The Effects And Filter
Using the Effects and Filter The SU200 lets you to apply a variety of impressive effects to your samples. Now let's try using the EFFECT CONTROL knobs and the ribbon controller on the SU200's front panel. • Effects and scratch to not operate during playback of high-grade samples. -
Page 18: Using Loop-Track Play
Note that it is also possible to synchronize sample playback using an external MIDI clock. To use these feature, you need to set the SU200 for an external MIDI clock (using Job mode) and you need to con- nect a MIDI clock device to the SU200’s MIDI IN connector. -
Page 19: Applying Effects Or Filter To Realtime Audio Input
SU200. Make the necessary connections. Switch off the SU200 and connect up a CD player or other audio source device. Also connect up an audio output device such as powered speakers or headphones. (See page 10.) Switch on the power to the audio devices and to the SU200. -
Page 20: Recording A Sample
Recording a Sample Now try taking a sample of your own voice, and then playing it back by pressing the pad. Connect a microphone to the MIC INPUT jack. (See page 10.) MIC INPUT Switch memory protection off. (See page 51.) Switch off all pads, and then press the [REC] button to enter Sampling mode. - Page 21 Speak into the microphone. Recording starts automatically when you begin speaking. “ABCDE” Press the [START/STOP] button to stop the recording. The SU200 leaves Sampling mode and returns to Pad-Play mode. • Sampling automatically stops if you run out of recording time (if the remaining-time display NOTE falls to 00_00_0).
-
Page 22: Chapter 1 Recording Samples
MIC INPUT PHONES • If you connect up both LINE INPUT and MIC INPUT, the SU200 records from the MIC INPUT NOTE only. If you wish to record from LINE INPUT, be sure that the MIC INPUT jack is left empty. - Page 23 Recording starts automatically when the input level hits the trigger level. “ABCDE” > When you have finished recording, press the [START/STOP] button to stop. The SU200 returns to Pad-Play mode. • Sampling automatically stops if you run out of recording time (if the remaining-time display NOTE falls to 00_00_0).
-
Page 24: Recording A Sample (Manual Start)
Adjust settings as necessary. Select STEREO or MONO, and set the grade. For more information about grades, see page 11. • Remember that the SU200 can play a maximum of 6 MONO samples (or 2 high-grade MONO NOTE samples) at one time. A STEREO samples counts as two MONO samples. - Page 25 LINE INPUT). “ABCDE” < When you have finished recording, press the [START/STOP] button to stop. The SU200 returns to Pad-Play mode. • Sampling automatically stops if you run out of recording time (if the remaining-time display NOTE falls to 00_00_0).
-
Page 26: Resampling
If you wish to change the bank, press the appropriate bank button before selecting the pad. When resampling, the SU200 always records in MONO (monaural) mode using STD (standard) grade. • If a sample is already recorded on the pad you select, the display asks whether to delete it (as NOTE in "Delete C-1?"). - Page 27 Start resampling. Begin pad play by pressing any pad other than the one you selected at Step 2. Resampling starts as soon as you press a pad. You can now play any combination of pads, you can switch on appropriate effects, and you can use the ribbon controller and the EFFECT CONTROL knobs.
-
Page 28: Chapter 2 Playing The Pads
Chapter 2 Playing the Pads This chapter explains sample playback methods and loop setup. The SU200 offers the following pad playback methods. GATE ONE SHOT TRIGGER LOOP STEREO/MONO GRADE Change the way the pad plays its sample. Gate/Trigger Setting... See below on this page. -
Page 29: One-Shot/Loop Setting
One-shot/Loop Setting Use this setting to select whether the sample plays one time only, or continuously as a loop. One-shot ... The sample plays out once only, from its start point to its end point (see page 30). Loop... The sample loops. If a start point and end point are set (see page 30), playback moves from the start point to the end point and then loops back to the start point. -
Page 30: Setting The Start Point And End Point
Make these settings using the [START POINT] and [END POINT] buttons. You can clear either of these set- tings using the [POINT CLEAR] button. • The SU200 automatically recalculates and displays the sample's BPM (tempo) based on the NOTE playback length from start point to end point. When you change the start point or end point, the BPM indication changes accordingly. - Page 31 • The start point and end point can be adjusted during sample playback. Press the [EXIT] button. The SU200 stores the settings and returns to Pad-Play mode. Clearing the Start or End Point Press the pad that you want to work on.
-
Page 32: Using The [Hold] Feature
Changing the sample’s tempo (bar-length) setting The SU200 lets you set a sample’s loop length to 1 bar or 2 bars (1 bar = 1 measure). This setting affects Loop-Track Play only. If you set the length to 1 bar, the sample loops once every bar. If you set the length to 2 bars, the sample slows down and loops once every two bars. - Page 33 RMIx tempo. If using a MIDI keyboard (such as the Yamaha CS6x): Press the SU200’s [LOOP TR PLAY] button while using the CS6x arpeggiator. The SU200 will start Loop-Track Play in sync with the tempo from the CS6x.
-
Page 34: Chapter 3 Sample Editing
• You can escape from this mode by pressing the [EXIT] button. NOTE Press the pad that holds the sample that you want to delete. BANK BANK Press the [+1/YES] button to delete the sample from the SU200’s memory. –1/NO 1/YES Chapter 3 Sample Editing DELETE... -
Page 35: Extract (Deleting The Unused Ends Of A Sample)
Press the pad that holds the sample that you want to edit. BANK BANK Press the [+1/YES] button to execute the extraction. The SU200 deletes the parts of the sample that lie outside the range defined by the start and end points. –1/NO... -
Page 36: Chapter 4 Effects
Chapter 4 Effects You can use the SU200’s ribbon controller and EFFECT CONTROL knobs to apply an effect or filter to playback of any sample or to real-time audio input. The basic operation is described in the Quick Start tutorial (see page 17). This chapter provides a more detailed explanation about the effects, the filter, the scratch feature, and the time-stretch feature. - Page 37 [TIME] button. TIME • The SU200 can play a maximum of 6 standard (or lower) grade monaural samples at one NOTE time, or up to 2 high-grade samples at one time. The maximum number may decline, how- ever, when using the scratch or TIME feature.
-
Page 38: Chapter 5 Midi Features
If you wish to con- trol the SU200 from an external MIDI device, therefore, you need to set the SU200’s MIDI Receive channel to match the external device’s Send channel. -
Page 39: Setting The Midi Clock And Midi Channel
The following tables show the correspondence between MIDI notes and SU200 pads. Note Setting the MIDI Clock and MIDI Channel Switch off all pads, and then press the [JOB] button to enter Job mode. • You can escape from Job mode by pressing the [JOB] button once again. -
Page 40: Chapter 6 Using Memory Cards
Chapter 6 Using Memory Cards Handling the Memory Card(SmartMedia Be sure to handle Memory Cards with care. Follow the important precautions below. * SmartMedia is a trademark of Toshiba Corporation. Compatible Memory Card Type 3.3V(3V) Memory Cards can be used. 5V type Memory Cards are not compatible with this instrument. Memory Capacity There are five types of Memory Cards: 2MB/4MB/8MB/16MB/32MB. - Page 41 Do not reuse the seal that is peeled off. Data Backup For maximum data security Yamaha recommends that you keep two copies of important data on separate Mem- ory Cards. This gives you a backup if one Memory Card is lost or damaged.
-
Page 42: Saving Data Into A Memory Card
• If the memory card does not have enough free space to hold the save, the SU200 displays an error message (see page 52) and cancels the save operation. If you wish to proceed, you must use a dif- ferent card or delete one or more files from the current card. - Page 43 Use [-1/NO], [+1/YES] , or knob 1 to select the following. If you selected Volume Save: Select the file number for the save file. (All SU200 samples and their related settings will be saved into this file.) If you selected WaveExpt: Select the sample you wish to save (A1 to C8).
-
Page 44: Loading Data From A Memory Card
Wave Import: Load wave data (a WAV file) into a selected pad on the SU200. Sample Load: Load a selected sample from a saved volume into a selected pad on the SU200. Insert the appropriate memory card into the card slot. - Page 45 (by bank and pad number). –1/NO Press the [LOAD] button (pad 6). The SU200 prompts you to select the pad that you want to load the sample into (bank letter/pad number). If Wav Impt:...
-
Page 46: Deleting Data From A Memory Card
Deleting Data from a Memory Card Use this feature to delete unnecessary files from a memory card. The SU200 offers two types of deletion. Volume Delete: Delete a file saved using the SU200’s Volume Save function. Wave Delete: Delete a WAV file. -
Page 47: Formatting A Memory Card
• Do not remove the memory card or switch off the power while deletion is in progress. Formatting a Memory Card Before you can use a new memory card with the SU200, you must first format the card. The format operation is also a convenient way to quickly delete all files from a card. -
Page 48: Chapter 7 Other Useful Features
Chapter 7 Other Useful Features This chapter explains five other useful features included on your SU200. • Scale play: Play a selected sample at different pitches. • Time stretch: Change the tempo (BPM) of one sample to match the tempo of another sample •... -
Page 49: Time Stretch (Changing A Sample's Length)
Select the master pad (the pad containing the sample whose tempo you want to use). BANK BANK Press [+1/YES] to rebuild the slave pad’s sample so that its tempo matches the tempo (BPM) of the master pad’s sample. The SU200 rebuilds the sample and then exits from Job mode. Which Pad? -
Page 50: Copying A Sample Into Another Pad
The SU200 executes the copy, and then exits from Job mode. BANK BANK • If a sample already exists on the pad you select as the copy destination, the SU200 first displays NOTE the “Replce Sure?” warning message-indicating that the copy operation will replace (and delete) the existing sample. -
Page 51: Using Memory Protection To Prevent Accidental Deletion
CAUTION • If you wish to retain the samples that came preinstalled on your SU200, please save them into a memory card. Switch off all pads, and then press the [JOB] button to enter Job mode. -
Page 52: Reference
Displayed Messages The SU200 displays a number of different messages. This section explains the most important of these messages. Battry Low! Keep PwrOn Memory Full! Protct Illgal Data! Initializing the Memory Reference Reference The batteries are running low and need to be replaced. For information about how to replace the batteries, see page 12. - Page 53 Grade The SU200’s receive buffer became full during reception of MIDI data (the SU200 was not able to keep up with the incoming data load). To correct the problem, reduce the quantity of data you are transmitting to the SU200.
-
Page 54: Troubleshooting
Possible Cause • Is your playback device (powered speakers, etc.) correctly con- nected? • The volume on the SU200 or the playback device may be set too low. • The pad volume setting (see page 51) may be too low. -
Page 55: Specifications
Specifications 1. Main Specifications Maximum polyphony Maximum number of samples Sampling modes Effects Loop-Track Play Interfaces 2. Memory Wave memory 3. Display 4. Controllers Volume, EFFECT CONTROL knobs 1 and 2, Ribbon controller 5. Connectors MIDI IN, PHONES (stereo mini jack), LINE OUT L/R (standard jacks), LINE IN L/R (standard jacks), MIC IN (monaural standard jack), DC IN 6. -
Page 56: Index
Index AC adaptor ...12 AUDIO IN ...19 AUTO...10, 22 BANK ...15, 16 Bar...32 Battery ...12 BPM (tempo)...18, 32 CARD...10, 40 COPY...50 CUTOFF ...37 DC IN ...10 DELAY...37 DELAY LEVEL ...37 DELETE ...34, 46 Display ...31 Displayed Messages...52 DIST ...37 DISTORTION ...37 DRIVE ...37 Effect...36 EFFECT CONTROL ...17, 36... - Page 57 NORMAL ...29 ONE SHOT...16, 29 PAD ...16 PAD VOL ...50 PHONES ...10 POINT CLEAR...31 Power supply...12 Protect ...52 Rear Panel...10 REC ...22, 24 RECORD ...22, 24 REC TRGLVL (Recording Trigger Level) ...23 Resonance...37 RESMPL (Resampling)...26 REVERSE...29 Ribbon Controller...19 Sample ...5 Sampling...5, 20, 22 Sampling mode...15 SAVE...42...
-
Page 58: Midi Implementation Chart
MIDI Implementation Chart Reference... - Page 59 Reference...
- Page 60 Compliance with FCC This applies only to products distributed by YAMAHA CORPORATION OF AMERICA. OBSERVERA! Apparaten kopplas inte ur växelströmskällan (nätet) sá länge som den ar ansluten till vägguttaget, även om själva apparaten har...
- Page 61 For details of products, please contact your nearest Yamaha or the authorized distributor listed below. Pour plus de détails sur les produits, veuillez-vous adresser à Yamaha ou au distributeur le plus proche de vous figurant dans la liste suivante. NORTH AMERICA CANADA Yamaha Canada Music Ltd.
- Page 62 This document is printed on recycled chlorine free (ECF) paper with soy ink. Auf Recycling-Umweltpapier mit Sojatinte gedruckt. Ce document a été imprimé sur du papier recyclé non blanchi au chlore avec de l'encre d'huile de soja. M.D.G., EMI Division, Yamaha Corporation © 2000 Yamaha Corporation V484910 004CRAP12.2-01A0 Printed in Japan...