Advertisement
Quick Links
2-597-470-43 (1)
Mobile TV Tuner
Installation/Connections
Notice to dealers and installers
Please return this manual to the customer after the installation is completed.
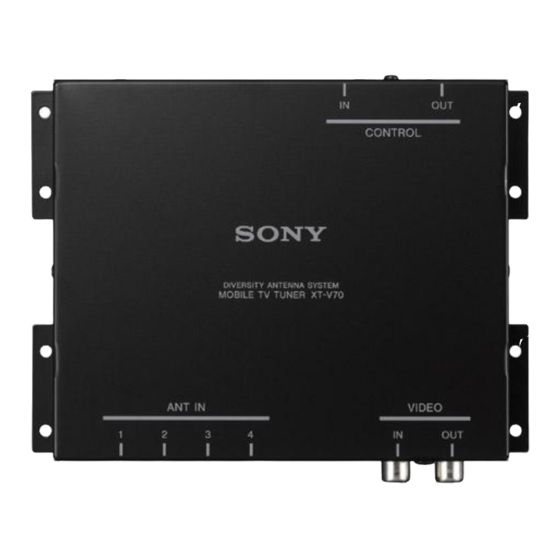
XT-V70
© 2005 Sony Corporation
Printed in Japan
1
1
2
3
4
5.3 m
5 m
2
5
6
7
2
8
9
0
qa
6
4
2
VIDEO OUT
AUX 3
TV tuner unit
XT-V70
AV Center
CONTROL OUT
XAV-A1
3
AV Center
XAV-A1
Film aerial 5
5
RCA interconnects (5 m) 2
2
* To the optional back camera or a video equipment (to AUX 3).
AUX 3
Aerial input cable 6
VIDEO IN
TV aerial amplifier unit 4
VIDEO OUT
4
ANT IN
To a metal surface of the car
TV tuner unit
Black
Fuse (0.5 A)
To the +12 V power terminal which is
energized in the accessory position of
Red
the ignition key switch.
CONTROL OUT
Be sure to connect the black ground lead
to it first.
Bus cable (5.3 m) 1
1
4
XT-V70
Hook-and-loop fastener 3
Hook-and-loop fastener 3
3
3
On installation surface
5
Front pillar
Film aerial (right) 5
Film aerial (left) 5
5
5
Aerial input cable 6
6
XAV-A1
6
1
2
Power supply point
2RR6P12A23300B
Ceramic line
Temporary fastener (cellophane
Align the upper edge of the
tape, etc.)
aerial with this line.
7
2
8
1
Spray bottle
Marking (cellophane tape, etc.)
2
Peel-off tab
6
3
Align the upper edge of the aerial with this line.
4
Squeegee 8
8
Precautions
Front pillar
•This unit is designed for negative ground 12 V DC systems only.
•Do not get the wires under a screw, or caught in moving parts
(e.g. seat railing).
•Before making connections, turn the car ignition off to avoid
short circuits.
•Connect the red power input leads only after all other leads have
been connected.
•Run all ground wires to a common ground point.
Aerial input cable 6
6
Fuse replacement
When replacing the fuse, be sure to use one matching the
amperage rating stated on the original fuse. If the fuse blows,
check the power connection and replace the fuse. If the fuse blows
again after replacement, there may be an internal malfunction. In
such a case, consult your nearest Sony dealer.
Fuse (0.5 A)
TV aerial amplifier unit 4
4
TV aerial amplifier unit 4
Parts list (1)
•The numbers in the list are keyed to those in the instructions.
• Use 9 and 0 to organize cords.
Connection example (2)
Connection diagram (3)
Installing the TV tuner unit (4)
Notes
Marking (cellophane tape, etc.)
• Ensure that the mounting surface is clean.
• Do not install the TV tuner unit
– in locations subject to high temperatures.
– in locations subject to direct sunlight, warm air from heater
outlets, or other locations that can get hot.
• When attaching the hook-and-loop fastener to the bottom of the TV
tuner unit, do not cover the model name plate in the center.
Keep the units and connection cables apart.
The AV Center main unit, the monitor, TV tuner unit, and RCA
interconnects should not be in close proximity. Otherwise noise
interference may affect the TV picture.
Mounting the TV aerial
Front pillar
Mount the film aerial 5 to the car and connect the TV tuner unit.
For directions on connecting the TV tuner unit, see also
"Connection diagram (3)".
Before mounting
•It may not be possible to mount the aerial on some cars.
- In cars with glass that does not transmit radio waves (infrared
reflecting glass, insulated glass, glass that is opaque to
electromagnetic waves, etc.), the signal reception will be
extremely poor.
- The aerial cannot be mounted in cars which have airbags in the
front pillars.
•Mount the aerial to the front window, in the specified location
and according to the specified dimensions.
- The supplied film aerial is designed for attaching only to the
front window. If attached to the rear window or elsewhere in
the car, the signal reception may be extremely poor.
Notes
• Once you have mounted the film aerial, do not attempt to remove it
and attach it again, as the adhesive will be considerably weakened.
Be sure to temporarily fasten the cable and aerial in place and check
that the cable has sufficient play before permanently attaching.
• During the mounting procedure, it will be necessary to remove the
front pillar molding to attach a ground wire.
When performing the installation yourself, if you decide it is too
difficult to remove the front pillar molding, please contact your
dealer for assistance. (Note that your dealer may charge a fee for
their assistance.)
Required items
Have the following items handy before beginning the mounting
procedure.
•Tools (Philips screwdriver, etc.)
•Cellophane tape
•Scissors
•Spray bottle (fill with 500 ml water and one or two drops of
detergent)
•Paper towels
Note
Mount the film aerials to the inside of the front window. Do not mount
the aerials anywhere other than the location described here.
Before attaching
Using the supplied cleaning cloth qa to wipe away any oil, wax, or dust
that may be on the window.
Mounting position (5)
Installation complete
Film aerial mounting procedure
Check the film aerial 5 mounting position (6)
1 Align the film aerial power supply point with the lower edge
of the window's ceramic line and fasten temporarily in place
with cellophane tape (6-1).
Do not remove the adhesive backing from the aerial yet.
The figure shows the results of this step, for the left aerial.
Temporarily position the right aerial in the same manner.
2 Mark the left and right sides of the film aerial, using
cellophane tape, etc (6-2).
Remove the inner molding from the front pillars on
both sides of the front window (7)
The figure shows an example of a car, such as a sedan or SUV,
which as a handle mounted on the front pillar.
Marking (cellophane tape, etc.)
Notes
• The molding on the front pillar will be fastened in place with clips or
screws. When removing it, take care not to damage or deform it.
• When performing the installation yourself, if you decide it is too
difficult to remove the front pillar molding, please contact your
dealer for assistance. (Note that your dealer may charge a fee for
their assistance.)
Attach film aerial 5 (8)
Before attaching
• Remove the film aerial, which you previously fastened temporarily in
place, before beginning these steps.
• Cover the dashboard with a cloth to protect it from the water and
detergent.
• Clean the front window well to remove any dirt, oil, or anti-fogging
agent before beginning these steps.
1 Using a spray bottle, wet the inside of the front window well
with a mild detergent solution. The optimal solution is 500 ml
of water with one or two drops of detergent (8-1). (Pure
water will not work well for making fine adjustments.)
2 Remove the clear backing from the film aerial. Using the spray
bottle, wet the exposed surface well with the mild detergent
solution (8-2).
•Grasp the peel-off tab and peel the clear backing off slowly.
•Do not remove the protective sheet from the other side (the
side that faces the inside of the car) yet. You will remove that
sheet in step 8-4.
•Take care not to get dirt or fingerprints on the exposed
surface of the film aerial.
When attaching the film aerial
• Position the aerial vertically by aligning the upper edge of the
aerial with the lower edge of the ceramic line. Position it
horizontally by aligning the edges with the marking (cellophane
tape, etc.) that you previously placed on the window.
• Do not let the front window get dry as you are working. Spray it
again with the detergent solution as needed.
• Until the front window dries, you can slide the aerial to adjust its
position.
• When you have the aerial positioned where you want it, remove
the markings.
3 Stick the film aerial to the front window (8-3).
4 Use the supplied squeegee 8 to make sure the film aerial is
well attached to the window (8-4).
•Hold the aerial so it does not move while using the squeegee.
•Work from the center of the aerial outward.
•Work the squeegee along the length of the aerial, pushing out
air bubbles to obtain a good seal.
•Do not rub the aerial too hard.
Note
Make sure that the film aerial is completely dry before continuing
with the mounting procedure. Continuing before the aerial is dry
1
may cause it to come off the window.
5 Use paper towels to wipe away the excess detergent solution
and dry the aerial well.
9
0
We recommend you let the aerial dry for 3-4 hours.
Do not try to rush the drying process by using a hair dryer or
other heater. Doing so may damage the film aerial.
Turn over. t
4
Замечания
При подсоединении крепления липучки к нижней части блока
селектора каналов не закрывайте находящуюся в центре
табличку с названием модели.
Держите блоки и соединительные кабели отдельно.
5
Замечания
Замечание
Перед прикреплением
5
5
1
2
7
Замечания
8
Перед прикреплением
1
8-1
2
8-2
8-4
При прикреплении пленочной антенны
4
3
8-3
4
8
8-4
2
3
Замечание
5
Переверните. t
3
qa
6
6-1
6-2
Advertisement

Related Manuals for Sony XT-V70 Marketing


Summary of Contents for Sony XT-V70 Marketing
- Page 1 If the fuse blows, check the power connection and replace the fuse. If the fuse blows again after replacement, there may be an internal malfunction. In such a case, consult your nearest Sony dealer. Fuse (0.5 A) TV aerial amplifier unit 4...
- Page 2 TV aerial amplifier unit 4 Protective sheet Power supply point Power supply point Peel off the Peel off the protective protective sheet. sheet. Temporary fastening Temporary fastening (cellophane tape, etc.) (cellophane tape, etc.) Roof lining Aerial input cable (left) 6 Grounding tape 7 (peel off the protective sheet.) Ground contact (peel off the protective sheet.) Aerial cord clamp 9...