Table of Contents
Advertisement
Blood Glucose Monitoring System
User's Manual
for Single Patient Use Only
Blood Glucose Meter
52926_07414587001_EN.indb 1
This file may not print or view at 100%.
Die lines and color breaks do not print.
"Holding Area" text, box and rules do
not print.
Roche USA –52926
V2/1 – 07414587001 – Black
Roche USA – 52926
V2/2 – 07414587001 – PMS 307
6/2/16 2:52 PM
Advertisement
Table of Contents

Related Manuals for Accu-Chek Guide


Summary of Contents for Accu-Chek Guide
- Page 1 This file may not print or view at 100%. Blood Glucose Monitoring System Die lines and color breaks do not print. “Holding Area” text, box and rules do not print. User’s Manual Roche USA –52926 for Single Patient Use Only V2/1 –...
- Page 2 52926_07414587001_EN.indb 2 6/2/16 2:52 PM...
-
Page 3: Table Of Contents
This file may not print or view at 100%. Die lines and color breaks do not Contents print. “Holding Area” text, box and rules do Important Safety Information ....................3 not print. Chapter 1: Your New System ....................9 Chapter 2: The Accu‑Chek FastClix Lancing Device ..............19 Roche USA –52926 V2/1 –... - Page 4 52926_07414587001_EN.indb 4 6/2/16 2:52 PM...
-
Page 5: Important Safety Information
The Accu‑Chek Guide blood glucose monitoring system is intended for in vitro diagnostic single‑patient use by people with diabetes. The Accu‑Chek Guide blood glucose monitoring system is intended to be used by a single person and should not be shared. - Page 6 Important Safety Information Limitations • The Accu‑Chek Guide test strips are for testing fresh capillary whole blood. • Hematocrit should be between 10–65 %. • Not for use in diagnosis or screening of diabetes mellitus. • Not for neonatal use. • Do not use this system if you are taking a high dose of vitamin C (ascorbic acid) in excess of 5 mg/dL.
- Page 7 Important Safety Information Need Help? For questions, contact the Accu‑Chek Customer Care Service Center toll‑free at 1‑800‑858‑8072. Hours of operation are Monday through Friday between 8:00 am and 8:00 pm eastern standard time (EST). We offer assistance in many languages. You can also visit accu‑chek.com for diabetes management tools and product demonstrations.
- Page 8 Important Safety Information WARNING • During normal testing, any blood glucose meter or lancing device may come in contact with blood. All parts of the kit are considered biohazardous and can potentially transmit infectious diseases from bloodborne pathogens, even after you have performed cleaning and disinfecting. •...
- Page 9 Important Safety Information NOTE • Perform a control test when you open a new test strip box or if you think that a test result is incorrect. Performing a control test lets you know that the meter and test strips are working properly.
- Page 10 • The meter, test strips, and control solution are only for use outside the body (in vitro). Do not eat the test strips. Do not swallow or inject the control solution or use the control solution for any purpose other than testing the Accu‑Chek Guide system. NOTE •...
-
Page 11: Chapter 1: Your New System
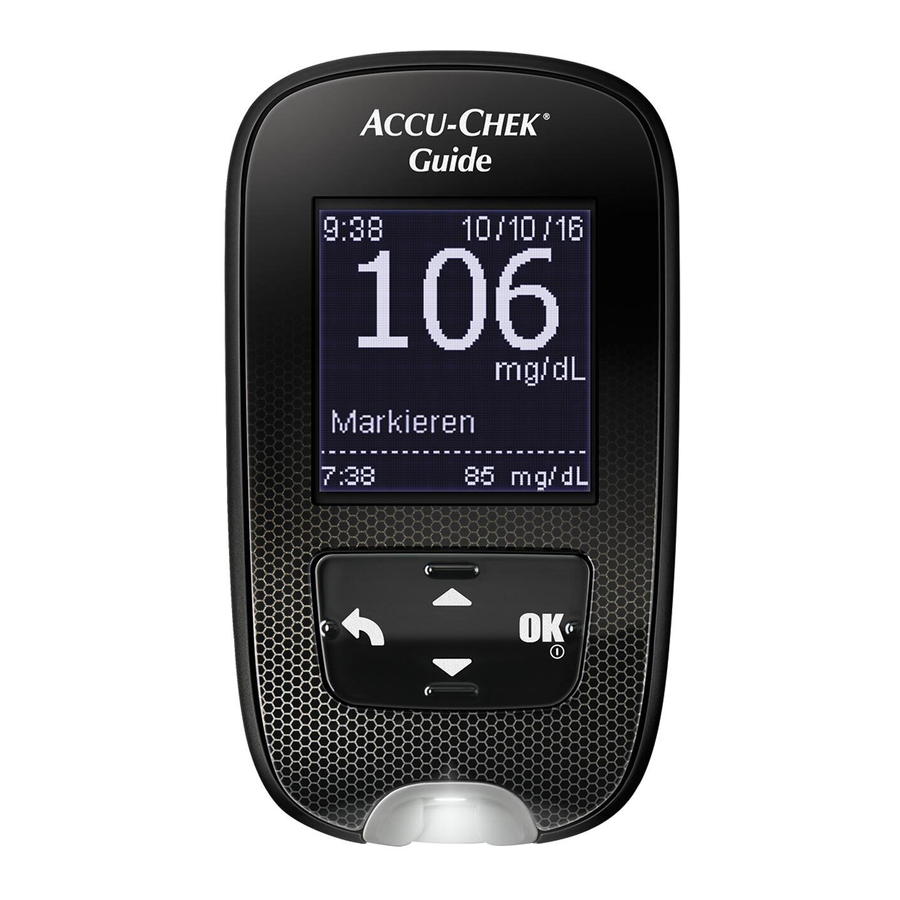
Chapter 1: Your New System Your New System The Accu‑Chek Guide Meter Front View Side View Back View 1. Display 6. Battery Door Shows results, messages, and test Flip open to replace batteries. results stored in memory. 7. Micro USB Port 2. - Page 12 Your New System (for example) Test Strip 9. Test Strip Container* 13. Batteries 10. Metallic End 14. USB Cable* Insert this end into meter. Connects the meter to a PC. 11. Yellow Edge *Some items may not be included in the kit. Touch blood drop or control solution here.
-
Page 13: Chapter 2: The Accu‑Chek Fastclix Lancing Device
Your New System The Accu‑Chek FastClix Lancing Device 1. Cap 4. Lever For fingertip testing. Advance to a new lancet. 2. Comfort Dial with Depth Selection 5. Lancet Counter Window Select penetration depth. Shows number of available lancets. 3. Penetration Depth Indicator 6. - Page 14 Your New System Button Functions Here are the functions of the back, arrow, and Power/Set/OK buttons on the meter. These functions are used throughout this manual. See the chapter Meter Settings for specific instructions on setting up the meter. Button Function Return to the previous display.
- Page 15 Your New System Meter Menus 1 Title of display or menu 2 Menu options 3 Scroll down 4 Scroll up Display Description There are more menu options listed beneath the last option. Press on the meter to view the options. There are more menu options listed above the first option.
- Page 16 Your New System Display Description Highlighted option (Test) Press to enter the Test menu. Highlighted field (Hour) Press to increase or decrease the hour. Press to set the hour and move to the minutes field. 52926_07414587001_EN.indb 14 6/2/16 2:52 PM...
-
Page 17: Chapter 3: Blood Glucose Tests
Your New System Symbols Here is a list of the symbols on the meter display. Symbols Description Above target range After meal Bedtime Before meal Below target range Blood glucose test Checkmark / Control test OK / Selected option or setting Control bottle Control test not OK Edit... - Page 18 Your New System Symbols Description Flight mode Help Low battery My data No comment Other Overall Settings Test reminder Warning Within target range 52926_07414587001_EN.indb 16 6/2/16 2:52 PM...
- Page 19 Your New System Set the Language The meter may prompt you to choose a language the first time you turn it on. Turn the meter on by briefly Press to set the desired pressing . Language language and return to Main appears.
- Page 20 Your New System 52926_07414587001_EN.indb 18 6/2/16 2:52 PM...
- Page 21 Chapter 2: The Accu‑Chek FastClix Lancing Device The Accu-Chek FastClix Lancing Device Using the Accu‑Chek FastClix Lancing Device • The black cap is for fingertip testing only. • Remember that the opening where the lancet comes out is not in the center of the cap.
-
Page 22: Inserting A Lancet Drum
The Accu-Chek FastClix Lancing Device Inserting a Lancet Drum You must first load the lancet drum into the lancing device to get it ready for use. Remove the cap. Slide the cap on until it stops by You are now ready to use the aligning the notch on the cap first lancet. - Page 23 The Accu-Chek FastClix Lancing Device Using the Accu‑Chek FastClix Lancing Device Obtain a blood drop. See the chapter Blood Glucose Tests. Adjust the lancet depth by turning the comfort dial. Advance to the next lancet by sliding the lever forward and back all the way.
- Page 24 The Accu-Chek FastClix Lancing Device Changing the Lancet Drum When you have used the sixth and last lancet, change the lancet drum. Remove the cap. Hold the lancet drum between your thumb and index finger and pull it straight out.
- Page 25 Chapter 3: Blood Glucose Tests Blood Glucose Tests WARNING • The meter and lancing device should never be used by more than one person. Do not share the meter and lancing device with anyone, including family members, due to the risk of infection from bloodborne pathogens.
-
Page 26: Chapter 4: Control Tests
Blood Glucose Tests Using the Accu‑Chek Guide System • Use only Accu‑Chek Guide test strips. • Use the test strip immediately after removing it from the test strip container. • Do not apply blood or control solution to the test strip before inserting it into the meter. If you applied blood or control solution before inserting the test strip into the meter, retest with a new test strip. - Page 27 Blood Glucose Tests WARNING To prevent inaccurate results: • DO NOT expose test strips to heat, moisture, or humidity. Temperatures outside the required range, as well as moisture and humidity, can damage the test strips and lead to inaccurate results. •...
- Page 28 Blood Glucose Tests Wash your hands with warm Adjust the comfort dial. Check the Use By date on the soapy water and dry thoroughly. test strip container. Dirty or wet hands could affect Do not use test strips past the test results.
- Page 29 Blood Glucose Tests When Apply drop appears, Press the lancing device firmly Gently squeeze your finger to obtain a blood drop. against the side of your assist the blood flow. This helps fingertip. you get a blood drop. Press the release button all the way down to prick your finger.
- Page 30 Blood Glucose Tests Press here to eject test strip Add Comment appears. Press The final result appears. Press Remove and discard the used to highlight a comment. to set the comment test strip by pulling the test Press to set the comment for and return to Main Menu.
- Page 31 Blood Glucose Tests Blood Glucose Warnings If your blood glucose result is outside the measurement range of the meter, a warning is displayed. Press to acknowledge the LO or HI warning, OR the meter automatically moves to the LO or HI result display. Blood glucose may be lower than the measurement range of the system.
-
Page 32: Chapter 5: Meter Settings
Blood Glucose Tests Adding Comments to Blood Glucose Results NOTE Analyzing your blood glucose results stored in the meter is an effective way for you and your healthcare professional to determine how well you are controlling your diabetes. This analysis is a valuable tool for making improvements to your diabetes management. - Page 33 Blood Glucose Tests Here is a list of comment symbols that can be added to a blood glucose result. Symbols Name Description Before meal If Patterns is On, select Before breakfast, lunch, dinner, or snack (see the following page for adding comments with Patterns On). After meal If Patterns is On, select After breakfast, lunch, dinner, or snack (see the following page for adding comments with Patterns On).
- Page 34 Blood Glucose Tests After performing a blood The Add Comment menu If Patterns feature is On: glucose test, the test result is appears. Press to highlight If Patterns is On and you select displayed on the screen with the desired comment. (The Before meal or After meal, Add Comment highlighted.
-
Page 35: Alternate Site Testing
Blood Glucose Tests Performing a Blood Glucose Test with Blood from Your Palm or Upper Arm (Alternate Site Testing) WARNING • Do not use Alternate Site Testing to calibrate a continuous glucose monitoring system or to make insulin dosing calculations. •... - Page 36 Blood Glucose Tests Unusual Blood Glucose Results If your blood glucose result does not match how you feel, follow these steps: 1. Perform a control test. See the chapter Control Tests. 2. Repeat the blood glucose test. If your blood glucose result still does not match how you feel, follow your healthcare professional’s instructions or call your healthcare professional immediately.
- Page 37 Blood Glucose Tests Symptoms of Low or High Blood Glucose WARNING The meter is designed to provide a numerical value for blood glucose in the range of 20–600 mg/dL. If you receive a numerical value below 20 mg/dL or above 600 mg/dL and it does not match how you feel, contact the Accu‑Chek Customer Care Service Center toll‑free at 1‑800‑858‑8072.
- Page 38 Blood Glucose Tests 52926_07414587001_EN.indb 36 6/2/16 2:53 PM...
-
Page 39: About The Control Solutions
• you want to check if you are performing the test correctly. About the Control Solutions • Use only Accu‑Chek Guide control solutions. • Close the control solution bottle tightly after use. • Write the date you open the control solution bottle on the bottle label. The control solution must be discarded 3 months from the date the control solution bottle was opened (discard date) or on the Use By... - Page 40 Control Tests Performing a Control Test You need the meter, a test strip, and control solution Level 1 or Level 2. Check the Use By date on the test strip container. Remove a test strip from the test strip container. Do not use test strips past the Use By date.
- Page 41 Control Tests Select the control solution to test. You will enter Remove the bottle cap. Wipe the tip of the bottle the level later in the test. with a tissue. Squeeze the bottle until a tiny drop forms at the tip. Touch the drop to the yellow Analyzing appears when there edge of the test strip.
- Page 42 Control Tests Control Result and the control bottle symbol appear. Press to select the control level you tested. If you do not select a level, the control result is saved without a control level. Press Within range and appear if the control result is within range. Out of range and appear if the control result is out of range.
- Page 43 Control Tests Wipe the tip of the bottle with a tissue. Cap the bottle tightly. Remove and discard the used test strip. NOTE • Most people just test the Level 1 control. If you wish, you can also test a Level 2 control. A set of Level 1 and Level 2 control solutions is available for purchase.
- Page 44 Control Tests Understanding Out‑of‑Range Control Results WARNING The control range applies only to a control result. It only indicates that the test strips and meter are working properly. Do not use a control result to interpret blood glucose results. If the control result is out of range, do not use the meter until you solve the problem. Check this list to help solve the problem.
-
Page 45: Chapter 7: Wireless Communication And Meter Pairing
Chapter 5: Meter Settings Meter Settings Overview You can adjust the following settings in the meter for your personal preferences. Refer to the sections later in this chapter for details and how to set the options. Setting Options Function Time/Date Time / Date Set the time and date. -
Page 46: Meter Settings
Meter Settings Setting Options Function Patterns On / Off On – a pattern is detected when 2 below‑target or 3 above‑target results with the same comment are detected within a 7‑day period. Reminders On / Off / Edit time On – set up to 4 reminders per day to remind you to test Post Meal On / Off / Edit time... - Page 47 Meter Settings Time/Date Time/Date Turn the meter on by briefly Time/Date is highlighted. Press Press to adjust each pressing . From Main Menu, field. Press to set and press to highlight Settings. proceed to the next field. Set Press am or pm if necessary. Press to save and return to the previous menu.
- Page 48 Meter Settings Beeper Beeper The beeper prompts you: • when a test strip is inserted. • to apply blood or control solution to the test strip. • when enough blood or control solution is drawn into the test strip. • when the blood glucose or control test is complete. •...