
Related Manuals for Panasonic Versio EB-TX320


Summary of Contents for Panasonic Versio EB-TX320
-
Page 1: Operating Instructions
® Versio EB-TX320 ™ Digital Multi-Network Phone Operating Instructions Before operating this phone, please read these instructions completely and save this manual for future use. Charge battery before operation. -
Page 3: Table Of Contents
Contents Introduction... vii About This Manual ... vii Icons Used in This Manual ... viii Chapter 1: Safety First ... 1 Batteries... 1 Charging Devices... 1 General... 1 Availability of Service ... 2 Emergency (911) Service ... 2 Safety Tips... 2 Chapter 2: Getting Started... - Page 4 Setting Date and Time ... 13 Adjusting Date and Time Settings ...13 Changing the Date Format ...13 Selecting 24-hour or 12-hour Mode ...13 Setting Ring Volume ... 14 Selecting a Ring Alert ... 14 Vibration Alert ...14 Using the Private Handsfree Headset ... 15 Chapter 3: Everyday Operations ...
- Page 5 Chapter 5: Phonebook Features ... 29 Assigning Your Own Favorite Number ... 29 Creating a Phonebook Entry... 30 Creating a Super Dial Entry ... 32 Changing or Deleting a Super Dial Entry ... 32 Programming Pauses or Waits ... 33 Saving a Displayed Phone Number...
- Page 6 Miscellaneous Menu ...47 Model Type ...47 Emergency Call ...47 TTY Mode ...47 DTMF Duration ...48 Reset Defaults ...48 Security Options ... 50 Changing Lock Code ...50 Call Lock ...50 Locking Incoming Calls ...51 Locking Outgoing Calls ...51 Limiting the Number of Digits Dialed ...51 Power-On Lock ...52 Activating the Power-On Lock ...52 Deactivating the Power-On Lock from Standby ...52...
- Page 7 Voice Mail ... 61 Listening to New Voice Mail ... 61 Saving and Deleting Voice Mail ... 61 Resetting the Voice Mailbox Number... 61 International Calls ... 62 Chapter 8: System Settings... 63 Voice Privacy Mode ... 63 Selecting Your Phone Number (NAM)... 63 Searching for Available Systems ...
-
Page 9: Introduction
Congratulations on your purchase of one of the world’s most technologically advanced mobile communications systems! Your new Panasonic phone combines the advantages of digital and analog coverage with a variety of time-saving and easy-to-use features. The result: a phone that offers real convenience, dependability, and mobility—in digital and analog service areas. -
Page 10: Icons Used In This Manual
Many accessories are available for your phone. Appendix B lists and illustrates each of these accessories. Please contact your wireless service provider to purchase Genuine Panasonic accessories. Appendix C: Consumer Update Appendix C contains a recent report published by the U.S. Food and Drug Administration about the safety of mobile phones. -
Page 11: Chapter 1: Safety First
• Do not use any accessories other than those designed for use with your phone. • Use of attachments not recommended or sold by your wireless service provider may result in fire, electrical shock, or injury. • Panasonic cannot be held responsible for damages caused by using non- Panasonic accessories. Safety First... -
Page 12: Availability Of Service
Safety Tips Following the suggestions in this section will help ensure safe and efficient operation of your Panasonic phone. This Model Phone Meets The Government's Requirements For Exposure To Radio Waves. Your wireless phone is a radio transmitter and receiver. It is designed and manufactured not to exceed the emission limits for exposure to radiofrequency (RF) energy set by the Federal Communications Commission of the U.S. -
Page 13: Antenna Care
To maintain compliance with FCC RF exposure guidelines, if you wear your wireless phone on your body while on a voice or data call, always place the phone in a Panasonic supplied or approved carry accessory. Use of non- Panasonic approved accessories may exceed FCC RF exposure guidelines. -
Page 14: Blasting Areas
Chapter 1 Persons with pacemakers: • Should ALWAYS keep the phone more than six inches from their pacemaker when the phone is turned ON; • Should not carry the phone in a breast pocket; • Should use the ear opposite the pacemaker to minimize the potential for interference;... -
Page 15: Chapter 2: Getting Started
Getting Started This chapter gets you started using your phone and learning its basic features and functions. Note: Do not modify or disassemble the handset. Do not pull or twist the antenna as doing so may loosen the connection and/or damage the antenna. Battery Use Note: The battery must be fully charged before using your phone for the first time. -
Page 16: Recharging Tips
Chapter 2 Recharging Tips • Recharge batteries in a well-ventilated area between 41°F (5°C) and 95°F (35°C). Temperature may slightly affect charging time. In extreme temperature conditions, the battery will stop charging and the indicator light and battery charging icon will turn off. If this happens, remove the charger, return the phone to an acceptable temperature level, and connect the charger to restart charging. -
Page 17: Low-Battery Warning
Low-Battery Warning The phone periodically beeps when the battery is low. The battery icon ) flashes and the Low Battery message is displayed. If your phone is at standby (idle) when the Low Battery message appears, you will not be able to place or receive calls until the battery has been recharged, or until shortly after you attach an AC or DC adapter. -
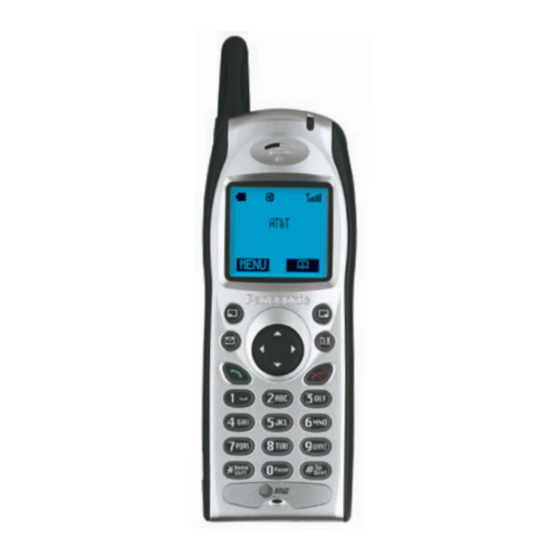
Page 18: Phone Description
Chapter 2 Phone Description You can enter up to 32 characters by pressing the number keys. The keypad is also used to enter text as described in Chapter 4, “Text Entry Operations”. Phone Specifications Size (with standard battery) Weight (with standard battery) Maximum RF Output Getting Started 4.6”... -
Page 19: Function Keys
Function Keys The following table describes how each function key works. Left Softkey/Key Lock: Press to use the function displayed above the key. From standby mode, press and hold to turn on Key Lock. Right Softkey: Press to use the function displayed above the key. -
Page 20: Display Icons
Chapter 2 Display Icons Icons that appear on the display depend on what features you are using and the options you have selected. Master Display and Icons Icon Charged battery. Low battery (flashes). New text message received. When icon is darkened, indi- cates that text message storage is full. -
Page 21: Phonebook Icons
In menu displays, an asterisk next to a menu item indicates the current setting. Phonebook Icons The following icons appear next to Phonebook entries to indicate whether a phone number is a work number, home number, cell phone number, etc. Icon Indicates Home phone number. -
Page 22: Standby Display
Chapter 2 Standby Display The standby display appears when your phone is on and in an “idle” state. You can return to the standby display at any time (except during a call) by pressing or by pressing and holding automatically for 15 seconds when you power up the phone or when you press any key. -
Page 23: Setting Date And Time
Setting Date and Time The standby display shows the current date and time, as well as the day of the week. You can adjust these settings if necessary. Note: You have the option of turning the Date/Time display On or Off. -
Page 24: Setting Ring Volume
Chapter 2 Setting Ring Volume You can adjust the volume of your phone’s ring. (See “Alert Mode” on page 44 for more information about using your phone in special situations such as meetings and theaters.) From standby, press Scroll to Tone Settings and press Press (OK) to select Ring Volume. -
Page 25: Using The Private Handsfree Headset
Scroll to Vibration and press • If selected, the vibration alert icon ( on the display. To change the setting, scroll to the other option and press Using the Private Handsfree Headset When the Private Handsfree Headset is plugged into the phone, you can have a phone conversation without holding the phone to your ear. - Page 26 Chapter 2 Caution: The use of an ear insert device while driving may violate the laws of some states/provinces. Be sure to check applicable state/provincial laws before using this device. Getting Started...
-
Page 27: Chapter 3: Everyday Operations
Everyday Operations Your phone comes with a variety of features. In most cases, however, you will use only some of these features on a daily basis. This chapter will familiarize you with most of those “everyday” operations. Descriptions of more advanced features are covered in additional chapters. Placing Calls To place a call, power on your phone and confirm that you have a strong signal indication. -
Page 28: Dialing A Phonebook Entry From The Menu
Chapter 3 When the arrow points to the entry you want, press the Phonebook entry. Press to scroll to the appropriate phone number and press to place the call. Dialing a Phonebook Entry from the Menu From standby, press Scroll to Search and press •... -
Page 29: Speed Dial
Speed Dial To call a Speed Dial number directly from standby (without going to a menu), enter the memory location number that contains the phone number you want to call, and press Note: If Emergency Call is set to On (see “Emergency Call” on page 47) and you press 911 will be called. -
Page 30: In-Call Features
Chapter 3 In-Call Features While you are in a call, several useful features are available: • Adjusting Voice Volume (see page 20) • Viewing Your Own Phone Number During a Call (see page 20) • Muting the Mouthpiece (see page 20) •... -
Page 31: Using The Display As A Scratchpad
Using the Display as a Scratchpad This feature allows you to enter a phone number on your phone’s display during a call. You can enter up to 32 digits. After ending the call, you can dial the number on the display or save the entry in the Phonebook. During a call, enter numbers by pressing the keys on your keypad. -
Page 32: Missed Calls
Chapter 3 Missed Calls If an incoming call is not answered, Missed Call is displayed. Press (VIEW) to view the phone number and the time of the missed call. • If the caller’s phone number matches an entry in the Phonebook, the corresponding name is also displayed (unless the call was placed through a PBX). -
Page 33: Voice Mail
Voice Mail Note: You must subscribe to voice mail through your wireless service provider before you can retrieve voice mail messages. To check if voice mail has been programmed, press and hold . If the display indicates that the Voice Mailbox number is empty, voice mail has not been programmed. -
Page 34: Automatic Redial
Chapter 3 Automatic Redial If a call cannot be completed because of a system busy error (or other system problem), your phone can automatically redial the number for you. If your call cannot be completed because of a system error, wait until Automatic Redial? is displayed. -
Page 35: Chapter 4: Text Entry Operations
Text Entry Operations Whenever you store an entry in your Phonebook, compose or reply to a message, or create reminders, you use the phone’s keypad to enter the text. There are two methods for entering text: • Letter Entry (ABC) ®... -
Page 36: Word Entry (Word T9) Mode
Chapter 4 Word Entry (Word T9) Mode Word Entry (Word T9) mode allows you to quickly type text with the aid of a built-in dictionary. When you press the key that corresponds to the character needed just once, the built-in dictionary suggests probable word choices. -
Page 37: Numbers (Num) Mode
Numbers (NUM) Mode You are in Numbers mode when corner. Use Numbers mode to insert numbers in a text entry. To select Numbers mode, press until number. Symbols (SYM) Mode You are in Symbols mode when corner. To select Symbols mode, press Each number key is associated with several symbols. - Page 38 Chapter 4 Text Entry Operations...
-
Page 39: Chapter 5: Phonebook Features
Panasonic wireless phone. With AT&T Wireless #121 service, you can keep up-to-date on the latest information when you're on the go. -
Page 40: Creating A Phonebook Entry
Enter the last name here. Enter the home number here. Enter the work phone number here. Enter the cell phone number here. Enter an alternate phone number here. Select the source to be used as the speed dialing number. See “Speed Dial” on page 19. - Page 41 • When entering numbers in the Phonebook, do not try to enter dashes or parentheses as generally shown in listings of phone numbers. Enter only the digits. Press (OK) when you complete the information. If you need to add more information, repeat steps 3 through 5 until the entry is complete.
-
Page 42: Creating A Super Dial Entry
Phonebook Features ) to enter the Phonebook. (OK). are listed as Not Assigned. key as the emergency call number (ASSIGN). Home Cell phone, and so on). through (BACK). ) to enter the Phonebook. (OK). (OK). (OK). (YES), or cancel it by pressing... -
Page 43: Programming Pauses Or Waits
Programming Pauses or Waits This feature is useful when you are placing a call that requires entry of additional digits once the call connects (for example, you may have to enter a password or PIN to access your voice mail). Enter the phone number. -
Page 44: Selecting A Phonebook Search Method
Chapter 5 Press to scroll to the entry you want to edit or delete. Press (OPTION). • You have the option to Edit the entry, delete all of Scroll to the action you want to perform, and press • If you select Edit, all stored information for the entry is displayed. Scroll to the information you want to edit, press change. -
Page 45: Displaying Your Own Number
Displaying Your Own Number Your phone can have up to two cellular phone numbers (programmed by your wireless service provider). You can select either phone number to make or receive a call. From standby, press ) to enter the Phonebook. Press to scroll to Own Number and press •... - Page 46 Chapter 5 Phonebook Features...