Miele DG 6100 Operating And Installation Instructions
Hide thumbs
Also See for DG 6100:
- Operating and installation instructions (100 pages) ,
- Operating and installation instructions (100 pages) ,
- Operating and installation instructions (92 pages)
Table of Contents

Related Manuals for Miele DG 6100


Summary of Contents for Miele DG 6100
- Page 1 Operating and installation instructions Steam oven To prevent the risk of accidents or damage to the appliance, it is essen‐ tial to read these instructions before it is installed and used for the first time. en-AU, NZ M.-Nr. 09 651 660...
-
Page 2: Table Of Contents
Contents Warning and Safety instructions ................5 Caring for the environment ................. 13 Overview ....................... 14 Steam oven front view ................... 14 Accessories supplied ..................... 15 Controls ........................ 16 Sensors ........................17 Display ........................17 Description of the functions ................18 Water container...................... - Page 3 Contents Cooking with liquid ....................28 Your own recipes ....................28 Steam cooking ..................... 29 Vegetables ......................29 Meat ........................32 Sausages ....................... 34 Fish ........................34 Shellfish........................37 Mussels ........................38 Rice ........................39 Pasta / Noodles...................... 40 European dumplings ....................41 Grains........................
- Page 4 Contents Appliance front....................... 68 Oven compartment ....................69 Water container...................... 69 Accessories ......................70 Shelf runners ......................70 Descaling ....................... 71 Door ........................73 Problem solving guide ..................75 Optional accessories ................... 77 Cooking containers ....................77 Cleaning and care products................... 79 Other accessories ....................
-
Page 5: Warning And Safety Instructions
They contain important notes on installation, safety, use and maintenance. Miele cannot be held liable for damage caused by non-compliance with these instructions. Keep these instructions in a safe place and ensure that new users... - Page 6 Warning and Safety instructions Correct application This steam oven is designed for domestic use and for use in simi‐ lar environments by guests in hotel or motel rooms, bed & break‐ fasts and other typical living quarters. This does not include com‐ mon/shared facilities or commercial facilities within hotels, motels or bed &...
- Page 7 Warning and Safety instructions Safety with children Young children must not be allowed to use this appliance. Older children may only use the steam oven when its operation has been clearly explained to them and they are able to use it safely, recognising the dangers of misuse.
- Page 8 Repairs and other work by unqualified persons could be danger‐ ous. Installation, maintenance work and repairs to electrical applian‐ ces must only be carried out by a Miele approved service technician. A damaged appliance is dangerous. Check the appliance for any visible damage.
- Page 9 The manufacturer's warranty will be invalidated if the appliance is not repaired by a Miele approved service technician. Faulty components must only be replaced by genuine Miele spare parts. The manufacturer can only guarantee the safety of the appli‐ ance when Miele replacement parts are used.
-
Page 10: Correct Use
Warning and Safety instructions Correct use Danger of burning! The steam oven becomes hot when in use. Ex‐ ercise care when handling food and trays so as not to burn yourself on the walls of the steam oven, shelf runners, trays, steam and hot food itself. - Page 11 Warning and Safety instructions When using an electrical appliance, e.g. a hand-held mixer, near the steam oven, ensure that the connection cable doesn't get caught in the door. The insulation on the cable could become dam‐ aged, giving rise to an electric shock hazard.
- Page 12 If it does happen, wipe these away thoroughly to avoid corrosion on the stainless steel surface. Accessories Use only genuine original Miele spare parts. If spare parts or ac‐ cessories from other manufacturers are used, the warranty will be in‐ validated, and Miele cannot accept liability.
-
Page 13: Caring For The Environment
Caring for the environment Disposal of the packing mate‐ Disposing of your old appli‐ rial ance The transport and protective packaging Electrical and electronic appliances of‐ has been selected from materials which ten contain materials which, if handled are environmentally friendly for dispos‐ or disposed of incorrectly, could be po‐... -
Page 14: Overview
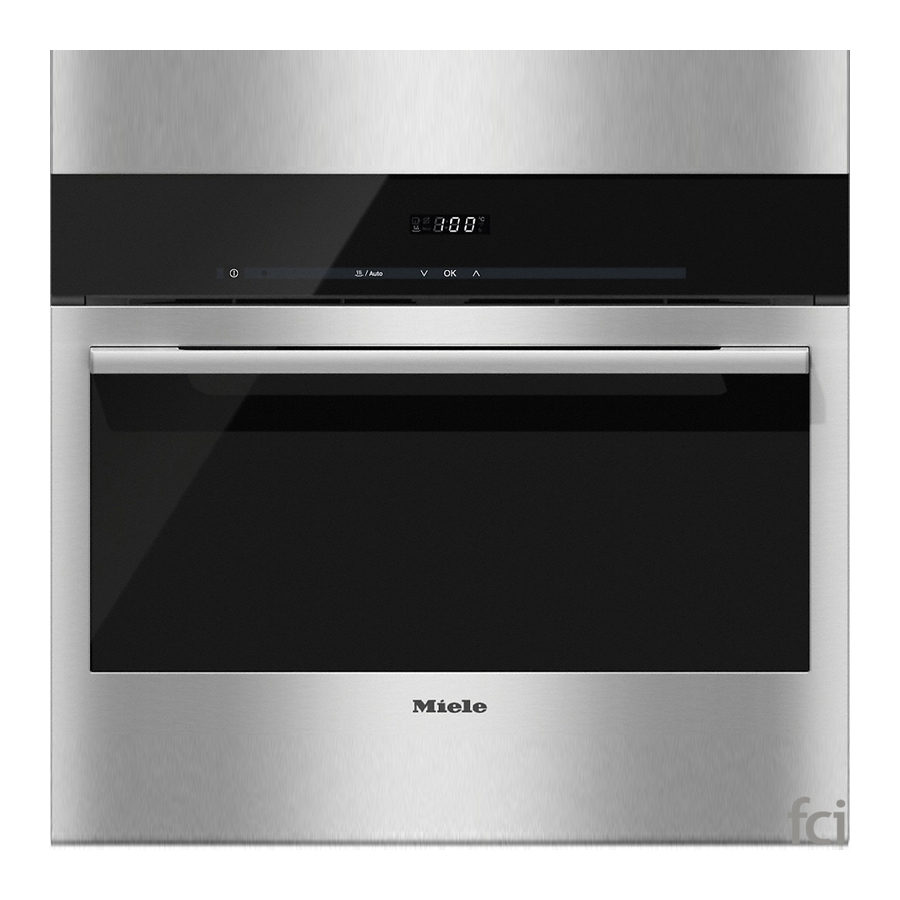
Overview Steam oven front view a Control panel g Water container b Ventilation outlet h Drip channel c Automatic door release for steam re‐ i Floor heating element duction j Temperature sensor d Door seal k Shelf runners e Suction tube l Steam inlet f Compartment for water container... -
Page 15: Accessories Supplied
Overview Accessories supplied Rack The accessories supplied with your ap‐ pliance, as well as a range of optional ones, are available to order from Miele (see "Optional accessories"). 1 rack for placing your own cooking DGG 21 containers on Descaling tablets... -
Page 16: Controls
Controls a Recessed On/Off button For switching the appliance on and off and accessing the descaling process b sensor For alternating between steam cooking and Automatic programmes c sensors For setting the temperature and duration and scrolling through the programme settings For accessing Programming mode: ... -
Page 17: Sensors
Controls Sensors The sensors react to touch. Each touch is confirmed with a keypad tone. This key‐ pad tone can be switched off (see "Settings – Keypad tone"). Display Display Meaning Steam cooking Insufficient water or water container not present ... -
Page 18: Description Of The Functions
Description of the functions Water container Temperature The maximum water level is 2.0 litres, The steam oven has a temperature the minimum 0.5 litre. These levels are range of 40 °C to 100 °C. The appliance indicated on the container on the han‐ is set at 100 °C when it is switched on. -
Page 19: Noises
Description of the functions Noises Steam reduction You will hear a pumping sound when If a cooking temperature above approx. the appliance is switched on, during 80 °C has been set, the appliance door use and after switching it off. This is the will automatically open a fraction just sound of water being pumped through before the end of a cooking programme... -
Page 20: Using For The First Time
Using for the first time Please stick the extra data plate for Cleaning for the first time the appliance supplied with this doc‐ Water container umentation in the space provided in the "After sales service, data plate, Take the water container out of the warranty"... -
Page 21: Setting The Water Hardness Level
Using for the first time Setting the water hardness lev‐ Setting the correct boiling point for water The water hardness level of the steam Before cooking with the steam oven for oven is set to Hard at the factory. For the first time, it must be set to the cor‐... -
Page 22: Operation
Operation Operating principles If you want to set a cooking duration Only use cold mains tap water (be‐ – less than 1 hour, confirm with OK, low 20 °C). Never use distilled or mineral water or other liquids. – more than 1 hour, set the cooking duration you want by touching the ... - Page 23 Operation After use If you are cooking at a temperature above approx. 80 °C, shortly before Remove the condensate tray and the end of the cooking time the door empty it. will automatically open a little to allow Remove the water container and some of the steam to escape.
-
Page 24: Interrupting Operation
Operation Changing settings during a cooking Interrupting operation process Operation is interrupted as soon as the You can alter the temperature and door is opened. The heating will be cooking duration at any time during op‐ switched off and the cooking duration eration. -
Page 25: Automatic Programmes
Automatic programmes Your steam oven is equipped with Using Automatic programmes 20 Automatic programmes for cooking Put the prepared vegetables into a vegetables. The temperature and dura‐ perforated cooking container. tion are preset, so you only have to pre‐ pare the vegetables as required (see the ... -
Page 26: Programme Chart
Automatic programmes Programme chart Programme no. Vegetable Cauliflower Florets, medium Beans (green, yellow) Whole Broccoli Florets, medium Chinese cabbage Cut into strips Peas — Fennel Cut into strips Kohlrabi Batons Pumpkin Diced Corn Cobs Carrots Diced / Batons / Sliced Capsicum Cut into strips New potatoes... -
Page 27: General Notes
General notes This section contains general informa‐ Your own containers tion. You will find more detailed infor‐ You can also use your own containers. mation about particular foods and how However, please note the following: to cook them in the other sections. –... -
Page 28: Shelf Level
General notes Shelf level Duration You can select any shelf level. You can In general, the cooking durations for also cook on several levels at the same cooking with steam are the same as for time. This will not alter the cooking du‐ cooking food in a saucepan. -
Page 29: Steam Cooking
Steam cooking Vegetables Shelf level When cooking vegetables with a dis‐ Fresh tinctive colour (e.g. beetroot) in a perfo‐ Prepare fresh vegetables in the usual rated container at the same time as way, i.e. wash, clean and cut them up. cooking other foods in other containers, place the solid tray directly underneath Frozen... - Page 30 Steam cooking The durations given in the charts for fresh vegetables are guidelines only. We rec‐ ommend selecting the shorter cooking duration quoted to start with. If vegetables are not cooked sufficiently after the shorter time, they can be put back in the oven compartment and cooked some more.
- Page 31 Steam cooking Vegetables [min.] Pumpkin, diced 4–8 Corn on the cob 10–15 Silverbeet, chopped 2–3 Capsicum, diced/cut into strips New potatoes, firm 20–25 Mushrooms Leek, chopped 2–4 Leek, stalks halved lengthways 4–6 Romanesco, whole 22–25 Romanesco, florets 5–7 Brussels sprouts 10–12 Beetroot, whole 50–60...
-
Page 32: Meat
Steam cooking Meat Settings Steam cooking Fresh Temperature: 100 °C Prepare the meat in the usual way. Duration: see chart Frozen Meat should be thoroughly defrosted before cooking in the steam oven (see "Special applicaitons - Defrost"). Preparation Meat which needs to be seared before being cooked, e.g. - Page 33 Steam cooking The durations given in the chart are guidelines only. We recommend selecting the shorter cooking duration quoted to start with. If meat is not cooked sufficiently af‐ ter the shorter time, it can be put back in the oven compartment and cooked some more.
-
Page 34: Sausages
Steam cooking Sausages Fish Settings Fresh Prepare fresh fish in the usual way, i.e. Steam cooking Temperature: 90 °C clean, gut and fillet. Duration: see chart Frozen Sausages [min.] Fish does not need to be fully defrosted before cooking. Defrost so that the sur‐ Frankfurters 6–8 face is sufficiently thawed to take herbs... - Page 35 Steam cooking Temperature – You can use any fish scraps, e.g. fish heads, bones, tails etc. to make a 85 °C – 90 °C fish stock. Place the fish scraps to‐ For gently cooking delicate types of gether with some mixed vegetables fish, such as flounder.
- Page 36 Steam cooking The durations given in the chart are guidelines for fresh fish. We recommend se‐ lecting the shorter cooking duration quoted to start with. If the fish is not cooked sufficiently after the shorter time, it can be put back in the steam oven and cooked for longer.
-
Page 37: Shellfish
Steam cooking Shellfish Preparation Defrost frozen shellfish before cooking with steam. Peel, remove and discard the intestines, and then wash the shellfish. Cooking containers If using a perforated container, grease it first or line it with baking paper. Duration The longer shellfish are cooked, the tougher they become. Use the cooking dura‐ tions given in the chart. -
Page 38: Mussels
Steam cooking Mussels Fresh Warning - danger of food poisoning! Only cook mussels which are closed. Do not eat mussels which have not opened after being cooked. Steep fresh mussels in water for a few hours before cooking to rinse out any sand. Then scrub the mussels thoroughly to clean them. -
Page 39: Rice
Steam cooking Rice Rice swells when cooked and needs to be cooked in liquid. The proportion of rice to liquid will vary depending on the type of rice. The rice absorbs all the liquid. Therefore none of the nutrients are lost. Settings Steam cooking ... -
Page 40: Pasta / Noodles
Steam cooking Pasta / Noodles Dry pasta and noodles Dry pasta and noodles swell when they are cooked and need to be cooked in liq‐ uid. The liquid must cover the pasta or noodles. Using hot liquid gives better re‐ sults. -
Page 41: European Dumplings
Steam cooking European dumplings Ready-made dumplings in wrappers need to be covered completely with water. Otherwise they will not absorb enough water and will fall apart, even if steeped in water prior to cooking. Cook fresh dumplings in a greased, perforated container. Settings Steam cooking ... -
Page 42: Grains
Steam cooking Grains Grain swells when cooked and needs to be cooked in liquid. The proportion of grain to liquid will vary depending on the type of grain. Grain can be cooked whole or cracked. Settings Steam cooking Temperature: 100 °C Duration: see chart Ratio ... -
Page 43: Dried Pulses
Steam cooking Dried pulses Soak pulses for at least 10 hours in cold water before cooking. Soaking makes the pulses more digestible and shortens the cooking duration required. Soaked pulses must be covered with liquid during cooking. Lentils do not need to be soaked before cooking. With unsoaked pulses a certain ratio of pulses to liquid is required. - Page 44 Steam cooking Unsoaked Ratio [min.] Pulses : Liquid Beans Kidney beans 1 : 3 130–140 Azuki beans 1 : 3 95–105 Black beans 1 : 3 100–120 Borlotti beans 1 : 3 115–135 Haricot beans 1 : 3 80–90 Lentils Brown lentils 1 : 2...
-
Page 45: Hen's Eggs
Steam cooking Hen's eggs Use a perforated container to prepare boiled eggs in the steam oven. The eggs do not need to be pierced before cooking as they are gradually warmed during the heating-up phase and so do not burst when they are cooked with steam. -
Page 46: Fruit
Steam cooking Fruit Cook fruit in a solid container so that none of the juice is lost. If you wish to cook fruit in a perforated container, place a solid container directly underneath it to col‐ lect the juice. Useful tip: You can use the collected juice to prepare a glaze for a fruit flan. Settings Steam cooking ... -
Page 47: Menu Cooking
Steam cooking Menu cooking Duration If you increase the recommended tem‐ Before cooking meals with the Menu perature, shorten the cooking duration cooking function, switch off steam re‐ by approx. ¹/₃. duction (see "Settings - Steam reduc‐ tion"). Example: Menu cooking involves cooking various Rice 20 minutes foods with different cooking times in or‐... - Page 48 Steam cooking Procedure Place the rice in the oven compart‐ ment first. Set the first cooking duration: 14 mi‐ nutes. After 14 minutes, place the fish in the steam oven. Set the second cooking duration: 2 minutes.
-
Page 49: Special Applications
Special applications Reheat Procedure Cover the food with a deep plate, a The steam oven is very effective at re‐ lid, or with clingfilm that is resistant to heating food gently, without drying it temperatures up to 100 °C and to out or cooking it further. -
Page 50: Defrost
Special applications Defrost Useful tips – Fish does not need to be fully defros‐ It is much quicker to defrost items in ted before cooking. Defrost so that the steam oven than at room tempera‐ the surface is sufficiently thawed to ture. - Page 51 Special applications Food to be defrosted Quantity [min.] [min.] [°C] Dairy products Sliced cheese 125 g Quark 250 g 20–25 10–15 Cream 250 g 20–25 10–15 Soft cheese 100 g 10–15 Fruit Apple sauce 250 g 20–25 10–15 Apple pieces 250 g...
- Page 52 Special applications Food to be defrosted Quantity [min.] [min.] [°C] Stew 1000 g 50–60 10–15 Liver 250 g 20–25 10–15 Saddle of hare 500 g 30–40 10–15 Saddle of venison 1000 g 40–50 10–15 Schnitzel / Chops / Sausages 800 g 25–35 15–20...
-
Page 53: Bottling
Special applications Bottling Fill volume Fill the glass jars with produce up to a Only use unblemished, fresh produce maximum of 3 cm below the rim. Do which is in good condition. not pack it down as this will damage Glass jars the cell walls of the produce. - Page 54 Special applications Procedure Place the rack on the lowest shelf level. Place the jars on the rack (all the same size). Ensure that they do not touch one another. Settings Steam cooking Temperature: see chart Bottling duration: see chart Food ...
- Page 55 Special applications Food [°C] [min.*] Broad beans Gherkins Beetroot Meat Pre-cooked Roasted Temperature / Duration The times quoted are for 1.0 litre jars. If using 0.5 litre jars, reduce the duration by about 15 minutes. If using 0.25 litre jars, reduce the duration by about 20 minutes.
-
Page 56: Extracting Juice
Special applications Extracting juice Procedure Put the prepared fruit (cleaned, wash‐ This appliance is ideal for extracting ed, chopped etc.) into a perforated juice from soft, firm and hard fruit. cooking container. It is best to use overripe fruit as the rip‐ ... -
Page 57: Making Yoghurt
Special applications Making yoghurt Yoghurt is grainy: The milk was heated too high, it was To prepare yoghurt, you will need milk not free of imperfections, the milk and and live culture or yoghurt starter pow‐ yoghurt starter were not stirred evenly. der, e.g. -
Page 58: Proving Yeast Dough
Special applications Procedure Proving yeast dough Mix 100 g yoghurt with 1 litre of milk Procedure or make up the mixture with yoghurt Prepare the dough according to the enzyme, following the instructions on recipe. the packaging. Place the covered bowl in a perfora‐ ... -
Page 59: Dissolving Gelatine
Special applications Dissolving gelatine Melting chocolate You can use the steam oven for melting Procedure any type of chocolate. Gelatine leaves: Cover the gelatine leaves with cold water and leave to Procedure soak for 5 minutes. The gelatine Break the chocolate into small leaves have to be fully covered with pieces. -
Page 60: Skinning Fruit And Vegetables
Special applications Skinning fruit and vegetables Preserving apples You can treat homegrown apples in the Procedure steam oven to increase the length of Cut a cross in the top of tomatoes, time for which you can store them. nectarines etc. This will allow the skin Once treated, the apples will keep for 5 to be removed more easily. -
Page 61: Blanching
Special applications Blanching Sweating onions Blanch fruit and vegetables before Sweating means cooking the onions in freezing them. Blanching helps maintain their own juices, with the addition of a the quality of the produce when it is fro‐ little fat if necessary. zen. -
Page 62: Rendering Fat
Special applications Rendering fat Disinfecting items The bacon will not become brown. The steam oven will disinfect baby bot‐ tles and other containers so that at the Procedure end of the programme they are as germ free as they would have been if boiled. ... -
Page 63: Heating Damp Towels
Special applications Heating damp towels Preparing custard royale Procedure Procedure Moisten towels and then roll them up. Stir 6 eggs into 375 ml milk (do not beat into a foam). Place them beside one another in a ... -
Page 64: Settings
Settings Your steam oven is supplied with a number of standard default settings. The standard settings listed in the chart can be altered. Changing and saving settings The appliance is switched off. Touch and hold the sensor. While pressing , touch once briefly. - Page 65 Settings The factory setting is shown in bold. Programme Status Possible settings P1 Water hardness Soft (< 1.5 mmol/l, < 8.4 °dH) Medium (1.5 - 2.5 mmol/l, 8.4–14 °dH) Hard (> 2.5 mmol/l, > 14 °dH) P2 Buzzer volume Very quiet Quiet Loud Very loud...
-
Page 66: Note For Test Institutes
Note for test institutes... -
Page 67: Cleaning And Care
Cleaning and care Notes on cleaning and care Disconnect the appliance from the electricity supply and allow it to cool Danger of injury! down to a safe temperature before The steam from a steam cleaning cleaning. appliance could reach electrical components and cause a short cir‐... -
Page 68: Appliance Front
Cleaning and care Appliance front Clean the front of the appliance with a solution of warm water and a little Unsuitable cleaning agents washing-up liquid applied with a clean sponge or cloth. To avoid damaging the surfaces of your You can also use a clean, damp mi‐... -
Page 69: Oven Compartment
Then dry the oven interior and the in‐ side of the door with a cloth. The door seal is designed to last the lifetime of the appliance. Should it for any reason need replacing, please contact Miele (see the end of these operating instructions). -
Page 70: Accessories
Remove any bluish discolouration on cooking containers using the Original Miele ceramic and stainless steel cooktop cleaner (see "Optional ac‐ Pull the shelf runners out first from cessories") or with vinegar. -
Page 71: Descaling
Other descaling water up to the level marker and agents, which contain other acids be‐ drop 2 Miele descaling tablets in it. sides citric acid and/or other undesira‐ Push the water container into the ap‐ ble substances, such as chlorides, for pliance until it connects. - Page 72 Cleaning and care Remove the water container and After descaling empty it. Switch the steam oven off. Rinse the water container thoroughly. Remove, empty and dry the water container. Fill the water container with 1 litre of fresh tap water and push it into the ...
-
Page 73: Door
Cleaning and care Door Danger of injury from the hinge guides for the door. Removing the door The hinge guides can flip back Prepare a suitable underlay for the against the steam oven. door, such as a soft cloth. Never attempt to pull the door off the hinge guides from a horizontal posi‐... - Page 74 Cleaning and care Refitting the door Risk of damage to the door. Make sure that the door goes back on straight. Turn both locking clamps up as far as they will go into a horizontal position. Hold the door securely at both sides and carefully fit it back onto the hinge guides.
-
Page 75: Problem Solving Guide
Problem solving guide With the aid of the following guide, minor problems can be easily corrected with‐ out contacting Miele. If, after reading this guide, you can't remedy the problem yourself, please call Miele (see back cover for details). Please note, however, that a call-out charge will be applied to unnecessary service visits where the problem could have been rectified as described in these operating instructions. - Page 76 Switch the steam oven off and then back on again after a few minutes. If the same message appears again, call Miele. and other fault codes Technical fault. Switch the appliance off and call Miele.
-
Page 77: Optional Accessories
DGGL 1 Perforated cooking container or from Miele (see end of this booklet Gross capacity 1.5 litres / Useable ca‐ for contact details). pacity 0.9 litre 325 x 175 x 40 mm (W x D x H) - Page 78 Optional accessories DGGL 4 DGGL 8 Perforated cooking container Perforated cooking container Gross capacity 4.0 litres / Useable ca‐ Gross capacity 2.0 litres / Useable ca‐ pacity 3.1 litres pacity 1.7 litres 325 x 265 x 65 mm (WxDxH) 325 x 265 x 40 mm (W x D x H) DGGL 5 DGGL 13 Perforated cooking container...
-
Page 79: Cleaning And Care Products
For descaling the appliance Condensate tray for catching excess moisture, can also be used as a cook‐ Original Miele ceramic and stainless ing container. steel cooktop cleaner 250 ml 325 x 430 x 40 mm (W x D x H) -
Page 80: Safety Instructions For Installation
Safety instructions for installation Incorrect installation can result in personal injury and damage to property. Before connecting the appliance to the mains supply, ensure that the connection data on the data plate (voltage and frequency) match the mains electricity supply. This data must correspond in order to avoid the risk of damage to the appliance. -
Page 81: Detailed Dimensions Of Oven Front
Detailed dimensions of oven front PureLine front ContourLine front * Glass front / ** Metal front... -
Page 82: Building-In Dimensions
Building-in dimensions Installation in a tall unit a Steam oven b Niche c Inlet for mains connection cable to the appliance d Recommended position for electrical socket. Important: Do not position direct‐ ly behind the appliance. e Mains connection cable, L = 2000 mm * Glass front / ** Metal front... -
Page 83: Installation In A Base Unit
Building-in dimensions Installation in a base unit When building the appliance into a base unit underneath a cooktop, please also observe the installation instructions for the cooktop as well as the building-in depth required for the cooktop (see installation instruction manual for the cook‐ top). -
Page 84: Installation In A Tall Unit In Combination With An Oven
Building-in dimensions Installation in a tall unit in combination with an oven a Steam oven b Niche c Inlet for mains connection cable to the appliance d Recommended position for electrical socket. Important: Do not position direct‐ ly behind the appliance. e Mains connection cable, L = 2000 mm f Cut-out for ventilation (only necessary when installing above a pyrolytic oven) g Oven... -
Page 85: Installation
Installation Installing the steam oven A malfunction can occur if the appli‐ ance is not correctly aligned. For correct functioning of the steam generator, please make sure that the appliance is horizontally level. The maximum deviation tolerated is 2°. Push the appliance into position in the niche and align it. -
Page 86: Electrical Connection
Danger of injury! Residual current device Miele cannot be held liable for unau‐ For extra safety, it is advisable to install thorised installation, maintenance a residual current device (RCD), with a and repair work as this can be dan‐... - Page 87 Electrical connection Replacing the mains connec‐ tion cable If the mains cable needs to be re‐ placed, it must be replaced with a spe‐ cial connection cable, type H 05 VV-F (PVC insulated), available from Miele.
-
Page 88: After Sales Service, Data Plate, Warranty
After sales service, data plate, warranty After sales service In the event of any faults which you cannot easily remedy, please contact Miele. See back of this booklet for contact details. Please quote the model and serial number of your appliance when contacting Miele. - Page 91 Miele Australia Pty. Ltd. ACN 005 635 398 ABN 96 005 635 398 Miele Center and Head Office Melbourne: 1 Gilbert Park Drive Knoxfield, VIC 3180 Miele Center and Office Melbourne: 206-210 Coventry Street South Melbourne, VIC 3205 Miele Center and Office Sydney:...
- Page 92 DG 6200 en-AU, NZ M.-Nr. 09 651 660 / 06...