Motorola StarTAC Owner's Manual
Motorola cell phone owner's manual
Hide thumbs
Also See for StarTAC:
- Instruction manual (161 pages) ,
- Manual (146 pages) ,
- User manual (119 pages)
Table of Contents
Advertisement
Quick Links
Welcome
Thank you for choosing your Motorola TDMA digital
StarTAC™ phone from a global leader in
communications technology. All Motorola digital
cellular phones are designed and manufactured to
meet Motorola's rigorous specifications and world-
class quality standards. During development, our
laboratory testing team took your TDMA digital
StarTAC™cellular phone through rigorous durability
tests including temperature, humidity, shock, dust,
vibration, and drop tests—and the phone still
worked!
We are confident that the phone you purchased will
meet your own exacting standards. Enjoy your
Motorola TDMA digital StarTAC™ phone.
Advertisement
Table of Contents

Related Manuals for Motorola StarTAC


Summary of Contents for Motorola StarTAC
- Page 1 Welcome Thank you for choosing your Motorola TDMA digital StarTAC™ phone from a global leader in communications technology. All Motorola digital cellular phones are designed and manufactured to meet Motorola’s rigorous specifications and world- class quality standards. During development, our laboratory testing team took your TDMA digital StarTAC™cellular phone through rigorous durability...
-
Page 2: Table Of Contents
Contents Welcome ....... . .i Safety Information ..... . . vii Overview . - Page 3 Using the Menu System ....41 Introducing the Menu Features ... .41 Navigating the Menu ....42 Road Maps .
- Page 4 Using Lock/Security Features ... . . 75 Road Map for Lock Security ....76 Activating Voice Privacy ....77 Locking/Unlocking Your Phone .
- Page 5 Reference Information ....114 Accessory Options .....114 Troubleshooting .
-
Page 7: Safety Information
Safety Information Important: Read this information before using your wireless handheld phone. Exposure to Radio Frequency Signals Your wireless handheld portable telephone is a low power radio transmitter and receiver. When it is ON, it receives and also sends out radio frequency (RF) signals. -
Page 8: Antenna Care
If you do not use a body-worn accessory, ensure the antenna is at least one inch (2.5 centimeters) from your body when transmitting. Use of non-Motorola accessories may violate FCC RF exposure guidelines. Antenna Care Use only the supplied or an approved replacement antenna. -
Page 9: Electronic Devices
packed with a protective battery cover; please use this cover for storing your batteries when not in use. Driving Check the laws and regulations on the use of wireless telephones in the areas where you drive. Always obey them. Observe the following guidelines when using your phone while driving. -
Page 10: Hearing Aids
Hearing Aids Some digital wireless phones may interfere with some hearing aids. In the event of such interference, you may want to consult your hearing aid manufacturer to discuss alternatives. Other Medical Devices If you use any other personal medical device, consult the manufacturer of your device to determine if it is adequately shielded from external RF energy. -
Page 11: Potentially Explosive Atmospheres
Potentially Explosive Atmospheres Turn your phone OFF, do not remove your battery when you are in any area with a potentially explosive atmosphere, and obey all signs and instructions. Sparks from your battery in such areas could cause an explosion or fire resulting in bodily injury or even death. -
Page 12: Overview
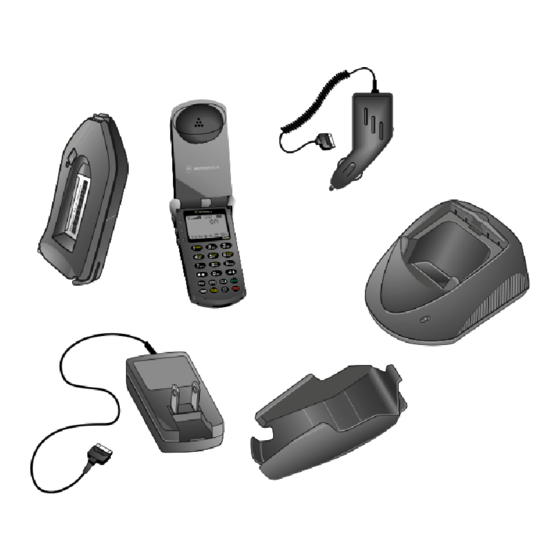
Overview Package Content Options Your TDMA digital StarTAC™ cellular phone is typically packed with a transformer charger and at least one battery. Below is a sampling of the different package options. Note: Your phone and accessories may not look exactly as pictured. -
Page 13: Phone Overview
Phone Overview See the inside front cover of this guide for a diagram of the components described below. Antenna—Provides superior connectability. Earpiece—Ultra-compact phone speaker. Accessory Connector Port—Provides the connections for an external power supply and vehicular and optional accessories. Headset Jack—Provides the connection for an optional headset. -
Page 14: Understanding The Guide
In the margins of your guide are short cuts and useful hints and ways to improve your phone’s performance. These are especially helpful for experienced Motorola Users, who can find many of the same key sequences used with other Motorola models. -
Page 15: Using The Battery
Using the Battery About Your Batteries Your TDMA digital StarTAC™ phone can use either Lithium Ion (LiIon) or Nickel Metal Hydride (NiMH) batteries. Batteries are available in these sizes: Slim, Standard, and Extra Capacity. Your phone can use two batteries at the same time. - Page 16 performance is reflected in the digital section of the table below. Otherwise, refer to the Analog section. The following table shows ranges for battery talk- times and standby times. Digital Battery Talk Type (up to) Slim Main LiION 60 min. 500mAH Standard Main NiMH...
-
Page 17: Removing And Attaching Battery Covers
Removing and Attaching Battery Covers Your phone’s batteries are shipped uncharged and fitted with protective covers. Before you install the batteries, remove these covers, and save them for storing unused batteries. The covers prevent metal objects from contacting the battery terminals, reducing the risk of injury or damage from a battery short circuit. - Page 18 Removing the Auxiliary Battery Cover 1. Hold the auxiliary battery securely with one hand. 2. With your other hand’s thumb, push up on the bottom of the cover. 3. Continue pushing until the cover slides free of the pins on the bottom of the battery, and swing the cover away from the battery.
-
Page 19: Installing And Removing Batteries
Installing and Removing Batteries Installing a Main Battery 1. Set the edge of the battery opposite the release latch into the cover. 2. Press the release latch side of the battery into the cover until the latch clicks into place Removing a Main Battery 1. -
Page 20: Checking Battery Levels
High Removing an Auxiliary Battery 1. Pull the battery down until the pins release from the base of the phone, and pull the base away from the phone. 2. Lift the battery’s hook out of the slot on the back of the phone. Checking Battery Levels Battery Level Indicator The three bar segments on your phone’s Battery... -
Page 21: Charging Batteries
To confirm low battery signals: ƒ › Press Power Status Messages You may also see one of the following messages: Auxiliary and/or main batteries fitted; Auxiliary phone is operating from auxiliary battery. Auxiliary and/or main batteries fitted; Main phone is operating from main battery. Charging Auxiliary and main batteries fitted;... -
Page 22: Using The Desktop Charger
Tip: If both a main and auxiliary battery are attached, the main battery is charged to 90% before the auxiliary is charged. 2. Plug the power adapter into a 110V AC electrical outlet. Plug the vehicle power adapter into the power adapter plug in the vehicle. - Page 23 Battery Charging Tips To ensure that you enjoy maximum battery life and use your battery to its fullest capacity: • Always use Motorola approved battery chargers. • For the best results, Li-Ion batteries should be charged using the E•P™ Desktop Charger, or your phone’s internal charger.
- Page 24 • Do not leave a NiMH battery connected to any charger for longer than 24 hours. A new NiMH battery may require several full charge/discharge cycles in order to achieve its optimum performance. After this initial charge, you can recharge your battery at your convenience, using the phone’s rapid travel charger.
-
Page 25: Using The Phone
Powering off will be displayed, and you will hear an audible alert. What You Will See When you turn on your TDMA digital StarTAC™ phone, it performs a self-test to let you know it is operational. When the test is completed, the display shows: •... -
Page 26: Reading The Indicators
Reading the Indicators Signal Strength Indicator (1) The Signal Strength Indicator (SSI) indicates the strength of your phone’s connection with the local High cellular system. A strong signal increases your chances of placing and receiving calls. Low signal strength can occur in a fringe area of the cellular system. - Page 27 SMS Message Waiting Indicator (6) The Short Message Service (SMS) Message Waiting Indicator is displayed when the phone receives a message. (This is an optional, network and subscription-dependent feature that is not available in all areas.) Voice Message Waiting Indicator(7) The Voice Message Waiting Indicator is displayed when your Voicemail has received a message.
-
Page 28: Standby Mode
Power/Status Indicator You can check the Power/Status indicator on top of the phone for status information on your current type of service and message status. Messages can include voice mails and Short Message Services (SMS) messages or the receipt of recent calls. (This is an optional, network and subscription-dependent feature that is not available in all areas.) During wake-up and while the phone is ringing, the... -
Page 29: Storing Your Phone In Its Holster
Storing Your Phone in Its Holster To store your phone in its holster, make sure the main battery is facing the inside of the holster. Then clip the holster onto a belt, purse or briefcase. Notes: • For body-worn use, keep the antenna at least one inch from your body when transmitting. -
Page 30: Ending A Call
“Deactivating Open to Answer” on page 92.) Unanswered Call Indicator When you cannot take a call, your TDMA digital StarTAC™ phone keeps a count of your unanswered calls and alerts you with the message Missed XX Calls, where XX is the number of missed calls. -
Page 31: Using The Smart Button
Using the Smart Button Use the Smart Button to place and end calls, enter menus, toggle features on and off, and select items in the display. The Smart Button is the middle key on the left side—easy to feel, easy to find, and easy to use. -
Page 32: Redialing A Number
Notes: • This feature is not available on all models of this phone. • Once you switch from digital to analog mode, you can not switch back to digital mode until you turn your phone off and on again. • When you switch from digital to analog mode, you may still see the digital the phone is idle (that is, not in an active call). -
Page 33: Controlling Volume
Controlling Volume Adjusting Volume Use the upper and lower volume keys to adjust earpiece, keypad, and ringer volume. When you press these keys, the phone’s speaker demonstrates the current volume level. To adjust earpiece and keypad volume: Press to raise or lower the volume. To adjust the ringer volume: ƒ. -
Page 34: Using Phone Memory
Using Phone Memory Use your TDMA digital StarTAC™ phone’s internal Phone Book to store up to 99 names and numbers for easy access. In this chapter you will learn how to: • store names and numbers into the Phone Book •... -
Page 35: Using Your Phone's Built-In Phone Book
Using Your Phone’s Built-in Phone Book Each phone number in your phone book is stored in a memory location numbered 01-99. Arrange numbers for easy recall by storing related numbers in groups. If you store the numbers you call most in locations 01-09, then you can use Turbo Dial™... - Page 36 § Tip: The symbol in your display represents the Smart Button. Tip: Press the upper or lower volume key first, to toggle between upper and lower case letters. 4. Enter a name to identify the phone number. (See the following section for details on entering names.) ¬...
-
Page 37: Recalling An Entry By Name
¬ 3. Press name. Your phone confirms your entry by displaying the information you stored. Recalling an Entry by Name After storing names and numbers, you can recall them alphabetically and immediately place calls. Use the Smart Button for instant access to the name directory. -
Page 38: Recalling An Entry By Memory Location
Recalling an Entry by Memory Location Each name and number you store is placed in a memory location numbered 01-99. Once you have stored names and numbers, you can recall them by memory location: ‰ 1. Press 2. Enter the two-digit memory location of the phone number you want. -
Page 39: Shortcuts For Recalling Phone Book Entries
Shortcuts for Recalling Phone Book Entries Using Speed Dial If you know the memory location of the number you want to call, try the Speed Dial function: 1. Enter the two-digit memory location (01-99). 2. Press and hold call. Using the Turbo Dial™ Function The Turbo Dial™... -
Page 40: Making Notes On The Scratchpad
Making Notes on the Scratchpad In addition to your internal phone book, you also have a built-in scratchpad for making quick notes. The scratchpad remembers the last phone number shown on your display. Entering a Number in the Scratchpad If you are on the phone and your party gives you another number to call, enter the number on the scratchpad so you can place the call later. -
Page 41: Using The Menu System
Using the Menu System Your TDMA digital StarTAC™ cellular phone includes many features to help you be more productive. The phone’s user-friendly menu system helps you find what you need quickly and easily. In this chapter you will learn: • what are the main menu features •... -
Page 42: Navigating The Menu
R e c e n t C a l l s P h o n e B o o k T i m e r s T o n e C o n t r o l L o c k S e c u r e P h o n e O p t i o n s... -
Page 43: Managing Recent Calls
Managing Recent Calls The recent calls menu option allows you to access your Caller Line ID and review previous calls. Caller Line ID is an optional network and subscription- dependent feature that is not available in all areas. In this chapter you will learn how to review all calls that you have received or dialed. -
Page 44: Road Map For Recent Calls
Following are some useful tips and information about reviewing recent calls. • Your TDMA digital StarTAC™ cellular phone can store the telephone numbers and names of the last thirty incoming calls. • If the caller’s phone number matches a phone number stored in the phone’s memory,... - Page 45 • Caller Line ID allows you to view the name and number of the calling party in the phone’s display while the phone is ringing. Caller Line ID is an optional feature that is not available in all markets. Contact your Service Provider for availability information.
-
Page 46: Reviewing Received Call
Getting to Recent Calls ƒ Press , then press When you see Recent Calls, press Press to scroll to the following features. Shortcut: ‰ ‰ Press to view your received calls. You must hold the second ‰ until the received call list is displayed. -
Page 47: Reviewing Dialed Calls
Reviewing Dialed Calls 1. Follow the steps in the ”Getting to Recent Calls…” block to scroll to Dialed Calls. The total number of dialed calls that are stored is displayed in the upper right corner. You can see up to the last twenty numbers dialed. -
Page 48: Clearing Caller Line Id
Tip: To erase all entries you must press and Ç hold whereas to erase a single entry you simply press Ç. Clearing Caller Line ID To erase all entries saved in your Caller Line ID memory: 1. Follow the steps in the ”Getting to Recent Calls…”... -
Page 49: Managing The Phone Book
Managing the Phone Book In “Using Phone Memory” you learned how to store and recall phone numbers with the internal Phone Book. You can access the same features, along with several advanced features, using your phone’s convenient menu system. In this chapter you will learn how to: •... -
Page 50: Road Map For Phone Book
Road Map for Phone Book To enter the menu system: ƒ Press , then press ƒ ⁄. Press Start: R e c e n t Calls P h o n e B o o k R e c a l l B y N a m e R e c a l l B y L o c a t i o n... -
Page 51: Recalling An Entry By Name
Getting to Phone Book... ƒ Press , then press Press to scroll to Phone Book, and press Press to scroll to the following features, and press select. Recalling an Entry by Name To recall a stored name with the Phone Book menu: 1. -
Page 52: Storing With The Menu
Tip: If the chosen location is full, º press restart the storing sequence. Storing with the Menu Use the phone’s menu system to store names and numbers into the Phone Book. 1. Follow the steps in the ”Getting to Phone Book…”... -
Page 53: Storing And Placing Numbers With Pause Dialing
Getting to Phone Book... ƒ Press , then press Press to scroll to Phone Book, and press Press to scroll to the following features, and press select. Storing and Placing Numbers with Pause Dialing Entering a Pause in a Number When you call automated systems, a recorded message prompts you for PIN numbers, Voice Mail numbers, etc. - Page 54 7. Insert another pause, and enter the next group of numbers by repeating steps 3 through 5 as many times as necessary. You can store up to 32 digits, including pauses. Then store the entire sequence as you would any phone number. ¬...
-
Page 55: Storing And Placing Numbers For Calling Card Information
Getting to Phone Book... ƒ Press , then press Press to scroll to Phone Book, and press Press to scroll to the following features, and press select Storing and Placing Numbers for Calling Card Information Storing Calling Card Information Like Pause Dialing, you can store calling card access numbers, separated by pauses, for recall later. - Page 56 7. Press to scroll to the Number Character. You will see Insert Number 'N. 8. Press to insert the 'N Character. This special character saves a place for the phone number you will be calling. The number is inserted automatically when you place the call.
- Page 57 3. Enter the phone number you want to call, including the area code. Enter the number manually, by location, or recall. 4. Press and hold , or press call. Your phone dials the number to access your long distance provider. æ...
-
Page 58: Editing A Memory Location
Getting to Phone Book... ƒ Press , then press Press to scroll to Phone Book, and press Press to scroll to the following features, and press select. to enter the menu system. Editing a Memory Location After you store names and numbers in the Phone Book, you can edit the information or erase entries at any time. - Page 59 Press to keep the phone number in its current location. The display shows the name stored with the phone number you are editing. 8. Enter your changes to the name. (See “How to Enter a Name” on page 36.) Ç Press to erase one letter at a time, or skip to step 9 to leave the name unchanged.
-
Page 60: Assigning An Individual Ring Style To A Phone Book Entry
Getting to Phone Book... ƒ Press , then press Press to scroll to Phone Book, and press Press to scroll to the following features, and press select. to enter the menu system. Assigning an Individual Ring Style to a Phone Book Entry You can use the individual ring style feature to assign one of nine ring styles to alert you of an incoming call from a phone number listed in your... - Page 61 ¬ 5. Press to select that ring style. The display confirms the selection by showing Ring Style Assigned. º 6. Press to exit, or scroll to other features.
-
Page 62: Timing Your Calls
Timing Your Calls Your phone’s Call Timers give you a variety of options for managing your time. You can monitor the length of individual calls, set a timer to track monthly usage, or have the phone alert you at intervals that you specify. In this chapter you will learn how to: •... -
Page 63: Road Map For Call Timers
Road Map for Call Timers To enter the menu system: ƒ Press , then press ƒ ⁄. Press Start: R ec en t C al ls P ho ne B oo k T im e rs Individual XX YY Resettable XXXXX Cumulative XXXXX... -
Page 64: Viewing The Individual Call Timer
Getting to Call Timers... ƒ Press , then press Press to scroll to Timers and press Press to scroll to the following features, and press select. Shortcut: ‰ » Press » for a quick look at this timer. Shortcut: ‰ » Press »»... -
Page 65: Viewing The Cumulative Timer
Viewing the Cumulative Timer This is a non-resettable timer that keeps track of your phone’s total air time (in minutes). 1. Follow the steps in the ”Getting to Call Timers…” block to select Cumulative XXXXX. The display shows your air time in minutes since your phone was activated. -
Page 66: Displaying The Individual Timer Automatically
Getting to Call Timers... ƒ Press , then press Press to scroll to Timers and press Press to scroll to the following features, and press select. Tip: Activating the Individual Timer may reduce both standby and talk times. to enter the menu system. Displaying the Individual Timer Automatically When you turn this feature on, your phone... -
Page 67: Setting The Repeating Audible Timer
Setting the Repeating Audible Timer You can set this timer to beep during your calls at an interval that you select—from 11-999 seconds. You will hear the beep 10 seconds before the end of each interval, but the party on the other end does not hear the beeps. - Page 68 2. Press to toggle between Single Timer Off and Single Timer On. The prompt to enter seconds appears only if you have turned the feature on. If you have turned it on, you will see Single Timer Off. 3. Enter the number of seconds you would like between audible beeps.
-
Page 69: Adjusting Tone Controls
Adjusting Tone Controls Use these features to select vibration mode, personalize your phone’s ringer styles, or turn the ringer off. In this chapter you will learn how to: • select the type of Call Alert or Message Alert • choose from nine different ringer styles •... -
Page 70: Road Map For Tone Controls
Road Map for Tone Controls To enter the menu system: ƒ Press , then press ƒ ⁄. Press Start: R e c e n t C a l l s P h o n e B o o k T i m e r s T o n e C o n t r o l C a l l A l e r t... -
Page 71: Selecting Call Alert Type
Getting to Tone Controls... ƒ Press , then press Press to scroll to Tone Control and press Press to scroll to the following features, and press select. Selecting Call Alert Type Using this feature, you can choose to be alerted to incoming calls using the vibrating ringer, the ringer, both, or neither. -
Page 72: Selecting Message Alert Type
Shortcut: ƒ † Press to toggle among the Message Alert and Call Alert types. 2. Press to scroll through your choices: Ring Only Vibrate Only Ringer On and Vib On Ringer Off Vib Off 3. Press when you reach the setting you want. -
Page 73: Selecting A Ring Style
Getting to Tone Controls... ƒ Press , then press Press to scroll to Tone Control and press Press to scroll to the following features, and press select Selecting a Ring Style Your phone lets you select any of nine different ring styles. -
Page 74: Turning Scratchpad Tones On And Off
2. Press to toggle between Keypad Tone On and Keypad Tone Off. º 3. Press to exit, or scroll to other features. Turning Scratchpad Tones On and Off Scratchpad tones are the tones that your phone sends to access automated calling systems like Voice Mail. -
Page 75: Using Lock/Security Features
Using Lock/Security Features While you probably would not want to leave your phone unattended, your TDMA digital StarTAC™ phone has a number of built-in security features to prevent unauthorized use. In this chapter you will learn how to: • activate the Voice Privacy feature •... -
Page 76: Road Map For Lock Security
Road Map for Lock Security To enter the menu system: ƒ Press , then press ƒ ⁄. Press Start: Recent Calls Phone Book Timers Tone Control Lock Secure Privacy Code Automatic View Lock Off Lock Code Priority Change Call Off Lock Code Secure Service... -
Page 77: Activating Voice Privacy
Getting to Lock Security... ƒ Press , then press Press to scroll to Lock Secure and press Press to scroll to the following features, and press select. Activating Voice Privacy When you activate your phone’s Voice Privacy feature, you request your cellular system to search for a Voice Privacy channel with each call. -
Page 78: Locking/Unlocking Your Phone
Shortcut: ƒ Press , the Smart Button, ⁄ fi , and continue with step 2. Tip: “LOCK” is printed on the fi key, as a reminder. Locking/Unlocking Your Phone For your protection, you must enter the six-digit security code to access the features that your phone contains. -
Page 79: Activating Priority Calling
Answering Calls While the Phone Is Locked You can still receive calls when the phone is locked. To answer an incoming call: 1. Enter your three-digit lock code. 2. Press and hold the call. Activating Priority Calling Priority Call allows the Turbo Dial™ function to dial from memory location 01—even when the phone is locked. -
Page 80: Viewing The Lock Code
Getting to Secure Options... ƒ Press , then press Press to scroll to Lock Secure and press Press to scroll to the Secure Options submenu, and press to select. Enter your six-digit security code, scroll to the following features, and press to enter the menu system. -
Page 81: Restricting Call Placement
Restricting Call Placement You can restrict call placement or hide memory information when loaning your phone to others. Selecting a Service Level 1. Follow the steps in ”Getting to Secure Options…” to select Service Level. The phone displays your current service level. Refer to the chart on the next page. - Page 82 Level Description • Calls can be placed from all memory locations. • No dialing from keypad • No memory edit or storage • No access to Caller Line ID stack or Last Number Dialed • Calls can be placed manually from the keypad only.
-
Page 83: Resetting All Options
Getting to Secure Options... ƒ Press , then press Press to scroll to Lock Secure and press Press to scroll to the Secure Options submenu, and press to select. Enter your six-digit security code, scroll to the following features, and press Resetting All Options Use the Master Reset feature to reset all user- selectable options back to their original factory... -
Page 84: Clearing All Stored Information
Clearing All Stored Information If you want to start over, use Master Clear to reset all user-selectable options, clear the resettable timer, and erase all Phone Book information. Note: Once you select this feature, the process cannot be canceled or reversed. 1. -
Page 85: Customizing Phone Options
Customizing Phone Options The Phone Options menu lets you customize the way your phone sends and receives calls. You can tune your phone for optimal performance, view information about the phone, and choose from a number of convenient features. In this chapter you will learn how to: •... -
Page 86: Road Map For Phone Options
Road Map for Phone Options To enter the menu system: ƒ Press , then press ƒ ⁄. Press Start: Recent Calls Phone Book Timers Tone Control Lock Secure Phone Options Automatic Pager HF Off Mode Off Mult Key Answer Off Number Open to Change... -
Page 87: Activating Pager Mode
Activating Pager Mode Getting to Phone Options... ƒ Press , then press Press to scroll to Phone Options and press Press to scroll to the following features Activating Pager Mode When Pager Mode is activated, the phone simulates a pager. Pager Mode suppresses incoming call alerts but leaves message alerts active. -
Page 88: Viewing Your Own Number
Shortcut: ‰» Press for a quick look at your phone number. Viewing Your Own Number Use this feature to view your phone’s currently active phone number. If you have more than one phone number, you can change the active number with the Change Number feature in the Phone Options menu. -
Page 89: Switching Between Numbers
Getting to Phone Options... ƒ Press , then press Press to scroll to Phone Options and press Press to scroll to the following features Switching Between Numbers Note: This is a carrier-specific option. If unavailable, please contact your service provider. Your phone can operate on two different home systems. -
Page 90: Reviewing Feature Settings
Reviewing Feature Settings Use this feature to review the changes you’ve made to feature settings. Note: While scrolling through Feature Review, you can only review settings. You cannot change them. 1. Follow the steps in the ”Getting to Phone Options…” block to select Feature Review. 2. -
Page 91: Activating Automatic Hands-Free
Getting to Call Options... ƒ Press , then press Press to scroll to Phone Options and press Press to scroll to the Call Options submenu, and press to select. Press to scroll to the following features. Activating Automatic Hands-Free Turn this feature on when you are using Hands-Free vehicular accessories. -
Page 92: Activating Multiple Key Answer
Activating Multiple Key Answer Turn on the Multiple Key Answer feature to answer calls by pressing the Smart Button, any key on the ⁄-» upper keypad volume keys. 1. Follow the steps in ”Getting to Call Options…” to scroll to Mult Key Answer. You will see Mult Key Answer On or Mult Key Answer Off. -
Page 93: Activating Automatic Answer
Activating Automatic Answer Turn Auto Answer on to have your phone automatically answer incoming calls after two rings. Note: Auto Answer does not work if the keypad cover is closed or if Pager Mode is activated. However, the Auto Answer will work with the headset while the keypad cover is closed. -
Page 94: Selecting Battery Options-Status Light
Getting to Phone Options... ƒ Press , then press Press to scroll to Phone Options and press Press to scroll to the following features. to enter the menu system. Selecting Battery Options— Status Light This feature enables you to turn off the Power/Status Indicator. -
Page 95: Selecting Language
Selecting Language This feature enables you to select the language in which your phone displays prompts and messages. 1. Follow the steps in ”Getting to Phone Options…” on the previous page to select the Language sub-menu. 2. Press to scroll through the language options. -
Page 99: Selecting A Network
Selecting a Network Note: This is an optional network- and subscription- dependent feature that is not available in all areas. The Network Selection menu lets you decide which network your phone will use. In this chapter you will learn how to: •... -
Page 100: Road Map For Phone Options
Road Map for Phone Options To enter the menu system: ƒ Press , then press ƒ ⁄. Press Start: R ece nt C all s P hon e B ook T ime rs T one C ont ro l L ock S ecu re P hon e O pti on s... -
Page 101: Selecting A Non-Public Network
Getting to Network Selection ƒ Press , then press Press to scroll to Network Selection, and press select. Press to scroll to the following features. Selecting a Non-Public Network To select a non-public network: 1. Follow “Getting to Network Selection” above to scroll to Find Best Non-Public, and press to activate a search. -
Page 102: Selecting A Public Network
3. Press to register with the displayed network. If registration is successful, your phone displays a confirmation message from the network. Note: The phone is registered with the selected network until you place or receive a phone call or until you turn the phone on and off. -
Page 103: Specifying A Default Search
Specifying a Default Search To reset the phone to use the default network search (rather than forcing the selection of a public or non-public network): Follow “Getting to Network Selection” on page 101 to scroll to Default Search, and press to select it. -
Page 104: Using The Message Center
Using the Message Center The Message Center gives you easy access to both voice mail and your text messages. In this chapter you will learn how to: • use voice mail • edit a phone number to access voice mail •... -
Page 105: Road Map For Message Center
Road Map for Message Center Start: V o i c e M a i l X X M s g s T ex t M s g s X X N e w l D i a l i n g X X X X S e t V o i c e M a i l N o . -
Page 106: Voice Mail Alerts
Getting to Voice Mail ø Press to enter the message center. Press to scroll to Voice Mail. Voice Mail Alerts This feature updates you each time a message is sent to your voice mail number, providing you with real-time information on messages waiting to be retrieved. -
Page 107: Reading Text Messages
Some Service Providers let you subscribe to a Short Message Service (SMS), which allows you to receive alphanumeric messages on your TDMA digital StarTAC™ phone, just like a pager. Contact your Service Provider for information about the availability of messaging in your area. - Page 108 • Urgent Msg Received or EMERGENCY MSG RECVD appears in the display, and: The message icon The phone beeps five times or vibrates three times. Short Message Indicators If the sender has marked the message “Emergency” or “Urgent,” the display shows the message content on the first line and either Urgent or Emergency on the second line.
- Page 109 • the message number • its urgency • the beginning of the message text Press to scroll forward or backward through the list of message headers. The newest message is placed at the top of the list, and the oldest message is at the bottom. 4.
-
Page 110: Locking And Unlocking A Message
Note: While in the message center, you can enter a Call Back number at any time by using the keypad, æ and then pressing Locking and Unlocking a Message You can lock important messages to ensure their safekeeping for later review. A locked message cannot be deleted until the message is unlocked. - Page 111 Clearing All Messages To erase all the messages from your Message Center at once: Ç 1. Press and hold message center. You will see Clear All?. ¬ 2. Press messages cleared. º Press if you decide not to clear all the messages.
-
Page 112: Editing The Voice Mail Number
Getting to Message Center Options... ø Press to enter the message center. Press to scroll to Msg Center Options and press Press to scroll to the following features. Editing the Voice Mail Number This feature allows you to save your voice mail access number. -
Page 113: Setting The Scrolling Speed
Setting the Scrolling Speed To adjust the scrolling speed of your incoming messages: 1. Follow the steps in the “Getting to Message Center Options…” block. 2. Press to select the Set Scroll Speed option. 3. Press to scroll through scrolling speed settings: •... -
Page 114: Reference Information
Reference Information Accessory Options An exciting line of Motorola TDMA digital StarTAC™ accessories, now smaller and lighter than ever, can enhance and personalize your cellular experience. Batteries If your cellular phone is quickly becoming your companion, an optional auxiliary battery gives your phone a boost. - Page 115 Now it is easy to rotate batteries and always have a charged spare. Holster Your TDMA digital StarTAC™ phone is so small and light, it is positively wearable. Slip it in and clip it on—for the ultimate in high-tech fashion.
- Page 116 Motorola specifically disclaims any responsibility for damage caused by the use of portable cellular telephone accessories not manufactured by Motorola. For details on the complete line of Motorola cellular accessories, see your dealer or visit our Web site at http://www.mot.com/.
-
Page 117: Troubleshooting
Troubleshooting Question Answer Make sure that you press and hold the power button I pressed the until the display appears and you hear an audible alert. If power button, but nothing still happens, then check that you have installed nothing happened. a battery and that the battery is charged. - Page 118 Question I tried to place a call and received a fast busy signal. I tried to place a call and received an alternating high/low tone. I tried to listen to my Voice Mail (or use a paging service, a calling card, etc.) but nothing happened.
-
Page 119: Glossary
Glossary AC adapter An accessory device that allows you to power your phone and charge any attached batteries from a wall outlet. AMPS (Advanced Mobile Phone System) A cellular technology that operates on 832 channels. accessory connector port A socket on the bottom of the phone where you can attach accessories such as an AC adapter, battery charger, cigarette lighter adapter, or optional accessories. - Page 120 DTMF tones See Dual Tone Multi-Frequency tones. default A feature’s original setting as pre-programmed in the factory. Dual Tone Multi-Frequency tones The tones that your telephone transmits when you press a key on the keypad. These tones are used to access automated calling systems such as Voice Mail, paging services, banking-by-phone, etc.
- Page 121 Keypad Tones The sounds produced through your phone’s speaker when you press the keys. See “Turning Keypad Tones On and Off” on page 73. landline The telephone system used for conventional office and home phones. Lithium Ion (LiIon) A battery technology used in personal cellular telephones.
- Page 122 pause A special character that tells your phone to “pause” or wait for your input before sending a group of numbers stored in memory. Pause Dialing A method of storing Phone Book entries that allows you to store multiple strings of numbers in one memory location; useful, for instance, in accessing automated phone systems.
- Page 123 TDMA (Time Division Multiple Access) TDMA is an efficient method of providing digital cellular communication by allowing several different conversations on the same carrier frequency. VibraCall™ alert Motorola’s silent vibration mode that discreetly alerts you to incoming calls. Voice Mail Contact your Service Provider for availability.
-
Page 124: Index
Index access number for voice mail accessories 114, 114–116 batteries 114 cigarette lighter adapter 114 desktop charger 115 hands-free kit 116 headset 115 holster 115 accessory connector port 13 analog mode 31 antenna 13 audible timer one-minute 66 repeating 67 automatic answer 93 automatic hands-free 91 auxiliary battery... - Page 125 calling card call 56 restricting call placement 81 receiving 30 open to answer 92 while phone is locked 79 Call Back number 109 call timer automatically display individual cumulative 65 individual 64 resettable 64 resetting 65 call waiting 44 Caller ID 48 Caller Line ID 45 calling card PIN number 56...
- Page 126 key answer, multiple 92 key presses 14 keypad tones 73 language, select for display 95 lock code changing 80 viewing 80 locking phone answering calls while phone is locked 79 automatically 78 manually 78 locking/unlocking phone 78 main battery installing 19 removing 19 Master Clear 84 Master Reset 83...
- Page 127 power save mode 94 power sources, switching 24 power status messages 21 Power/Status Indicator 28 Priority Call 39 prompts, defined 14 public network selecting 102 recalling entry by location 38 recalling entry by name 37 received calls 46 receiving call automatic answer 93 multiple key answer 92 procedure 30...
- Page 128 unanswered call indicator 30 unlock phone 117 VibraCall™ Alert 27, 33, 60, 71, VibraCall™ alert 72 vibrating ringer 60, 71, 73 voice mail 72, 118 dialing 106 edit access number 112 Voice Message Waiting Indicator voice privacy 77 Voicemail 27 volume adjusting 33 muting 33...
-
Page 129: Patent Information
Patent Information Manufactured under one or more of the following U.S. patents: 4121218 4628529 4127824 4629829 4128740 4630304 4138681 4630305 4193036 4633141 4254382 4636593 4302845 4636741 4312074 4644351 4327319 D288432 4329666 4648125 4369516 4649543 4369522 D288683 4378603 4654655 4390963 4654867 4398265 4662691 4400584... - Page 130 5195108 5242767 5198887 D339127 5200655 D339335 5201069 D339336 5202654 D339337 5203009 5247544 D334746 D339578 5204977 5249302 5205751 5250916 5208566 5251331 5210793 5253292 5211581 5255292 5212815 5257414 5212826 5259005 5214675 5260170 5214774 5260988 5220290 5261119 5222078 5262710 5222104 5263052 5222251 5263055 5224122 5265219 5230007...
- Page 132 The U.S. Food and Drug Administration's Center for Devices and Radiological Health Consumer Update on Mobile Phones FDA has been receiving inquiries about the safety of mobile phones, including cellular phones and PCS phones. The following summarizes what is known—and what remains unknown—about whether these products can pose a hazard to health, and what can be done to minimize any potential risk.
- Page 133 What kinds of phones are in question? Questions have been raised about hand-held mobile phones, the kind that have a built-in antenna that is positioned close to the user's head during normal telephone conversation. These types of mobile phones are of concern because of the short distance between the phone's antenna—the primary source of the RF—and the person's head.
- Page 134 animal studies apply to the use of mobile phones. First, it is uncertain how to apply the results obtained in rats and mice to humans. Second, many of the studies that showed increased tumor development used animals that had already been treated with cancer-causing chemicals, and other studies exposed the animals to the RF virtually continuously—up to 22 hours per day.
- Page 135 cancers by the National Cancer Institute is expected to bear on the accuracy and repeatability of these results. 2. Researchers conducted a large battery of laboratory tests to assess the effects of exposure to mobile phone RF on genetic material. These included tests for several kinds of abnormalities, including mutations, chromosomal aberrations, DNA strand breaks, and structural changes in the genetic...
- Page 136 1. Two groups of 18 people were exposed to simulated 2. In a study of 209 brain tumor cases and 425 matched Because this occurred in only a small number of cases, the increased likelihood was too small to be statistically significant.
-
Page 137: Mobile Phones
understand that this type of cancer also occurs among people who have not used mobile phones. In fact, brain cancer occurs in the U.S. population at a rate of about 6 new cases per 100,000 people each year. At that rate, assuming 80 million users of mobile phones (a number increasing at a rate of about 1 million per month), about 4800 cases of brain cancer would be expected each year... - Page 138 Although the existing scientific data do not justify FDA regulatory actions at this time, FDA has urged the mobile phone industry to take a number of steps to assure public safety. The agency has recommended that the industry: • support needed research into possible biological •...
- Page 139 In the absence of conclusive information about any possible risk, what can concerned individuals do? If there is a risk from these products—and at this point we do not know that there is—it is probably very small. But if people are concerned about avoiding even potential risks, there are simple steps they can take to do so.
- Page 140 Where can I find additional information? For additional information, see the following websites: Federal Communications Commission (FCC) RF Safety Program (select “Information on Human Exposure to RF Fields from Cellular and PCS Radio Transmitters”): http://www.fcc.gov/oet/rfsafety World Health Organization (WHO) International Commission on Non-Ionizing Radiation Protection (select Qs &...