Sign In
Upload
Manuals
Brands
Siemens Manuals
Touch terminals
Cerberus PACE
Siemens Cerberus PACE Manuals
Manuals and User Guides for Siemens Cerberus PACE. We have
4
Siemens Cerberus PACE manuals available for free PDF download: Manual, Operation Manual, Operating Manual, Mounting & Installation
Siemens Cerberus PACE Manual (173 pages)
Brand:
Siemens
| Category:
Security System
| Size: 3.94 MB
Table of Contents
Table of Contents
3
About this Document
19
Applicable Documents
22
Revision History
23
Safety
24
Safety Notes
24
Safety Regulations for the Method of Operation
25
Responsibility of the Operator
27
Standards and Directives Complied with
28
Cyber Security Disclaimer
28
Preparatory Work
29
Installation Site
29
Delivery Units
29
Electrical Supply Lines
30
Mounting/Installation of Cabinets
31
Mounting the 19" Pedestal Cabinet
31
Wiring the Mains Supply Line
32
1-Phase Mains Connection
33
Fig. 1: Example Diagram of the 1-Phase Mains Connection Wiring
33
3-Phase Mains Connection
34
Fig. 2: Example Diagram of the 3-Phase Mains Connection Wiring
34
Power Supply and Batteries
35
Power Supply PP2003
35
Fig. 3: Wiring Diagram for 1X Battery Sets
35
Fig. 4: Wiring Diagram for 2X Battery Sets
36
External Power Supply PP2004
37
Fig. 5: Wiring Diagram for the Batteries in the PP2004-A1
37
Install Internal Components
38
Digital Audio Matrices
38
Table 1: Digital Audio Matrices In- and Output Overview
38
Digital Audio Matrices PC2001-A1, PC2002-A1, PC2005-A1 and PC2006-A1
39
Fig. 6: PC2001-A1, PC2002-A1, PC2005-A1 and PC2006-A1 Input and Output Overview
39
Fig. 7: PC2001-A1 Connector Overview
39
Connect DC 24 V Power Supply
40
Connect PACE-Net Ethernet
40
Fig. 8: PC2001-A1, PC2002-A1, PC2005-A1 and PC2006-A1 Power Supply Connector
40
Fig. 9: PC2001-A1, PC2002-A1, PC2005-A1 and PC2006-A1 Network Connector
40
Table 2: PC2001-A1, PC2002-A1, PC2005-A1 and PC2006-A1 DC 24 V Power Supply Connector
40
Connect General Fault Relay
41
Fig. 10: PC2001-A1, PC2002-A1, PC2005-A1 and PC2006-A1 Fault Relay Connector
41
Table 3: PC2001-A1, PC2002-A1, PC2005-A1 and PC2006-A1 Fault Relay Connector
41
Connect 'PACE-Bus' (RS485)
42
Fig. 11: PC2001-A1, PC2002-A1, PC2005-A1 and PC2006-A1 'PACE-Bus' (RS485) Connector
42
Fig. 12: Connects to RS485 Components
42
Table 4: 'PACE-Bus' (RS485) Connector - 'RS485
42
Connect 'PACE-Bus' (RS232)
43
Fig. 13: PC2001-A1, PC2002-A1, PC2005-A1 and PC2006-A1 'PACE-Bus' (RS232) Connector
43
Table 5: 'PACE-Bus' (RS232) Connector - 'RS232
43
Connect Analog Control Inputs
44
Fig. 14: PC2001-A1, PC2002-A1, PC2005-A1 and PC2006-A1 Analog Control Input Connection
44
Table 6: PC2001-A1, PC2002-A1, PC2005-A1 and PC2006-A1 Analog Control Inputs Connector
44
Connect Logic Control Inputs
45
Fig. 15: PC2001-A1, PC2002-A1, PC2005-A1 and PC2006-A1 Logic Control Input Connection
45
Table 7: Logic Control Inputs Connector
45
Connect Logic Control Outputs
46
Fig. 16: PC2001-A1, PC2002-A1, PC2005-A1 and PC2006-A1 Logic Control Output Connection
46
Table 8: PC2001-A1, PC2002-A1, PC2005-A1 and PC2006-A1 Logic Control Outputs Connector
46
Connect Analog Audio Inputs
47
Fig. 17: PC2001-A1 and PC2005-A1 Analog Audio Input Connection
47
Fig. 18: Analog Audio Input XLR Connector
47
Table 9: Analog Audio Input Connectors - 'IN1' to 'IN4
47
Connect Analog Audio Outputs
48
Fig. 19: PC2001-A1, PC2002-A1, PC2005-A1 and PC2006-A1 Analog Audio Output Connection
48
Fig. 20: Analog Audio Output XLR Connector
48
Table 10: Analog Audio Output Connectors - 'OUT1' to 'OUT4
48
Connect 100 V Audio Input and Speaker Lines
49
Fig. 21: PC2001-A1 and PC2002-A1 100 V Audio In- and Output Connection
49
Table 11: PC2001-A1 and PC2002-A1 100 V Audio Connector - 'Zone 1-2
49
Table 12: PC2001-A1 and PC2002-A1 100 V Audio Connector - 'Zone 3-4
49
Audio Path PC2001-A1 and PC2002-A1
50
Fig. 22: PC2001-A1 and PC2002-A1 Audio Path (One Zone)
50
Audio Path PC2005-A1 and PC2006-A1
51
Fig. 23: PC2005-A1 and PC2006-A1 Audio Path (One Zone)
51
Digital Audio Matrix PC2003-A1
52
Connect DC 24 V Power Supply
52
Fig. 24: PC2003-A1 Connector Overview
52
Fig. 25: PC2003-A1 Power Supply Connector
52
Table 13: PC2003-A1 DC 24 V Power Supply Connector
52
Connect 'PACE-Net' Ethernet
53
Connect General Fault Relay
53
Fig. 26: PC2003-A1 Network Connector
53
Fig. 27: PC2003-A1 Fault Relay Connector
53
Table 14: PC2003-A1 Fault Relay Connector
53
Connect 'PACE-Bus' (RS485)
54
Fig. 28: PC2003-A1 'PACE-Bus' (RS485) Connector
54
Table 15: 'PACE-Bus' (RS485) Connector - 'RS485/RS232
54
Connect 'PACE-Bus' (RS232)
55
Fig. 29: PC2003-A1 'PACE-Bus' (RS232) Connector
55
Table 16: 'PACE-Bus' (RS232) Connector - 'RS485/RS232
55
Connect Logic Control Inputs
56
Fig. 30: PC2003-A1 Logic Control Input Connection
56
Table 17: Logic Control Inputs Connector
56
Connect Logic Control Outputs
57
Fig. 31: PC2003-A1 Logic Control Output Connection
57
Table 18: PC2003-A1 Logic Control Outputs Connector
57
Audio Path PC2003-A1
58
Fig. 32: PC2003-A1 Audio Path (One Zone)
58
Connect Analog Audio Input
59
Fig. 33: PC2003-A1 Analog Audio Input Connection
59
Table 19: PC2003-A1 Analog Audio Input Connectors - 'IN1' to 'IN4
59
Connect Analog Audio Outputs
60
Fig. 34: PC2003-A1 Analog Audio Output Connection
60
Table 20: PC2003-A1 Analog Audio Output Connectors - 'OUT1' to 'OUT4
60
Connect 100 V Audio Input
61
Connect 100 V Audio Speaker Lines
61
Fig. 35: PC2003-A1 100 V Audio Input Connection
61
Fig. 36: PC2003-A1 100 V Audio Speaker Line Output Connection
61
Table 21: PC2003-A1 100 V Audio Input Connectors - 'A1' to 'A4
61
Table 22: PC2003-A1 100 V Audio Speaker Line Output Connectors - 'L1' to 'L16
61
Connect 100 V Audio Backup Input
62
Fig. 37: PC2003-A1 100 V Audio Backup Input Connection
62
Table 23: PC2003-A1 100 V Audio Backup Input Connectors - 'B1' to 'B4
62
Table 24: PC2003-A1 100 V Audio Backup Amplifier Connection
62
Backup Concept
63
Fig. 38: PC2003-A1 Backup Concept
63
Backup with a Free Analog Output
64
Fig. 39: PC2003-A1 Backup with a Free Analog Output
64
Backup with an Additional Digital Audio Matrix
65
Fig. 40: PC2003-A1 Backup with an Additional Digital Audio Matrix
65
Backup with 'Backup Extension PC2003' PCA2014-A1
66
Fig. 41: PCA2014-A1 Mounting and Connectors
66
Table 25: PCA2014-A1 Analog Audio Output Connectors - 'OUT1' to 'OUT4
66
Table 26: PCA2014-A1 Analog Audio Output Connector - 'B-OUT
66
Table 27: PCA2014-A1 Logic Control Input Connector - 'D-IN
66
Fig. 42: PC2003-A1 Backup with PCA2014-A1
67
Use Control Inputs and Outputs
68
Use Analog Control Inputs
68
Use Analog Control Inputs as Supervised Inputs
68
Fig. 43: Use of Analog Control Inputs
68
Fig. 44: Wiring Diagram for Analog Control Inputs Used as Supervised Inputs
68
Use Logic Control Inputs
69
Fig. 45: Use of Logic Control Inputs
69
Use Logic Control Outputs
70
Fig. 46: Wiring Diagram for Open Collector Logic Control Outputs with 10 V
70
Fig. 47: Wiring Diagram for Open Collector Logic Control Outputs with External Power
70
Fig. 48: Wiring Diagram for Open Collector Logic Control Outputs Connecting Relays
70
Power Amplifier
71
Table 28: Power Amplifier Features and Input and Output Overview
71
Power Amplifier (2X250W) PV2001-A1
72
Connect AC 230 V Mains Supply Input
72
Connect DC 24 V Power Supply
72
Fig. 49: PV2001-A1 Connector Overview
72
Fig. 50: PV2001-A1 Power Supply Connector
72
Table 29: PV2001-A1 DC 24 V Power Supply Connector
72
Connect Analog Audio Inputs and Controls
73
Fig. 51: PV2001-A1 Analog Audio Input and Control Connectors
73
Table 30: PV2001-A1 Analog Audio Input and Control Connector - 'CH a
73
Connect 100 V Analog Audio Output
74
Fig. 52: PV2001-A1 100 V Analog Audio Output Connectors
74
Table 31: PV2001-A1 Analog Audio Input and Control Connector - 'CH B
74
Table 32: PV2001-A1 100 V Analog Audio Output Connectors - 'Out A' and 'Out B
74
Use PV2001-A1 in Bridged Mode 500 W
75
Power Amplifier (2X500W) PV2002-A1
76
Connect AC 230 V Mains Supply Input
76
Connect DC 24 V Power Supply
76
Fig. 53: PV2002-A1 Connector Overview
76
Fig. 54: PV2002-A1 Power Supply Connector
76
Table 33: PV2002-A1 DC 24 V Power Supply Connector
76
Connect Analog Audio Inputs and Controls
77
Fig. 55: PV2002-A1 Analog Audio Input and Control Connectors
77
Table 34: PV2002-A1 Analog Audio Input and Control Connector - 'CH a
77
Connect 100 V Analog Audio Output
78
Fig. 56: PV2002-A1 100 V Analog Audio Output Connectors
78
Table 35: PV2002-A1 Analog Audio Input and Control Connector - 'CH B
78
Table 36: PV2002-A1 100 V Analog Audio Output Connectors - 'Out A' and 'Out B
78
Power Amplifier (4X150W) PV2003-A1
79
Connect AC 230 V Mains Supply Input
79
Connect DC 24 V Power Supply
79
Fig. 57: PV2003-A1 Connector Overview
79
Fig. 58: PV2003-A1 Power Supply Connector
79
Table 37: PV2003-A1 DC 24 V Power Supply Connector
79
Connect Analog Audio Inputs
80
Fig. 59: PV2003-A1 Analog Audio Input and Bridge Mode Connectors
80
Table 38: PV2003-A1 Analog Audio Input and Bridge Mode Connector - 'CH A/B
80
Table 39: PV2003-A1 Analog Audio Input and Bridge Mode Connector - 'CH C/D
81
Connect Status Output Relays and Amplifier Activation
82
Fig. 60: PV2003-A1 Status Output Relays and Amplifier Activation Connector
82
Table 40: PV2003-A1 Status Output and Activation Connector - 'Control
82
Table 41: PV2003-A1 Amplifier Activation with 'Auto On' Potentiometer
82
Connect Delay Link
83
Connect 100 V Analog Audio Output
83
Fig. 61: PV2003-A1 100 V Analog Audio Output Connectors
83
Table 42: PV2003-A1 100 V Analog Audio Output Connectors - 'Out A', 'Out B', 'Out C' and 'Out D
83
Use PV2003-A1 in Bridged Mode 2X300W
84
Power Amplifier (1X250W) PV2007-A1
85
Connect AC 230 V Mains Supply Input
85
Connect DC 24 V Power Supply
85
Fig. 62: PV2007-A1 Connector Overview
85
Fig. 63: PV2007-A1 Power Supply Connector
85
Table 43: PV2007-A1 DC 24 V Power Supply Connector
85
Connect Analog Audio Inputs and Controls
86
Fig. 64: PV2007-A1 Analog Audio Input and Status Output Connector
86
Table 44: PV2007-A1 Analog Audio Input and Status Output Connector - 'CH a
86
Connect 100 V Analog Audio Output
87
Fig. 65: PV2007-A1 100 V Analog Audio Output Connector
87
Table 45: PV2007-A1 100 V Analog Audio Output Connector - 'Out a
87
Operating Terminals
88
System Operating Unit (19'') PT2010-A1
89
Configuration with the ID Switch
89
Table 46: PT2010-A1 Set RS485 Address with ID Switches
89
Installation
90
Connect DC 24 V Power Supply
90
Connect 'PACE-Bus' (RS485)
90
Fig. 66: PT2010-A1 Connector Overview
90
Table 47: PT2010-A1 DC 24 V Power Supply Connector - 'X1
90
Table 48: PT2010-A1 'PACE-Bus' (RS485) Connector - 'X2
90
Logic Control Outputs
91
Logic Control Inputs
91
Table 49: PT2010-A1 Logic Control Outputs Connector - 'X3
91
Table 50: PT2010-A1 Logic Control Inputs Connector - 'X4
91
System State Indicator PT2004-A1 and PT2007-A1
92
Installation
92
Connect DC 24 V Power Supply
92
Fig. 67: PT2004-A1 and PT2007-A1 Connector Overview
92
Table 51: PT2004-A1 and PT2007-A1 DC 24 V Power Supply Connector - 'CN1
92
Connect Inputs and Outputs
93
Table 52: PT2004-A1 and PT2007-A1 Input and Output Connector - 'CN2
93
Alarm Control Panel PT2005-A1
94
Installation
94
Connect Inputs and Outputs
94
Table 53: PT2005-A1 Input and Output Wiring
94
PACE-Net' Network Switches
95
Table 54: Ethernet Network Switches Ports and Topologies Overview
95
Ethernet Switch (2X4/2) PN2001-A1
96
Connect DC 24 V Power Supply
96
Fig. 68: PN2001-A1 Connector Overview
96
Fig. 69: PN2001-A1 Power Supply Connector
96
Table 55: PN2001-A1 DC 24 V Power Supply Connector
96
Connect 'PACE-Net' Ethernet
97
Fig. 70: PN2001-A1 Network Connectors
97
Table 56: PN2001-A1 Switch a and Switch B Connectors
97
Planet IGS-10020MT Switch PN2005-A1
98
Fig. 71: PN2005-A1 Connector Overview
98
Connect DC 24 V Power Supply and Fault Contact
99
Fig. 72: PN2005-A1 Power Supply Connector
99
Table 57: PN2005-A1 DC 24 V Power Supply and Fault Connector
99
Connect 'PACE-Net' Ethernet
100
Fig. 73: PN2005-A1 Network Connectors
100
Planet IGT-805AT Converter PN2007-A1
101
Fig. 74: PN2007-A1 Connector Overview
101
Connect DC 24 V Power Supply and Fault Contact
102
Fig. 75: PN2007-A1 Power Supply Connector
102
Table 58: PN2007-A1 DC 24 V Power Supply and Fault Connector
102
Connect 'PACE-Net' Ethernet
103
Fig. 76: PN2007-A1 Network Connectors
103
DC/DC Converter PCA2011-A1
104
Mounting
104
Installation
104
Connect DC 24 V Power Supply Input and Output
104
Fig. 77: PCA2011-A1 Terminal Connector
104
Table 59: PCA2011-A1 Terminal Connector for DC 24 V Input and Output
104
DC/DC Converter PCA2018-A1
105
Mounting
105
Installation
105
Connect DC 24 V Power Supply Input and Output
105
Fig. 78: PCA2018-A1 Terminal Connector
105
Table 60: PCA2018-A1 Terminal Connector for DC 24 V Input and Output
105
RS485 Isolator PNA2009-A1
106
Mounting
106
Installation
106
Connect the Internal Wiring
106
Connect the External Wiring
106
Fig. 79: PNA2009-A1 Connector Overview
106
Table 61: PNA2009-A1 Internal Wiring Connector - 'In
106
Table 62: PNA2009-A1 External Wiring Connector - 'Out
106
Earth Fault Monitor PCA2001-A1
107
Installation
107
Configuration with the Jumpers
107
Fig. 80: PCA2001-A1 Connectors and Jumper
107
Table 63: PCA2001-A1 Set the Sensitivity with Jumper Switches
107
Connect DC 24 V Power Supply and Earth
108
Connect Earth Fault Relay Output
108
Call Station Interface (RS485) PTO2008-A1
108
Mounting
108
Table 64: PCA2001-A1 DC 24 V Power Supply Connector - 'CN1
108
Table 65: PCA2001-A1 Earth Fault Relay Connector - 'CN2
108
Installation
109
Connect DC 24 V Power Supply
109
Fig. 81: PTO2008-A1 Connector Overview
109
Table 66: PTO2008-A1 DC 24 V Power Supply Connector - 'X1
109
Connect 'PACE-Bus' (RS485)
110
Connect Analog Audio Input
110
Connect Analog Audio Output
110
Table 67: PTO2008-A1 'PACE-Bus' (RS485) Connector - 'X2
110
Table 68: PTO2008-A1 Analog Audio Input Connector - 'X3
110
Table 69: PTO2008-A1 Analog Audio Output Connector - 'X4
110
Connect to Call Station
111
Connect to Further PTO2008
111
Table 70: PTO2008-A1 Call Station Connectors - 'X5' and 'RJ1
111
Table 71: PTO2008-A1 Call Station Connectors - 'RJ2' and 'RJ3
111
Input/Output Extension (Digital 16) PCIO2001-A1
112
Mounting
112
Installation
112
Fig. 82: PCIO2001-A1 Connector Overview
112
Configuration with the ID Jumper
113
Connect DC 24 V Power Supply
113
Table 72: PCIO2001-A1 Set the RS485 Address with ID Jumper
113
Table 73: PCIO2001-A1 Function Settings with ID Jumper
113
Table 74: PCIO2001-A1 DC 24 V Power Supply Connectors - 'X1' and 'X6
113
Connect 'PACE-Bus' (RS485)
114
Table 75: PCIO2001-A1 'PACE-Bus' (RS485) Connector - 'X5
114
Logic Control Inputs
115
Table 76: PCIO2001-A1 Logic Control Inputs Connector - 'X7
115
Table 77: PCIO2001-A1 Logic Control Inputs Connector - 'X8
115
Analog Control Inputs
116
Table 78: PCIO2001-A1 Analog Control Inputs Connector - 'X9
116
Logic Control Outputs
117
Table 79: PCIO2001-A1 Logic Control Outputs Connector - 'X3
117
Table 80: PCIO2001-A1 Logic Control Outputs Connector - 'X4
117
Input/Output Module (Digital, 16) PCIO2002-A1
118
Mounting
118
Installation
118
Configuration with the ID Switch
118
Fig. 83: PCIO2002-A1 Connector Overview
118
Table 81: PCIO2002-A1 Set the RS485 Address with ID Switches
118
Connect DC 24 V Power Supply
119
Connect 'PACE-Bus' (RS485)
119
Logic Control Inputs
119
Table 82: PCIO2002-A1 DC 24 V Power Supply Connector - 'X1
119
Table 83: PCIO2002-A1 'PACE-Bus' (RS485) Connector - 'X6
119
Table 84: PCIO2002-A1 Logic Control Inputs Connector - 'X3
119
Analog Control Inputs
120
Table 85: PCIO2002-A1 Logic Control Inputs Connector - 'X4
120
Table 86: PCIO2002-A1 Analog Control Inputs Connector - 'X5
120
Relay Outputs
121
Table 87: PCIO2002-A1 Relay Output Connectors Pole 1 - 'X1.1' to 'X8.1
121
Table 88: PCIO2002-A1 Relay Output Connectors Pole 2 - 'X1.2' to 'X8.2
121
Output Module (Relay, 8) PCO2002-A1
122
Mounting
122
Installation
122
Configuration with the ID Switch
122
Fig. 84: PCO2002-A1 Connector Overview
122
Table 89: PCO2002-A1 Set the RS485 Address with ID Switches
122
Connect DC 24 V Power Supply
123
Connect 'PACE-Bus' (RS485)
123
Relay Outputs
123
Table 90: PCO2002-A1 DC 24 V Power Supply Connector - 'X1
123
Table 91: PCO2002-A1 'PACE-Bus' (RS485) Connector - 'X6
123
Table 92: PCO2002-A1 Relay Output Connectors Pole 1 - 'X1.1' to 'X8.1
123
Table 93: PCO2002-A1 Relay Output Connectors Pole 2 - 'X1.2' to 'X8.2
123
Output Extension (Relay, 8) PCO2003-A1
124
Mounting
124
Installation
124
Relay Outputs
124
Fig. 85: PCO2003-A1 Connector Overview
124
Table 94: PCO2003-A1 Relay Output Connectors Pole 1 - 'X9.1' to 'X16.1
124
Table 95: PCO2003-A1 Relay Output Connectors Pole 2 - 'X9.2' to 'X16.2
124
Connect External Components
125
Desk Call Station PT2001-A1
125
Mounting
125
Installation
125
Fig. 86: PT2001-A1 Connector Overview
125
Connect DC 24 V Power Supply
126
Fig. 87: PT2001-A1 Power Supply from a Cabinet
126
Table 96: PT2001-A1 DC 24 V Power Connector - 'CN2
126
Connect PACE-Net Ethernet
127
Fig. 88: PT2001-A1 Redundant Power Supply from a Cabinet
127
Analog Audio Inputs
128
Analog Audio Outputs
128
Logic Control Inputs
128
Table 97: PT2001-A1 Analog Audio Input 1 and 2 Connector - 'CN1
128
Table 98: PT2001-A1 Analog Audio Output 1 and 2 Connector - 'CN5
128
Table 99: PT2001-A1 Logic Control Inputs Connector - 'CN7
128
Logic Control Outputs
129
Table 100: PT2001-A1 Logic Control Outputs Connector - 'CN3
129
Analog Control Inputs
130
Table 101: PT2001-A1 Analog Control Inputs Connector - 'CN1
130
PACE-Bus' (RS232) Serial Interface
131
Mount the SD Card
131
Table 102: PT2001-A1 'PACE-Bus' (RS232) Connector - 'CN4
131
Desk Call Station Extension PTO2001-A1
132
Mounting
132
Installation
132
Connect DC 24 V Power Supply
132
Fig. 89: PTO2001-A1 Connector Overview
132
Table 103: PTO2001-A1 DC 24 V Power Connector 1 - 'CN1
132
Table 104: PTO2001-A1 DC 24 V Power Connector 2 - '-CN2
132
Connect RS232
133
Fig. 90: PTO2001-A1 Connection to PT2001-A1
133
Table 105: PTO2001-A1 RS232 Connector 1 - 'CN4
133
Table 106: PTO2001-A1 RS232 Connector 2 - 'CN3
133
Configuration
134
Check the ID Settings
134
Fig. 91: PTO2001-A1 Keypad Numbering
134
Change the ID Settings
135
Desk Call Station Extension (Kaba) PTO2002-A1 and (Nordic) PTO2003-A1
136
Table 107: Connect PTO2002-A1 or PTO2003-A1 to PT2001-A1
136
Fire Brigade Call Station (AT) PT2002-A1
137
Mounting
137
Installation
137
Fig. 92: PT2002 Connector Overview
137
Connect DC 24 V Power Supply
138
Table 108: DC 24 V Power Connector - 'AB-CN1' on PT2002-A1 Adapter Board
138
Table 109: DC 24 V Power Connector - 'AB-CN2' on PT2002-A1 Adapter Board
138
Fig. 93: PT2002-A1 Power Supply from a Cabinet
139
Fig. 94: PT2002-A1 Redundant Power Supply from a Cabinet
140
Connect PACE-Net Ethernet
141
Analog Audio Inputs
141
Analog Audio Outputs
141
Table 110: PT2002-A1 Analog Audio Input 1 and 2 Connector - 'CN1
141
Table 111: PT2002-A1 Analog Audio Output 1 and 2 Connector - 'CN5
141
Logic Control Inputs
142
Table 112: PT2002-A1 Logic Control Inputs Connector - 'CN7
142
Logic Control Outputs
143
Table 113: PT2002-A1 Logic Control Outputs Connector - 'CN3
143
Analog Control Inputs
144
Table 114: PT2002-A1 Analog Control Inputs Connector - 'CN1
144
PACE-Bus' (RS232) Serial Interface
145
Mount the SD Card
145
Fire Brigade Call Station (485, AT) PT2003-A1
145
Mounting
145
Installation
145
Table 115: PT2002-A1 'PACE-Bus' (RS232) Connector - 'CN4
145
PT2003-A1 Connectors
146
Microphone Input
146
Fig. 95: PT2003-A1 Connector Overview
146
Table 116: PT2003-A1 Microphone Input Connector MIC in - 'X3
146
Speaker Output and Microphone Off-Hook Switch
147
Connect to a Cabinet with PTO2008-A1
147
Fig. 96: Wiring of PT2003-A1 with PTO2008-A1
147
Table 117: PT2003-A1 Speaker Output Connector - 'X2
147
Configuration with the ID Switch
148
Table 118: PT2003-A1 Call Station Connectors - 'X1' and 'J1
148
Table 119: PT2003-A1 Set RS485 Address with ID Switches
148
Call Station PT2009-A1
149
Mounting
149
Installation
149
Connect to a Cabinet
150
Fig. 97: Daisy Chain Wiring of Multiple PT2009-A1 in the Standard Use Case
150
Fig. 98: Star Wiring of Multiple PT2009-A1 in the 24 V Redundant Use Case
151
Fig. 99: Star Wiring of Multiple PT2009-A1 in the Redundant Use Case
152
Install PT2009-A1
153
Analog Audio Inputs
153
Fig. 100: PT2009-A1 Connector Rear View
153
Table 120: PT2009-A1 Analog Audio Input 1 Connector - 'CN1
153
Analog Audio Outputs
154
Extension Connector
154
Table 121: PT2009-A1 Analog Audio Speaker Output 1 Connector - 'X2
154
Table 122: PT2009-A1 Extension Connectors - 'X1' and 'X5
154
Configuration with the ID Switch
155
Call Station Extension PTO2006-A1
156
Fig. 101: PTO2006-A1 Connector Rear View
156
Table 123: PTO2006-A1 Extension Connectors - 'X1' and 'X5
156
Call Station Interface (Redundant) PTO2009
158
Fig. 102: PTO2009-A1 Connector Overview
158
Table 124: PTO2009-A1 24 V Power Supply In/Out Connectors - 'CN2', 'CN4', 'CN5
158
Table 125: PTO2009-A1 Ethernet in Connectors - 'CN1' and 'CN3
159
Table 126: PTO2009-A1 Ethernet out RJ45 Connectors - 'J1' and 'J2
159
Table 127: PTO2009-A1 Fault Relay Connector - 'CN6
159
RJ45 Interface PNA2008-A1
160
Fig. 103: PNA2008-A1 Connector Overview
160
Table 128: PNA2008-A1 Ethernet Single Wire Connector - 'CN1
160
Table 129: PNA2008-A1 Ethernet Single Wire Connector - 'CN2
160
Table 130: Ethernet RJ45 Connector - 'J1
161
Network Repeater PNA2007-A1
162
Installation
162
Fig. 104: PNA2007-A1 Connector Overview
162
Table 131: PNA2007-A1 DC 24 V Power Supply Connector - 'X1
162
Automatic Volume Control (AVC)
163
Table 132: PNA2007-A1 Ethernet Single Wire Connectors - 'CN1' and 'CN3
163
Table 133: PNA2007-A1 Ethernet Single Wire Connectors - 'CN2' and 'CN4
163
Automatic Volume Control Microphone PCA2007-A1
164
Mounting and Configuration
164
Installation
164
Fig. 105: PCA2007-A1 Mounting and Installation Connector
164
Table 134: PCA2007-A1 Set Analog Audio Signal Output Level with Jumper
164
Table 135: PCA2007-A1 Microphone out Connector - 'CN1
164
Automatic Volume Control Module PCA2008-A1
165
Configuration
165
Fig. 106: PCA2008-A1 Connector Overview
165
Table 136: PCA2008-A1 Microphone Input Activation with Jumper 'SJ1' to 'SJ4
165
Installation
166
Table 137: PCA2008-A1 DC 24 V Power Supply Connector - 'CN7
166
Table 138: PCA2008-A1 Microphone Input Connectors - 'CN1' to 'CN4
166
Table 139: PCA2008-A1 Microphone Sum Output Connector - 'CN5
166
Table 140: PCA2008-A1 Fault Relay Output Connector - 'CN6
166
Remote Control Panel PT2006-A1
167
Installation of PT2006-A1
167
Fig. 107: PT2006-A1 Connector Overview
167
Table 141: PT2006-A1 Connector - 'X1
167
Configuration with the Configuration Menu
168
Fig. 108: PT2006-A1 Configuration Buttons
168
EOL3 (Active) PCA2004-A1
169
Configuration with the ID Switch
170
Fig. 109: PCA2004-A1 EOL3 ID Switch
170
Fig. 110: PCA2004-A1 EOL3 ID Switch Example 26
170
Table 142: PCA2004-A1 EOL3 ID Switch
170
Installation of PCA2004-A1
171
Fig. 111: PCA2004-A1 Principal Connection Stub Line
171
Fig. 112: PCA2004-A1 Connection Tree / Star Examples
171
Loop Isolator (100V) PCA2005-A1
172
Advertisement
Siemens Cerberus PACE Operation Manual (57 pages)
Public Address and Controlled Evacuation
Brand:
Siemens
| Category:
Security System
| Size: 1.24 MB
Table of Contents
Table of Contents
3
1 About this Document
5
Applicable Documents
8
Technical Terms and Abbreviations
9
Revision History
9
2 Safety
10
Safety Notes
10
Safety Regulations for the Method of Operation
11
System Owner
13
Function Test / System Acceptance / Maintenance
13
Standards and Directives Complied with
14
Multimedia Equipment
14
Cyber Security Disclaimer
15
3 Operating Conditions
16
Operating Condition Indicators
16
4 Operating Elements in the System
17
Call Stations
17
Operating Terminals
20
5 Access Levels
22
6 Fire Brigade Call Station (AT) PT2002-A1
23
Operating Functions PT2002-A1
24
Operation PT2002-A1
25
7 Fire Brigade Call Station (485, AT) PT2003-A1
26
Operating Functions PT2003-A1
27
Operation PT2003-A1
28
8 Desk Call Station (19 Buttons) PT2001-A1
29
Operating Functions PT2001-A1
29
Operation PT2001-A1
30
Indicator PT2001-A1
32
Display Information PT2001-A1
33
9 Key Switch for Desk Call Station PTO2002/3-A1
34
Operating Functions PTO2002/3-A1
34
Operation PTO2002/3-A1
34
10 Desk Call Station (RS485, 8+1) PT2009-A1 and Call Station Extension (RS485, 8) PTO2006-A1
35
Operating Functions PT2009-A1
35
Operation PT2009-A1
36
Indicator PT2009-A1
37
11 Desk Call Station (Analog, 3+1) PT2008-A1
38
Operating Functions PT2008-A1
38
Operation PT2008-A1
39
Indicator PT2008-A1
40
12 System Operating Unit (19") PT2010-A1
41
Operating Functions PT2010-A1
41
Operation PT2010-A1
42
Indicator PT2010-A1
43
13 System Status Indicator (19") PT2004-A1
44
Operating Functions PT2004-A1
44
Operation PT2004-A1
44
Indicator PT2004-A1
45
14 System Status Display (Door) PT2007-A1
46
Operating Functions PT2007-A1
46
Operation PT2007-A1
46
Indicator PT2007-A1
47
15 Alarm Control Panel (19") PT2005-A1
48
Operating Functions PT2005-A1
48
Operation PT2005-A1
49
Indicator PT2005-A1
49
16 Remote Control Panel PT2006-A1
50
Operating Functions PT2006-A1
50
Operation PT2006-A1
51
17 System Acceptance on Site
52
18 Commissioning and Maintenance
53
Glossary
55
Index
56
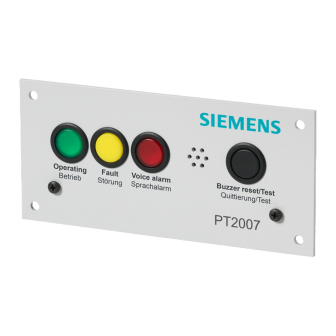
Siemens Cerberus PACE Operating Manual (42 pages)
Operating terminals / Call stations
Brand:
Siemens
| Category:
Touch terminals
| Size: 7.69 MB
Table of Contents
Table of Contents
3
1 About this Document
5
Applicable Documents
8
Technical Terms and Abbreviations
8
Revision History
9
2 Safety
10
Safety Instructions
10
Safety Regulations for the Method of Operation
11
System Owner
13
Function Test / System Acceptance / Maintenance
13
Standards and Directives Complied with
14
Information Technology Equipment (ITE)
14
Cyber Security Disclaimer
15
3 Operating Conditions
16
Operating Condition Indicators
16
4 Operating Elements in the System
17
Call Stations
17
Operating Terminals
20
5 Access Levels
21
6 Fire Brigade Call Station (AT) PT2002-A1
22
Fire Brigade Call Station Operating Functions
23
Fire Brigade Call Station Operation
23
7 Desk Call Station (19 Buttons) PT2001-A1
25
Desk Call Station Operating Functions
26
Desk Call Station Operation
26
8 Key Switch for Desk Call Station PTO2002/3-A1
28
Key Switch Operating Functions
28
Key Switch Operation
28
9 System Status Indicator (19") PT2004-A1
29
Operating Functions PT2004-A1
29
Operation PT2004-A1
29
10 System Status Display (Door) PT2007-A1
30
Operating Functions PT2007-A1
30
Operation PT2007-A1
30
11 Alarm Control Panel (19") PT2005-A1
31
Operating Functions PT2005-A1
31
Operation PT2005-A1
31
12 Remote Control Panel PT2006-A1
33
Operating Functions PT2006-A1
33
Operation PT2006-A1
34
13 Function Test
35
Testing the Indicating Elements
35
14 System Acceptance on Site
36
15 Maintenance
37
Glossary
40
Index
41
Advertisement
Siemens Cerberus PACE Mounting & Installation (24 pages)
System
Brand:
Siemens
| Category:
Security System
| Size: 0.81 MB
Table of Contents
Table of Contents
3
1 About this Document
5
Applicable Documents
8
Revision History
8
2 Safety
9
Safety Instructions
9
Safety Regulations for the Method of Operation
10
Responsibility of the Operator
13
Standards and Directives Complied with
13
Cyber Security Disclaimer
14
3 Preparatory Work
15
Installation Site
15
Delivery Units
15
Electrical Supply Lines
16
4 Mounting/Installation
17
Installing the 19" Pedestal Cabinet
17
Wiring the Mains Supply Line
18
1-Phase Mains Connection
19
Figure 1: Example Diagram of the 1-Phase Mains Connection Wiring
19
3-Phase Mains Connection
20
Figure 2: Example Diagram of the 3-Phase Mains Connection Wiring
20
5 Wiring the Batteries
21
Power Supply PP2003
21
Figure 3: Wiring Diagram for 1X Battery Set
21
Figure 4: Wiring Diagram for 2X Battery Sets
22
Power Supply PP2004
23
Figure 5: Wiring Diagram for the Batteries in the PP2004
23
Advertisement
Related Products
Siemens Climatix HMI-DM
Siemens Cerberus LMSmodular
Siemens Cerberus Dati
Siemens CERBERUS AlgoRex Series
Siemens CERBERUS AlgoRex CT
Siemens CERBERUS AlgoRex FDC
Siemens Cerberus PACE Compact
Siemens CERBERUS PYROTRONICS PXL
Siemens Cerberus PYROTRONICS MXL
Siemens Cerberus PYROTRONICS MXLV
Siemens Categories
Industrial Equipment
Controller
Control Unit
Oven
Washer
More Siemens Manuals
Login
Sign In
OR
Sign in with Facebook
Sign in with Google
Upload manual
Upload from disk
Upload from URL