Table of Contents
Advertisement
Advertisement
Table of Contents

Related Manuals for Sony HT-IV300


Summary of Contents for Sony HT-IV300
- Page 1 4-486-848-11(1) Home Theatre System Operating Instructions HT-IV300...
-
Page 2: Copyrights And Trademarks
HDMI Licensing LLC in the The nameplate is located on the bottom United States and other countries. exterior of the main unit. • “BRAVIA” is a trademark of Sony Corporation. On power sources • “AVCHD/Progressive” and the “AVCHD/ •... -
Page 3: End User License Agreement
Read the following agreement carefully to registered trademarks owned by Bluetooth proceed. SIG, Inc. and any use of such marks by Sony Corporation is under license. Other END USER LICENCE AGREEMENT FOR trademarks and trade names are those of their CERTAIN SOFTWARE AND SERVICE TO respective owners. - Page 4 Sony Software in whole or in part for any transmitted, or used by Sony anywhere in the purpose other than allowed under this EULA. world, in any medium, for the period in which...
- Page 5 Sony Software or judgment, settlement, attachment, or lien, or the Content to a prohibited country or any other act adverse to the interest of Sony or otherwise in violation of any such restrictions any Indemnified Party without the prior or regulations.
-
Page 6: About These Operating Instructions
Services, and the Content. Any notice by Sony hereunder may be made by letter, e-mail, or Instructions posting on the Services. The failure of Sony to exercise or enforce any right or provision of this EULA shall not constitute a waiver of •... -
Page 7: Table Of Contents
Table of Contents Sound Adjustment About These Operating Instructions ..6 Unpacking ..........8 Enjoying Multiplex Broadcast Guide to Parts and Controls ....9 Sound .......... 32 Getting Started Tuner Step 1: Installing the Listening to the Radio ......33 Speakers ...... -
Page 8: Unpacking
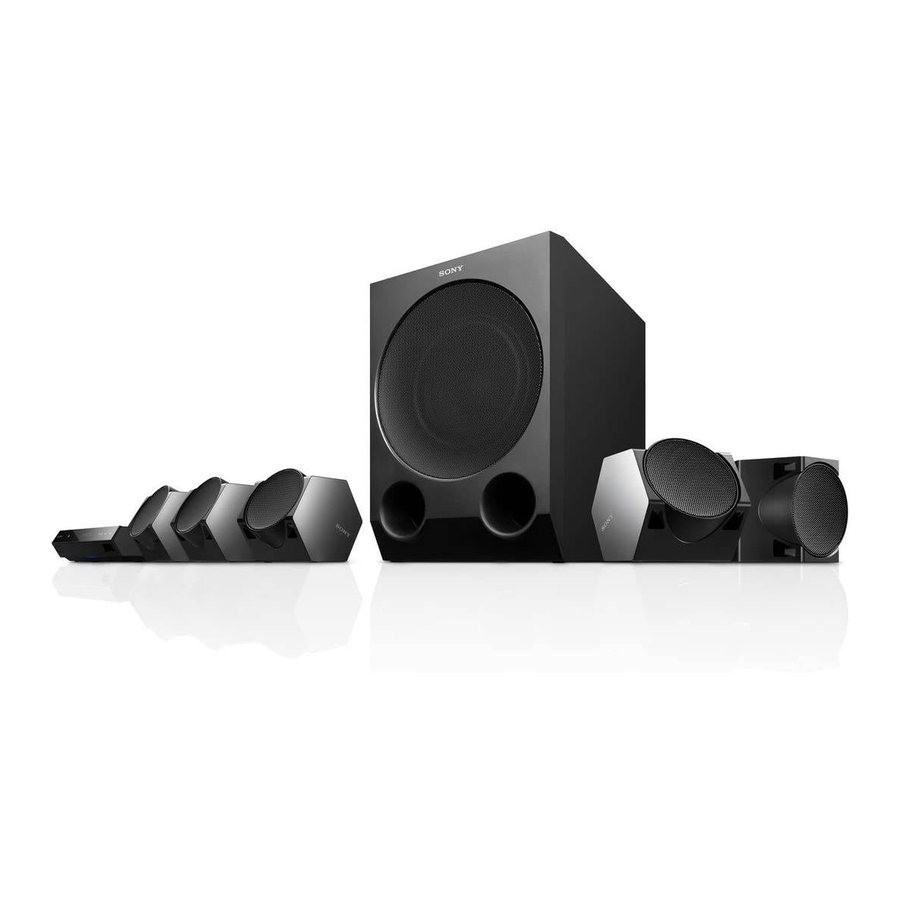
Unpacking • Operating Instructions • Subwoofer (1) • Remote control (1) • R03 (size AAA) batteries (2) • FM wire antenna (aerial) (1) • High Speed HDMI cable (1) • Speaker cords (4, red/white/gray/blue) • Foot pads (1) • Front speakers (2) •... -
Page 9: Remote
Guide to Parts and Controls For more information, refer to the pages indicated in parentheses. Front panel A "/1 (on/standby) * Hold down FUNCTION on the main unit for more than 2 seconds, the built-in sound Turns on the main unit, or sets it to demonstration will be played back on the standby mode. - Page 10 Indicators in the front panel display Muting is on BLUETOOTH power Repeat play is on Stereo sound The HDMI (OUT) is received jack is correctly (Radio only) connected to an HDCP* compliant equipment with The system’s status HDMI input (radio frequency, etc.)** * High-bandwidth Digital Content Protection ** When you press DISPLAY, the stream information/decoding status is displayed when the function is set to “TV”.
-
Page 11: Surround
"/1 (on/standby) (pages 21) Remote control Turns on the system or sets it to standby mode. B SPEAKERS TVyAUDIO Selects whether TV sound is output from the system’s speakers or the TV’s speaker(s). This function works only when you set [Control for HDMI] to [On] (page 41). - Page 12 G MIRRORING (pages 27, 29) N (play) Selects the “SCR M” function. Starts or re-starts playback (resume play). BLUETOOTH (page 26) X (pause) Selects the “BT” function. Pauses or re-starts playback. OPTIONS (pages 23, 30) x (stop) Displays the options menu on the TV screen or in the front panel display.
-
Page 13: Center
Installing all speakers in front position Getting Started (Speaker layout: [All Front]) Step 1: Installing the Speakers Install the speakers by referring to the illustration below. A Front left speaker (L) B Front right speaker (R) C Center speaker D Surround left speaker (L) E Surround right speaker (R) F Subwoofer G TV... -
Page 14: Foot
Example of multi angle Installing the speakers speaker configuration on the wall Speakers can be placed on a flat surface or You can install your speakers on the wall. installed on walls (page 14). You may position the speakers at different angles to Prepare screws (not supplied) achieve optimum sound quality. -
Page 15: For Fixed/Multi Angle Speaker Installation
For fixed angle speaker intallation For multi angle speaker installation The screw should protrude 6mm to 8 mm The screw should protrude 4 mm to 5 mm 6 mm to 8 mm 4 mm to 5 mm Hook on the rear of the front and surround Horizontal speaker installation speakers 5 mm... -
Page 16: Step 2: Connecting The System
(Surround right wall material or screws to be used. speaker (R)) (Subwoofer) speaker (R)) • Sony is not responsible for accident or damage caused by improper installation, insufficient wall strength or improper screw installation, natural calamity, etc. Step 2: Connecting the... -
Page 17: High Speed Hdmi
Connecting the TV Select one of the following connection methods according to the input jacks on your TV. Video connection HDMI cable (supplied) High Speed HDMI cable The Audio Return Channel (ARC) function enables the TV to output sound through the system with an HDMI connection, without performing connection B or C. -
Page 18: Connecting The Other Equipment
Note To enjoy TV sound, select “TV” function for connection B or “AUDIO” function for connection C. Connecting the other equipment Connect the system, TV and other equipment as follows. You cannot enjoy the audio and video of the connected equipment on the TV through this system when the system is off or in standby mode. - Page 19 High quality HDMI cable* (supplied) HDMI OUT * High Speed HDMI cable Optical digital cord (not supplied) DIGITAL OUT OPTICAL Coaxial digital cord (not supplied) AUDIO COAXIAL Audio cable (not supplied) AUDIO OUTPUT Standard quality When you make connection A This connection can transmit both video and audio signals.
-
Page 20: Connecting The Antenna (Aerial)
** You need to check the settings of your wireless LAN router to get the information about SSID and security key. For details: – visit the following website: http://www.sony-asia.com/section/support – refer to the operating instructions supplied with the wireless LAN router – consult the manufacturer of the wireless... -
Page 21: Step 4: Performing The Easy Setup
x WPA-PSK (TKIP), WPA2-PSK Switch the input selector on (TKIP) your TV so that the signal from TKIP is a security technology developed in the system appears on the TV response to the deficiencies of WEP. TKIP screen. assures a higher security level than WEP. The [Easy Initial Settings] for OSD x WPA-PSK (AES), WPA2-PSK language selection appears. -
Page 22: Step 5: Selecting The Playback Source
“BT” [Bluetooth AUDIO] ClearAudio+ BLUETOOTH device that supports A2DP You can enjoy the sound with Sony- “AUDIO” recommended sound field. Sound field is Equipment that is connected to the AUDIO automatically optimized according to IN (L/R) jacks (pages 17, 18) playback content and function. - Page 23 Press OPTIONS and V/v to select [Digital Music] [Music Arena], then press This is a technology developed by Sony to enhance the sound quality of compressed Press V/v to select [On], then press audio files by restoring high frequency range sound after compression process.
-
Page 24: Playback
Notes • We recommend you to select the football mode Playback when watching a football match broadcast. • If you hear unnatural sound in the content when Playing from a USB [Football : Narration Off] is selected, [Football : Narration On] is recommended. Device •... -
Page 25: Enjoying Music From A Bluetooth Device
Displaying the playback Enjoying Music from a information BLUETOOTH Device You can check the playback information, etc., by pressing DISPLAY. About the BLUETOOTH The displayed information differs depending on the media type and system wireless technology status. BLUETOOTH wireless technology is a Example: when playing from a USB short-range wireless technology that enables wireless data communication... -
Page 26: Connecting To Bluetooth Device
Check the following before playing music: Select your system’s name (for – The BLUETOOTH function of the example, “HT-IV300”) on the BLUETOOTH device is turned on. device’s display. – The pairing has been completed Perform this step within 5 minutes, (page 26). -
Page 27: To Disconnect/Delete Bluetooth Device
Press N to start playback. Using Screen mirroring Adjust the volume. Adjust the volume of the “Screen mirroring” is a function to display BLUETOOTH device first, if the the screen of a mobile device on the TV by volume level is still too low, adjust the Miracast technology. -
Page 28: Connecting To A Remote Device By One-Touch Function (Nfc)
Connecting to a remote Connecting to a Remote device by One-touch Device by One-touch listening function (NFC) Function (NFC) By holding an NFC-compatible remote device near to the N-Mark on the main unit, What is “NFC”? the main unit and remote device proceed to NFC (Near Field Communication) is a complete pairing and the BLUETOOTH technology enabling short-range wireless... -
Page 29: To Stop Playback
To stop playback Start the “NFC Easy Connect” The playback will be stopped when you application on the remote perform any of the following items. device. – Hold the remote device near to the N- Make sure that the application screen Mark on the main unit again. -
Page 30: Using "Songpal
Once connection is established, Available Options the Xperia smartphone screen appears on the TV screen. Various settings and playback operations The Xperia smartphone is registered to are available by pressing OPTIONS. The the system. available items differ depending on the situation. - Page 31 [Music] only [Video Settings] [Picture Quality Mode]: Selects the picture settings ([Direct], [Brighter Room], [Theatre [Add Slideshow BGM] Room], [Auto], [Custom1] and [Custom2]). Registers music files in the USB memory as slideshow background music (BGM). You can customize the following picture settings according to your preference and save them in [Custom1]/[Custom2] settings.
-
Page 32: Dual Mono
Adjusting the delay between the picture and Sound Adjustment sound Enjoying Multiplex (A/V SYNC) Broadcast Sound When the sound does not match the pictures on the TV screen, you can adjust (DUAL MONO) the delay between the picture and sound for You can enjoy multiplex broadcast sound the following functions. -
Page 33: Tuner
Presetting radio stations Tuner You can preset up to 20 stations. Before Listening to the Radio tuning, make sure to turn down the volume to minimum. Press FUNCTION repeatedly until “FM” appears in the front Press FUNCTION repeatedly panel display. until “FM”... -
Page 34: Other Operations
This function is available on TVs with the Each time you press DISPLAY, the display in the “BRAVIA” Sync function. front panel display changes cyclically as follows: By connecting Sony equipment that is Frequency t Preset number t Decoding compatible with the Control for HDMI status*... -
Page 35: System Audio Control
Routing Control Notes When you perform One-Touch Play on the • The above features may not operate with certain connected equipment, the system turns on equipment. • Depending on the settings of the connected and sets the system’s function to “HDMI1” equipment, the Control for HDMI function may or “HDMI2”... - Page 36 Press or B/V/v/b to adjust the x [Test Tone] parameter. The speakers will emit a test tone to adjust [Level]. Press to confirm the settings. Check the following settings. [Off]: The test tone is not emitted from the speakers. [On]: The test tone is emitted from each x [Centre Speaker] speaker in sequence while adjusting level.
-
Page 37: Using The Sleep Timer
Using the Sleep Timer Saving Power in Standby Mode You can set the system to turn off at a preset time, so you can fall asleep listening Check that you have made the following to music. settings: – [Control for HDMI] in [HDMI Settings] Press SLEEP. -
Page 38: Settings And Adjustments
Updates the software of the For information about update functions, refer to system. the following website: [Screen Settings] http://www.sony-asia.com/section/support (page 39) Makes the screen settings according to the type of TV. x [Update via USB Memory] Updates software using USB memory. -
Page 39: [Screen Settings]
[Off]: Turns off the function. the screen size with the original picture Note aspect ratio. If your Sony equipment is not detected when [Auto1] is selected, the setting will have the same x [Output Video Resolution] effect as [Auto2] setting. -
Page 40: [Audio Settings]
[Speaker]: Outputs multi-channel sound x [SBM] (Super Bit Mapping) from the system’s speakers only. [On]: Smooths the gradation of video [Speaker + HDMI]: Outputs multi-channel signals output from the HDMI (OUT) jack. sound from the system’s speakers and [Off]: Select this when outputting distorted 2-channel linear PCM signals from the video signals or unnatural color. -
Page 41: [System Settings]
x [Auto Display] [System Settings] [On]: Automatically displays information on the screen when changing the viewing titles, picture modes, audio signals, etc. x [OSD Language] [Off]: Displays information only when you You can select the language you want for press DISPLAY. the system on-screen display. -
Page 42: [Network Settings]
[Initialise Personal Information] connection. For details, see “Step 3: You can erase your personal information Preparing for Network Connection” stored in the system. (page 20). For further details, visit the following website and check the FAQ: http://www.sony-asia.com/section/support... -
Page 43: Additional Information
• Keep the system and discs away from components with strong magnets, such as Additional Information microwave ovens, or large loudspeakers. • Do not place heavy objects on the system. • Do not place metal objects in front of the Precautions front panel. - Page 44 BLUETOOTH technology. with a BLUETOOTH connection • Sony cannot be held liable in any way for – Locations where a wireless LAN is damages or other loss resulting from installed information leaks during communication –...
-
Page 45: Troubleshooting
“D. MODE” appears in the front panel difficulties while using the system, use this display. troubleshooting guide to help remedy the t Contact your nearest Sony dealer or problem before requesting repairs. Should local authorized Sony service facility. any problem persist, consult your nearest Sony dealer. - Page 46 “NOT.USE” appears in the front panel Color irregularity occurs on the TV display when you press any of the screen. sound field buttons (page 11). t If the speakers are used with a CRT- based TV or projector, install the t The setting for the sound field buttons speakers at least 0.3 meters from the cannot be changed when the [Sound...
- Page 47 Severe hum or noise is heard. Tuner t Move your audio equipment away from the TV. Radio stations cannot be tuned in. t Clean the disc on the connected t Check that the antenna (aerial) is device. connected securely. Adjust the antenna (aerial).
-
Page 48: Usb Device
USB device Network connection The USB device is not recognized. The system cannot connect to the t Try the following: network. 1 Turn the system off. t Check the network connection 2 Remove and reconnect the USB (page 20) and the network settings device. -
Page 49: Playable Types Of Files
t The wireless LAN connection may be t Check that the BLUETOOTH unstable depending on the usage connection is made properly between environment, especially while using this system and the BLUETOOTH the BLUETOOTH function of the device. t Pair this system and the system. - Page 50 Photo Codec Container Extension MPEG4/AVC .mkv Format Extension .mp4, .m4v JPEG .jpeg, .jpg, .jpe .m2ts, .mts .png Quick .mov .gif Time The system can support AVC up to Level 4.1. 3gpp/ .3gp, .3g2, The system can play AVCHD Ver.2.0 format 3gpp2 .3gpp, .3gp2 (AVCHD/Progressive).
-
Page 51: Supported Audio Formats
Supported Audio Specifications Formats Amplifier Section POWER OUTPUT (rated) Audio formats supported by this system are Front L/Front R: as follows. 75W + 75W (at 3ohms, 1kHz, 1% THD) POWER OUTPUT (reference) Function Front L/Front R/Surround L/Surround R: “HDMI 1/ “TV/COAX”... - Page 52 Compatible BLUETOOTH profiles Subwoofer (SS-WSIV300) A2DP 1.2 (Advanced Audio Distribution Dimensions (w/h/d) (approx.) Profile) 245 mm × 350 mm × 325 mm AVRCP 1.3 (Audio Video Remote Mass (approx.) Control Profile) 6.2 kg (with speaker cord) Supported Codecs General , AAC Power requirements Transmission range (A2DP) 220 V –...
-
Page 53: Index
Index A/V SYNC 32 HDMI Attenuation settings - AUDIO 40 YCbCr/RGB (HDMI) 39 Audio DRC 40 HDMI Deep Colour Output 39 Audio Output 40 Audio Return Channel 41 Audio Settings 40 Initialise Personal Information 42 Auto Display 41 Input Skip Setting 41 Auto Renderer Access Permission 42 Auto Standby 41 Multiplex broadcast sound 32... - Page 54 SBM 40 Screen Format 39 Screen mirroring 27, 29 Screen Saver 41 Screen Settings 39 SLEEP 37 Slideshow 31 Software License Information 41 Software Update 38 SongPal 30 Sound Effect 40 Speaker Settings 35, 40 Distance 36 Level 36 System Information 41 Test Tone 36 TV Type 39 Update 38...
- Page 56 The software of this system may be updated in the future. To find out details on any available updates, please visit the following URL. http://www.sony-asia.com/section/support ©2014 Sony Corporation Printed in Malaysia...