
Related Manuals for Motorola D501


Summary of Contents for Motorola D501
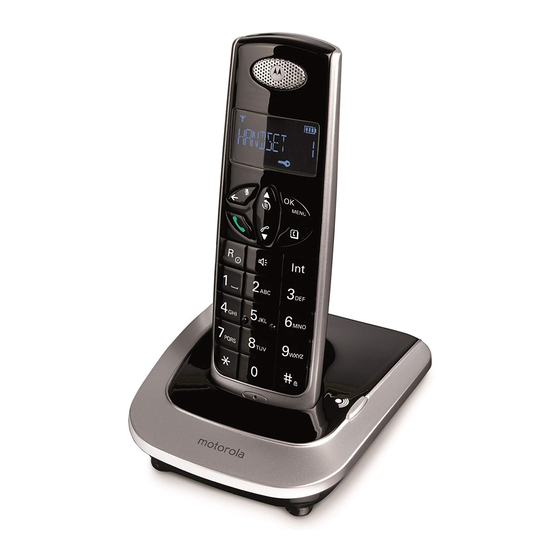
- Page 1 Motorola D5 Digital Cordless Telephone For D501, D502, D503 and D504 Warning Charge the handset for 24 hours before use.
- Page 2 Welcome... to your new Motorola D5 Digital Cordless Telephone! • All handsets are fully cordless for locating anywhere within range. • 100 Name and Number phonebook. • Speakerphone for hands-free conversation. • Caller ID shows you who’s calling and see details of the last 40 callers in a Calls list.* •...
- Page 3 This User Guide provides you with all the information you need to get the most from your phone. Before you make your first call, you need to set up your phone. Follow the simple instructions in ‘Getting Started’, on the next few pages.
-
Page 4: Table Of Contents
1. Getting started ..........6 Lock/unlock the keypad ........16 Paging/Find handset........16 2. Getting to know your phone ......9 4. Phonebook ............ 16 3. Using the phone..........13 Store a name and number.......16 Switch the handset on / off ......13 View or dial an entry ........17 Calls.............. - Page 5 10. Help..............29 Eco mode ............22 Default settings..........23 11. General information ........31 7. Clock & alarm ..........24 Set the date ............. 24 Set the time ............. 24 Set alarm ............24 Switch off alarm ring........24 8. Caller ID and the Calls list......25 Caller ID ............
-
Page 6: Getting Started
1. Getting started The line will hang up if the handset moves out of range of the base. Move closer to the base. The handset will automatically reconnect to the base. WARNING Do not place your D5 in the bathroom or other humid areas. Setting up Location IMPORTANT... -
Page 7: Connecting The Handset And Charger
2. Plug the power adaptor with clear connecter into the socket marked on the underside of the base and plug the other end into the mains power wall socket. Switch on the mains power. Installing and charging the handset 1. Remove the battery cover from the back of the handset and insert the 2 x rechargeable Ni-MH battery cells supplied. -
Page 8: Date And Time
Date and time BATTERY LOW WARNING icon flashes on the display and you hear a warning If you have subscribed to a Caller ID Service, the date and beep every minute during a call, you will need to recharge time is set automatically for all handsets when you receive the handset before you can use it again. -
Page 9: Getting To Know Your Phone
2. Getting to know your phone Earpiece Display See page 10 for an overview of the display icons. Overview of your handset Secrecy / Clear / Back During a call, press to switch Secrecy on/off, page 13. In menu mode, press to return to previous menu or press and hold to return to standby. -
Page 10: Display Icons
Display icons Intercom Used to make internal calls and transfer calls to other D5 Flashes to indicate an incoming external call handsets registered to the base, page 13. Hands-free speakerphone External call in progress During a call, press to switch hands-free on and off, page 14. -
Page 11: Navigating The Menus
Keypad is locked Page In standby mode, press to ring the handset(s), page 16. Displayed number is longer than 12 digits Press and hold to enter registration mode when registering handsets, page 27. The approximate power levels of your battery are indicated as follows: Navigating the menus Your D5 has an easy to use menu system. -
Page 12: Menu Map
Menu map PHONEBOOK SETUP HANDSET DATE - TIME REGISTER ADD ENTRY BASE VOLUME BEEP DATE SET SELECT BASE MODIFY ENTRY BASE MELODY INT RING VOL CLOCK SET REG BASE DELETE ENTRY DEL HANDSET EXT RING VOL ALARM SET PIN CODE INT MELODY DIAL MODE EXT MELODY... -
Page 13: Using The Phone
< 3. Using the phone 1. Press to answer the call, or simply lift up the handset to answer the call. NOTE NOTE Your handset will automatically time the duration of all < If you prefer to press when you lift up the handset to external calls. -
Page 14: Receive An Internal Call
3.5.2 Receive an internal call 2. When the other handset answers, press to connect all three callers to begin the conference call. When you receive an internal call, icon flashes and the handset number that is calling you is displayed. icon is displayed. -
Page 15: Switch To Hands-Free During A Call
3.6.3 Switch to hands-free during a call 4. Press again. NAME ? The display shows During a call, press to put the call on the loudspeaker. 5. Enter the name and press . The number is To switch hands-free off and return the call to the earpiece, displayed. -
Page 16: Lock/Unlock The Keypad
4. Phonebook Lock/unlock the keypad You can lock the keypad so that it cannot be operated You can store up to 100 names and numbers in the accidentally while carrying it around. phonebook. Names can be up to 12 characters long and NOTE numbers up to 24 digits. -
Page 17: View Or Dial An Entry
5. Press to select the ringer melody you want and 2. Scroll to the entry you want. press ADD ENTRY Enter the first letter of the name to search alphabetically. The display shows The first name that starts with this letter or the nearest 6. -
Page 18: Delete An Entry
5. Handset settings 6. Scroll to select a new ringer melody and press ADD ENTRY The display shows Handset ringer volume 7. Enter the next name and number entry you wish to store in You can adjust the ring volume and set different volume your phonebook or press twice to return to standby. -
Page 19: Auto Answer
NAME 3. Press to select the ringer melody (1 - 10). 2. Scroll and press 4. Press to confirm or to return to the previous 3. Enter the new handset name and press to confirm. menu. NOTE The handset name will only be displayed for approximately 20 NOTE Calls from the numbers that you have stored in the seconds when no button is pressed. -
Page 20: Battery Low Warning Beep
Keypad lock using the menu 4. Press to select and press confirm. You can use the menu to lock the keypad. HANDSET 1. Press , scroll and press Battery low warning beep KEYLOCK ? 2. Scroll and press to confirm. When the battery is almost fully discharged, you will hear a icon is displayed. -
Page 21: Base Settings
6. Base settings Change base PIN code Some functions are protected by a 4 digit PIN code which Base ringer volume must be entered if you want to change the settings. The Choose from 5 volume levels or Off. default PIN is 0000. You can change this to your own preferred number. -
Page 22: Recall Mode
TONE DIAL PULSE DIAL 3. Press to select and press 4. Press to confirm or to return to the previous to confirm. menu. Your D5 will restart automatically. Recall mode Emergency default If you have lost your PIN code, you can still restore your D5 Depending on your country and network operator, your D5 to its default settings. -
Page 23: Default Settings
Default settings 3. Press to select and press confirm. Low battery beeps Out of range warning beeps Eco mode Key beep Auto answer Internal melody Internal volume External melody External volume Ear volume When Eco mode is switched off, the circle around disappears. -
Page 24: Clock & Alarm
7. Clock & alarm Set alarm Each handset can have a different alarm setting. If you have subscribed to Caller ID Service, the date and DATE-TIME 1. Press , scroll and press time will be set on all your handsets whenever a call is ALARM SET received. -
Page 25: Caller Id And The Calls List
8. Caller ID and the Calls list If your caller’s name and number are stored in the phonebook and a name/number match is found, you will see the caller’s name on the display instead. IMPORTANT To use Caller ID, you must first subscribe to the service from Calls list your network provider. -
Page 26: Dial A Number In The Calls List
• If the caller’s number exactly matches an entry 6. Press Digit key to input a number or to delete a stored in the phonebook, the display will alternate number. < between the name and the number. Press 7. Press to dial out using the modified number. -
Page 27: Delete An Entry
9. Using additional handsets 8.2.5 Delete an entry 1. Press to open the Calls list. You can register up to five handsets to your D5 base to 2. Scroll to the entry you want and press extend your phone system without having to install extension DELETE ? The display shows sockets for each new phone. -
Page 28: Register A Different Make Of Handset To
Register a different make of handset On the handset: to your D5 base REGISTER 1. Press , scroll and press REG BASE IMPORTANT 2. Scroll and press DECT GAP Profile only guarantees that basic calling 3. Enter the base number (1 - 4). functions will work correctly between different makes/types The base numbers that are already in use flashes. -
Page 29: Help
10. Help 2. Press . All the bases that your handset has been BASE 1 2 3 4 registered to will be displayed, e.g. . The No dial tone currently selected base number flashes. • Use only the telephone line cord supplied. 3. - Page 30 icon is not scrolling during charge • Check that you are at least one metre away from other electrical equipment to avoid interference when • Adjust the handset slightly on the base. registering. • Clean the charging contacts with a cloth moistened with alcohol.
-
Page 31: General Information
11. General information 6. Unplug this product from the wall outlet before cleaning. Do not use liquid cleaners or aerosol cleaners. Use a IMPORTANT damp cloth for cleaning. This equipment is not designed to make emergency telephone 7. Do not disassemble this product. If service or repair calls when the power fails. -
Page 32: Installation Guidelines
Installation Guidelines 10. To avoid interference to nearby appliances, do not place the base of the phone on or near a TV, microwave oven, 1. Read and understand all instructions and save them for or VCR. future reference. 2. Follow all warnings and instructions marked on the Battery Safety Instructions product. -
Page 33: Product Disposal Instructions
Warranty the free flow of air over its surfaces. Thank you for purchasing this Motorola branded product • Do not submerge any part of your product in water and manufactured under license by Suncorp Technologies... - Page 34 OTHER WARRANTIES, EXPRESS OF IMPLIED. IN NO and line cords) purchase by the first consumer EVENT SHALL MOTOROLA OR SUNCORP BE LIABLE, purchaser of the product. WHETHER IN CONTRACT OR TORT (INCLUDING Consumer Products and The balance of the original...
- Page 35 (e) your address and telephone number. installation, maintenance, alteration, or modification in any way by someone other than Motorola, SUNCORP or its authorized service centers, are excluded from coverage. General information...
-
Page 36: Technical Information
Technical Information How many telephones can I have? All items of telephone equipment have a Ringer Equivalence Number (REN), which is used to calculate the number of items which may be connected to any one telephone line. Your D5 has a REN of 1. A total REN of 4 is allowed. If the total REN of 4 is exceeded, the telephones may not ring. - Page 37 General information...
- Page 38 MOTOROLA and the Stylized M Logo are trademarks or registered trademarks of Motorola Trademark Holdings, LLC. and are used under license. All other trademarks are the property of their respective owners. © 2011 Motorola Mobility, Inc. All rights reserved. Version 1 (HK.2)