
Related Manuals for Panasonic PP103910


Summary of Contents for Panasonic PP103910
-
Page 1: Operating Instructions
MP3 CD Player/Weather Band Receiver PP103910 PP P/N Operating Instructions ¡Please read these instructions carefully before using this product and keep this manual for future reference. -
Page 2: Safety Information
Safety Information Read the operating instructions for the unit and all other This manual uses pictographs to show you how to use the components of your truck audio system carefully before product safely and to alert you to potential dangers result- using the system. - Page 3 Observe the following cautions when in- Caution stalling. Observe the following cautions when using q Refer wiring and installation to qualified serv- this unit. ice personnel. Installation of this unit requires special skills and experi- q Keep the sound volume at an appropriate level. ence.
- Page 4 Safety Information (continued) The following applies only in the U.S.A. Warning Part 15 of the FCC Rules TO REDUCE THE RISK OF FIRE OR ELECTRIC SHOCK FCC Warning: OR PRODUCT DAMAGE, DO NOT EXPOSE THIS This device complies with Part 15 of the FCC Rules for APPLIANCE TO RAIN, SPLASHING, DRIPPING OR Radio Receiver.
- Page 5 Caution THIS PRODUCT IS A CLASS I LASER PRODUCT. USE OF CONTROLS OR ADJUSTMENTS OR PERFORMANCE OF PROCEDURES OTHER THAN THOSE SPECIFIED HEREIN MAY RESULT IN HAZARDOUS RADIATION EXPOSURE. DO NOT OPEN COVERS AND DO NOT REPAIR BY YOURSELF. REFER SERVICING TO QUALIFIED PERSONNEL.
-
Page 6: Table Of Contents
Contents Safety Information ....2 Alarm Setting ....20 Features . -
Page 7: Features
Features Front AUX terminal (AUX1) USB connector Your mobile audio player and other devices are The USB Connector is equipped on the front panel. connectable to this unit without any difficulty. (· page 16) By connecting a USB memory (not included) to USB connector via a USB extension cable (USB 2.0, not Rear AUX terminal (AUX2) included), you can enjoy MP3/WMA files stored on... -
Page 8: Preparation
Preparation First time power on Turn the key in the ignition until the Press [SRC] (PWR). accessory indicator lights. Clock adjustment The 12-hour (AM/PM) system is used for the clock Press [DISP] (CLK). adjustment. Minute blinks Press [DISP] (CLK). (Clock display) Adjust the minute. -
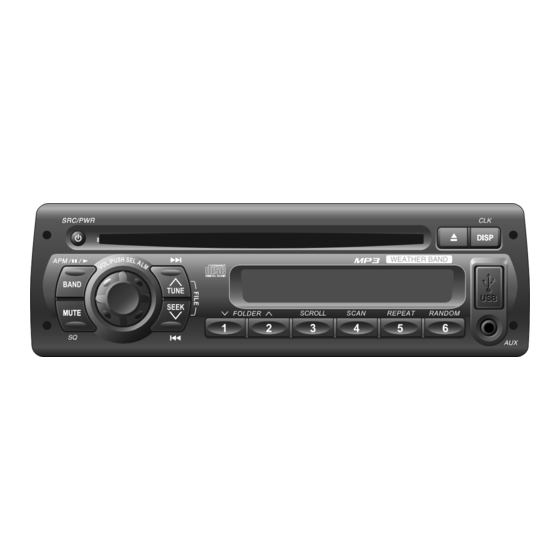
Page 9: Controls Layout
Controls Layout Main unit SRC Source page 10) page 14) u (Eject) PWR Power page 10) DISP Display BAND page 12) Disc slot page 14, etc.) 5 y Play/Pause CLK Clock page 8) page 14, 16, 18) APM Auto Preset Memory page 12) USB Connector page 16) -
Page 10: General
General Source selection [SRC] The source changes as follows every time (Source) is pressed. Radio FM, AM, WB page 12) AUX (when no external device is connected to rear AUX terminal) Disc player When device connected to the front AUX CD, MP3/WMA terminal of this unit page 14) -
Page 11: Sound Controls
Sound Controls SQ (Sound Quality) SQ is a function that can call up various sound types at the touch of button in accordance with your listening music type. Press [SQ] for more than 2 seconds to select the sound type as follows: SQ indicator (FLAT) flat frequency response:... -
Page 12: Radio
Radio Band Caution Press [BAND] to change the band. To ensure safety, never attempt to preset stations while you are driving. (FM stereo) indicator Weather Band lights while receiving an FM stereo signal. page 13) Frequency adjustment Preset station selection [TUNE/SEEK s ]: Lower Press the corresponding preset button from [1] to [TUNE/SEEK d ]: Higher... - Page 13 Tuning in a weather band station Press [BAND] to select WB (Weather Warning Band). page 12) Any NOAA broadcast weather report, including Press any of the buttons [1] to [6] to moni- current and forecasts, may not reflect your actual tor the preset station.
-
Page 14: Cd/Mp3/Wma Player
CD/MP3/WMA Player Cautions ¡Refer to the section on “Notes on CD-Rs/RWs” ¡Do not insert a disc when the indica- page 30). tor lights. ¡Refer to the section on “Notes on MP3/WMA”. ¡This unit does not support 8 cm {3"} page 28) discs. -
Page 15: Scan, Repeat, Random
Display change Press [DISP] to change the display. Notes: ¡For scrolling text, press [3] (SCROLL). ¡“NO TEXT” is displayed when there is no information on the disc. CD-DA MP3/WMA Track number/ Folder number/ Play time File number Disc title* Play time Track title* Folder name/ Album*... -
Page 16: Usb (Mp3/Wma)
USB (MP3/WMA) Compatible USB devices Cautions ¡USB Mass Storage Class ¡Do not connect a USB device directly to this unit. For details as to whether your USB If a USB device is connected directly to this unit memory/USB Audio is compatible with USB and an accident occurs, or if the brakes are ap- Mass Storage Class, please contact the USB plied suddenly, the driver or passenger may... -
Page 17: Random
Notes: ¡Refer to the section on “Notes on MP3/WMA”. page 28) ¡Do not leave the USB device for long periods of time in places inside the truck where the temperature rises too high. ¡This unit may not operate correctly if a cable other than a USB standard cable is used. ¡To prevent dirt and dust from adhering to the USB connector, close the cover of this unit when not in use. -
Page 18: Ipod Control
iPod Control By connecting iPod series to USB connector via a USB extension cable for iPod (USB 2.0, not included), you can enjoy music files stored on the iPod series in your truck. Controllable iPod/software version (USB connector) ¡iPod classic/ver. 1.1.2 ¡iPod touch/ver. - Page 19 Notes: ¡Connect this unit after turning down the volume ¡The shuffle function of iPod corresponds to the of the iPod. RANDOM function of this unit. ¡“PAUSE” appears until the iPod is recognized ¡Please make sure to detach the iPod after turning after connecting the iPod.
-
Page 20: Alarm Setting
Alarm Setting [ALM] Alarm time setting Turning ON/OFF the alarm Hold down [ALM] for more than 2 seconds. Hold down [ALM] for more than 2 seconds. lights) (Alarm time display) (Alarm time display) Push [ALM]. “ALM ADJ” is displayed when the alarm time is not (Alarm ON/OFF adjusted. -
Page 21: Troubleshooting
Troubleshooting If you suspect something wrong Warning Check and take steps as described below. ¡Do not use the unit in an irregular condi- If the described suggestions do not solve the problem, it is tion, for example, without sound, or with recommended to take the unit to your dealership. - Page 22 Troubleshooting (continued) BALANCE/FADER setting is not appropriate. Readjust BALANCE/FADER. No sound from speaker(s) There is a break, a short circuit, poor contact or wrong wiring regarding the speaker wiring. aCheck the speaker wiring. The speaker channels are The speaker wiring is confused between right and left. reversed between aPerform the speaker wiring in accordance with the wiring dia- right and left.
- Page 23 The disc is inserted upside down. Insert a disc correctly. No playback or disc ejected There is a flaw or foreign material on the disc. Remove the foreign material, or use a flawless disc. There is a flaw or foreign material on the disc. Sound skipping or noise Remove the foreign material, or use a flawless disc.
-
Page 24: Product Servicing
Troubleshooting (continued) The USB device and USB extension cable are not connected correctly. Connect the USB device and USB extension cable correctly. There is no music stored in a format that is supported on this unit. Check if there is any music data that can be played stored on Music is not played back the USB device. -
Page 25: Error Display Messages
Error Display Messages CD/MP3/WMA Possible cause Possible solution Display The disc is dirty, or is upside down. Check the disc. The disc has scratches. Check the disc. No operation by some cause. Unplug the power cord and plug it again. In case the unit is still out of order, consult your dealership. - Page 26 Error Display Messages (continued) A USB device is not connected or the connected device cannot be recognized. Use the type of USB memory that is suitable for this unit. Your USB device has no playable file. Download playable file to your USB device. A USB device the capacity of which exceeds the acceptable current was connected.
-
Page 27: Maintenance
Maintenance Cleaning this unit Your product is designed and manufactured to en- To remove stubborn stains sure a minimum of maintenance. Use a dry soft Moisten the soft cloth in dishwash- cloth for routine exterior cleaning. Never use ben- ing soap diluted with water and zine, thinner or other solvents. -
Page 28: Notes On Mp3/Wma
Notes on MP3/WMA Both of MP3 (MPEG Audio Layer-3) and WMA (Windows Media™ Audio) is a format for compressed audio file. These formats allow users to save all the files contained in approximately 10 pieces of existing CDs on one piece of CD-R/RW. Note: Each of encoding software is not included with this unit. - Page 29 Cautions as to compressed audio files Compressed audio file writing Folder selection order/file playback order n CD-media/USB-device ¡Do not save an audio file (CD-DA file) and a compressed audio file on the same disc. Failure Root Folder to observe this may result in difficulty in playing. (Root Directory) ¡If compressed audio files formatted with two or more types are saved on the same disc, each...
-
Page 30: Notes On Discs
Notes on Discs How to hold the disc Disc insert ¡Do not touch the underside of the disc. The surfaces of new discs tend to be slippery. ¡Do not scratch the disc. Therefore, when using such a disc for the first time, ¡Do not bend disc. -
Page 31: Specifications
Specifications General Power Supply: 12 V DC (11 V-16 V) test Voltage 14.4 V, Negative ground Current consumption: Less than 2.5 A (CD mode, 0.5 W 4-speaker) Maximum Power Output: 45 W x 4 channels at 400 Hz, Volume Control maximum Tone adjustment range: Bass: ±... -
Page 32: Specification From The Terminal End (Rear Connector Of This Unit)
Specification from the Terminal End (Rear Connector of This Unit) Specification from the terminal end (Rear connector of this unit) Cavity Pin # Function J1939 CAN-H* I/O J1939 CAN-L* I/O Park Lights ACC (Ignition) Cavity C 15 18 Power Antenna O Dim PWM Battery Cavity B... - Page 33 Memorandum...
- Page 34 Memorandum...
- Page 36 YFM264C212CA PTW1009-1119 Printed in China...