Advertisement
Table of Contents
- 1 Mounting the Camera
- 2 Mount the Camera on the Head
- 3 Approximate Positioning of the “Nodal Point”
- 4 Accurate Positioning of the “Nodal Point”
- 5 Longitudinal Positioning
- 6 Lateral Positioning
- 7 Instructions for Spherical Panoramic Shooting
- 8 Additional Plates
- 9 Use of the Kit as an Object Panorama Turntable
- Download this manual
Advertisement
Table of Contents

Related Manuals for Manfrotto 303SPH


Summary of Contents for Manfrotto 303SPH
- Page 1 INSTRUCTIONS 303SPH “VR” H PHERICAL...
- Page 2 Unless your tripod has a built-in levelling device (such as the Manfrotto MDeVe tripod’s 50mm half ball), you will need to use one of the levelling accessories available from the Manfrotto range to ensure accurate levelling of the head (see point 1).
- Page 3 MOUNTING THE CAMERA Remove the top assembly (fig. 2) by releasing knob “D”. To slide it completely out of the housing, push safety button “E”. Remove camera plate “CP” (fig. 3) by releasing knob “G”. To slide it completely out of the housing, push safety button “H”.
- Page 4 NOTE The position of the housing “M” relative to the long plate “F” will need to be adjusted: loosen screw “O” to slide the housing. The ideal position is with the camera body as far back on the plate as it can go before the front edge “N”...
- Page 5 APPROXIMATE POSITIONING OF THE “NODAL POINT” (Ref. Figure 8): Align the optical axis of the camera “Q” with the panoramic axis of rotation “R” using “CENTER” marking on plate as a guide, by loosing the knob “V” and moving long plate “S” laterally . (Ref.
- Page 6 ACCURATE POSITIONING OF THE “NODAL POINT” 10 11 If the scene being shot contains objects at varying distances from the point where the shot is being taken (close and distant objects), the “Nodal Point” needs to be more accurately positioned as follows (this procedure is possible ONLY with reflex cameras ): Note:...
- Page 7 - LATERAL POSITIONING (Ref. Figure 11): Choose a frame that contains both a near object “1” and a distant object “2” situated along the same horizontal line of vision. 1. (See Figure 11A and 11B): unscrew knob “AF” and move the camera around the panoramic axis so that the two objects are first on the left hand side of the frame, then on the right. Check whether the horizontal gap “X”...
- Page 8 INSTRUCTIONS FOR SPHERICAL PANORAMIC SHOOTING A special panoramic scene is obtained by adding together panoramic sequences taken at different angles from the horizontal. First you will need to choose the number of panoramic sequences you will need to complete the sphere depending on the angle of the lens you will be using. Before starting with the panoramic sequence, choose the initial vertical angle using the round scale “Z”...
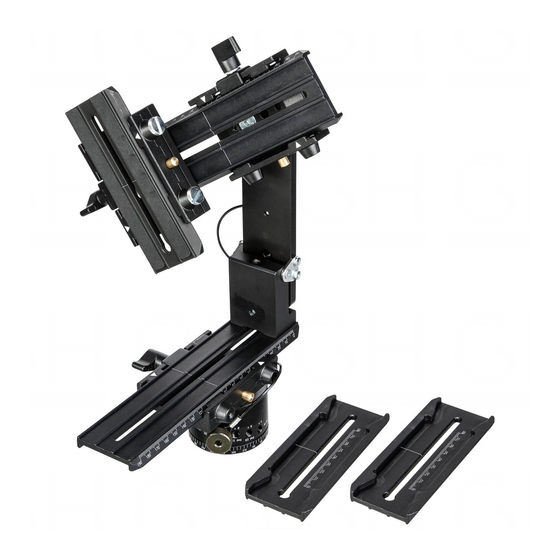
- Page 9 CENTER FC/FS CENTER ADDITIONAL PLATES If you have a very compact camera we suggest you to use the short plates ”SC” (fig. 13) and “FC” (supplied with the head) instead of the two long plates “F” and “S” in order to reduce space and weight of the system.
- Page 10 NOTES:...
- Page 11 NOTES:...
- Page 12 Cod. 303,10 - 05/03 Copyright © 2003 Manfrotto Bassano Italy...