Table of Contents
Advertisement
Advertisement
Table of Contents

Related Manuals for DeWalt XR Li-Ion DCS355-XE


Summary of Contents for DeWalt XR Li-Ion DCS355-XE
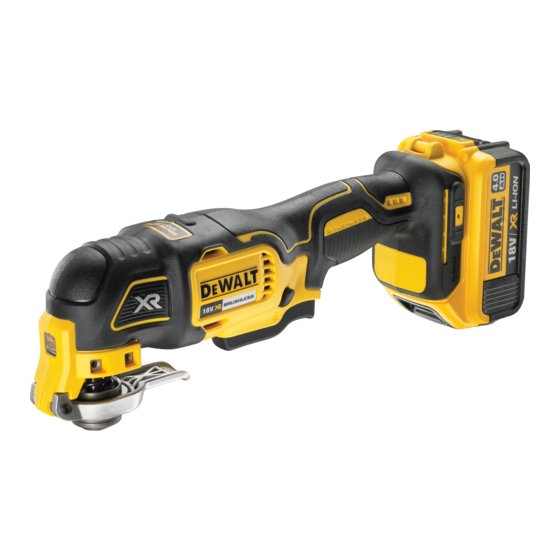
- Page 1 INSTRUCTION MANUAL DCS355-XE 18V BRUSHLESS CORDLESS MULTI TOOL...
-
Page 3: Definitions: Safety Guidelines
Vibration total values (triax vector sum) determined according to EN 60745: Definitions: Safety Guidelines Vibration emission value a The definitions below describe the level of severity for each signal m/s² 16.1 word. Please read the manual and pay attention to these symbols. Uncertainty K = m/s²... -
Page 4: Work Area Safety
SAVE ALL WARNINGS AND INSTRUCTIONS FOR 3) PERSONAL SAFETY a) Stay alert, watch what you are doing and use common sense when FUTURE REFERENCE operating a power tool. Do not use a power tool while you are tired or The term “power tool” in the warnings refers to your mains-operated (corded) power under the influence of drugs, alcohol or medication. -
Page 5: Extension Cords
Electrical Safety d) Store idle power tools out of the reach of children and do not allow persons unfamiliar with the power tool or these instructions to operate the The electric motor has been designed for one voltage range only. Always check that power tool. -
Page 6: Important Safety Instructions For All Battery Packs
min ....minutes or AC ....alternating current WARNING: ALWAYS wear approved protective safety equipment complying with or DC ..direct current or AC/DC ..alternating or the following standards: ....Class I Construction ......direct current • Eye protection: AS/NZS1337 Eye Protectors for Industrial Applications; (grounded) no .......no load speed •... -
Page 7: Specific Safety Instructions For Lithium Ion (Li-Ion)
Important Safety Instructions for All Battery Chargers NOTE: Do not store the battery packs in a tool with the trigger switch locked on. Never tape the trigger switch in the ON position. SAVE THESE INSTRUCTIONS: This manual contains important safety and operating WARNING: Fire hazard. -
Page 8: Charge Indicators
Indicator Light Operation • Do not place any object on top of the charger or place the charger on a soft surface that might block the ventilation slots and result in excessive internal heat. Place the charger in a position away from any heat source. The charger is PACK CHARGING ventilated through slots in the top and the bottom of the housing. -
Page 9: Important Charging Notes
6. Foreign materials of a conductive nature such as, but not limited to, grinding dust, NOTE: This could also mean a problem with a charger. metal chips, steel wool, aluminum foil, or any buildup of metallic particles should PROBLEM POWERLINE be kept away from charger cavities. -
Page 10: Intended Use
Installing/Removing Accessories (Fig. 3–5) FIG. 2 TOOL-FREE ACCESSORY CLAMP The DCS355 features a quick change accessory system. This allows for faster accessory changes without the need for wrenches or hex keys like other oscillating tool systems. 1. Grasp the tool and squeeze the accessory FIG. - Page 11 Attaching the Cut/Depth Guide (Fig. 8–12) INSTALLING/REMOVING SANDING SHEETS (FIG. 6) FIG. 8 A diamond shaped platen uses a hook and loop FIG. 6 (AVAILABLE IN SELECTED MODEL ONLY) adhesion system to attach the sanding sheets. The cut/depth guide allows you to precisely cut material The platen allows you to use it on large flat at a specified depth or height and more accurately track surfaces and tight spots or corners.
-
Page 12: Operation
2. Adjust the length of the guide by pulling out or pushing inward to achieve the To install the battery pack (H) into the tool handle, align the battery pack with the rails inside the tool’s handle and slide it into the handle until the battery pack is firmly desired length as shown in Figure 12. -
Page 13: Helpful Hints
Pushing the button to the left or right with the trigger depressed will lock the trigger FIG. 16 in the depressed position. This allows for more comfort and control in extended use applications. Pressing the trigger switch again will release the lock out and the tool will turn off upon release of the trigger. -
Page 14: Maintenance
MAINTENANCE Recommended accessories for use with your tool are available at extra cost from your local service center. If you need any assistance in locating any accessory, please WARNING: To reduce the risk of serious personal injury, turn the tool off and contact Stanley Black &... - Page 16 Stanley Black & Decker 82 Taryn Drive, Epping, VIC 3076 Australia • 1800 338 002 (Aust) or 0800 339 258 (NZ) www.dewalt.com.au • www.dewalt.co.nz (OCT13) Part No. N346799 DCS355-XE Copyright © 2013 D WALT The following are trademarks for one or more D WALT power tools: the yellow and black color scheme;...