Advertisement
Table of Contents
- 1 Definitions: Safety Guidelines
- 2 Electrical Safety
- 3 Extension Cords
- 4 Additional Safety Instructions
- 5 Important Safety Instructions for Battery Packs
- 6 Important Safety Instructions for Battery Chargers
- 7 Important Charging Notes
- 8 Side Handle
- 9 Maintenance
- 10 Drill Operation
- Download this manual
Advertisement
Table of Contents

Related Manuals for DeWalt DC920-XE


Summary of Contents for DeWalt DC920-XE
- Page 1 INSTRUCTION MANUAL DC920-XE, DC930-XE, DC940-XE HEAVY-DUTY XRP™ 13mm (1/2") CORDLESS DRILL/DRIVER DC925-XE, DC926-XE, DC935-XE, DC936-XE, DC945-XE HEAVY-DUTY XRP™ 13mm (1/2") CORDLESS HAMMERDRILL/DRILL/DRIVERS...
-
Page 3: Definitions: Safety Guidelines
1. WORK AREA Definitions: Safety Guidelines a. Keep work area clean and well lit. Cluttered and dark areas invite accidents. b. Do not operate power tools in explosive atmospheres, such as in the The definitions below describe the level of severity for each presence of flammable liquids, gases or dust. -
Page 4: Electrical Safety
d. Remove any adjusting key or wrench before turning the power tool on. A 5. BATTERY TOOL USE AND CARE wrench or a key left attached to a rotating part of the power tool may result in a. Ensure the switch is in the off position before inserting battery pack. Inserting personal injury. -
Page 5: Extension Cords
Extension Cords WARNING: Some dust created by power sanding, sawing, grinding, drilling, and other construction activities contains chemicals known to cause cancer, birth defects CAUTION: Use only extension cords that are approved by the country’s Electrical or other reproductive harm. Some examples of these chemicals are: Authority. -
Page 6: Important Safety Instructions For Battery Packs
DANGER: Electrocution Hazard. Never attempt to open the battery pack for any ....Class I Construction .....earthing terminal reason. If battery pack case is cracked or damaged, do not insert into charger. Electric ....(grounded) .....safety alert symbol shock or electrocution may result. Damaged battery packs should be returned to .... -
Page 7: Important Safety Instructions For Battery Chargers
Important Safety Instructions for Battery Chargers capacity of the cable, that is 16 gauge has more capacity than 18 gauge. When using more than one extension to make up the total length, be sure each SAVE THESE INSTRUCTIONS: This manual contains important safety instructions individual extension contains at least the minimum wire size. - Page 8 Using Automatic Tune-Up™ Mode 3. The completion of charge will be indicated by the red light remaining ON continuously. The pack is fully charged and may be used at this time or left in the The Automatic Tune-Up™ Mode equalizes or balances the individual cells in the charger.
-
Page 9: Important Charging Notes
charger cavities. Always unplug the charger from the power supply when there NOTE: A battery pack will slowly lose its charge when kept out of the charger. If the battery pack has not been kept on maintenance charge, it may need to be recharged is no battery pack in the cavity. -
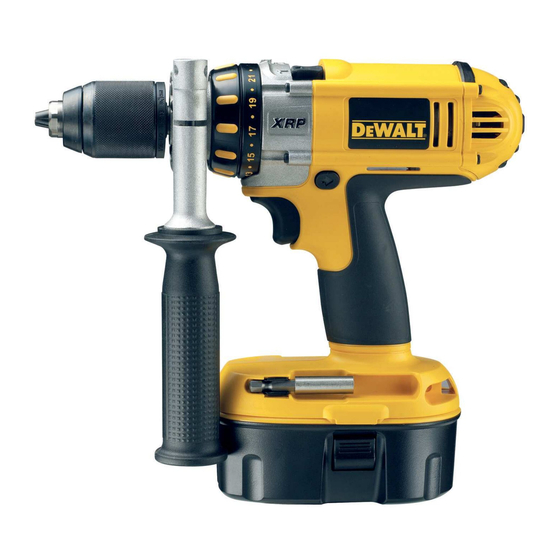
Page 10: Side Handle
KEYLESS SINGLE SLEEVE CHUCK (FIG. 3–5) the larger the fastener which (DC920-XE, DC930-XE, DC940-XE)) can be driven. To select any of Your tool features a keyless chuck with one rotating sleeve for one-handed operation the numbers, rotate until the of the chuck. - Page 11 3. Insert the accessory about 3/4" (19 mm) into the chuck and tighten securely by SELF-TIGHTENING CHUCK OPERATION (FIG. 6–8) rotating the chuck sleeve clockwise with one hand while holding the tool with the (DC925-XE, DC926-XE, DC935-XE, DC936-XE, DC945-XE) other hand. Continue to rotate the chuck sleeve until several ratchet clicks are To insert a drill bit or other accessory: heard to ensure full gripping power.
-
Page 12: Maintenance
OPERATION 5. Hold tool firmly with both hands to control the twisting action of the drill. 6. IF DRILL STALLS, it is usually because it is being overloaded. RELEASE Installing and Removing FIG. 9 TRIGGER IMMEDIATELY, remove drill bit from work, and determine cause of the Battery Pack (Fig. - Page 13 Cleaning Guarantee Applicable to hand held Power Tools, Lasers and Nailers. WARNING: Blow dirt and dust out of all air vents with dry air at least once a week. To minimize the risk of eye injury, always wear ANSI Z87.1 approved eye Three Year Limited Warranty protection when performing this procedure.
- Page 14 FREE WARNING LABEL REPLACEMENT: If your warning labels become illegible or are missing, call (AUS) 1800 654 155 or (NZ) 09 259 1111 for a free replacement.
- Page 16 20 Fletcher Road, Mooroolbark, VIC 3138 Australia (03 8720 5100) • 5 Te Apunga Place, Mt Wellington, New Zealand (09 259 1111) (APR07) Form No. 652901-00 DC920-XE, etc. Copyright © 2006, 2007 D WALT The following are trademarks for one or more D WALT power tools: the yellow and black color scheme;...