
Related Manuals for Sharp AX-1100J


Summary of Contents for Sharp AX-1100J
- Page 1 ® AX-1100J Steam Oven OPERATION MANUAL WITH COOKBOOK Read all instructions carefully before using the oven...
-
Page 2: Table Of Contents
CONTENTS Warranty ..............1 Cleaning and Care ..........22 Important Safety Instructions ......2-3 Troubleshooting Chart ........23-25 Installation Instructions ..........4 Service Call Check ..........26 Oven Diagram ............5 Specifi cations .............26 Operation of Control Panel ........ 6-7 Cooking Guides ..........27-32 Display Information ..........6 Point to Remember ..........27 Touch Control Panel Layout ......7 Glossary of Terms ..........27... -
Page 3: Warranty
Sharp. Please retain your sales documentation, as this should be produced to validate a warranty claim. - Page 4 VISIT OUR WEBSITE AT www.sharp.net.au OR CALL SHARP CUSTOMER CARE 1300 135 022 (LOCAL CALL COSTS APPLY WITHIN AUSTRALIA) SHARP CORPORATION OF AUSTRALIA PTY LTD FOR LOCATION ENQUIRIES WITHIN NEW ZEALAND REGARDING YOUR LOCAL SHARP APPROVED SERVICE CENTRE VISIT OUR WEBSITE AT www.sharp.net.nz...
-
Page 5: Important Safety Instructions
Do not use harsh abrasive cleaners or sharp metal scrapers to clean the oven door glass since they can scratch the surface, which may result in shattering of the glass. - Page 6 If the oven lamp fails please consult your dealer or a qualifi ed service technician trained by SHARP. 10. Avoid steam burns by directing steam away from the face and hands. Slowly lift the furthest edge of a dish's cover including microwave plastic wrap etc., and carefully open popcorn and oven cooking bags...
-
Page 7: Installation Instructions
If there is any damage, please do not operate the oven until it has been checked by a service centre approved by SHARP and repaired, if necessary. 2. Accessories provided 1) Rack 2) Glass tray 3) Steam tray 4) Combined operation manual and cookbook 5) Touch guide 3. -
Page 8: Oven Diagram
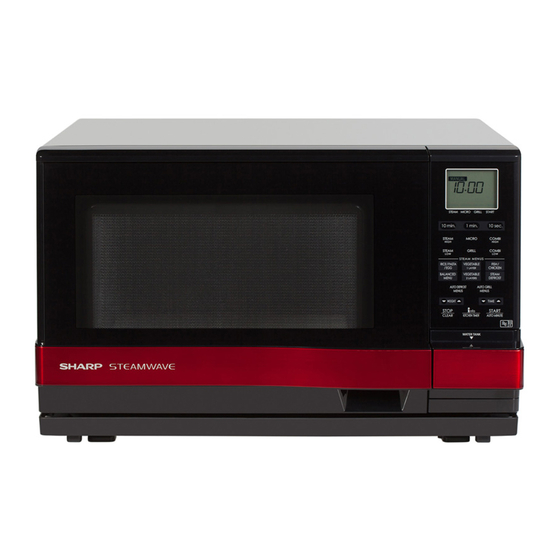
OVEN DIAGRAM 1 Ventilation openings Be aware that hot steam or air comes out during steam or grill mix cooking, and keep children away from the oven. 2 Door open handle 3 LCD display 4 Control panel 5 Oven lamp 6 Upper position (position 3) 7 Lower position (position 2) 8 Water tank (See page 8.) -
Page 9: Operation Of Control Panel
OPERATION OF CONTROL PANEL Display Information The display shows useful information including cooking time and cooking mode. 1. Cooking mode & START indicators The indicator will fl ash or light up during the operation. You can press a concerned key when the indicators are fl ashing. When the indicators light up on the display, they mean that each cooking mode is selected or the oven is operating in each cooking mode. -
Page 10: Touch Control Panel Layout
OPERATION OF CONTROL PANEL Touch Control Panel Layout Operating keys: EASY AUTO MENUS keys Press to select 'Easy Auto Menus' menus. STEAM COOK HIGH key Press to select steam cook high cooking. MICROWAVE key Press to select microwave cooking. Press to select microwave power setting. -
Page 11: Important Instructions
Contact a service centre 5. Install the water tank by pushing fi rmly. (Figure 3) approved by SHARP. 6. After cooking, empty the water tank and wash the 6. There may be a few water drops when removing water tank and the lid. -
Page 12: Steam In Automatic And Manual Cooking
IMPORTANT INSTRUCTIONS Steam in Automatic and Manual Cooking Before cooking 1. Make sure the water tank is fi lled with room temperature water suitable for drinking (fi ltered) and is installed. (See page 8.) 2. Make sure the empty drip tray is installed. (See page 8.) 3. -
Page 13: Drain Water Function
IMPORTANT INSTRUCTIONS Drain Water Function Press Info/Timer and number 2 to select “In F2”. Perform the Drain Water function at least once a day after cooking with steam. It takes up to 7 minutes. Drain Water function is very useful to prevent Place the glass tray in lower position (position scale build up and the use of stale water. -
Page 14: Before Operating
BEFORE OPERATING CLEAN THE OVEN BEFORE FIRST USE • Before operating your oven, make sure you read and understand this operation manual completely. You may detect smoke or a burning smell when using • Before the oven can be used, follow these procedures: the grill for the fi... -
Page 15: Automatic Cooking
AUTOMATIC COOKING Automatic Operation is cooked with steam, grill and microwave function. Refer to each function for the details. Easy Auto Menus WARNING for stacking the steam tray and glass Easy Auto Menus have 9 categories and 27 menus. tray: Category 1-6: Rice/Pasta, Veg/Potato, Fish/Chicken, After cooking, take out the steam tray fi... - Page 16 AUTOMATIC COOKING For Category 7: Easy Defrost For Category 8: Sensor Reheat Sensor Reheat automatically reheats all the food Easy Defrost has 4 menus. Do not use the glass tray, shown in the Sensor Reheat Guide on page 38. steam tray and metal rack. 1 Steak/Chops SPECIAL NOTE for Sensor Reheat: 2 Poultry...
-
Page 17: Automatic Cooking
AUTOMATIC COOKING For Category 9: Grill Grill has 4 menus. 1 Chicken Legs 2 Grilled Whole Chicken 3 Roast Beef 4 Grill Skewers Refer to the Grill Guide on page 39 for details. * Suppose you want to cook 0.5 kg of Chicken Legs. P R O C E D U R E Press Grill once. -
Page 18: Manual Cooking
MANUAL COOKING Manual Cooking is an option in Steam Cook, Grill, Grill Mix and Microwave. Refer to the “Manual Cooking Chart” and “Food and Utensil Position Chart”. The charts give information on each setting. Manual Cooking Chart Cooking mode Temp/power range Time range Water tank High... -
Page 19: Steam Cook
MANUAL COOKING Steam Cook Manual Steam Cook has 2 options, Steam Cook High STEAM COOK LOW and Steam Cook Low. Always cook food using steam * Suppose you want to cook for 20 minutes on Steam tray and glass tray. See page 15 for the details. And Cook Low (75°C). -
Page 20: Grill
MANUAL COOKING Grill Grill Mix The grill heating element at the top of the oven cavity Grill Mix combines microwave power with grill. Grill has one power setting only. This mode does not use Mix has 2 options; Grill Mix High and Grill Mix Low. steam. -
Page 21: Microwave
MANUAL COOKING Microwave Microwave is fast and convenient for cooking, To change the microwave power level, press Micro until the desired power level is displayed. reheating and defrosting. First enter the cooking time then select the power * Suppose you want to defrost for 5 minutes on 30%. level. -
Page 22: Other Convenient Features
OTHER CONVENIENT FEATURES More or Less Time Adjustment Multiple Sequence Cooking This function allows you to cook using up to 3 manual To use with automatic cooking: cooking programs; combinations of Microwave, Grill You can adjust cooking results as you like. and Grill Mix. -
Page 23: Kitchen Timer
OTHER CONVENIENT FEATURES Kitchen Timer Info Use the Kitchen Timer as a minute timer or to monitor Info key provides 7 features. the standing time for cooked/defrosted food. In F1: Drain In F2: Descale * Suppose you want to set the kitchen timer for 5 In F3: Water Hardness minutes. -
Page 24: Other Convenient Features
OTHER CONVENIENT FEATURES DEMONSTRATION MODE ENERGY SAVE MODE This feature is mainly for use by retail outlets, and Your oven has an Energy Save Mode. This feature also allows you to practice the key operation. saves electricity when the oven is not in use. If you set the clock, Energy Save Mode will be To demonstrate, press Info/Timer and number 4 (In cancelled. -
Page 25: Cleaning And Care
Do not use harsh abrasive cleaners Water Tank and Water Tank Lid or sharp metal scrapers to clean the oven door glass After cooking, wash in a mild soap or detergent since they can scratch the surface, which may result solution with a soft damp cloth or sponge, rinse and in shattering of the glass. -
Page 26: Troubleshooting Chart
Never adjust, repair or modify the oven by yourself. It is hazardous for anyone other than a qualifi ed service technician trained by SHARP to carry out any service or repair operation. This is important as it may involve the removal of covers that provide protection against electrical parts. - Page 27 TROUBLESHOOTING CHART The following situations are normal and are not signs that the oven is malfunctioning. QUESTION / SITUATION ANSWER The display is black / blank. * Open the door and close. Control panel / * Check the power plug is properly connected to a power supply suitable wall outlet.
-
Page 28: Troubleshooting Chart
TROUBLESHOOTING CHART The following situations are normal and are not signs that the oven is malfunctioning. QUESTION / SITUATION ANSWER Water is found inside the oven Steam has condensed inside the oven. Wipe dry with a Steam when the door is opened. soft cloth or a sponge after cooling. -
Page 29: Service Call Check
If “NO” is the answer to any of the above questions, please check your wall socket and the fuse in your meter box. If both the wall socket and the fuse are functioning properly, contact your nearest service centre approved by SHARP. IMPORTANT: If the display shows nothing even if the power supply plug is properly connected, the Energy Save Mode may be in operation. -
Page 30: Cooking Guides
COOKING GUIDES Points to Remember • Please make reading the Operation Manual your very fi rst step in working with your new oven. This important booklet explains exactly how the oven works and what you need to know to operate it successfully. •... -
Page 31: About Utensils And Coverings
COOKING GUIDES About Utensils and Coverings The chart below will help you decide what utensils and coverings should be used in each mode. Cooking Steam Grill Grill Mix Microwave Mode Utensils - Coverings Aluminium Foil Small flat pieces of aluminum foil placed smoothly on food can be used to shield areas from cooking or defrosting too quickly. -
Page 32: Steam Cooking Advice
Sharp is not responsible for any damage to the oven when accessories are used. For automatic cooking, use the recommended container in each cooking guide and recipes of the cookbook section. - Page 33 COOKING GUIDES - Advice for STEAM - Food characteristics Food density will affect the amount of cooking time needed. Cut the food Density into thinner parts if possible, and arrange in single layer. Quantity The cooking time must be increased as the amount of food cooked in the oven increases.
-
Page 34: Microwave Cooking Advice
COOKING GUIDES Microwave Cooking Advice - Special Notes and Warning for MICROWAVE - DON’T Eggs, fruits, * Puncture egg yolks and whites and * Cook eggs in shells. This prevents nuts, seeds, oysters before cooking to prevent "explosion", which may damage the vegetables, "explosion". -
Page 35: Cooking Guides
COOKING GUIDES - Advice for MICROWAVE - Cooking Techniques Arrange food carefully Place the thickest areas toward outside of dish. Watch cooking time Cook for the shortest amount of time indicated and add more time as needed. Food severely overcooked can smoke or ignite. Cover foods before Check recipe for suggestions: paper towels, microwave plastic wrap or a lid. -
Page 36: Automatic Cooking Chart
AUTOMATIC COOKING CHART Easy Auto Menus Guide - Make sure that the water tank is fi lled to the MAX mark with room temperature water suitable for drinking (fi ltered) and is installed. Rice/Pasta Guide Food Weight range Food Menu name Procedure Type (Increasing unit) - Page 37 AUTOMATIC COOKING CHART Steam Defrost Guide Weight range Food Food Menu name Procedure (Increasing unit) Position Type • Place the fish steak in a shallow microwave Fish Steak 0.2 - 0.6 kg (100g) safe defrosting dish. (initial temp -18°C) • When the oven stops and the audible signals sound, turn over.
- Page 38 AUTOMATIC COOKING CHART RECIPES FOR COMPLETE MEAL OF EASY AUTO MENUS Salmon fi llets with broccoli fl orets (1) [Utensils] 2 Steam trays, glass tray Ingredients 1 portion 2 portions 3 portions 4 portions Deep-frozen salmon fi llets 125 g (1 piece) 250 g (2 pieces) 375 g (3 pieces) 500 g (4 pieces) Lemon juice, pepper Broccoli fl...
- Page 39 AUTOMATIC COOKING CHART Chicken breast with potato wedges and a vegetable medley (2) [Utensils] 2 Steam trays, glass tray Ingredients 1 portion 2 portions 3 portions 4 portions Chicken breast fi llets 150 g 300 g 450 g 600 g Salt, pepper, paprika Potatoes, peeled cut into wedges 75 g...
- Page 40 AUTOMATIC COOKING CHART Easy Defrost Guide Food Weight range Menu name Procedure Type (Increasing unit) Steak/Chops 0.1 - 1.0 kg (100g) • Place the food on a microwave safe defrosting dish with rack* on the centre of the oven fl oor (position1). (initial temp -18°C) •...
- Page 41 AUTOMATIC COOKING CHART Sensor Reheat Guide Food Weight range Menu name Procedure Type (Increasing unit) Dinner Plate 1 serve • Cover with plastic wrap and pierce 5 times with skewer. (approx. 400g) • Place the plate directly on the oven fl oor (position 1). (initial temp 3°C) •...
- Page 42 AUTOMATIC COOKING CHART Grill Guide Food Weight range Food Menu name Procedure Type (Increasing unit) Position Chicken Legs 0.2 - 0.8 kg (100g) • Mix the ingredients and spread on chicken legs. (initial temp 3°C) • Pierce the skin of the chicken legs. Ingredients for 1 kg (5 pieces) chicken •...
-
Page 43: Manual Cooking Chart
MANUAL COOKING CHART Steam Cook High Chart Use glass tray and steam tray Food Amount Oven Setting Cooking Time Food Position SEAFOOD Fish Fillets (½ Inch Thick) 800g Steam Cook High 21 minutes Mussels, In Shell 900g Steam Cook High 20 minutes Scallops 500g... -
Page 44: Steam Cook Low Chart
MANUAL COOKING CHART Steam Cook Low Chart This setting uses a low temperature from 70°C – 95°C in 5°C increments to cook delicate items like terrines, fl ans, fresh seafood, desserts to perfection. This programme is ideal for slow cooking meat after briefl y sear the meat in a hot pan on a hob and where a very tender result is wanted. -
Page 45: Grill Mix Cooking Chart
MANUAL COOKING CHART Grill Mix Cooking Chart Use glass tray and rack Food Amount Cooking Time and Procedure Standing Food Result Time Position BEEF Blade Roast Micro 70% for 8 minutes 10 minutes Medium Grill Mix High for 9 minutes TURN OVER Micro 70% for 3 ½... -
Page 46: Reheating And Defrosting Convenience Food Chart
MANUAL COOKING CHART Reheating and Defrosting Convenience Food Chart Food Amount Oven setting and Cooking Time Procedure Standing Time BEVERAGE 1 Cup Microwave 100% for 2 minutes Microwave safe mug. Stir halfway through and after heating 2 Cups Microwave 100% for 4 minutes CANNED FOOD 1 Cup Microwave 100% for 2 minutes... -
Page 47: Microwave: Frozen Vegetable Chart
MANUAL COOKING CHART Microwave: Frozen Vegetable Chart 1. Place vegetables in a medium/large microwave safe bowl and cover with plastic wrap. Place on the oven fl oor (position1). 2. Allow to stand for 2 minutes before draining any water and serving. Food Amount Cooking Time (100%) -
Page 48: Microwave: Fresh Vegetable Chart
MANUAL COOKING CHART Microwave: Fresh Vegetable Chart 1. Cover each dish with plastic wrap. Place on the oven fl oor (position1). 2. Drain any remaining water after standing before serving. Food Amount Cooking Time Procedure (100%) Asparagus (halved) 500g 3 ½ minutes Place in a shallow microwave safe dish. -
Page 49: Microwave: Defrost Times For Meat, Poultry, Seafood And Bread
MANUAL COOKING CHART Microwave: Defrost Times for Meat, Poultry, Seafood and Bread 1. Remove wrapping and place frozen item on a shallow microwave safe defrosting dish with rack (a microwave safe defrosting rack). Shield with aluminum foil to prevent the item from cooking while defrosting. 2. -
Page 50: Recipe
RECIPE Vegetables Honey Carrots Snow Peas with Feta and Olives 500 g carrots, peeled 3 teaspoons orange juice 1 teaspoon oil 2 teaspoons honey 5 g butter 1 teaspoon olive oil 1 clove of crushed garlic ½ teaspoon orange rind 150 g snow peas topped and tailed Serves 4 1 small Spanish onion, sliced... - Page 51 RECIPE Stuffed Potatoes Asian Greens in Oyster Sauce 4 large potatoes, washed (approximately 200g each) 1 rasher bacon 200 g baby pak choy ¼ cup cream 200 g baby bok choy ¼ cup milk ½ teaspoon sesame oil 1 cup shredded tasty cheese 1 teaspoon grated fresh ginger 1 tablespoon fresh chives, chopped ½...
-
Page 52: Chicken
RECIPE Chicken Chicken and Vegetable Chicken Caesar Salad Rice Paper Rolls 1 tablespoon Worcestershire sauce 1 teaspoon Dijon mustard 2 chicken breasts, approximately 200-250g each 300 g chicken breast fi llet 24 large rice paper rolls 2 lean rashers bacon 1 avocado, halved and thinly sliced ½... - Page 53 RECIPE Chicken and Mushroom Chicken and Vegetable Dumplings Nuggets 300 g chicken mince 500 g chicken mince 100 g shiitake mushrooms, fi nely chopped 1 cup wholemeal breadcrumbs 1 tablespoons chives, fi nely chopped 125 g canned corn kernels 2 shallots, fi nely chopped 1 egg, lightly beaten 1 clove garlic, crushed 1 carrot, fi...
- Page 54 RECIPE OYSTER SAUCE Chicken, Cashew Nuts • In a microwave safe glass bowl combine the oil, and Hokkien Noodles ginger and sesame seeds. (served with Asian Greens) • Manually set oven to Microwave 100% > 1 minute > START. • Add oyster sauce, vegetable stock, soy sauce and 2 x 200 g Chicken breast caster sugar.
-
Page 55: Seafood
RECIPE Seafood Marinated Snapper Ocean Perch with Summer Salad 2 tablespoons soy sauce 2 cloves garlic, crushed 4 x 200 g ocean perch fi llets 1 tablespoon sesame oil ¼ cup lemon juice 1 teaspoon grated fresh ginger 1 teaspoon soy sauce 1 tablespoon chopped fresh coriander 1 teaspoon Worcestershire sauce 2 bird’s eye chillies, seeds removed, fi... - Page 56 RECIPE Grilled Garlic Prawns Herbed Fish Steak 500 g green king prawns, peeled, tails intact, deveined 2 tablespoons butter, melted cup vegetable oil 1 teaspoon freshly grated lemon rind 3 teaspoons sesame oil 1 tablespoon lemon juice 1 teaspoon ground coriander 1 tablespoon oregano 3 cloves garlic, crushed 4 swordfi...
-
Page 57: Meat
RECIPE Meat Pork Dumplings Ham, Tomato and Ricotta Frittata Bites Circular wonton wrappers, ready made 300 g pork mince 1 egg 1 teaspoon olive oil 3 shallots, fi nely sliced ½ brown onion, fi nely diced 2 teaspoons sesame oil 6 eggs 2 tablespoons light soy sauce 150 g ricotta cheese... - Page 58 RECIPE Beef and Vegetable Leek, Bacon and Cheese Ravioli Quiche 300 g beef mince 80 g bacon, diced Ready made Circular wonton wrappers (2 x 30 pack) 120 g leek, washed and thinly sliced 2 teaspoons light soy sauce ½ cup cheddar cheese, grated 1 teaspoon cornfl...
-
Page 59: Desserts
RECIPE Desserts Upside Down Pineapple Chocolate Hazelnut Cake Brownies 50 g butter 75 g butter ¼ cup fi rmly packed brown sugar 100 g dark chocolate, roughly chopped 225 g can pineapple slices, drained, juice reserved ¼ cup caster sugar 1 egg 1 egg, beaten ½... - Page 60 Note: do not cut down to the core. • Using a sharp knife or apple corer, cut around the core of the pear. Only cut down to just above the bottom of the pear, not all the way through. Use a...
- Page 61 TINSEB303WRRZ-J11 Printed in Thailand SHARP CORPORATION...