D-Link DSL-2520U User Manual
Dsl-2520u
Hide thumbs
Also See for DSL-2520U:
- User manual (83 pages) ,
- Quick installation manual (16 pages) ,
- Quick installation manual (12 pages)
Table of Contents
Advertisement
Quick Links
Download this manual
See also:
User Manual
Advertisement
Table of Contents

Related Manuals for D-Link DSL-2520U


Summary of Contents for D-Link DSL-2520U
- Page 1 Table of Contents D-Link DSL-2520U User Manual...
-
Page 2: Table Of Contents
OFTWARE ..................7 NSTALLATION OTES ....................38 EBOOT Information you will need from your ADSL service provider ......9 Information you will need about DSL-2520U..........10 TROUBLESHOOTING..................39 ..................12 EVICE NSTALLATION NETWORKING BASICS..................41 Power on Router ..................12 Factory Reset Button.................. -
Page 3: Package Contents
• One USB cable • One Quick Installation Guide Note: Using a power supply with a different voltage rating than the one included with the DSL-2520U will cause damage and void the warranty for this product. System Requirements • ADSL Internet service •... -
Page 4: Features
This eliminates the need to reconfigure every host whenever changes in network topology occur. • Network Address Translation (NAT) – For small office environments, the DSL-2520U allows multiple users on the LAN to access the Internet concurrently through a single Internet account. This provides Internet access to everyone in the office for the price of a single user. -
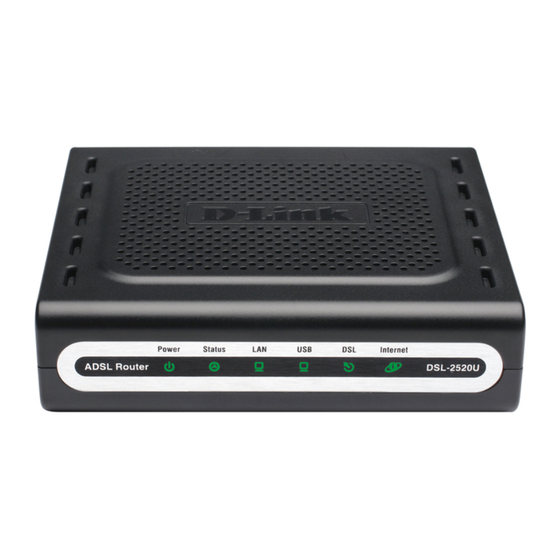
Page 5: Hardware Overview
Use the USB port to Power Button To manually reset, connect to a single Push in to power-on depress button with the Router. Push computer the power on for at again to power-off least seven seconds the Router D-Link DSL-2520U User Manual... -
Page 6: Leds
A solid red light indicates there is a a steady green or dark light. valid USB connection. A blinking green light remote server failure for DHCP, PPPoE or indicates activity on the USB interface. static IP address assignment. D-Link DSL-2520U User Manual... -
Page 7: Installation
Operating Systems The DSL-2520U uses an HTML-based web interface for setup and management. The web configuration manager may be accessed using any operating system capable of running web browser software, including Windows 98 SE, Windows ME, Windows 2000, Windows XP, and Windows Vista. - Page 8 LAN side of the bridge, such as a PC, a server, a gateway device such as a router or similar firewall hardware. The IP address can be assigned in a number of ways. Your network service provider will give you instructions about any additional connection software or NIC configuration that may be required. D-Link DSL-2520U User Manual...
-
Page 9: Information You Will Need From Your Adsl Service Provider
ADSL service provider’s network and your computer. If you are setting up the Router for multiple virtual connections, you will need to configure the VPI and VCI as instructed by your ADSL service provider for the additional connections. D-Link DSL-2520U User Manual... -
Page 10: Information You Will Need About Dsl-2520U
IP address used for DHCP service on the LAN when DHCP is enabled. LAN Subnet Mask for the DSL-2520U This is the subnet mask used by the DSL-2520U, and will be used throughout your LAN. The default subnet mask is 255.255.255.0. This can be changed later. - Page 11 Ethernet NIC If your computer has an Ethernet NIC, you can connect the DSL-2520U to this Ethernet port using an Ethernet cable. You can also use the Ethernet ports on the DSL-2520U to connect to other computer or Ethernet devices.
-
Page 12: Device Installation
Device Installation The DSL-2520U connects two separate physical interfaces, an ADSL (WAN) and an Ethernet (LAN) interface. Place the Router in a location where it can be connected to the various devices as well as to a power source. The Router should not be located where it will be exposed to moisture or excessive heat. -
Page 13: Network Connections
USB port. Connect to USB Port Before using the USB port to connect a computer to the Router, first install the USB network driver on the computer. Follow the instructions below to install the USB driver. D-Link DSL-2520U User Manual... -
Page 14: Installing The Usb Driver
PC with the USB cable. To install the driver follow these instructions: 1. Click the Install DSL-2520U link or Setup.exe file in the USBDRIVER folder on the CD-ROM in to launch the USB driver installation software. - Page 15 When the USB driver has been installed, make sure the Router is powered on and insert one end of the USB cable included with the Router into the DSL-2520U Router’s USB port. Insert the other end of the USB cable into a USB port on your PC. Check the USB LED on the front of the Router to confirm that the connections have been made.
-
Page 16: Configuration
Section 3 – Configuration Configuration This section will show you how to configure your new D-Link Router using the web-based configuration utility. Web-based Configuration Utility Connect to the Router To configure the WAN connection used by the Router it is first necessary to communicate with the Router through its management interface, which is HTML-based and can be accessed using a web browser. -
Page 17: Device Info
Section 3 – Configuration Device Info To access the Device Info window, click either the Device Info or Summary button in the Device Info directory. The following page opens: D-Link DSL-2520U User Manual... -
Page 18: Summary
Section 3 – Configuration Summary This window displays the current status of your DSL connection, including the software version, LAN IP address, and DNS server address. D-Link DSL-2520U User Manual... -
Page 19: Wan
Section 3 – Configuration To access the WAN Info window, click the WAN button in the Device Info directory. This menu displays the current status of your WAN connection. D-Link DSL-2520U User Manual... -
Page 20: Statistics
Statistics button to refresh these statistics. This window displays the Router’s WAN statistics. Click the Reset Statistics button to refresh these statistics. This window displays the Router’s ATM statistics. Click the Reset button to refresh these statistics. D-Link DSL-2520U User Manual... - Page 21 Section 3 – Configuration This window displays the Router’s ADSL statistics. Click the Reset Statistics button to refresh these statistics. Click the ADSL BER Test button to test functional ADSL parameters of the physical ADSL connection. D-Link DSL-2520U User Manual...
-
Page 22: Route
To access the Device Info – ARP window, click the ARP button in the Device Info directory. This read-only window displays Address Resolution Protocol info. DHCP To access the Device Info – DHCP Leases window, click the DHCP button in the Device Info directory. This read-only window displays DHCP lease info. D-Link DSL-2520U User Manual... -
Page 23: Advanced Setup
WAN interfaces on this window. Once the desired changes to the WAN interface are complete, click the Save/Reboot button. If you are setting up the WAN interface for the first time, click the Add button. D-Link DSL-2520U User Manual... - Page 24 Encapsulation Mode. Click the Next button to continue. For further information about each of the five connection types available on the Router, please go to the Quick Setup section earlier in this manual as all of the windows are identical. D-Link DSL-2520U User Manual...
-
Page 25: Lan
Setup window, click the LAN button in the Advanced Setup directory. This window allows you to set up a LAN interface including IP settings and DHCP server function. When you are finished, click either the Save or Save/Reboot button. D-Link DSL-2520U User Manual... -
Page 26: Quality Of Service
Click the Add button to add a QoS Queue Configuration table entry. This window allows you to configure a QoS queue entry and assign it a specific network interface. Click the Save/Apply button to save and activate the filter. D-Link DSL-2520U User Manual... -
Page 27: Qos Classification
Please remember that all of the specified conditions on this window must be met for the rule to take effect. Click the Save/Apply button to save and activate this rule. D-Link DSL-2520U User Manual... -
Page 28: Routing
Click the Add button on the Routing – Static Route window to access the following window displayed on the next page. Enter the static routing information for an entry to the routing table. Click the Save/Apply button when you are finished. D-Link DSL-2520U User Manual... -
Page 29: Dsl
To access the DSL Settings window, click the DSL Setup button in the Advanced Setup directory. This window allows you to select the desired modulation, phone line pair, and capability. Click the Save/Apply button when you are finished. Click the Advanced Settings button to select a DSL test mode. D-Link DSL-2520U User Manual... - Page 30 Select the desired DSL test mode and then click the Apply button. Click the Tone Selection button to modify the upstream and downstream tones. Select the appropriate upstream and downstream tones for your ADSL connection. Click the Apply button to let your settings take effect. D-Link DSL-2520U User Manual...
-
Page 31: Pptp
To access the PPTP Setting window, click the PPTP button in the Advanced Setup directory. To set up Point-to-Point Tunnel Protocol, tick the Enable check box, enter the appropriate information in the fields offered, and then click the Save/Apply button when you are finished. D-Link DSL-2520U User Manual... -
Page 32: Diagnostics
Section 3 – Configuration Diagnostics To access the Diagnostics window, click the Diagnostics button in the Diagnostics directory. This window is used to test connectivity of the Router. D-Link DSL-2520U User Manual... -
Page 33: Management
Backup window, click the Settings button in the Management directory. This window allows you to backup your DSL Router configurations. Click the Backup Settings button to save your Router configurations to a file on your computer. D-Link DSL-2520U User Manual... -
Page 34: System Log
System Log server. The available event severity levels are: Emergency, Alert, Critical, Error, Warning, Notice, Informational, and Debugging. This window allows you to log selected events. When you are finished, click the Save/Apply button. D-Link DSL-2520U User Manual... -
Page 35: Snmp Agent
Save/Apply button. Internet Time To access the Time settings window, click the Internet Time button in the Management directory. This window allows you to set the Router’s time configuration. When you are finished, click the Save/Apply button. D-Link DSL-2520U User Manual... -
Page 36: Access Control
Enable or disable the desired LAN services. When you are finished, click the Save/Apply button. Access Control – IP Address This window allows you to enable or disable Access Control Mode. To add an IP address management station, click the Add button. D-Link DSL-2520U User Manual... -
Page 37: Update Software
This window allows you to change the password on the Router. When you are finished, click the Save/Apply button. Update Software To access the Tools - Update Software window, click the Update Software button in the Management directory. This window allows you to update the Router’s software. D-Link DSL-2520U User Manual... -
Page 38: Save/Reboot
Section 3 – Configuration Save/Reboot To access this window, click the Save/Reboot button in the Management directory. To save your settings and reboot the system, click the Save/Reboot button. D-Link DSL-2520U User Manual... -
Page 39: Troubleshooting
Troubleshooting This chapter provides solutions to problems that might occur during the installation and operation of the DSL-2520U. Read the following descriptions if you are having problems. (The examples below are illustrated in Windows® XP. If you have a different operating system, the screenshots on your computer will look similar to the following examples.) - Page 40 There might be a potential security issue if you disable the setting of Firewall on your PC. Please remember to turn it back on once you have finished the whole installation procedure and can surf on Internet without any problem. D-Link DSL-2520U User Manual...
-
Page 41: Networking Basics
Check Your IP Address After you install your new D-Link adapter, by default, the TCP/IP settings should be set to obtain an IP address from a DHCP server (i.e. wireless router) automatically. To verify your IP address, please follow the steps below. -
Page 42: Statically Assign A Nip Address
Windows® 2000 - From the desktop, right-click on the My Network Places > Properties. Step 2 Right-click on the Local Area Connection which represents your D-Link network adapter and select Properties. Step 3 Highlight Internet Protocol (TCP/IP) and click on the Properties. -
Page 43: Technical Specifications
Technical Specifications ADSL Standards Data Transfer Rate • ANSI T1.413 Issue 2 • G.dmt full rate downstream: up to 8 Mbps / upstream: up to 1 • ITU G.992.1 (G.dmt) AnnexA Mbps • ITU G.992.2 (G.lite) Annex A • G.lite: ADSL downstream up to 1.5 Mbps / upstream up to 512 •...