Kenwood DNN990HD Quick Start Manual
Connected navigation system
Hide thumbs
Also See for DNN990HD:
- Quick use manual (1 page) ,
- Instruction manual (36 pages) ,
- Instruction manual (87 pages)
Table of Contents
Advertisement
Take the time to read through this instruction manual.
Familiarity with installation and operation procedures will help you obtain the best performance from your new
Navigation System.
For your records
Record the serial number, found on the back of the unit, in the spaces designated on the warranty card, and in the space
provided below. Refer to the model and serial numbers whenever you call upon your Kenwood dealer for information or
service on the product.
Model DNN990HD/ DNN770HD Serial number
US Residence Only
Register your Kenwood product at www.Kenwoodusa.com
© 2013 JVC KENWOOD Corporation
DNN990HD
DNN770HD
CONNECTED NAVIGATION SYSTEM
Quick Start Guide
NAVIGATION CONNECTÉ
Guide de démarrage rapide
SISTEMA DE NAVEGACIÓN CONECTADO
Guía de inicio rápido
Register Online
B59-2163-00/00 (K)
Advertisement
Chapters
Table of Contents

Related Manuals for Kenwood DNN990HD


Summary of Contents for Kenwood DNN990HD
-
Page 1: Quick Start Guide
Record the serial number, found on the back of the unit, in the spaces designated on the warranty card, and in the space provided below. Refer to the model and serial numbers whenever you call upon your Kenwood dealer for information or service on the product. -
Page 2: Table Of Contents
Front Panel _________________ 10 specifications and so forth. You can Common Operation _________________ 14 download the latest version of the Instruction Manual from http:// Login manual.kenwood.com/edition/ Operation on the Home Screen im365. How to Use the Navigation System NOTE Other Features _____________________ 19 • The panels shown in this guide are... -
Page 3: Precautions
• 8-cm (3 inch) discs cannot be used. • When you purchase optional accessories, check • Discs with coloring on the recording surface or with your Kenwood dealer to make sure that discs that are dirty cannot be used. they work with your model and in your area. -
Page 4: Cleaning The Unit
The unit returns to factory settings. After the system acquires satellites for the first time, it will acquire satellites quickly each time DNN990HD thereafter. About the front panel (DNN990HD) When removing the product from the box or... -
Page 5: Safety Precautions And Important Information
Kenwood Car Navigation System and follow the instructions in this manual. Neither Failure to avoid the following potentially Kenwood nor Garmin shall be liable for problems hazardous situations may result in injury or or accidents resulting from failure to observe the property damage. -
Page 6: Features Of Navigation Systems
Quick Start Guide eatures of Navigation systems By connecting this navigation system to Internet, you can use various services. Cooperation with Route Collector site • Destinations and routes specified on the PC can be input to this navigation system. • The routes you have traveled and the songs you have listened to can be logged. • By uploading music files to Dropbox and creating a play list on Route Collector site, you can listen to music anywhere through streaming without music files on this navigation system. -
Page 7: First Step
DNN990HD/ DNN770HD irst Step Touch the corresponding key and set the item. Power on the unit and perform some setup steps before using. DNN990HD Press the <8HOME> button. Language Setup Select the language used for the GUI and input HOME methods. - Page 8 Default is “American Collector site. English (en)”. 1) Touch [Create Account]. After setting, touch [Enter]. Angle (DNN990HD only) 2) Enter account information. Adjust the position of the monitor. Default is You cannot register an account “0”.
- Page 9 DNN990HD/ DNN770HD How to prepare the remote EXT SW (DNN990HD only) control Control the external devices. After setting, touch [ Insert two “AAA”/“R03”-size batteries Camera Set the parameters for the camera. with the poles aligned After setting, touch [ properly, following the illustration Demo mode inside the case.
-
Page 10: Basic Operations
Quick Start Guide asic Operations Functions of the Buttons on the Front Panel DNN990HD HOME How to insert an SD card 1) Press < > button for 1 second. Labelled The panel fully opens. side 2) Hold the SD card as the illustration in the right and insert it into the slot until it clicks. - Page 11 DNN990HD/ DNN770HD Number Name Motion fi (Reset) • If the unit or the connected unit fails to operate properly, the unit returns to initial settings when this button is pressed (Instruction Manual P.157). • If the SI function is turned on, this indicator flashes when the vehicle ignition is off (Instruction Manual P.130).
- Page 12 Quick Start Guide DNN770HD HOME How to insert a microSD card 1) Open the microSD card slot cover as the illustration in the right. 2) Hold the microSD card with the label facing up and the notched section right, and insert it into the slot until it clicks.
- Page 13 DNN990HD/ DNN770HD Number Name Motion Disc insert A slot to insert a disc media. slot 0 (Eject) • Ejects the disc. • Pressing for 1 second ejects the disc forcibly. fi (Reset) • If the unit or the connected unit fails to operate properly, the unit returns to initial settings when this button is pressed (Instruction Manual P.157).
-
Page 14: Common Operation
Quick Start Guide Common Operation General There are some functions which can (Mixed Media Search) be operated from most screens. Touch to display the Mixed Media Search screen. (Quick menu) Touch to display the quick menu. The content of the menu are as follows. : Touch to turn on or off the external device power supply. -
Page 15: Login
DNN990HD/ DNN770HD ogin Press the <HOME> button to turn the power on. Select the login user. Enter the password. (Password) Enter the registered password. If you selected Administrator or Guest, this screen is not displayed. [Auto Login?] Checking this checkbox allows you to log in to the system automatically from the next time. - Page 16 Quick Start Guide Allows you select a source. 3 Source launcher panel Allows you to select a network-related application. 4 Network contents panel Source launcher panel (Shortcut) You can register sources you use frequently so that you can start them quickly. (All source list) Displays all sources.
-
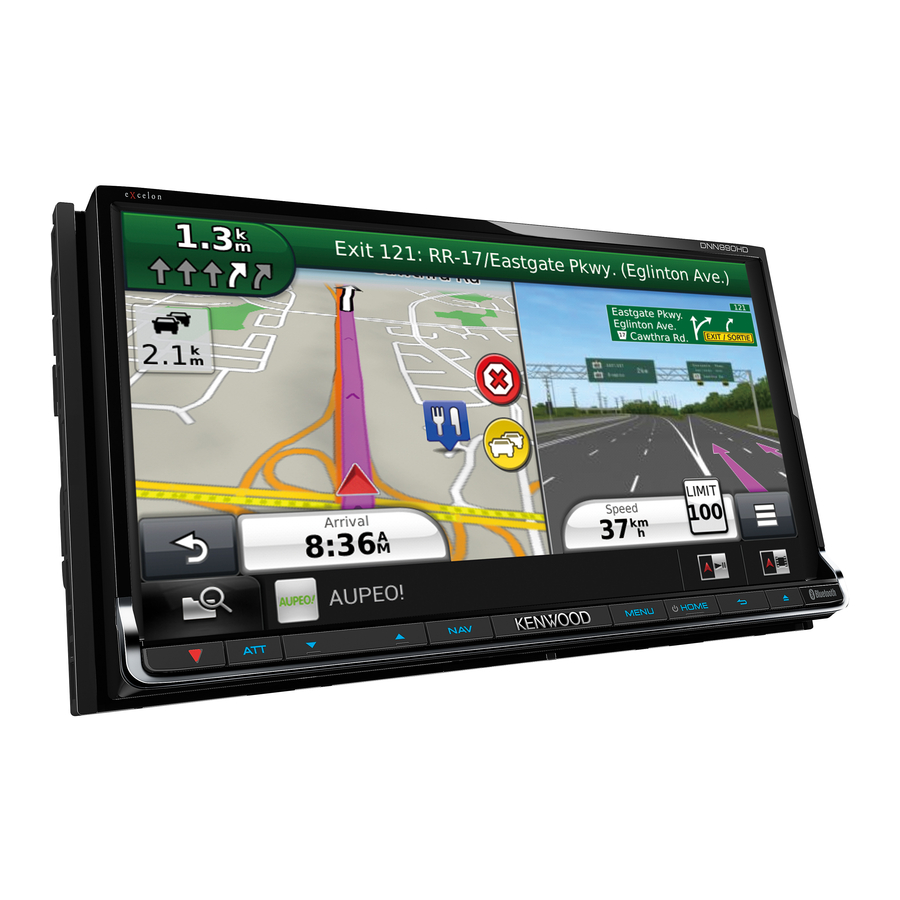
Page 17: How To Use The Navigation System
DNN990HD/ DNN770HD ow to Use the Navigation System ● DNN990HD ● DNN770HD 1) Press the <NAV> button to 1) Press the <HOME> button. display the navigation screen. 2) Select the Source launcher panel. 3) Touch [ NAV]. (or) Touch the information bar. - Page 18 Garmin and JVC KENWOOD will not be responsible for any traffic fines or citations that you may receive for failing to follow all applicable traffic laws and signs.
-
Page 19: Other Features
NOTICE • Traffic service is not available in some areas or countries. • Garmin and JVC KENWOOD are not responsible for the accuracy or timeliness of the traffic information. • Your navigation system can receive traffic information using the built-in traffic receiver or a subscription to INRIX Traffic Service. -
Page 20: How To Play Music
• For details on playable file format, media format, iPod model, etc., refer to the Instruction Manual. Connect the media you want to play as shown below. Disc DNN990HD 1) Press the <0> button to open the front panel. DNN990HD DNN770HD 2) Insert the disc into the slot. - Page 21 DNN990HD/ DNN770HD Control the music you are listening to on the source control screen. The following symbols indicate the keys on the screen. The functions of the keys are the same despite the difference of the source you are listening to.
-
Page 22: How To Play Movie
Quick Start Guide ow to Play Movie You can play DVD video, Video CD (VCD), movie files from disc media, iPod and USB storage device. NOTE • For details on playable file format, device format, etc., refer to the Instruction Manual. Connect the media you want to play. -
Page 23: How To Listen To The Hd Radio™ Tuner/ Siriusxm
DNN990HD/ DNN770HD ow to Listen to the HD Radio™ tuner/ SiriusXM Press the <HOME> button twice to the Source launcher panel. Touch [ ] in the Source launcher panel. Touch [HD Radio] or [SIRIUS XM]. The unit switches to the HD Radio tuner / SIRIUS XM Satellite Tuner source. -
Page 24: How To Make A Phone Call
Quick Start Guide ow to Make a Phone Call You can use your Bluetooth cell-phone when paired to this unit. Register your cell-phone to the unit. Follow as the procedures shown below. For detailed operation, see Registering the Bluetooth Unit (P.115) in the Instruction Manual. 1) Press and hold the <... - Page 25 DNN990HD/ DNN770HD Make or receive a phone call. See the table below for each operation method. Call by entering a phone number 1 Touch [ 2 Enter a phone number with number keys. 3 Touch [ Call using call records...
-
Page 26: Installation Procedure
Quick Start Guide • If the console has a lid, make sure to install nstallation Procedure the unit so that the faceplate will not hit the lid when closing and opening. • If the fuse blows, first make sure the wires aren’t touching to cause a short circuit, Before Installation then replace the old fuse with one with the same rating. - Page 27 DNN990HD/ DNN770HD Unit Installation Procedure 1 To prevent a short circuit, remove Supplied accessories the key from the ignition and disconnect the ¤ terminal of the First of all, make sure that all battery. accessories are supplied with the 2 Make the proper input and unit.
- Page 28 Quick Start Guide ● Toyota, Nissan or Mitsubishi car ● Toyota/Scion cars 1) Cut out accessory 4 as illustrated. 6 (M5x6mm) or 7 (M5x7mm) Car Bracket Cutting line 6 (M5x6mm) or 7 (M5x7mm) NOTE • Make sure that the unit is installed securely in place.
- Page 29 (accessory horizontally as possible to allow easy -) and the Push-To-Talk switch reception of the GPS satellite signals. (accessory =: DNN990HD only). To mount the GPS antenna inside 2) Clean the installation surface. your vehicle: 3) Install the microphone.
-
Page 30: Removing Procedure
Quick Start Guide Removing the unit NOTE • Install the microphone as far as possible 1) Remove the trim plate by from the cell-phone. referring to step 1 in “Removing the trim plate”. Removing Procedure 2) Insert the two extraction keys (accessory3) deeply into the slots Removing the trim plate on each side, as shown. -
Page 31: Connection
Purple/White (Reverse sensor wire) REVERSE Connect to vehicle’s reverse lamp harness when using the optional rear view camera. Blue/Red (DNN990HD only) RELAY To Relay Box If no connections are made, do not let the cable come out from the tab. - Page 32 Quick Start Guide Connecting wires to terminals (2) DNN990HD DNN770HD M4 x 8mmMAX M4 x 8mmMAX iPod/ iPod/ iDalalink I/F iDalalink I/F AV-IN/OUT AV-IN2 MIC AV-IN AV-IN2 VIDEO AV-OUT AV-OUT AUDIO AUDIO POWER POWER Accessory 1 Ignition key switch Red (Ignition wire) Speaker impedance: 4-8 Ω...
-
Page 33: System Connection
AV-OUT AUDIO AUDIO POWER POWER AV-OUT Output AV-OUT Output - Audio Output - Audio Output Accessory ~ (DNN990HD only) AV-OUT Output - Visual Output Rear View Camera Input AV-IN1 input AV-OUT Output - Yellow (Visual input) - Visual Output VIDEO... -
Page 34: Optional Accessory Connection
(iPod/ AV-IN2 switchable) iPod/ iPhone USB terminal (0.8m) USB device (commercially available) USB maximum power supply current : 5 V 500 mA DNN990HD DNN770HD M4 x 8mmMAX M4 x 8mmMAX iPod/ iPod/ iDalalink I/F iDalalink I/F AV-IN/OUT AV-IN2 MIC AV-IN AV-IN2... -
Page 35: About This Unit
Patents. HD Radio™ and the HD, HD Radio, and “Arc” Collector” User’s Agreement (“Agreement”) sets forth logos are proprietary trademarks of iBiquity Digital the terms and conditions for use of the KENWOOD Corp. Route Network Service “Route Collector” provided by JVCKENWOOD Corporation (“Service”) to the users who... - Page 36 Quick Start Guide 3. Disclaimer (9) Obstruction or acts that may likely constitute obstruction of the operation of the Service The User shall undertake use of the Service at its own individual responsibility, and accordingly we shall not (10) Acts that cause or that may likely cause trouble, assume any responsibility for usage of the Service by disadvantages or damages to us or third parties the User, including but not limited to the examples as...
- Page 37 DNN990HD/ DNN770HD ■ ■ Requirements iHeartRadio™: only use Information for issuing notices regarding completion of registration, maintenance of Service, Requirements for listening to iHeartRadio™ are as suspension of Service, and procedures for reissuance follows: of passwords. We shall not disclose Information for any • In the application on your device, log in and create a...
- Page 39 64/128 bit WEP /WPA & WPA2 Frequency Range: • This adapter has been designed exclusively for 2.401 GHz – 2.473 GHz use with Kenwood car receivers. Do not use this Transfer rates (MAX.): adapter with any other car receiver. 802.11n (150 Mbps) • The Wi-Fi CERTIFIED Logo is a certification mark 802.11g (54 Mbps) of the Wi-Fi Alliance.
- Page 40 Gama de frecuencias: • Este adaptador ha sido diseñado 2,401 GHz - 2,473 GHz exclusivamente para utilizarse en los receptores Tasas de transferencia (MÁX.): para automóvil de Kenwood. No lo utilice en 802.11n (150 Mbps) ningún otro receptor para automóvil. 802.11g (54 Mbps) • El logotipo Wi-Fi CERTIFIED es una marca de 802.11b (11 Mbps)
- Page 41 FCC WARNING This equipment may generate or use radio frequency energy. Changes or modifications to Les spécifications et le design sont sujets à this equipment may cause harmful interference changements sans notification. unless the modifications are expressly approved in the instruction manual. Laissez l'adaptateur Wi-Fi inséré...
- Page 42 IC (Industry Canada) Notice Note de ‘IC (Industrie Canada) This device complies with Industry Canada Le présent appareil est conforme aux CNR-210 licence-exempt RSS-210 standard(s). d’Industrie Canada applicables aux appareils radio Operation is subject to the following two exempts de licence. conditions: L’exploitation est autorisée aux deux conditions (1) This device may not cause interference, and...
- Page 43 Record the serial number, found on the back of the unit, in the spaces designated on the warranty card, and in the space provided below. Refer to the model and serial numbers whenever you call upon your Kenwood dealer for information or service on the product.
- Page 44 Basic Operations Bookmark _________________________ 95 AV Output Interface Setup ____________ 137 RSS Widget ________________________ 44 Functions of the Buttons External Device Control (DNN990HD) __ 137 Schedule Application ________________ 44 SiriusXM™ Satellite Radio on the Front Panel __________________ 10 Operation SNS Application ____________________ 46...
-
Page 45: Before Use
• When you purchase optional accessories, • Do not use disc type accessories. check with your Kenwood dealer to make • Clean from the center of the disc and move sure that they work with your model and in HOME outward. -
Page 46: How To Read This Manual
Return to the Top page Return to the Top page How To Read This Manual How To Read This Manual ñ ow to Read this Manual Link header Return to the Top page CD, Disc, iPod, USB device You can refer each section or top page with one-click. -
Page 47: Features Of Navigation Systems
Return to the Top page Return to the Top page Basic Operations Basic Operations ñ eatures of Navigation systems By connecting this navigation system to Internet, you can use various services. Cooperation with Route Collector site Use of internet service • Destinations and routes specified on the PC can be input to this navigation system. -
Page 48: Basic Operations
Buttons on the Front Panel • If the SI function is turned on, this indicator flashes when the vehicle ignition is off (P.130). DNN990HD • Switches attenuation of the volume on/off. • Pressing for 1 second stores the tag data of the current music from HD (P.94) - Page 49 Return to the Top page Return to the Top page Basic Operations Basic Operations DNN770HD Number Name Motion Disc insert A slot to insert a disc media. slot 0 (Eject) • Ejects the disc. • Pressing for 1 second ejects the disc forcibly. fi...
-
Page 50: Turning On The Navigation System
Navigation System Select the login user. The method for turning on the power varies between different models. When the owner has not been registered DNN990HD Press the <HOME> button. When the owner has been registered HOME The navigation system is turned on. -
Page 51: Initial Setup
Language setup (P.130). For details on operation, see Wi-Fi Setup (P.32). For details on operation, see Angle (DNN990HD only) Date Setup Adjust the position of the monitor. Default is “0”. Set the date and time. 1 Touch [SET]. 1 Touch [Date Setup]. - Page 52 4 Touch your desired color and [ For details on operation, see Panel color coordinate (P.133). EXT SW (DNN990HD only) Control the external devices. 1 Touch [SET]. 2 Set device name, output pattern, and pulse set for device. Then, touch [ EXT SW setup (P.131).
-
Page 53: How To Play Media
SD card DNN770HD ow to Play Media Press the <0> button. Open the microSD card slot cover DNN990HD as the illustration in the right. Music CD and disc media Press the <G> button for 1 second to open the front panel. -
Page 54: Operation On The Home Screen
Most functions can be operated on the Home screen. You can register sources and applications Press the <HOME> button. you use frequently so that you can start them quickly. DNN990HD (All source list/ All apps list) Displays all sources and applications. HOME DNN770HD... - Page 55 Return to the Top page Return to the Top page Basic Operations Basic Operations Moving or deleting of an icon on the Source launcher panel and Network Change the skin for home screen contents panel You can select a home screen skin from 3 types. Touch and hold the icon.
-
Page 56: Common Operation
Return to the Top page Return to the Top page Basic Operations Basic Operations ñ Flick scrolling ommon Operation You can scroll the list screen by flicking the screen up/down or right/left. Introduces the common operation. General There are some functions which can be operated from most screens. (Mixed Media Search) Touch to display the Mixed Media Search screen. -
Page 57: Navigation Operation
] or [ ] in the navigation screen. avigation Operation For details on the navigation function, please refer to the Navigation Instruction Manual. Display the navigation screen DNN990HD Press the <NAV> button. Touching this area displays the audio screen. HOME... -
Page 58: Oem Feature Operation
Return to the Top page Return to the Top page Basic Operations Basic Operations ñ EM Feature Operation : Displays information about the : Displays information about the air instruments such as a speedometer. conditioner of the vehicle. By connecting this navigation system to the bus system of the vehicle using an ADS (commercially available), this navigation system can access the satellite radio source provided for the vehicle and vehicle information can be displayed on this navigation system. -
Page 59: Wi-Fi Setup
Return to the Top page Return to the Top page Wi-Fi setup Wi-Fi setup ñ Register the Wi-Fi access point Confirm the MAC address i-Fi Setup manually Press the <MENU> button. Touch [ADD NETWORK]. Touch [Wi-Fi]. Touch [Advanced]. Wi-Fi Setup You can connect to a Wi-Fi access point to connect to Internet. -
Page 60: Clock And Date Setup
Return to the Top page Return to the Top page Clock and Date Setup Clock and Date Setup ñ Adjust the date and time manually. Touch [Select time zone]. lock and Date Setup Touch [Automatic date & time] to Select a time zone. remove the check Set each item as follows. -
Page 61: Account Setup
Return to the Top page Return to the Top page Account setup Account setup ñ Touch [Create Account]. ccount Setup Set Owner Account Ñ You can register an owner account for the Account registration About Account person who manages this system. procedure To use this unit, you must register an Preparation... -
Page 62: Set User Account
Return to the Top page Return to the Top page Account setup Account setup Set User Account Switch the User Login Delete User Account Reset Owner Account You can register a user account for the user You can switch to a different account from You can delete a previously registered user You can delete previously registered owner of this navigation system. -
Page 63: Widget And Application Operation
Return to the Top page Return to the Top page Widget and Application Operation Widget and Application Operation ñ Ñ Add a City Perform desired operation as follows. idget and Application Operation Adds a region to the City list. Ñ City select Touch [ Weather Widget... -
Page 64: Today Widget
Return to the Top page Return to the Top page Widget and Application Operation Widget and Application Operation Ñ Ñ Delete City Weather setup Today Widget SNS Widget You can delete a region from the City list. Performs setup when using Weather You can display the today’s schedule You can use Facebook, Twitter, Gmail, and Application. -
Page 65: Rss Widget
Return to the Top page Return to the Top page Widget and Application Operation Widget and Application Operation Touch [Next] thrice. Detailed schedule view. RSS Widget Schedule Application Ñ Displays the RSS news. You can edit schedules on the internet. Schedule Operation In addition, you can also synchronize the Press the <HOME>... -
Page 66: Sns Application
Return to the Top page Return to the Top page Widget and Application Operation Widget and Application Operation Ñ Add event Status bar Input the Email address/Phone and NOTE Password. Adds an event to the schedule. Drag the status bar downward. • You can register Email (IMAP). - Page 67 Return to the Top page Return to the Top page Widget and Application Operation Widget and Application Operation Ñ Add to post Detailed article or message view. Gmail Twitter Facebook Create an article to be posted to the SNS service of the selected category. Touch [ ] in the SNS application.
-
Page 68: Rss Application
Return to the Top page Return to the Top page Widget and Application Operation Widget and Application Operation Ñ Ñ Add RSS feed Delete RSS feed Detailed article view. RSS Application Add an RSS feed. Delete an RSS feed. Displays an RSS feed. Touch [ ] in the RSS application. -
Page 69: Now Playing Widget
Return to the Top page Return to the Top page Widget and Application Operation Widget and Application Operation Ñ Ñ Posting the information about Preset select Radio source such as HD Radio Now playing Widget Technology or SiriusXM the song you are listening to Touch illustrated area. -
Page 70: Network Media History Widget
Return to the Top page Return to the Top page Widget and Application Operation Widget and Application Operation Ñ Select the photo you want to Network Media History Widget Photo Frame Widget display. You can select a song from the history of the You can display the photos stored in the USB Touch [ songs played on YouTube, and listen to it... -
Page 71: Mixed Media Search
Ñ Plays screen Mixed Media Search You can search for a song in USB, SD, iPod, Kenwood Wireless Link, and Cloud Storage by entering an artist name or album name, and play the song irrespective of the media type. Touch [ Input the Artist or Album. -
Page 72: Dvd/Video Cd (Vcd) Operation
Return to the Top page Return to the Top page DVD, VCD DVD, VCD ñ 5 Sub function menu VD/Video CD (VCD) Operation The following functions can be performed by using keys in this area. • Repeats the current content: Touch [ ]. -
Page 73: Dvd Disc Menu Operation
Return to the Top page Return to the Top page DVD, VCD DVD, VCD Ñ Multi function menu Enters selected item DVD Disc Menu Operation Touch [Enter]. You can set up some items in the DVD-VIDEO Enables direct operation disc menu. Touch [Highlight] to enter the highlight control The functions of each key are as follows. -
Page 74: Zoom Control For Dvd And Vcd
Return to the Top page Return to the Top page DVD, VCD DVD, VCD Ñ DVD Play Mode Setting Set each item as follows. Switches zoom ratio Zoom Control for DVD and VCD Touch [Zoom]. You can select DVD play mode. You can enlarge Playback screen for DVD and For DVD, changes the zoom ratio at 4 levels;... - Page 75 Return to the Top page Return to the Top page DVD, VCD DVD, VCD Ñ Ñ Ñ Language setup Parental level Disc setup Parental Level* Parental level (P.65). This setting is for the language used in the Set a parental lock level to prohibit children Performs setup when using disc media.
-
Page 76: Cd/Audio And Visual Files/Ipod Operation
Return to the Top page Return to the Top page CD, Disc, iPod, USB device, SD card CD, Disc, iPod, USB device, SD card ñ 3 Multi function key D/Audio and Visual Files/iPod Operation Multi function menu (P.70). Touch to switch the multi function menu. For details on the menu, see 4 Multi function menu Music/Video Basic Operation Multi... - Page 77 Return to the Top page Return to the Top page CD, Disc, iPod, USB device, SD card CD, Disc, iPod, USB device, SD card Ñ USB device, SD card and iPod Video screen NOTE • The screen shot below is for USB device. It may be different from the one for iPod and SD card. Simple Control screen List Control screen 10 11...
- Page 78 Return to the Top page Return to the Top page CD, Disc, iPod, USB device, SD card CD, Disc, iPod, USB device, SD card Ñ Ñ Multi function menu Sub function menu Music CD Disc media Music CD Disc media iPod USB device and SD card iPod...
-
Page 79: Search Operation
Return to the Top page Return to the Top page CD, Disc, iPod, USB device, SD card CD, Disc, iPod, USB device, SD card Ñ Other search Category search (Only for iPod, USB Link search (Only for iPod, USB device, Search Operation device, and SD card) and SD card) - Page 80 Return to the Top page Return to the Top page CD, Disc, iPod, USB device, SD card CD, Disc, iPod, USB device, SD card Ñ Search from album artwork Touch [ D ] on the selected artwork. Folder search (Only for disc media, Touch the desired artwork in the favorite list.
-
Page 81: Movie Control
Return to the Top page Return to the Top page CD, Disc, iPod, USB device, SD card CD, Disc, iPod, USB device, SD card Movie Control Pandora® Operation You can adjust the movie playback. You can listen to the Pandora® on this navigation system by controlling the application installed in the iPhone, Android or BlackBerry. - Page 82 Return to the Top page Return to the Top page CD, Disc, iPod, USB device, SD card CD, Disc, iPod, USB device, SD card Ñ Ñ Ñ Multi function menu Sub function menu Station list screen NOTE You can perform the following functions • If you touch [ ] when no device has been from this screen.
-
Page 83: Usb/Sd/Ipod/Divx Setup
CD, Disc, iPod, USB device, SD card Ñ Ñ Ñ USB SD setup iPod setup DivX® VOD (DNN990HD) USB/SD/iPod/DivX Setup This feature is available only for Central and Set each item as follows. Set each item as follows. You can perform setup when using USB/SD/ South America sales area. -
Page 84: Cloud Storage Operation
Return to the Top page Return to the Top page Cloud Storage Cloud Storage ñ ñ loudñStorageñOperation #:##:## Category search For confirmation of play time. You can search music files by the following Status bar in center Starting procedure Music Basic Operation operations. -
Page 85: Kenwood Wireless Link Operation
• We confirmed normal operation using the following the server. Select the content to play. media servers (software): Server name: DNN990HD or DNN770HD. • Windows Media Player 12 Media Controller function Allows you to handle the content stored in another media server device via this unit and play them on another network media player (client device). -
Page 86: Media Controller Function
Touch the server name of the server to to this unit. For confirmation of current playing position. connect. This unit:DNN990HD or DNN770HD. You can drag the circle left or right to change Select a network media player to be the playing position. -
Page 87: Hd Radio™ Tuner Operation
Return to the Top page Return to the Top page HD Radio HD Radio ñ Radio™ tuner Operation HD Radio tuner Basic Operation Most functions can be controlled from the source control screen. About HD Radio™ Technology NOTE Switching the operation • Set the remote controller mode switch to AUD mode before starting operation, see mode (P.151). -
Page 88: Memory Operation
Return to the Top page Return to the Top page HD Radio HD Radio 6 Preset list Memory Operation Selecting Operation Displays the list of preset stations or channels and the information. Ñ Ñ 7 Sub function menu Auto memory Preset select The following functions can be performed by using keys in this area. -
Page 89: Traffic Information
Return to the Top page Return to the Top page HD Radio HD Radio Ñ Ñ Ñ Search by program type Direct search Category/Channel search Traffic Information You can tune to a station with a specific You can tune in by entering the desired You can specify the desired category and You can listen and watch the traffic program type when listening to FM. -
Page 90: Receive Mode
• Up to 100 bookmarks can be registered to this diagram for 1 second during listening unit. to the song from HD Radio station. DNN990HD NOTE • If you select [Auto], tunes to analog broadcast HOME automatically when there is no digital broadcast. - Page 91 Return to the Top page Return to the Top page HD Radio HD Radio Ñ Ñ Bookmark list Bookmark delete Touch [ Deletes all the selected bookmark(s) Displaying a list of registered bookmarks Deleting a bookmark. and detailed information and QR code of the Touch [ ] in the control screen.
-
Page 92: Siriusxm™ Satellite Radio Operation
Return to the Top page Return to the Top page SiriusXM SiriusXM ñ 4 Preset key/Multi function menu iriusXM™ Satellite Radio Operation Recalls the memorized channel. When touched for 2 seconds, the current channel being received is stored to the memory. SiriusXM™... -
Page 93: Memory Operation
Return to the Top page Return to the Top page SiriusXM SiriusXM Ñ Multi function menu Selecting from the preset list Memory Operation Touch illustrated area. Ñ Manual memory The functions of each key are as follows. You can store the current receiving station or [P1] - [P6] channel in memory. -
Page 94: Itunes Tagging
[Enter]. Press the button instructed in each diagram for 1 second during listening to the song from SiriusXM station. The previously used category or channel DNN990HD list appears. Select the desired content from the list. NOTE • All the channels in the selected category appear. -
Page 95: Song, Artist And Game Alerts
Return to the Top page Return to the Top page SiriusXM SiriusXM Ñ Checking the memory usage Song, Artist and Game Alerts SiriusXM Replay™ Touch [ ] to display a program list. Touch illustrated area. When a broadcast program related to the You can replay up to the last 60 minutes registered artist, song, team or city starts, a broadcasting of current channel... -
Page 96: Siriusxm Setup
Return to the Top page Return to the Top page SiriusXM SiriusXM Ñ Ñ Parental code Parental lock Touch each channel list and set on or SiriusXM Setup off. You can set a SiriusXM parental code. You can select the channels to enable SiriusXM Parental Lock function. - Page 97 Return to the Top page Return to the Top page SiriusXM SiriusXM Ñ Ñ Ñ Ñ Skip channel select Content alerts setup City select for Content alerts Tune Start™ setup You can set the undesired channels to skip. You can turn on or off the Content alerts You can select a city for which traffic Touch [ON] or [OFF] of [Tune Start] in function.
-
Page 98: Streaming Service Application
Return to the Top page Return to the Top page Streaming Service Application Streaming Service Application ñ Ñ Ñ Keyword Search My YouTube treaming Service Application By logging into YouTube, you can use My Touch [Keyword Search]. Ñ Favorites and My-Videos. Video screen Streaming Video Application Perform desired operation as follows. -
Page 99: Aupeo! Application
Return to the Top page Return to the Top page Streaming Service Application Streaming Service Application Ñ Ñ Ñ Log in Play screen Editing Favorites AUPEO! Application By registering an account, you can listen to You can edit the titles registered in Loves and You can listen to music on the online radio your favorite songs. -
Page 100: Bluetooth Control
Press and hold the < 6 > button. This navigation system conforms to the internet radio or Bluetooth Audio. following Bluetooth specifications: DNN990HD • This navigation system is compatible with the Apple Easy Pairing function. When an iPod Version touch or iPhone is connected to this navigation system using Dock Connector to USB Cable, Bluetooth Ver4.0 Certified... -
Page 101: Playing Bluetooth Audio Device
Return to the Top page Return to the Top page Bluetooth Operation Bluetooth Operation Ñ Connecting the Bluetooth unit Playing Bluetooth Audio Device Touch the name of device to connect. Ñ Bluetooth basic operation Profile select screen appears. NOTE Simple Control screen List Control screen • If the icon of selected Bluetooth unit is lit, it indicates that the navigation system will use that... -
Page 102: Using Hands-Free Feature
Using Hands-Free Feature character. Press and hold the < 6 > button. You can make or answer a call with Hand- Free by connecting a smartphone/cell-phone DNN990HD with built-in Bluetooth connected to this navigation system. Ñ Downloading the phonebook HOME... - Page 103 Voice Recognition screen appears. Adjust the receiver volume Touch [ ] again. Pronounce a name. DNN990HD Each time you touch [ ], the caller is Press the <S> or <R> button. switched. To terminate the first call Touch [ The caller switches to the second caller.
-
Page 104: Hands-Free Setup
Return to the Top page Return to the Top page Bluetooth Operation Bluetooth Operation Set each item as follows. Call Beep Hands-Free Setup Select whether or not to beep upon receiving You can perform various setup about hands- a call. free function. -
Page 105: Sms (Short Message Service)
Return to the Top page Return to the Top page Bluetooth Operation Bluetooth Operation Ñ Ñ Creating an SMS (Short Using templates [Template] SMS (Short Message Service) Message Service) Displays the template list. You can create a message easily by selecting You can send or receive a short message the desired sentence from the template list. -
Page 106: Voice Control (Dnn990Hd)
Return to the Top page Return to the Top page Voice Control Camera Control ñ ñ oice Control (DNN990HD) amera Control (DNN990HD) The navigation system is equipped with When a CMOS-310/CMOS-300 (optional Speak the command. (Ex: Speak “HD Switching the View Camera... -
Page 107: Setting Up
Return to the Top page Return to the Top page Setting Up Setting Up ñ Beep etting Up System Setup Turns the key touch tone on or off. Default is “ON”. Bright / Tint / Color / Contrast / Black / Monitor Screen Setup NOTE Remote Sensor... - Page 108 Return to the Top page Return to the Top page Setting Up Setting Up Ñ Ñ EXT SW setup (DNN990HD) Setup memory Language setup Navigation Language Select: Select the language used for navigation. Set up the external switch power mode.
-
Page 109: Display Setup
• You can touch [SET] or [Initialize] when scan through the color spectrum. Monitor angle control [Panel Color Scan] is set to off. (DNN990HD) Touch [ON] of [Panel Color Scan] in • Touch [Initialize] to reset the settings to the the Color screen. -
Page 110: Navigation Setup
*2 This setting becomes settable only when the parking brake is on and the CMOS- 310/CMOS-300 series is selected. *3 This setting becomes settable only when the parking brake is on and “Front Camera” is set to [ON]. *4 DNN990HD only. -
Page 111: Software Information
Software Information AV Input Setup External Device Control source and also the iPod is disconnected. (DNN990HD) *2 [AV-IN2 Name] becomes settable when Check the software version of this unit. You can set AV input parameters. “AV-IN2” is selected in [iPod AV Interface Control the external device power supply. -
Page 112: Controlling Audio
Audio Select if you are using a subwoofer. You can select a speaker type and its size to get the best sound effects. Tweeter (DNN990HD) Setting Audio NOTE When the speaker type and size are set, You can set the tweeter when you are the speaker crossover network is set • Each operation in this section can be started from... - Page 113 Return to the Top page Audio Setting Up Audio Setting Up Ñ Ñ Car type setup (DNN990HD) DSP select (DNN990HD) Crossover network setup Speaker location setup You can set a crossover frequency of You can setup the car type and speaker...
-
Page 114: Controlling General Audio
“None”. Adjust the subwoofer volume. This setting is Speaker setup (P.139). not available when subwoofer is set to “None”. Speaker setup (P.139). Bass Boost (DNN990HD) Set the amount of bass boost among “OFF”/ “Level1”/ “Level2”/ “Level3”. -
Page 115: Sound Effect (Dnn990Hd)
Audio Setting Up Ñ Ñ DNN770HD operation Space Enhancer Controlling equalizer manually Sound Effect (DNN990HD) Touch [Tone] in the Equalizer screen. Controlling EQ curves Touch [Space Enhancer] in the Sound You can set sound effects. Effect screen. Set each item as follows. -
Page 116: Zone Control
Return to the Top page Return to the Top page Audio Setting Up Audio Setting Up Ñ Ñ Highway sound setting Realizer and Supreme Zone Control NOTE You can boost a certain range of sound that You can restore the sound lost due to audio • When the rear speaker sound is switched, the You can select different sources for both becomes hard to hear due to road noise. -
Page 117: Listening Position (Dnn990Hd)
Position DTA Control Listening Position NOTE You can fine-adjust your listening position. (DNN990HD) • Make fine adjustment of the delay time of the speaker output specified here to have a more In Position screen, touch [Adjust]. suitable environment for your vehicle. -
Page 118: Remote Control
Return to the Top page Return to the Top page Remote Control Operation Remote Control Operation ñ emote Control Functions of the Remote Control Buttons Ñ Ñ Switching the operation mode Direct search mode This navigation system can be operated using the remote controller. The functions operated from the remote Using the remote controller, you can jump #CAUTION... - Page 119 Return to the Top page Return to the Top page Remote Control Operation Remote Control Operation Location of the mode Function Name switch ROUTE M Screen mode changes each time you press this key during video playback. Returns to the DVD top menu. Displays Route Option menu.
-
Page 120: Troubleshooting
(P.141). “Bypass”. Mecha Error The disc player is malfunctioning. Eject the disc and try inserting it again. Contact the Kenwood dealer if this indicator continues Ñ blinking or the disc cannot be ejected. About audio operations Disc Error An unplayable disc is inserted. -
Page 121: Resetting The Navigation System
Owner or User account and then use the Storage application. HOME Your Dropbox Dropbox account information is not Log in Route Collector site and register the and Kenwood registered to the logged in Owner Dropbox account NOTE accounts are or User account. -
Page 122: Appendix
Playable Media and Files • DivX (.divx, .div, .avi) does not conform to the CD standard, playback may be *Only for DVD of DNN990HD impossible. You can play various kinds of media and files on this navigation system. • H.264/MPEG-4 AVC (.mp4, .m4v) (A “DualDisc”... -
Page 123: Status Bar Indicator Items
• When the iPod is connected to this unit, The repeat function is on. The VCD version is 2. “KENWOOD” or “ä” is displayed on the iPod to indicate that you cannot operate the iPod. C-REP The repeat function is on. -
Page 124: Region Codes In The World
Return to the Top page Return to the Top page Appendix Appendix öUSB SD öHD Radio reception Region Codes in the World FO-REP AUTO1 The DVD players are given a region code according to the country or area it is marketed, as The folder repeat function is on. -
Page 125: Dvd Language Codes
Code Language Code Language Code Language S/N Ratio (dB) Afar Interlingua Kirundi Picture Size DNN990HD: 100 dB (DVD-Video 96 kHz) Abkhazian Interlingue Romanian DNN770HD: 98 dB (DVD-Video 96 kHz) DNN990HD : 6.95 inches (diagonal) wide Afrikaans Inupiak Russian Dynamic Range : 156.6 mm (W) x 81.6 mm (H) - Page 126 : 16 – 18dBm (CCK), 13 – 15dBm (OFDM) Preout Level (V) : 20 Hz – 20 kHz : -50 – +10 dB DNN990HD: 5 V/ 10 kΩ S/N Ratio (dB) öBluetooth section DNN770HD: 2 V/ 10 kΩ : 75 dB (STEREO)
-
Page 127: Trademarks
: High-sensitivity GPS receiver the Bluetooth SIG, Inc. and any use of such marks Reception Frequency by JVC KENWOOD Corporation is under license. • Twitter is a registered trademark of Twitter, Inc. : 1575.42 MHz (C/A code) Other trademarks and trade names are those of their • Manufactured under license under U.S. -
Page 128: Safety Precaution
• In the application on your device, log in and create a relating to laser product safety. in a safe place. free account with iHeartRadio. • Internet connection by 3G, LTE, EDGE, or WiFi. JVC KENWOOD Corporation Note 2967-3, ISHIKAWA-MACHI, • Because iHeartRadio™ is a third-party service, HACHIOJI-SHI, TOKYO, JAPAN the specifications are subject to change without prior notice. - Page 130 CONNECTED NAVIGATION SYSTEM DNN990HD DNN770HD GPS NAVIGATION INSTRUCTION MANUAL © IM365_Nav_K_En_00...
- Page 131 Contents Navigation End-User License Agreements Starting a Route Previewing Multiple Routes Following a Route Getting Started Using the Navigation Map Using the Navigation System Using Multi-touch Controls Help When You Need It Adding a Point to a Route Searching Help Topics Taking a Detour Status Bar Icons Stopping the Route...
- Page 132 Using the Apps Customizing the Settings About the Apps Customizing the Navigation System About ecoRoute Changing the Map Settings Creating a Vehicle Profile Enabling Maps Resetting Your Vehicle Profile Changing the Navigation Settings Calibrating Fuel Economy Adjusting the Display Settings Taking the ecoChallenge Route Preferences About ecoChallenge Scores...
-
Page 133: End-User License Agreements
End-User License Agreements Software License Agreement suppliers) and affiliated companies on the other hand. BY USING THE DNN990HD / DNN770HD, YOU AGREE TO BE BOUND BY THE TERMS AND IMPORTANT: CAREFULLY READ THIS LICENSE CONDITIONS OF THE FOLLOWING SOFTWARE BEFORE USING THIS PRODUCT. INSTALLING, LICENSE AGREEMENT. - Page 134 HAVE BEEN ADVISED OF THE POSSIBILITY OF addition, you are prohibited from renting or leasing SUCH DAMAGES. GARMIN’S AND ITS LICENSORS’ the Data or the Garmin products containing the Data to any other person or third party. Only those TOTAL AGGREGATE LIABILITY WITH RESPECT TO ITS OBLIGATIONS UNDER THIS AGREEMENT rental car companies that are specifically authorized by Garmin in writing to rent Garmin products...
- Page 135 End-User License Agreements Her Majesty and Canada Post, shall not be liable in as (i) if applicable, your subscription term is either respect of any claim, demand or action, irrespective terminated (by you or by Garmin) or expires, or of the nature of the cause of the claim, demand (ii) Garmin terminates this Agreement for any or action alleging any loss, injury or damages, reason, including, but not limited to, if Garmin...
- Page 136 and all disputes, claims and actions arising from or in connection with the Data provided to you hereunder. Government End Users. If End User is an agency, department, or other entity of the United States Government, or funded in whole or in part by the U.S.
- Page 137 End-User License Agreements accuracy, exhaustiveness, and completeness of NAVTEQ Traffic™ End User License the Traffic Data, which may contain inaccuracies Agreement and/or errors from time to time. To the maximum extent permitted by applicable law, any and all Your Garmin product may be equipped to receive warranties of any kind whatsoever with regard to traffic data.
- Page 138 or applying rights similar to those customarily claimed by the United States government, this Data is a “commercial item” as that term is defined at 48 C.F.R. (“FAR”) 2.101, is licensed in accordance with this Agreement, and the Traffic Data delivered or otherwise furnished shall be marked and embedded as appropriate with the following “Notice of Use, ”...
-
Page 139: Getting Started
Getting Started The first time you use your Kenwood Navigation System, you need to set up your system. The Help menu provides additional information. Help When You Need It WARNING See "Safety Precautions and Important Information" Select Apps > Help to view information in the Quick Start Guide for product warnings and about using the device. -
Page 140: Satellite Signals
Adding a Shortcut Satellite Signals You can add shortcuts to the Where To? menu. A After your vehicle is turned on, the navigation shortcut can point to a location, a category, or a system begins acquiring satellite signals. The search tool. The Where To? menu can contain up to system may need a clear view of the sky to acquire 36 shortcut icons. -
Page 141: Finding Locations
Finding Locations The navigation system offers many methods for finding locations. The detailed maps loaded in your navigation system contain locations, such as restaurants, hotels, and auto services. You can use categories to browse for nearby businesses and attractions. Finding a Location by Category Enter a search term. -
Page 142: Finding Fuel Stations And Prices
Finding Fuel Stations and Prices Finding a City Before you can use this feature, you must Before you can find a city, you must add a subscribe to the Fuel Price service, and your shortcut to the cities search tool (page 11). -
Page 143: Finding A Location Using Coordinates
Finding Locations Finding a Location Using Coordinates Select an option: Before you can find a location using coordinates, • Select a location marker. you must add a shortcut to the coordinates • Select a point, such as a street, intersection, or search tool (page 11). address location. You can find a location using latitude and If necessary, select the location description longitude coordinates. -
Page 144: Going Home
Going Home Select an area on the map. Select Where To? > Go Home. The address of the location appears at the bottom of the screen. Editing Your Home Location Information Select the location description. Select Where To? > Saved > Home. Select Set Location. Select > > Edit. Saving a Location Enter your changes. -
Page 145: Starting A Route To A Saved Location
Finding Locations Starting a Route to a Saved Location Assigning Categories to a Saved Location You can add custom categories to organize your Select Where To? > Saved. saved locations. ⁄ If necessary, select a category, or select All Saved Places. •... -
Page 146: Voice Command
Voice Command Voice Command allows you to use your device by saying words and commands. The Voice Command menu provides voice prompts and a list of available commands (DNN990HD). Listen for the voice prompt, and speak the ⁄ name of the location. -
Page 147: Navigation
Navigation You can create, customize, and edit your routes. Starting a Route Using the Navigation Map Search for a location (page 12). From the main menu, select View Map. Select a location. If the zoom controls are hidden, select the map to display the zoom controls. -
Page 148: Adding A Point To A Route
Select Where To?. safe driving judgment at all times. Garmin and JVC KENWOOD will not be responsible for any Search for the location (page traffic fines or citations that you may receive for failing to follow all applicable traffic laws and signs Select Go!. -
Page 149: Finding Exit Services
Navigation Finding Exit Services Adding a Custom Avoidance Area Custom avoidances allow you to avoid specific From the map, select > Exit Services. areas and sections of road. You can enable and disable custom avoidances as needed. Use the arrows to select an upcoming exit. Select Settings >... -
Page 150: Deleting Custom Avoidances
Deleting Custom Avoidances Navigating Off Road If you are not following roadways as you navigate, Select Settings > Navigation > Custom you can use Off Road mode. Avoidances. Select Settings > Navigation. Select an option: Select Calculation Mode > Off Road > Save. • To delete all custom avoidances, select • To delete one custom avoidance, select the The route will be calculated as a straight... -
Page 151: The Map Pages
The Map Pages You can customize which data appear on the map and view upcoming turns and current location information. Customizing the Map Layers Changing the Map Perspective You can customize which data appear on the Select Settings > Map & Vehicle > Driving map, such as icons for points of interest and road Map View. -
Page 152: Viewing A List Of Turns
Viewing a List of Turns Viewing Junctions When you are navigating a route, you can view all While navigating a route, you can view the of the turns and maneuvers for your entire route junctions on major roadways. When you approach and the distance between turns. -
Page 153: Resetting Trip Information
The Map Pages Resetting Trip Information From the map, select > Trip Computer. Select > Reset All. Select an option: • When not navigating a route, select Select All to reset every data field, except the speedometer, on the page. • Select Reset Trip Data to reset the information on the trip computer. • Select Reset Max. Speed to reset the maximum speed. • Select Reset Trip B to reset the odometer. Viewing Current Location Information You can use the Where Am I? page to view information about your current location. -
Page 154: Using The Apps
Traffic, Fuel Prices, Dynamic Parking, Real-Time Select Reset. Traffic Camera, Movie Times and more. The coverage of these services depends on availability in your region. For details, see other Kenwood Calibrating Fuel Economy system manuals. Use this feature when you refuel to maintain an accurate fuel economy. - Page 155 Using the Apps Viewing Your Fuel Economy ⁄ • To view detailed ecoChallenge scores, select the icon. Select Apps > ecoRoute™ > Fuel Economy. The leaf color on the driving challenge icon changes depending on your performance in the challenge. The graph along the bottom shows your average fuel economy for a period of About ecoChallenge Scores...
- Page 156 Exporting a Mileage Report Editing a Trip Itinerary Connect a USB mass storage device to your Select Apps > Trip Planner. Kenwood unit. Select a saved trip. Select Apps > ecoRoute > Mileage Report. Select an option: Select Export to export and save the •...
- Page 157 Using the Apps Importing Routes Using Dynamic Parking Trip Planner and the KENWOOD Route Collector Before you can use this feature, you must site can share information for up to 10 routes. You subscribe to the Dynamic Parking service, and...
- Page 158 Traffic information is not available on all models or in all areas. Traffic Data Using INRIX Traffic Service NOTICE Garmin and JVC KENWOOD is not responsible for You can purchase a traffic subscription to receive the accuracy or timeliness of the traffic information.
- Page 159 Traffic Information Traffic on Your Route Viewing Traffic on the Map When calculating your route, the navigation The traffic map shows color-coded traffic flow system examines the current traffic and and delays on nearby roads. automatically optimizes the route for the shortest From the map, select time.
-
Page 160: Customizing The Settings
Customizing the Settings You can customize the settings of your GPS navigation system. Customizing the Navigation System Changing the Navigation Settings Select Settings. Select Settings > Navigation. • Calculation Mode—sets route preference. Select a setting category. • Avoidances—sets road features to avoid on a route. •... - Page 161 Customizing the Settings Updating the Time Settings Restoring Settings You can restore a category of settings or all Select Settings > Units & Time. settings to the factory default values. • Current Time—select Automatic to update the time Select Settings. automatically.
- Page 162 Safety Cameras To update the navigation system software, you WARNING must have a USB mass storage device and an Garmin and JVC KENWOOD are not responsible for Internet connection. the accuracy of, or the consequences of using, a safety camera database.
- Page 163 WARNING Garmin and JVC KENWOOD are not responsible for the consequences of using custom POI databases, or for the accuracy of custom POI databases. After downloading your POI database, use the Garmin POI Loader to install the POIs onto a USB mass storage device.
- Page 165 For the latest free software updates (excluding map data) throughout the life of your Garmin products, visit the Garmin Web site at www.garmin.com/Kenwood. © 2012 Garmin Ltd. or its subsidiaries Garmin International, Inc. 1200 East 151st Street, Olathe, Kansas 66062, USA Garmin (Europe) Ltd.
- Page 166 CONNECTED NAVIGATION SYSTEM DNN990HD DNN9230DAB Voice Command Table 13DNN_IM365_VoiceCommand_en_01 (K/E) © 2013 JVC KENWOOD Corporation General opreration Displaying Voice Commands The available voice commands depend on each screen and you can Voice Command Screen Operation find them by pressing and holding the Push-To Talk switch.
- Page 167 KENWOOD Ver.1.0 W01 -2055-05...
- Page 168 Software License Agreement The software embedded in the Product (hereinafter the "Licensed Software") provided by JVC KENWOOD Corporation (hereinafter the "Licensor") is copyrighted to or 1. When the User transfers the Product, it may also transfer sublicensable by the Licensor, and this Agreement provides...
- Page 172 WOOD ELECTR ONICS CANADA INC. (ci·apr!s ppel!e Cette garantie represente l'enti!re garantie donr100 ecrit par BRASIL JVC KENWOOD DO BRASIL COMERCIO DE ELETRONICOS LTDA courant, tes manques de so d'entretiens p~riodiques, "KENWOOD"), donne par ecrilla garanlie vente cheteur...