Table of Contents
Advertisement
Operating and installation instructions
Frost free freezer
with wine conditioning unit,
ice cube maker
and Dynamic cooling
KWTN 14826 SDE ed
en - AU, GB, HK, NZ
To avoid the risk of accidents or
damage to the appliance, it is
essential to read these instructions
before it is installed and used for the
first time.
M.-Nr. 07 808 300
Advertisement
Table of Contents

Related Manuals for Miele KWTN 14826 SDE ed


Summary of Contents for Miele KWTN 14826 SDE ed
-
Page 1: Ice Cube Maker
Frost free freezer with wine conditioning unit, ice cube maker and Dynamic cooling KWTN 14826 SDE ed en - AU, GB, HK, NZ To avoid the risk of accidents or damage to the appliance, it is essential to read these instructions before it is installed and used for the first time. -
Page 2: Table Of Contents
Contents Guide to the appliance ..........5 Caring for the environment . - Page 3 Contents Storing frozen food ..........29 Home freezing .
- Page 4 Contents Ventilation............55 Installation .
-
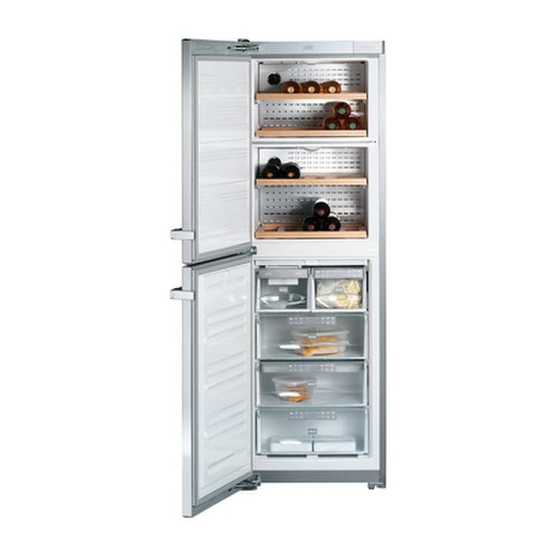
Page 5: Guide To The Appliance
Guide to the appliance On/Off sensor for the whole Sensor for switching between the appliance and On/Off sensor for wine conditioning zones and the switching the wine conditioning freezer section zones on and off separately (top and middle = "Wine conditioning"... - Page 6 Guide to the appliance Wooden shelves with shelf edge trim for descriptive labels Active charcoal filter Isolator plate for thermal separation of the wine conditioning zones Condensate channel and drain hole (behind the metal covers) Ice cube drawer with automatic ice cube maker Freezer drawers with freezer calendar...
-
Page 7: Caring For The Environment
Caring for the environment Disposal of the packing Disposal of your old appliance material Electrical and electronic appliances often contain materials which, if The transport and protective packing handled or disposed of incorrectly, has been selected from materials which could be potentially hazardous to are environmentally friendly for human health and to the environment. -
Page 8: Warning And Safety Instructions
Warning and Safety instructions Correct application This appliance complies with all This appliance is intended for relevant local and national safety domestic use only for storing wine as requirements. Improper use can, well as for storing deep frozen food, however, present a risk of both freezing fresh food and for preparing personal injury and material ice. -
Page 9: Technical Safety
Warning and Safety instructions Technical safety - air the room in which the appliance is located for several minutes and Before setting up the appliance, - contact the Service Department for check it for any externally visible advice. damage. Do not install and use a damaged appliance. - Page 10 Faulty components must only be replaced by genuine Miele original national and local safety regulations. Repairs and other work by unqualified spare parts. The manufacturer can only persons could be dangerous. The...
- Page 11 Warning and Safety instructions Before making plumbing Do not operate any electrical connections, ensure the appliance is equipment (e.g. an electric ice-cream disconnected from the mains electricity maker) inside the appliance. Danger of supply. sparking and explosion. In countries where there are areas Do not store cans or bottles which may be subject to infestation by containing carbonated drinks or liquids...
-
Page 12: Disposal Of Your Old Appliance
Warning and Safety instructions Disposal of your old appliance Do not use defrosting sprays or de-icers, as they might contain Before disposing of an old substances which could damage the appliance, first make the door latch or plastic parts or which could cause a lock unusable. -
Page 13: How To Save Energy
How to save energy Normal energy Increased energy consumption consumption Installation site In a ventilated room. In an enclosed, unventilated room. Protected from direct sunlight. In direct sunlight. Not situated near to a heat source Situated near to a heat source (radiator, oven). -
Page 14: Switching On And Off
^ Touch the On/Off sensor until the a suitable stainless steel conditioning temperature display lights up. agent (available from The temperature displays for the wine www.miele-shop.com). conditioning zones show the current temperatures in the different zones. Important: Stainless steel conditioner gives long lasting... -
Page 15: Switching Off
Switching on and off Switching off You switch between the wine ^ Touch the On/Off sensor until all of conditioning zones and the freezer the indicators go out. (If this does not section with this sensor. happen, the safety lock is still If you want to select the freezer section activated). -
Page 16: Settings Mode
Switching on and off Settings mode Certain settings on the appliance can only be selected in the settings mode. ^ Touch the On/Off sensor until the How to select the settings mode and how to change the settings is "Wine conditioning" symbol goes out. described in the relevant section of The interior light will not come on when these instructions. -
Page 17: Switching The Sensor Tones On/Off
Switching on and off Switching the sensor tones on/off Activating or deactivating the safety lock The sensor tone which sounds each time a sensor is touched can be The safety lock can be activated to deactivated. prevent the appliance being switched off inadvertently. -
Page 18: Switching Off For Longer Periods Of Time
Switching on and off ^ Touch the On/Off sensor to confirm a new setting. ^ Touch the X sensor repeatedly until c appears in the display. ^ Touch the On/Off sensor. You have now left the settings mode. The safety lock indicator will light up in the temperature display when the safety lock has been activated. -
Page 19: The Correct Temperature
The correct temperature . . . in the wine conditioning Isolator plate for thermal separation zones The appliance has a fixed isolator plate which divides the top cabinet into two Wine keeps on maturing depending on different temperature zones. You can the surrounding conditions. -
Page 20: In The Freezer Section
The correct temperature . . . in the freezer section Setting the temperature To freeze fresh food and to store frozen food for a long time, a temperature of -18 °C is required. At this temperature the growth of micro-organisms is generally halted. -
Page 21: Temperature Range
The correct temperature Temperature display – Leaving a finger on the sensor: changes the temperature During normal operation the continuously. temperature display on the control When the highest or lowest panel shows the temperature in the temperature in the range is reached, middle of the wine conditioning zones the X or Y sensor disappears. - Page 22 The correct temperature The old setting lights up, and your newly selected setting flashes. ^ Touch the On/Off sensor to confirm a new setting. ^ Touch the X sensor repeatedly until c appears in the display. ^ Touch the On/Off sensor. You have now left the settings mode.
-
Page 23: Alarm
Alarm Switching the temperature Your appliance has been fitted with a warning system to protect your stored alarm off early wine and frozen food from an If the noise disturbs you, you can unsuitable temperature and also to switch the alarm off early if you wish. avoid energy being wasted if a door is left open. -
Page 24: Door Alarm
Alarm Door alarm The alarm will sound if a door is left open for more than 2 minutes. The alarm off sensor will light up red and the symbol for the section or zones with the opened door will flash. The alarm will stop and the indicators will go out as soon as the door is closed. -
Page 25: Using Dynamic Cooling
Using Dynamic cooling Humidity in the wine Constant humidity (Dynamic cooling) sensor m conditioning zones Dynamic cooling raises the relative It is very important to store wine in an humidity inside the wine conditioning atmosphere with a high humidity level zones which prevents corks from drying (60 - 70%) so that the corks remain out. - Page 26 Using Dynamic cooling To save energy, the fan for Dynamic cooling switches off whilst the door is open. Switching off Dynamic cooling ^ Select the relevant wine conditioning zone. The corresponding "Wine conditioning" symbol will light up yellow. ^ Touch the Constant humidity (Dynamic cooling) sensor.
-
Page 27: Using Super Freeze
Using Super freeze Switch the Super freeze function on Switching off Super freeze before putting fresh food into the Depending on the amount of food freezer section. placed in the freezer section, the Super This helps food to freeze quickly and freeze function will switch off retain its nutrients, vitamins, flavours automatically after approx. -
Page 28: Storing Wine Bottles
As far as possible, store bottles of the Additional labels can be purchased same type of wine beside each other from your Miele Dealer or the Miele on the same shelf. Removing a bottle of Spare Parts Department. one type will then leave the other types... -
Page 29: Freezing And Storing Food
Freezing and storing food Maximum freezing capacity Storing frozen food To ensure that fresh food placed in the When buying frozen food to store in freezer section freezes through to the your freezer section, check core as quickly as possible, the –... -
Page 30: Home Freezing
Freezing and storing food Home freezing lightly before freezing, but care should be taken as the taste of some Only freeze fresh food which is in a spices alters when frozen. good condition. – Do not place hot foods or drinks in Hints on home freezing the freezer. -
Page 31: Before Placing Food In The Freezer Section
Freezing and storing food Before placing food in the freezer When freezing, make sure that food section already frozen does not come into ^ When freezing more than 2 kg of contact with fresh food being frozen fresh food, switch on the Super as this could cause the frozen food freeze function for some time before to begin to defrost. -
Page 32: Defrosting
Freezing and storing food Defrosting Cooling drinks Frozen food can be defrosted in When cooling drinks quickly, make sure different ways: bottles are not left in the freezer for more than one hour, as they could – in a microwave oven, burst. -
Page 33: Cool Pack
Freezing and storing food Cool pack The cool pack prevents the temperature in the freezer rising too quickly in the event of a power cut. Place the cool pack in the top drawer of the freezer section, directly on top of the food. -
Page 34: Making Ice Cubes
Making ice cubes For the automatic ice cube maker to To ensure that the water pipes are operate it must be connected to the thoroughly flushed through before mains water supply. use, ice cubes from the first three ice cube making processes must not be consumed. -
Page 35: Setting The Water Intake Time For The Ice Cube Maker
Making ice cubes Switching off the ice cube Setting the water intake time maker for the ice cube maker The ice cube maker can be switched The size of the ice cubes produced off independently of the freezer section depends on the water pressure present if you do not want the appliance to and the water intake time which has make any ice cubes. - Page 36 Making ice cubes ^ The length of the water intake time for the ice cube maker can now be adjusted by touching the X sensor: E 1: Shortest water intake time, E 8: Longest water intake time, E – : Return to menu. The old setting lights up, and your newly selected setting flashes.
-
Page 37: Automatic Defrost
Automatic defrost Wine conditioning zones Freezer section The wine conditioning zones defrost This appliance is equipped with a "Frost automatically. free" system. The freezer section defrosts automatically. Condensate and frost can build up on the back wall of the wine conditioning The moisture generated in the zones whilst they are in use. -
Page 38: Cleaning And Care
Cleaning and care ^ A range of Miele branded cleaning ^ Take out any removable parts, e.g. agents is available from the Miele shelves, for cleaning. Spare Parts Department, or via the internet at www.miele-shop.com. Cleaning the outer casing, the... -
Page 39: Cleaning The Condensate Drain Hole
Cleaning and care Cleaning the ice cube tray It is important to do this every time The ice cubes are formed in a tray the stainless steel surfaces are before they are dropped down into the cleaned, as the stainless steel drawer. -
Page 40: Ventilation Gaps
Cleaning and care ^ Wait until the ice cube tray has Door seals completed this rotation before Do not use any grease or oil on the continuing. door seals as these will cause them ^ Then take the ice cube drawer out of to deteriorate and become porous the appliance and clean it. -
Page 41: After Cleaning
Cleaning and care After cleaning ^ Put the wooden shelves back in the wine conditioning zones. ^ Put the wine bottles back in the wine conditioning zones and close both the appliance doors. ^ Insert the plug in the socket and switch the appliance back on. -
Page 42: Active Charcoal Filters
If you do not have new active charcoal filters, you can order them from your Miele dealer or from the Miele Spare Parts Department. You can switch off the Change active charcoal filter indicator early, if you would prefer not to have the red indicator showing. - Page 43 Active charcoal filters If you have delayed changing the active charcoal filters and the indicator is not lit up, you will need to reset the counter when you replace the active charcoal filters via the settings mode. ^ Touch and leave your finger on the X sensor.
-
Page 44: Problem Solving Guide
If it has, contact the Miele ^ The doors have been opened too Service Department. frequently, or a large amount of fresh food has been put in at once for . - Page 45 ^ Replace the active charcoal filters. room. You can order replacement filters via Operating in a room which is too cold your Miele dealer or the Miele Spare will cause the cooling system to switch Parts Department. off for too long, causing the freezer section to become too warm.
- Page 46 Problem solving guide ^ Lengthen the water intake time for the . . . "dn" appears in the temperature ice cube maker (see "Making ice display. cubes"). The demonstration function is activated. ^ Call the Service Department..the indicator light on the ice cube maker is flashing.
- Page 47 ^ Clean the condensate channel and drain hole. If you still cannot remedy the fault having followed these suggestions, please contact the Miele Service Department. To prevent unnecessary loss of temperature it is advisable not to open the doors while waiting for the...
-
Page 48: Noises
Noises Normal noises What causes them Humming noise made by the motor (compressor). This noise can Brrrrr... get louder for brief periods when the motor is switching on. Blubb, blubb..A gurgling noise can be heard when coolant is circulating through the pipes. -
Page 49: After Sales / Guarantee
– your Miele Dealer – Miele (see back cover for contact details). When contacting your Dealer or Miele, please quote the model and serial number of your appliance. This information is given on the data plate inside your appliance. -
Page 50: Mains Water Connection
This may only be lengthened purged of air by a qualified and by means of a Miele extension hose. competent person. This extension hose is available from – To do so the stainless steel hose... - Page 51 Mains water connection ^ The stainless steel hose should be attached to the solenoid valve at the base of the appliance at the back. ^ Ensure that the hose is fitted correctly and that it is water tight. ^ Turn on the stopcock slowly and check the whole water system for leaks.
-
Page 52: Electrical Connection Irl, U.k., Za
Electrical connection IRL, U.K., ZA All electrical work should be carried out Non-rewireable plugs (BS 1363) by a suitably qualified and competent The fuse cover must be re-fitted when person in strict accordance with current changing the fuse, and if the fuse cover local and national safety regulations is lost, the plug must not be used until a (BS 7671 in the UK). -
Page 53: Electrical Connection Aus, Nz
Electrical connection AUS, NZ All electrical work should be carried out WARNING by a suitably qualified and competent THIS APPLIANCE MUST BE person in accordance with local and EARTHED national safety regulations. The appliance is supplied with a mains cable and moulded plug ready for connection to 220-240 V 50 Hz supply. -
Page 54: Installation
Should you require further dry, well-ventilated room. It should not assistance please contact your be installed where it is exposed to Miele customer service centre. direct sunlight or directly adjacent to a heat-producing appliance such as an Climate range oven or a radiator. -
Page 55: Ventilation
Installation Ventilation Air at the back of the appliance gets warm. To ensure sufficient ventilation the air inlet and outlet must not be covered or blocked in any way. They should be dusted on a regular basis. Installation ^ Remove the cable clip from the back of the appliance. -
Page 56: Appliance Dimensions
Installation Appliance dimensions KWTN 14826 SDE ed 1852 mm 600 mm 630 mm... -
Page 57: Installing In A Side-By-Side Combination
However, this appliance has side wall spanners, a torque screwdriver and heating, and can be installed a socket wrench. side-by-side with certain other Miele ^ Before starting, peel off any appliances. protective foil from the appliance Your dealer will be able to advise casing. - Page 58 Installing in a side-by-side combination ^ Close the doors to check whether the door handles are correctly aligned with one another. The top of both appliances must be the same height. If they are not, the covers will not fit properly. ^ Push the two appliances together, and align them again.
- Page 59 Installing in a side-by-side combination ^ Position wide brackets ^ Position the long stainless steel trim at the top and bottom on the back, and push in the gap, making sure that it is the top bracket upwards until it is in located above bracket the correct position (z).
- Page 60 Installing in a side-by-side combination ^ Refit cover. ^ Push short trim into the gap at the top of the appliances. Make sure that Please align the handles on both the gap in the trim faces the front. doors if necessary. See "Changing The trim must sit flush with the top of the door hinging".
-
Page 61: Changing The Door Hinging
Changing the door hinging To change the door hinging you will need the following tools: – a cross-slotted screwdriver, – a flat-bladed screwdriver, – a selection of Torx screwdrivers, – a spanner. Two people are needed for changing the door hinging. Removing the door handles: ^ Pull door handle towards you. - Page 62 Changing the door hinging Removing the soft-close mechanism for the upper door: ^ Open the upper door. ^ Slide panel towards the appliance, and leave it hanging between the door and the appliance. ^ Fit restraining clip (supplied with ^ Prise open from the soft-close the appliance) onto soft-close mechanism by inserting a flat-bladed...
- Page 63 Changing the door hinging Removing the upper door: ^ Slide soft-close mechanism bracket as far as it will go towards the handle side of the door, and undo ^ Gently loosen cover by carefully screws on the soft-close inserting a flat-bladed screwdriver mechanism.
- Page 64 Changing the door hinging Caution. The upper door is not Take care not to damage the door secure as soon as the upper hinge seal. plate is removed. If the door seal becomes damaged, the door will no longer close ^ Close the upper door.
- Page 65 Changing the door hinging Removing the lower door: ^ Close the lower appliance door. ^ Push hinge pin up and out from underneath. The soft-close mechanism is now no longer fixed to the appliance. ^ Pull the middle hinge pin upwards ^ Remove panel to remove it.
- Page 66 Changing the door hinging ^ With the help of another person, carefully tilt the appliance backwards and pull hinge pin out. ^ Take care not to lose hinge bush ^ Undo screws and take hinge plate off. ^ Remove cover and refit on the opposite side.
- Page 67 Changing the door hinging ^ Insert the soft-close mechanism back into the door, starting at the right ^ Fit hinge pin into middle hinge hand side. plate in the lower door. Replacing the lower soft-close door mechanism: ^ Slide the soft-close mechanism back into the door as far as it will go towards the appliance using a flat-headed screwdriver.
- Page 68 Changing the door hinging Refitting the upper door: ^ Then fit the top door on middle hinge ^ Close the upper door. ^ Attach panel to soft-close mechanism bracket ^ Align bracket to the hinge plate, and insert pin from above so that the right angle fits into the recess.
- Page 69 Changing the door hinging Replacing the upper soft-close door mechanism: ^ First screw the soft-close mechanism onto the appliance side, then onto the handle side , pushing it firmly ^ Remove cover from panel towards the appliance. rotate it by 180° and refit it on the other side.
- Page 70 Changing the door hinging Make sure that cover fits properly so that the door can be closed without hindrance and the pin is protected. ^ Remove retaining clip ^ Replace panel onto the soft-close mechanism from above, clicking it back into place first at the bottom and then at the top.
- Page 71 Changing the door hinging Refitting the handle: It is important to check that the side Please make sure you follow the section of the handle does not instructions below carefully when come into contact with the door seal you refit the handle. The door seal when opening the door, as this will be damaged if the handle is would damage the door seal...
-
Page 72: Aligning The Appliance Doors
Aligning the appliance doors The appliance doors can be aligned Align the upper door using the long with the housing after they have been outer slots in the middle hinge plate: fitted. In the following illustration the door is shown open to make it easier to see what you have to do. -
Page 73: Building In The Appliance
Building in the appliance The air inlet and outlet must not be covered or blocked in any way. They should be dusted on a regular basis. When built into a kitchen run (max. depth 580 mm) the appliance can be installed directly next to a kitchen furniture housing unit. - Page 76 Alteration rights reserved / 5209 M.-Nr. 07 808 300 / 00 KWTN 14826 SDE ed...