Table of Contents
Advertisement
SEARS
Owner's Manual
Manual de Instrucciones
Manuel d'lnstructions
SEWING MACHINE
MAQUINA DE COSER
MACHINE A COUDRE
Model
Modelo
Modele
385. 17124
CAUTION:
Before using sewing machine,
read this manual and follow
all its Safety Rules and
Operating Instructions.
•
Safety Instructions
•
Warranty
•
Specifications
•
Operation
•
Care and Maintenance
•
Troubleshooting
Sears, Roebuck and Co., Hoffman Estates, IL 60179 U.S.A.
P/N
752800309
Advertisement
Table of Contents

Related Manuals for Kenmore 385.17124


Summary of Contents for Kenmore 385.17124
- Page 1 SEARS Owner's Manual Manual de Instrucciones Manuel d'lnstructions SEWING MACHINE Model MAQUINA DE COSER Modelo 385. 17124 Modele MACHINE A COUDRE CAUTION: • Safety Instructions • Warranty Before using sewing machine, • Specifications read this manual and follow • Operation all its Safety Rules and •...
- Page 2 iMPORTANT SAFETY iNSTRUCTiONS Your sewing machine is designed and constructed only for HOUSEHOLD use. Read all instructions before using this sewing machine. DANGER To reduce the risk of electric shock: A sewing machine should never be left unattended when plugged in.
- Page 3 mNSTRUCOmONSSDE SEGURmDAD JMPORTANTES Su m_.quina de coser esta diseSada y construida s61o para uso dom_stico. Lea todas las instrucciones antes de usar esta mAquina de coser. PELmGRO Para reducir el riesgo de descarga electrica: La m&quina nunca se debe desatender cuando se ha conectado.
- Page 4 mMPORTANTES OONSmGNES DE SECURJTE Votre machine & coudre n'est con_ue et construite que pour I'usage m6nager. Lisez toutes ces consignes avant d'utiliser cette machine & coudre. DANGER- Comment r6duire le risque de choc 61ectrique: Une machine ne devrait jamais _tre laiss6e sans surveillance Iorsqu'elie est branch6e.
- Page 5 WARRANTY FULL 25 YEAR WARRANTY ON SEWING MACHINE HEAD For 25 years from the date of purchase, Sears will, free of charge, repair defects in material or workmanship which .--- appear in the sewing machine head. FULL TWO YEAR WARRANTY ON ELECTRICAL EQUIPMENT OF SEWING MACHINE...
- Page 6 Machine Specifications Item Specification Sewing speed (Maximum): Over 730 r.p.m. Stitch length: 4 mm (Maximum) Stitch width: 5 mm (Maximum) Stitch package (Built=in): Buttonhole: 4 step built-in buttonhole + snap-in automatic BH-2 styles Machine dimensions: W 422 mm (16.6 ") x D 172 mm (6.8") x H 297 mm (11.T) Weight (Net): 8.5kg (18.5 Ibs)
- Page 7 TABLE OF CONTENTS SECTION I. NAMES OF PARTS Zipper Sewing ........38 - 40 To Raise or Drop the Feed Dogs ....Portable Case or Cabinet ......:..2 Darning ............Names of Parts ..........Available Accessories and Attachments ..4 SECTION iV.
-
Page 8: Table Of Contents
INDICE SECCION I. NOMBRE DE LAS PARTES Costura de cremalleras ........ 39 - 41 Como bajar/subir los dientes Gabinete o estuche portAtil ........3 del transporte ............Nombre de las pares ..........Zurcido ..............Accesorios y refacciones disponibles ....5 SECCION iV. - Page 9 TABLE DES MATIF::RE$ PARTIE !. IDENTiFiCATiON DES PIECES DE LA La couture des fermetures & glissi_re ..... 39-41 MACHINE Comment monter et descendre les griffes d'entrafnement ........... Mallette de transport ou meuble ......3 Reprisage .............. 43 Identification des pieces ......... Accessoires disponibles .........
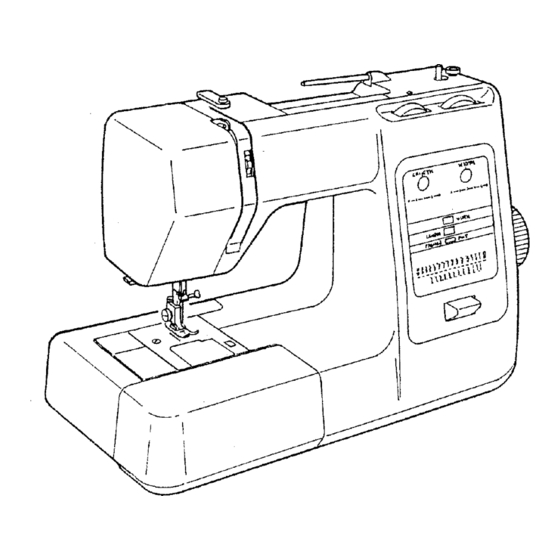
- Page 10 SECTNON L NAMES OF PARTS Portable Case or Cabinet A full line of sewing maChine cabinets and carrying cases is available through the RSOS catalog at your nearest Sears retail store. Names of Parts _1_ Reverse stitch control 2_ Sewing guide display (_) Stitch selector...
-
Page 11: Gabinete O Estuche Portatil
8ECC!ON I. NOMBRE DELAS PARTES PARTIE I iDENTiFICATiON DES PIECES DE LA MACHINE Maliette de transport eu rneuble Gabinete o estuche port&tii Usted encontrar& una Ifnea completa de gabinetes y Vous trouverez dans les magasins Sears, ainsi que dans notre catalogue RSOS une gamme compl6te de meubles estuches port&tiles para su m&quina de coser en el et de mallettes de transport pour les machines &... - Page 12 Available Accessories and Attachments All parts listed may be ordered from any Sears store or service center. WHEN ORDERING REPAIR PARTS, ALWAYS GIVE THE FOLLOWING INFORMATION: 1. PART NUMBER 2. PART DESCRIPTION 3. MODEL NUMBER 4. NAME OF ITEM (SEWING MACHINE) [ the 10artsyou need are not stocked locally, your order will be electronically transmitted to a Sears Repair Parts...
-
Page 13: Accesorios Y Refacciones Disponibles
Accesorios y refacciones disponibles Accessoires disponibles Todas las partes listadas se pueden ordenar de cualquier Toutes ces pi_ces peuvent ¢tre commandoes dans un tienda de Sears o centre de servicio de Sears. magasin ou un centre de r6paration Sears. JOIGNEZ TOUJOURS A VOTRE COMMANDE LES CUANDO ORDENE REPUESTOS, SIEMPRE SUMINISTRE RENSEIGNEMENTS SUIVANTS: LA SIGUIENTE INFORMACION:... -
Page 14: For Your Safety
SECTnON He GEeiNG READY TO SEW Connecting Machine to Power Supply (_ Power switch (_ Power supply plug Outlet Machine socket (_ Machine plug (_ Light bulb Before connecting the power cord, make sure the voltage and frequency shown on the machine conform to your electrical power. -
Page 15: Seccion
SECCION iio PREPARACION DE LA PARTIE I!, PREPAREZoVOU8 A COUDRE MAQUINA PARA COSER Cone×i6n de ia rn_quina a la red eldctrica Branchez la machine au secteur. Q Clavijade toma de corriente Q Interruptorde corriente Prise electrique L-_ Interrupteur secteur Red el6ctrica _ddEnchufede la m__quina (_Prise de courant Prise de la machine... -
Page 16: Pressure Adjusting Lever
Pressure Adjusting Lever Pressure adjusting lever The pressure adjusting lever should be set at "3" for regular sewing. Reduce pressure to "2" for applique, cut work, draw work and basting. Set pressure at "1" when sewing chiffon, lace, organdy and other fine fabrics. Velour and knits with a lot of stretch may also require pressure... -
Page 17: Ajuste De La Presidn Del Prensatelas
Ajuste de la presi6n del prensatelas Levier de r6giage de la pression O Palanca del ajuste de la presion Levier de r6glage de la pression La palanca del ajuste de la presi6n debe ser situada en el Le levier de r6glage de la pression devrait _tre r_gl_ sur la "3"... - Page 18 Changing Needne Q Needle clarnp screw Needle clamp Turn off the power switch. Raise the needle to its highest position by turning the handwheel counterclockwise and lower the presser foot. Loosen the needle clamp screw C!) by turning counterclockwise. Remove the needle from the clamp _. Insert a new needle into the needle clamp (_ with the flat side to the rear.
-
Page 19: C6Mo Cambiar La Aguja
C6mo cambiar la aguja Changer I'aiguiiie 0 Tornillode sujeci6n dela aguja (_) Vis de fixation de I'aiguille (_) Topesuperior (_) Broche (3_ Alojamiento de la aguja (_) Support de I'aiguille _-] Apague la maquina con interruptor de corriente. [] #teignez la machine. Suba la aguja hasta su posici6n m&s alta girando el Faites monter I'aiguille le plus haut possible en tournant le volant &... -
Page 20: Darning
Presser Feet Types ® Zigzag Foot ( Foot A) Use this foot for both straight and zigzag stitching. For: Basic zigzag (page 44) Bar tacking (page 48) Sutton sewing (page 50) Overcasting stitch (page 50) Blind hem stitch (page 52) Lace work (page 52) Multiple zigzag stitch (page 54) -
Page 21: Tipos De Pie Prensatelas
Tipos de pie prensatelas Les diff_rents pieds presseurs + Pie para zig=zag ( Pie A ) Pied zig-zag ( Pied A ) Utilice este pie para puntada recta y puntada de zig-zag. Ce pied convient pour les points zig-zag et les points droits. Pour: Zig-zag simple (page 45) Para: Puntada de zig-zag (pagina 45) - Page 22 Selecting Needle and Thread For general sewing use needle size 11 or 14. A fine thread and needle should be used for sewing lightweight fabrics so the fabric will not be marred. Heavy fabrics require a needle large enough to pierce the fabric without fraying the needle thread.
-
Page 23: Seleccisn De Aguja E Hilo
Selecci6n de aguja e hiio Para el cosido general se utilizan agujas del tamafio 11 o 14. Los hilos y agujas delgados deberan utilizarse para coser tejidos ligeros evitando asi que 6stos se puedan echar a perder. Los tejidos gruesos hay que coserlos con una aguja Io suficientemente gruesa como para que pueda penetrar el tejido sin que el hilo de la aguja se deshilache. - Page 24 Choi× de I'aiguiile et du fil Pour les coutures normales, utilisez une aiguille n°l 1 ou 14. On devrait utiliser du fil fin et une aiguille fine avec les tissus 16gets pour ne pas les endommager. Les tissus Iourds n6cessitent une aiguille assez grosse pour percer le tissu sans effilocher le fil de I'aiguille.
- Page 25 (blankpage) (p&ginablanca) (pageblanche)
-
Page 26: Horizontal Spool Pin
Bobbin Winding ® Removing the Hook Cover Plate lq_ Hook cover plate release button _') Hook cover plate Slide the hook cover plate release button 0_ to the right, and remove the cover plate _2). Horizontal Spool Q-_Spool pin (2_ Large spool holder Small spool holder Lift up the spool pin 0. -
Page 27: Bobinado De La Canilla
Bobinado de la canilla Reraplir la canette ® C6mo sacar la canilla o Retrait de la canette (_ Pulsador de apertura de la tapa de acceso a canilta Bouton de d6gagement du couverclede navette (_) Tapa de acceso a canilla (_ Couvercle de navette Deslice el pulsador (_ hacia la derecha y quite la tapa (_). -
Page 28: O Bobbin Winding
o Bobbin Winding @ Forhorizontal spool p in ® ® (_ Foradditional spool p in (_ Pullthe clutch knob out to disengageclutch. (_) Drawthreadfrom spool. ® ® Guidethe threadaroundthe thread guide. (_) Threadthroughthe hole in the bobbinfromthe insideto the outside. ®... -
Page 29: Bobinado De La Canilla
o Bobinado de la canilla o Rernplir la canette (_ Para el portacarretes horizontal @ Pour porte-bobine horizontal ® Para el portacarretes adicional ® Pour porte-bobine suppl6rnentaire (_ Tirez sur le bouton d'embrayage. (_ Hale el embrague hacia afuera de la mAquina. (_) Tirez sur le fil de la bobine. - Page 30 inse_ing the Bobbin (_) End of thread (_ Notch (_ Notch (_ Threading chart Place a bobbin in the bobbin holder with the thread running off counterclockwise. Guide the thread into the notch (_ off the front side of the bobbin holder.
-
Page 31: Portacanillas
insertion de la canette Colocaci6n de la canilia en el portacanilias Ext_mit6 dufil Extreme del hilo Encoche (_ Ranura ___ Encoche Ranura 4(_ Guide d'enfilage Esquema de enhebrado Ponga una canilla dentro del portacanillas de mode que [] Placez la canette dans son support, avec le fil se el hilo se suelte en el sentido contrario alas agujas del d@oulant en sens antihoraire. -
Page 32: Threading The Machine
Threading the Machine o Threading the Machine Raise the thread take-up lever to its highest position by turning the handwheel counterclockwise. •' Raise the presser foot lifter. Place a spool on the spool pin, with thread coming off as shown. 1_ Draw the end of thread around the upper thread guide. -
Page 33: Enhebrado Del Hilo Superior
Enhebrado Enfiiage de la machine del hilo de la aguja ® Enhebrado del hilo de la aguja Enfilage de la machine * Faites monter le releveur tendeur de fille plus haut Suba et tirahiios hasta su posici6n mas alta girando el volante en et sentido contrario alas agujas del reloj. -
Page 34: Adjust The Needle Thread Tension For Straight
Adjust the Needle Thread Tension for Straight Stitch - Correct tension _'_ Needle thread (Top thread) Bobbin thread (Bottom thread) To loosen To tighten The ideal Straight stitch has threads locked between two layers of fabric, as illustrated (magnified to show detail). -
Page 35: Ajuste De La Tensi6N Del Hilo Superior Para Puntada Recta
Ajuste de la tensi6n del hilo de la aguja para puntada R6glage de la tension du fil de raiguille pour le point recta droit Tensi6n correcta Tension correcte (_) Hilo de la aguja (Hilo superior) (_ Fil de I'aiguille (Fil sup6rieur) L_ Hilo de la canilla (Hilo inferior) (_) Fil de la canette (Fil inf6rieur) (_) Pour rel&cher la tension... -
Page 36: Stitch
Adjust the Needle Thread Tension for Zigzag Stitch For an ideal zigzag stitch, bobbin thread does not show on right side of fabric and needle thread shows slightly on wrong side. See the illustrations for correct appearance. To match this appearance, adjust the needle tension. -
Page 37: Ajuste De La Tensi6N Del Hilo Superior Para Puntada Zig-Zag
R6glage de la tension du fil de I'aiguille avec le point Ajuste de la tensi6n del hilo de la aguja para zig-zag puntada zig-zag Lorsqu'un point zig-zag est effectu6 correctement, le fil En la puntada zigzag ideal, el hilo de la canilla no de la canette ne parait jamais sur le c6t6 endroit du tissu aparecerA en la parte de arriba de la tela y el hilo de la et le fil de I'aiguille apparait &... -
Page 38: Stitch Length Control
Stitch Length Con&oR "_ (_ Stitch length setting display The higher the number of stitch length control, longer the stitch. "0" means "no feed". The stitch length control also has a stretch stitch setting. To select a stretch stitch, set the control "... -
Page 39: Control De La Iongitud De Puntada
R_glage de la Jongueur du point Control de la Iongitud de puntada Fen_tre de r6glage de la Iongueur du point 1_ Pantalla de ajuste de ta Iongitud de puntada Plus le chiffre du r6glage est grand, plus le point est long. Cuanto mAs grande el nL_mero en el control de la Iongitud A "0", I'avance est "nulle". -
Page 40: Stitch Selector
Stitch Selector Sewing guide display (_ Selected stitch indicator (3) Stitch selector Turn the stitch selector @ until the red indicator WIDTH reaches the desired stitch. LENGTH The bottom row of stitches on the pattern indicating PRES,SER FOOT panel is selected when the stitch length control set at the stretch stitch position. -
Page 41: Selector De Patr6N
S_lecteur de point Selector de patr6n Fen6tre-guide (_) Pantalla de guia de costura Indicateur du point choisi _) Indicador de puntada seleccionada S61ecteurde point _) Selector de patrdn Tournez le s61ecteur de point _ jusqu'& ce que Gire el selector de patr6n (._ hasta que el indicador rojo I'indicateur rouge _ soit sur le point voulu dans la rangee Ilegu6 a la puntada deseada. -
Page 42: Stitch Width Control
SECTION RIB STRAIGHT STITCH SEWnNG Straight Stitch ® L_ Stitch width: Red zone k_ Stitch length: LENGTH WlD'IH Needle thread tension: 2to6 Presser foot A: Zigzag foot (_ Presser foot H: Straight Stitch foot NOTE: ® ® when using the straight stitch foot, make sure to set the stitch width control at 0. -
Page 43: Puntada Recta
SECCION III, COSTURA DE PUNTADA RECTA PARTIE III. COUTURE[ AVEC LE POINT DROIT Point droit Puntada recta 1_ Largeur du point Control de la anchura: (_Longueur du point Zone rouge (2_ Control de la Iongitud: Zona roja (_)Tension du fil d'aiguille 2 &... -
Page 44: Straight Stitch
Topstitching ® 10 Stitch width: WID'IH LENGTH Red zone (_ Stitch length: 2to6 (_ Needle thread tension: @ Presser foot A: Zigzag foot Presser foot H: Straight stitch foot Topstitching emphasizes lines of garments keeps seams and edges flat and crisp. Accent suits or blouses... -
Page 45: Costura A La Vista
Costura a la vista Surpiq_re (1_ Control de la anchura: _T_ Largeur du point Zone rouge (_ Control de la Iongitud: Zona roja L_ Longueur du point 2&6 (_) Tension du fil de I'aiguille (_ TensiSn del hilo de la aguja: Pied zig-zag Pie para zig-zag (_) Pied presseur A:... -
Page 46: Stitch
Zipper Sewing ® (_) Stitch width: WIITfH LI_GTH (_) Stitch length: 6) Needle thread tension: 2 to 6 (_) Presser foot E: Zipper foot ® To Snap on the Zipper Foot Fit the pin on the zipper foot into the groove on the foot holder. -
Page 47: La Couture Des Fermetures & Glissi_Re
Costura de crernalleras La couture des ferrnetures & glissi_re Largeur du point _) Control de la anchura: (-_ Longueur du point Q Control de la Iongitud: Tension du fil de I'aiguille 2 & 6 _3_Tensidn del hilo de la aguja: 2 a 6 Pied presseur E: Pied &... -
Page 48: Stitch
Zipper Sewing (Continued) (1/8") To Sew: 1_ Zipper teeth Zipper tape Wrong side of fabric ® Fold back the left seam allowance. Turn under the right seam allowance to form a 0.2 to 0.3 cm (1/8") fold. Place the zipper teeth _ next to this fold and pin in place. -
Page 49: Costura De Cremalleras
Costura de cremalleras (continuaci6n) La couture des fermetures & glissi6re (Suite) • Para coser La couture Dientes de la cremallera Dents de la fermeture (2_ Cinta de la cremallera (_ Ruban de la fermeture _3) Parte de abajo de la tela ,_ C6t6 envers du tissu [] Doble la tela superior de la costura izquierda hacia Repliez la ressource du c6t6 gauche. -
Page 50: Embroidery
To Raise or Drop the Feed Dogs The drop feed dogs lever is located underneath free arm bed on the back side of the machine. (_ To drop the feed dogs, push the lever in the direction of the arrow as illustrated. To raise the feed dogs, push the lever in the direction... -
Page 51: Como Bajar/Subir Los Dientes Del Transporte
Comment monter ou descendre les griffes C6mo 10ajar / subir los dientes del transporte d'entrainement La palanca de mando para los dientes del transporte est& Le levier des griffes d'entrainement est situ6 sous le debajo del brazo libre colocado en la parte del rev_s de berceau du bras libre &... -
Page 52: Button Sewing
SECTION iV. ZIGZAG STMTCHES Basic Zigzag _ Stitch width: 1 to 5 (2_ Stitch length: Red zone Needle thread tension: 3 to 8 Presser foot A: Zigzag foot The zigzag stitch is one of the most common versatile stitches. It can be a utility stitch for button sewing, buttonhole making,... -
Page 53: Puntadas De Zig=Zag
SECCION IV. PUNTADAS DE ZIG°ZAG PARTIE iV POINTS ZIGoZAG Puntada de zig=zag Zig-zag simple (_ Control de la anchura: 1_ Largeur du point 1 & 5 Control de la Iongitud: Zona roja Longueur du point Zone rouge ___Tensi6n del hilo de la aguja: (_ Tension du fil de I'aiguille 3 &... - Page 54 Monogramming ® Stitch width: WIDTH LENGTH L_ Stitch length: 0.5 to 1 Needle thread tension: 2 to 6 _) Presser foot F: Satin stitch foot L_ Pressure adjusting lever: 1 or 2 ® Attach a piece of stabilizer on wrong side of fabric. Draw letters on the fabric with tailor's chalk.
-
Page 55: Monogramas
Monograrnas MonogP_i_mes Control de la anchura: (_ Largeur du point 0.5al Control de la Iongitud: (_ Longueur du point 0.5 & 1 Tensi6n del hilo de la aguja: (_ Tension du fil de I'aiguille 2 & 6 4_ Pie prensatelas F: (_ Pied presseur A: Pied &... - Page 56 Bar Tacking ® ® O Stitch width: 2 to 5 _ Stitch length: 0.5 to 1 LENG_ Needle thread tension: 2 to 6 Presser foot A: Zigzag foot This is similar to a very short satin stitch and is used to reinforce points of strain such as corners,...
-
Page 57: Puntada De Refuerzo
Puntada de refuerzo Brides de renfort Q._ Control de la anchura: 2 a 5 1_ Largeur du point 2 & 5 C2_Control de la Iongitud: 0.5 a 1 Longueur du point 0.5 & 1 (._ Tensi6n del hilo de la aguja: 2 a 6 Tension du fil de I'aiguille 2 &... -
Page 58: Overcasting Stitch
Button Sewing ® Stitch width: 2to5 Stitch length: WIDTH LENGTH 2to6 L_ Needle thread tension: _) Presser foot A: Zigzag foot (_ Feed dogs: Dropped ® Drop the feed dogs. Match the holes on a button with the horizontal slot on the presser foot [A]. Ad- just stitch width matching the distance of the holes... -
Page 59: Costura De Botones
Cosido de botones Pose des boutons _') Anchura de la puntada: 2 a 5 Largeur du point 2 & 5 _) Longitud de la puntada: Ninguna Longueur du point Toute _) Tensi6n del hilo de la aguja: 2 a 6 G Tension du fil de I'aiguille 2 &... -
Page 60: Lace Work
SECTION V. UTILITY STOTCHES AND DECORAT_VF= STITCHES BJind Hem Stitch ® Stitch width: 2to3 L_G_ Red zone (_ Stitch length: Needle thread tension: 2to6 Presser foot A: Zigzag foot ® Lightweight fabric 1/4" 1/4" 6) Heavyweight fabric Wrong side of fabric On heavyweight fabrics that ravel, the raw edge... -
Page 61: Dobladillo Invisible
SECCION V. PUNTADAS UTILES Y PUNTADAS PARTIE V. POINTS UTILiTAIRES ET POINTS DECORATIVAS D ECO RATIFS Dobladilio invisible Ourlet invisible %U_ Anchura de la puntada: 2 a 3 1_ Largeur du point 2 & 3 (_ Longitud de la puntada: Zona roja Longueur du point Zone rouge... -
Page 62: Shell Stitch
iVluitiple Zigzag Stitch ® Stitch width: WID'Prl LENGTH Stitch length: 0.5 to 1 > Needle thread tension: 2 to 6 L'_ Presser foot A: Zigzag foot ® This is used to finish seam allowance on synthetics and other fabrics that tend to pucker. The stitch is also excellent for darning... -
Page 63: Puntada De M01Tiple Zig-Zag El_Stica
Puntada de mdltiple zig-zag Point zig-zag multiple O Anchura de la puntada: Largeur du point Longitud de la puntada: 0.5 a 1 (_ Longueur du point 0.5 & 1 Tensi6n del hilo de la aguja: 2 a 6 (3_ Tension du fil de I'aiguille 2 &... -
Page 64: Box Stitch
Box Stitch ® 3to 5 Stitch width: W1D'fH LENG'fH Red zone (_ Stitch length: d__NeedJe thread tension: 3to8 (_ Presser foot A: Zigzag foot ® Overlap two row edges of heavyweight interlining and use this stitch to join them. Fagoting Stitch ©... -
Page 65: Puntada De Caja
Purttadas de caja Point de cr_neau 1_ Anchura de la puntada: 3 a 5 (i_ Largeur du point 3 & 5 @ Longitud de la puntada: Zona roja Longueur du point Zone rouge (._ Tensi6n del hilo de la aguja: 3 a 8 Tension du fil de I'aiguille 3 &... -
Page 66: Two-Point Shell Stitch
Two-point Shell Stitch © _q_Stitch width: 3to 5 LENGTH W]D'fH Red zone Stitch length: ¢- 3to 8 Needle thread tension: Presser foot A: Zigzag foot ® This stitch is often used as a single overlock stitch. Two-point Box Stitch © ®... -
Page 67: Puntada De Concha De Dos Puntos
Puntada de coneha de dos puntos Point coquiile en deux temps '_ Anchura de la puntada: 3 a 5 Q-_ Largeur du point 3 & 5 Longitud de la puntada: Zona roja (_) Longueur du point Zone rouge Tensibn del hilo de la aguja: 3 a 8 (_ Tension dufil de I'aiguille 3 &... - Page 68 Decorative Stitch of Geometric Patterns ® Stitch width: 3to5 LENGTH WtD'[N Green zone Stitch length: Needle thread tension: 3to8 _jj Presser foot F: Satin stitch foot ® For a delicate appearance on fabric such as chiffon, use a single layer with a tear-away backing, if neces- sary.
-
Page 69: Puntadas Decorativas De Disedos Geom_Tricos
Puntadas decorativas de disefios georn6tricos Points d6coratifs g_orn_triques (_ Anchura de la puntada: 3 a 5 Largeur du point 3&5 (_ Longitud de la puntada: Zona verde Zone verte _2_ Longueur du point 3&8 Tensi6n del hilo de la aguja: 3 a 8 _3_ Tension du fil de I'aiguille Pie prensatelas... -
Page 70: Rick-Rack Stretch
Rick-rack Stretch ® 2to5 _q_Stitch width: LENG'fH WID'IH Stitch length: Gold stretch stitch position Needle thread tension: 2to6 _}_ Presser foot A: Zigzag foot Sew on stretch fabrics in any area that you might use a zigzag stitch. This stitch is used as a decorative topstitch... -
Page 71: Extensidn De "Rick-Rack" (Zig-Zag)
E×tensi6n de "Rick-rack" (zig°zag) Croquet extensible 2&5 (i) Anchura de la puntada: 2 a 5 1_ Largeur du point (_) Longitud de la puntada: Posici6n ore de puntada (_) Longueur du point Position or point extensible el_stica 2&6 (_ Tension du fil de I'aiguille _) Tensi6n del hilo de la aguja: 2 a 6 4_ Pied presseur A:... -
Page 72: Smocking
Smocking ® ® 3 to 5 1_ Stitch width: WID'TH LENGTH (_ Stitch length: Gold stretch stitch position 2to6 ___Needle thread tension: 4_ Presser foot A: Zigzag foot ® ® Wrong side of fabric Smocking is a delicate decorative treatment children's clothes or women's... -
Page 73: Fruncidos
Fruncidos Point _ smocks 3&5 O Anchura de la puntada: (_ Largeur du point (_ Longitud de la puntada: Posici6n oro de puntada (_ Longueur du point Position or point extensible 2&6 el&stica (_ Tension du fil del'aiguille (_) Tensi6n del hilo de la aguja: (_) Pied presseur A: . -
Page 74: Elastic Stretch Stitch
Elastic Stretch Stitch ® LENGIN WIDTH (&) Stitch width: 3to 5 Gold stretch stitch 3osition (_) Stitch length: (_ Needle thread tension: 3to 6 (_ Presser foot A: Zigzag foot ® ® Choose this stitch to attach elastic to garments. Mark elastic into quarters and match these to the center front, center... -
Page 75: Puntada El&Stica De Extensi6N
Puntada el&stica de extensi6n Point extensible pour la fixation des _lastiques 1_ Anchura de la puntada: 3 a 5 3&5 1_ Largeur du point Longitud de la puntada: Posici6n oro de puntada (_ Longueur du point Position or point extensible elAstica 3&6 (_ Tension du fil de I'aiguilte... -
Page 76: Decorative Stretch Patterns
Decorative Stretch Patterns ® _1_Stitch width: 3to5 W1BTH Stitch length: Gold stretch stitch position Needle thread tension: 2t06 4(4(4_ Presser foot A: Zigzag foot Decorative stretch patterns are used for adding creative and personalized touch to items. You can decorate children's clothes, women's... -
Page 77: Disesos Decorativos El_.Sticos
Dise_os decorativos el&sticos Motifs d6coratifs extensibles 3&5 (1_ Anchura de la puntada: 3 a 5 Largeur du point (2) Longitud de la puntada: Posici6n oro de puntada Longueur du point Position or point extensible elAstica L'_ Tension du fil de I'aiguille (_ Tensi6n del hilo de la aguja: 2 a 6 L_ Pied presseur A:... - Page 78 SECTION Vii. BUTTONHOLE AND TWIN NEEDLE STITCHES tVianual Buttonhole © ® Stitch width: 3to5 WIDTH LENG'fH Blue zone C2_ Stitch length: C3_ Needle thread tension: 2to6 Presser foot J: Sliding buttonhole foot Depending on your preference, you may adjust stitch density within the blue zone on the stitch length control.
-
Page 79: Seccion
SECCION Vii. OJALES Y PUNTADAS PARTIE VIL BOUTONNIERE ET AIGUtLLE$ DOBLE AGUJA JUMEL_=ES Boutonnibre manaelle Ojai manual 1C) Anchura de la puntada: 3 a 5 (_) Largeur du point 3&5 Zone bleue Longueur du point Longitud de ia puntada: Zona Azul 2&6 Tensi6n del hilo de la aguja: 2 a 6... -
Page 80: Manual Buttonhole
Manual Buttonhole (Continued) Set the stitch selector at _. Sew four (4) to six (6) stitches. Stop sewing at a right stitch. Set the stitch selector at [_. Sew until you reach the back marking of the buttonhole. Stop sewing at a right stitch. -
Page 81: Ojal Manual
Ojal Manual (continuaci6n) Boutonniere rnanuelie (suite) Ajuste el selector de puntada a _] . Cosa de cuatro (4) a R6glez le sSlecteur de point sur _ . Cousez quatre (4) seis (6) puntadas. Termine cosiendo con una puntada six (6) points. Arr6tez la couture avec I'aiguille & droite. derecha. -
Page 82: Automatic Buttonhole
Automatic Buttonhole For more varied and accurate buttonholes, use the buttonhole attachment and tern plates. The buttonhole attachment consists of the illustrated parts: (_ Guide slot Measure marking Catch (_) Buttonhole guide plate (_ Buttonhole templates (_) Guide block (_ Two pins (A) Hook (_ Lever ®... -
Page 83: Boutonniere Automatique
Ojal autorn&tico Boutonniere automatique Para mayor variedad y ojales mas precisos, use el Utilisez le guide pour les boutonnieres avec les gabarits accesorio para ojales, el cual consiste de las partes pour r_aliser des boutonnieres vari6es et plus precises. lustradas. Le guide pour les boutonnieres est constitu_ des pieces d_crites ci-dessous:... - Page 84 Automatic Bu_onhole (Continued) ® ® To Sew LENGTH WIDTH (_ Stitch width: (_ Stitch length: 3 to 4 Needle thread tension: 2 to 6 ® 4_ Presser foot: Buttonhole foot NOTE: Best results are obtained by using #60 or #80 lightweight thread for bobbin thread.
- Page 85 Ojai Automdtico (continuaci6n) Boutonniere automatique (suite) Para coser Pour coudre (_ Anchura de la puntada: (_ Largeur du point Longitud de la puntada: 3 a 4 (_ Longueur du point 3 & 4 Tensi6n del hilo de la aguja: 2 a 6 (._ Tension du fil de raiguille 2 &...
- Page 86 Automatic Bu_onhole (Continued) (_ Guide slot (._ Guide block (_ Buttonhole guide plate (_ Buttonhole template (_ Catch Setting mark (_ Gear (_ Base plate After you select a template _ with the style and size of buttonhole, slide the template into the guide plate 3_.
- Page 87 Ojal autom_tico (¢entinuaci6n) Boutonniere auternatique (suite) O Ranura guia (_ Fente de guidage (_ Bloque gufa (_ Doigt de guidage (_ Placa guia para ojales (_ Plaque guide de boutonni6re (_ Plantilla de ojales Gabarit Enganche Cliquet (_ Marca de posici6n (_ Marque de rep_re Dentada (_ Pignon...
- Page 88 Automatic Bu_onhole (Continued) O Marked buttonhole on fabric (_ Center marking on buttonhole foot (_ Measure marking on the guide plate (_ Fabric Mark the buttonhole position carefully on the fabric. Placing the fabric behind the machine, insert the fabric between the guide plate and the buttonhole foot as illustrated.
-
Page 89: Ojal Autom&Tico
Ojal autom&tico (continuaci6rt) Boutonniere automatique (suite) Q Ojal marcado en la tela (_) Trac6 de la boutonniere sur le tissu (_) Marca central en el pie para oj ales (_) Rep_re central sur le pied& boutonni¢re (_) Marca de medida en la _laca guia (_) ReP_re de dimension sur la plaque guide (_) Tela (_) Tissu... - Page 90 Twin Needle Stitches (Optional item) ® (_) Stitch width: 1'1" LENGTH V_DTH (_) Stitch length: Gold,stretch stitch position or green zone (_ Needle thread tension: 3 to 7 (_ Presser foot A: Zigzag foot (_) Presser foot F: Satin stitch fool ®...
-
Page 91: Puntadas De Doble Aguja (Objeto Opcional)
Puntadas de doble aguja (objeto opcional) Aiguilles jumel6es (en option} Anchura de la puntada (T) Largeur du point Position or point extensible Longitud de la puntada Posici6n oro de puntada Longueur du point ou zone verte el&stica o zona verde 3&7 Tensi6n de hilo de la aguja 3 a 7... -
Page 92: Replacing The Light Bulb
SECTION Viii. CARE OF YOUR MACHINE NOTE: Unplug the machine. Do not dismantle the machine other than as explained in this section. Do not store the machine in a high-humidity area, near a heat radiator or in direct sunlight. Clean the outside of the machine with a soft cloth and mild soap. -
Page 93: Maquina
SECCION Viii, MANTENIMIENTO DEL LA PARTIE Viii. ENTRETIEN DE VOTRE MAQUINA MACHINE NOTA: REMARQUE: * Debranchez la machine. * Desenchufe ia maquina. * Ne demontez rien d'autre que ce qui est decrit dans * No desmonte la m#.quina de ninguna otra forma que la ce chapitre. -
Page 94: Cleaning The Hook Race And Feed Dogs
Cleaning the Hook Race and Feed Dogs Unplug the machine and remove the presser foot and needle. Remove the screw on the left side of the needle plate with a screwdriver. Remove needle plate and take out the bobbin. Lift up the bobbin holder and remove it. -
Page 95: Limpieza Del Garfio Y Los Dientes Del Transporte
Limpieza dei ga_io y los dientes del transperte Nettoyage de la piste du crochet et des grilles d'entraTnement Desenchufe la m&quina y quite el pie prensatelas y la aguja. Destornille el tornillo que sujeta la placa de aguja D6branchez la machine et retirez I'aiguille et le pied con un destornillador. -
Page 96: Troubleshooting
Troubleshooting Condition Cause Reference The needle thread Page 24 The needle thread is not threaded properly. breaks. The needle thread tension is too tight. Pages26,28 The needle is bent or blunt. PagelO The needle is incorrectly inserted. Page!O The needle thread and the bobbin thread are not set properly under (drawn to the rear of) the presser foot when sewing is starting. -
Page 97: Soluciones De Problemas De Funcionamiento
Soluciones de probiemas de funciona_iento CONDICION CAUSA PROBABLE REFERENCIA Se rompe el hilo de la 1. El hilo de la aguja no se ha enhebi'ado correctamente. P_gina 25 aguja. 2. La tensi6n del hilo de la aguja es excesiva. P&ginas 27, 29 3. -
Page 98: En Cas De Problcme
cas de probl_rne Problbme Cause Page de reference Le fil d'aiguille se 1. Le fil d'aiguille n'est pas passe correctement. Page25 casse. 2. La tension du fil d'aiguille est trop forte. Pages 27,29 3. L'aiguille est tordue ou emoussee. Page 11 4. - Page 99 For the repair or replacement parts you need delivered directly to your home. Call 7 am - 7 pm, 7 days a week. 1-800-366-PART (1-800-366,7278) Para ordenar piezas con entrega a domicilio-1-800-659-7084 For in-house major brand repair service. Call 24 hours a day, 7 days a week. 1-800-4-REPAIR (1-800-473-7247) Para pedir servicio de reparacibn...