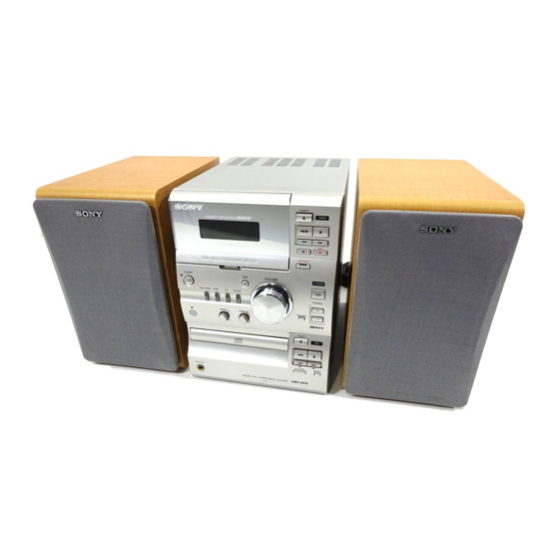
Sony CMT-CP11 Operating Instructions Manual
Micro hifi component system
Hide thumbs
Also See for CMT-CP11:
- Service manual (45 pages) ,
- Operating instructions manual (36 pages)
Table of Contents
Advertisement
S OI'_IY_
4-227-681
Micro
i
Component
System
Operating Instructions
Owner's Record
The model and serial numbers are located at the rear. Record the serial number in the space
provided below.
Refer to them whenever you call upon your Sony dealer regarding this
product.
Model No. CMT-CP 11
Serial No.
DIGITAL AUDIO
CMT-CP11
@2000 Sony Corporation
Advertisement
Table of Contents

Related Manuals for Sony CMT-CP11


Summary of Contents for Sony CMT-CP11
- Page 1 Owner's Record The model and serial numbers are located at the rear. Record the serial number in the space provided below. Refer to them whenever you call upon your Sony dealer regarding this product. Model No. CMT-CP 11 Serial No.
- Page 2 INFORMA TI ON This equipment has been tested and found to comply with the limits for a Class B digital device, pursuant To prevent fire or shock hazard, do not to Part 15 of the FCC Rules. These limits are expose the unit to rain or moisture.
-
Page 3: Table Of Contents
Table of Contents Other Features Getting Started Step 1: Hooking up the system ....Adjusting the sound ........ Step 2: Setting the time ......Using the Radio Data System (RDS)* ..24 Step 3: Presetting radio stations Falling asleep to music -- Preset .......... -
Page 4: Step 1: Hooking Up The System
Step 1: Hooking up the system Follow steps [] through [] of the procedure below to hook up your system using the supplied cords and accessories. AM loop antenna FM antenna Right speaker Left speaker © © Connect the speakers. []Connect the FM and AM antennas. - Page 5 Jack type ® Inserting size-AA (R6) batteries into remote Extend the FM AM loop wire antenna antenna horizontally With normal use, the batteries should last for about six months. When the remote no longer operates the system, replace both batteries with new ones. Notes on batteries •...
-
Page 6: Step 2: Setting The Time
Press ENTER. Step 2: Setting the time The minute indication flashes. Before you can use the system's timer functions, set the internal clock. The clock uses a 24-hour system on the European model, and a 12-hour system on other models. The 24-hour system is used here for illustration purposes. - Page 7 Press TUNER. Step 3: Presetting radio "TUNER" appears. stations - p_eset Press TUNER BAND to select FM or The system can store a total of 30 preset stations (20 for FM and 10 for AM/. This section explains how to tune in stations and preset them. Press TUNING MODE repeatedly until...
-
Page 8: Step 3: Presetting Radio Stations
Step 3: Presetting radio stations (continued) Connecting optional To tune in a weak station components In step 3, press TUNING MODE repeatedly until "AUTO" and "PRESET" disappear, then press This section explains how to connect a variety of TUNING +/- repeatedly to tune in the station. - Page 9 Connecting deck Connecting headphones digital recording Connect headphones to the PHONES jack. By connecting an MD deck to the system with a io® commercially available optical cable, you can make a digital recording from a CD. 0000 ¢b To the digital input connector on the MD deck ICED PHONES jack...
- Page 10 Connecting optional components (continued) Jack type ® _5o_hmpp_ig_lla,cable_ antenna For the AM antenna, use a 6- to 15-meter, horizontally extended insulated wire, with one end connected to the AM ANTENNA terminals shown below. Leave the supplied AM loop antenna connected. Jack type ®...
-
Page 11: Play
Press CD I_11. Playing a CD - Jvo ma/P/ay Playback starts. Do the procedure below to play a CD starting from the first track. 1717 jJ.u To turn on the system, press I/(._). I/(_ Track number Playing time VOLUME (Power) 7 , 2 Do this Stop playback... -
Page 12: Recording From A Cdto A Tape
Press TAPE EJECT and insert Recording from a CDto recordable tape into the cassette holder. a tape With the side you want to record on facing towards you CD Synchro Recording The CD Synchro Recording function makes it easy to record from a CD to a tape. Both Type I (normal) and Type II (CrO2) tapes can be used. -
Page 13: Listening To The Radio -- Preset Tuning
Press DIR MODE on the remote Listening to the radio repeatedly to select "._" to record on -- Preset Tuning one side of the tape, or "_)"or "(_)" to record on both sides. Presetting radio stations in the system's memory Press TAPE in advance makes it easy to tune in those stations later (see "Step 3: Presetting... - Page 14 Listening to the radio Tips (continued) • If you press TUNER BAND when the power is off, the system automatically turns on and tunes in the station last received (One Touch Play). Press TUNER. • To switch to the radio while listening to another source, press TUNER BAND (Automatic...
-
Page 15: Recording From The Radio
Press TUNER BAND to select FM or Recording from the radio Press TUNING MODE repeatedly until Do the procedure below to tune in a preset station "PRESET" appears. (see page 13) and record from the radio to a tape. Both Type I (normal) and Type II (CrO2) tapes Press TUNING +/- repeatedly can be used. -
Page 16: Playing A Tape
Recording from radio Playing a tape (continued) Press TAPE The system can play three types of tapes: Type I (normal), Type II (CrO,,) and Type IV (metal). Recording starts. The system automatically detects the tape type so there is no need to specify it. To stop recording To turn on the system, press I/Q). - Page 17 Tips Press TAPE EJECT A and insert a • If you press TAPE -_11_ when the power is off, recorded tape into the cassette holder. the system automatically turns on and starts playing the tape if there is a tape in the holder (One Touch With the side you want to play Play).
-
Page 18: Checking The Remaining Playing Time On The Cd
Playing CDtracks Checking the remaining repeatedly - Repoat p/ay playing time on the CD The Repeat Play function lets you playback Do the procedure below to check the remaining single track or all the tracks on a CD repeatedly playing time of the current track or the entire CD. Normal Play. -
Page 19: Playing Cd Tracks In Random Order -- Shuffle Play
cancel Shuffle Play Playing CDtracks in Press PLAY MODE repeatedly until "SHUFFLE" disappears. random order - Shuffle P lay Tips • You can also start Shuffle Play during Normal Play You can use this function to playback all the by selecting "SHUFFLE". tracks on a CD in random order. -
Page 20: Playing Cdtracks In A Favorite Order
Press PLAY MODE. Playing CDtracks in a The selected track is programmed. "STEP" favorite order appears, followed by the number of the selection just programmed, -- Program Play To program additional tracks, repeat You can make a program of up to 24 tracks on a steps 3 and 4. -
Page 21: Recording To A Tape Manually
"7 Press TAPE EJECT A and insert a Recording to a tape recordable tape. manually Press the button of the source you want to record from. Do the procedure below to manually record from any source to a tape. For example, tracks from a •... -
Page 22: Recording Your Favorite Cdtracks To A Tape
Recording your favorite "1 Press CD EJECT _A and place a CD. CDtracks to a tape Press CD EJECT _ again to close the disc tray. -- Program Edit Press TAPE EJECT --_ and insert a With Program Edit function, you can select only recordable tape. -
Page 23: Adjusting The Sound
1 0 Repeat steps 6 and 7 to select tracks to Adjusting the sound be recorded on the side of the tape facing away from you. Not only can you adjust the bass and treble, you can use the DSG (Dynamic Sound Generator) 1 1 Press CD SYNC. -
Page 24: Usingthe Radio Data System (Rds)
Usingthe Radio Data Falling asleep to music System (RDS) -- Sleep Timer (European model only) The Sleep Timer function lets you specify a sleep time, after which the system stops playing and What is the RadioData turns off automatically. You can thus tall asleep to music. -
Page 25: Waking Up To Music -- Daily Timer
Waking up to music Press 1}<_ or _ repeatedly until "SET DAILY" appears. -- Daily Timer "SET DAILY" scrolls and "Q DAILY" appears in the display. By setting the Daily Timer, you can make the Press ENTER. system automatically turn on and off at specified times. -
Page 26: Timer-Activated Recording Of Radio Programs - Rectimer
Waking up to music (continued) Timer-activated recording of radio Press ENTER. programs - REcTimer The starting time, the slopping lime, and the music source appear in turn, then the original display returns. Set the REC Timer to make the system start recording from a preset radio station at a specified Press I/(_ to turn off the system,... - Page 27 To check settings Press 0<3<1 or _ repeatedly until Press TIMER SELECT repeatedly until "O REC" "SET REC" appears. appears in the display. "SET REC" scrolls and "Q REC" appears in The preset items appear in turn. the display. To turn REC Timer Press ENTER.
-
Page 28: Precautions
• When moving the unit, remove any disc that may be on the disc tray. If you have any questions or problems concerning Detector slots your system, please consult your nearest Sony dealer. -
Page 29: Troubleshooting
The tape may get entangled in the tape corrective action. deck's playing mechanism. If the problem persists after doing all of the above, consult your nearest Sony dealer. Cleaning tape heads Clean the tape heads after every l0 hours of use. - Page 30 Tape Deck Troubleshooting (continued) Recording cannot be done. The remote does not work. • There is no tape in the cassette holder, • There is an obstacle between the remote and • The record protect tab has been removed from the unit.
-
Page 31: Specifications
Tuner Specifications There is a severe hum or noise ("TUNED" or "STEREO" flashes). Amplifier section • Adjust the antenna. U.S. model • The signal strength is too weak. Connect an AUDIO POWER SPECIFICATIONS external antenna (see page 9). POWER OUTPUT AND TOTAL HARMONIC •... - Page 32 50 - 13,000 Hz (+3 dB), using a Sony TYPE 1 cassette Mass Approx. 5.6 kg 50 - 14,000 Hz (:!:3 dB), using a Sony TYPE 11 cassette Wow and flutter +0.15% W. Peal', (1EC) Supplied accessories Remote commander 0.1% W.
-
Page 33: Parts Identification For The Remote
TAPE Parts identification for Remote Function Button(s) the remote TAPE <31_> Starts playback. Each time you press this button, the tape reverses direction. You can also operate the system with the supplied remote. Stops playback. Buttons marked with "*" are provided only on the I1 I1 Pauses playback. -
Page 34: Index
Index Playing Tape deck 12, 15, 16,21,26 Timer a tape 16 falling asleep to music tracks in random order timer-activated recording (Shuffle Play) Adjusting tracks in the desired order the bass waking up to music (Program Play) 20 the treble Troubleshooting tracks repeatedly (Repeat... - Page 36 SonyOline http://www.world.sony.com/ Sony Corporation Printed in USA...