Epson EB S6 User Manual
Hide thumbs
Also See for EB S6:
- Specifications (2 pages) ,
- User manual (28 pages) ,
- Brochure & specs (6 pages)
Table of Contents
Advertisement
Quick Links
Advertisement
Chapters
Table of Contents

Related Manuals for Epson EB S6


Summary of Contents for Epson EB S6
- Page 1 User's Guide...
-
Page 2: Notations Used In This Guide
Notations Used in This Guide Safety Indications So that you can use the projector safely and correctly, symbols are applied in the documentation and on the projector to indicate possible harm to the user or to others and the risk of damage to property. The indications and their meaning are as follows. -
Page 3: Table Of Contents
Contents Projector Features..................5 Troubleshooting Part Names and Functions ................6 Using the Help ..................49 Front/Top......................6 Rear (EB-W6 only) ....................7 Problem Solving..................51 Rear (EB-X6/S6 only)................... 8 Reading the Indicators..................51 Control Panel (EB-W6/X6 only)................9 When the Indicators Provide No Help..............55 Control Panel (EB-S6 only) ................ - Page 4 Contents Using Slideshow (EB-W6 only) ...............90 Image Files that can be Projected in a Slideshow ..........90 Basic Slideshow Operations ................90 Setting Image File Display and Slideshow............95 Optional Accessories and Consumables..........97 Glossary ....................98 ESC/VP21 Commands................100 Command List ....................100 Cable Layouts ....................
-
Page 5: Projector Features
Projector Features Projecting images from a USB storage device or SD card without Ease of use using a computer (EB-W6 only) Connect the USB storage device or SD card to the projector, and you can The A/V mute slide makes it easy to project and store project JPEG images of photographs shot with a digital camera and so on, You can stop and resume projection as a slideshow. -
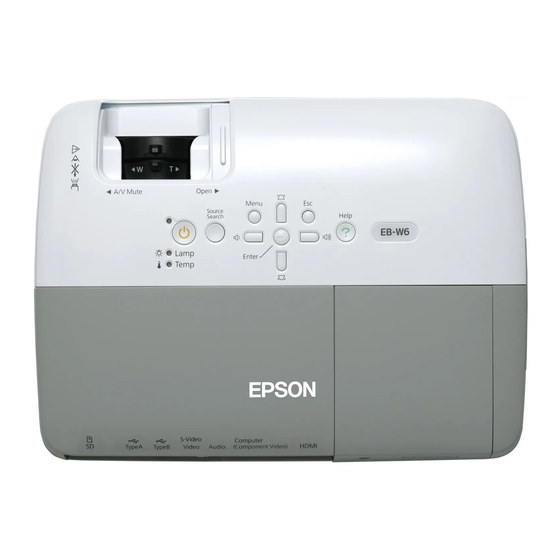
Page 6: Part Names And Functions
Part Names and Functions Front/Top Name Function Front adjustable Extend and adjust the position of the projected feet image when the projector is placed on a surface such as a desk. s Quick Start Guide Foot adjust lever Pull out the foot lever to extend and retract the front foot. -
Page 7: Rear (Eb-W6 Only)
Part Names and Functions Rear (EB-W6 only) Name Function S-Video input For S-video signals from video sources. port Video input port For composite video signals from video sources. Audio input port Connects to the audio output port of the equipment you want to project from and inputs the audio. -
Page 8: Rear (Eb-X6/S6 Only)
Part Names and Functions Rear (EB-X6/S6 only) Name Function Computer input For video signals from a computer and port component video signals from other video sources. S-Video input For S-video signals from video sources. port Video input port For composite video signals from video sources. -
Page 9: Control Panel (Eb-W6/X6 Only)
Part Names and Functions Control Panel (EB-W6/X6 only) Name Function [Enter] button If pressed during projection of computer signal images, it automatically adjusts the tracking, synchronization, and position to project the optimum image. When a configuration menu or a help screen is displayed, it accepts and enters the current selection and moves to the next level. -
Page 10: Control Panel (Eb-S6 Only)
Part Names and Functions Control Panel (EB-S6 only) Name Function [v] [w] buttons Corrects keystone distortion. If pressed when a configuration menu or a help screen is displayed, these buttons select menu items and setting values. s Quick Start Guide, p.39 [Help] button Displays and closes the help screen which... -
Page 11: Remote Control (Eb-W6 Only)
Part Names and Functions Remote Control (EB-W6 only) Name Function [t] button Turns the projector power on or off. s Quick Start Guide [S-Video] button Changes to images from the S-Video input port. s p.18 [Computer] Changes to images from the Computer input button port. - Page 12 Part Names and Functions Name Function Name Function [Menu] button Displays and closes the configuration menu. [Num] button Use these buttons when entering a password. p.37 p.31 If pressed when a configuration menu or a help [HDMI] button Changes to images from the HDMI input port. ] button screen is displayed, these buttons select menu p.18...
-
Page 13: Remote Control (Eb-X6/S6 Only)
Part Names and Functions Remote Control (EB-X6/S6 only) Name Function [t] button Turns the projector power on or off. sQuick Start Guide [Source Search] Changes to the next input source that is button connected to the projector and is sending an image. - Page 14 Part Names and Functions Name Function Name Function [Volume] button The volume adjustment screen is displayed. Remote control Outputs remote control signals. sQuick Start light-emitting You can adjust the volume by pressing the Guide area [ ]/[ ] buttons. Numeric buttons Use these buttons when entering a password.
-
Page 15: Base
Part Names and Functions Base Name Function Air filter This prevents dust and other foreign particles (Air intake vent) from getting inside the projector when air is drawn in. The projector displays a warning message when it is time to clean or replace the air filter. -
Page 16: Useful Functions
Useful Functions This chapter explains useful functions for giving presentations and so on, and the security functions. Changing the Projected Image ......17 • Changing the Aspect Ratio ..........24 Switching methods................. 24 • Switching by Automatic Detection of Input Signal Changing the aspect ratio of video equipment images .... -
Page 17: Changing The Projected Image
Changing the Projected Image Use the following methods to switch images for projection. • Switching by source search Procedure The projector automatically detects signals being input from When your video equipment is connected, start playback before beginning connected equipment, and the image being input from the equipment this operation. -
Page 18: Direct Switching By Remote Control (Eb-W6 Only)
Changing the Projected Image The following screen showing the status of image signals is displayed when only the image that the projector is currently displaying is available, or when no image signal can be found. You can select the input port where the connected equipment you want to use is projecting. -
Page 19: Functions For Enhancing Projection
Functions for Enhancing Projection Selecting the Projection Quality (Selecting Color Changing color mode by remote control (EB-W6 only) Mode) Procedure You can easily obtain the optimum image quality simply by selecting the setting that best corresponds to your surroundings when projecting. The brightness of the image varies depending on the mode selected. -
Page 20: Changing Color Mode With The Configuration Menu
Functions for Enhancing Projection Changing color mode with the configuration menu Select a Color Mode name. Procedure Press the [Menu] button to close the configuration menu. Press the [Menu] button and select "Image" - "Color Mode" in the configuration menu. EB-W6 s p.37 EB-X6 s... -
Page 21: Setting Auto Iris
Functions for Enhancing Projection Setting Auto Iris Select "On". The set value is stored for each color mode. By automatically setting the luminance according to the brightness of the displayed image, it lets you enjoy deep and rich images. Press the [Menu] button to close the configuration menu. -
Page 22: Hiding The Image And Sound Temporarily (A/V Mute)
Functions for Enhancing Projection Hiding the Image and Sound Temporarily (A/V Mute) Each time you press the button, or the A/V mute slide is opened or closed, A/V Mute turns on or off. You can use this when you want to focus the audience's attention on what you are saying, or if you do not want to show details such as when you are •... -
Page 23: Freezing The Image (Freeze)
Functions for Enhancing Projection Freezing the Image (Freeze) • Audio does not stop. When the moving image on the screen is frozen, the image continues to • The image source continues to play back the moving project, so you can project a moving image one frame at a time like a still images even while the screen is frozen, so it is not possible photo. -
Page 24: Changing The Aspect Ratio
Functions for Enhancing Projection Changing the Aspect Ratio EB-X6/S6 When you connect video equipment and project images that have been Press the [Menu] button and select "Signal" - recorded in digital video or onto DVDs in 16:9 wide-screen format, "Aspect" from the configuration menu. change the aspect ratio . -
Page 25: Changing The Aspect Ratio Of Video Equipment Images
Functions for Enhancing Projection Press the [Enter] button to display the "Aspect" Changing the aspect ratio of video equipment images screen. EB-X6/S6 16:9 * During 720p/1080i signal input, the display has a zoom ratio of 4:3 (display of image with left and right cut off). Select the aspect ratio and press the [Enter] button. -
Page 26: Changing The Aspect Of Computer Images (For Eb-X6/S6)
Functions for Enhancing Projection Changing the aspect of computer images (For EB-X6/S6) When projecting input images from the Computer Input port, the aspect ratio can be changed as follows. Setting Explanation Projection example Normal During image input Projects to the full projection size retaining the from Computer aspect of the input image. -
Page 27: Changing The Aspect Of Computer Image/Hdmi Image (For Eb-W6)
Functions for Enhancing Projection Changing the aspect of computer image/HDMI image (For EB-W6) When projecting input images from the Computer input port or HDMI input port, the aspect ratio can be changed as follows. For EB-W6 the projection size is 1280 x 800 dots (aspect ratio 16:10) due to WXGA panel resolution. When projecting on to 16:9 screens, set the aspect to "16:9". Setting Explanation Projection example... - Page 28 Functions for Enhancing Projection Setting Explanation Projection example Zoom Projects to full projection size in the lateral During 1024 ^ 768 signal input direction retaining the aspect ratio of input image. Parts that extend beyond the projection size are not projected. Through Projects at the resolution of the input image size During 800 ^ 600 signal input...
-
Page 29: Enlarging Part Of The Image (E-Zoom)
Functions for Enhancing Projection Enlarging Part of the Image (E-Zoom) Move the cross to the area of the image that you want to enlarge. This is useful when you want to expand images such as graphs and tables Remote control to see them in greater detail. - Page 30 Functions for Enhancing Projection Enlarge. Remote control EB-W6 EB-X6/S6 Each time the button is pressed, the area is enlarged. You can enlarge quickly by holding the button down. You can reduce the enlarged image by pressing the [-] button. Press the [Esc] button to cancel. •...
-
Page 31: Security Functions
Security Functions The projector has the following enhanced security functions. Setting Password Protect • Password protect Use the following procedure to set Password Protect. You can limit who can use the projector. • Control Panel Lock Procedure You can prevent people from changing the settings on the projector without permission. - Page 32 Security Functions Turn on "Power On Protect". (3) Enter a four digit number using the numeric buttons. (With the EB-W6, enter the digit while holding down the [Num] button.) (1) Select "Power On Protect", and then press the [Enter] button. The number entered is displayed as "* * * *".
-
Page 33: Entering The Password
• If you continue to repeat the above operation and input the wrong password thirty times in succession, the following message is displayed and the projector does not accept any more password entries. "The projector's operation will be locked. Contact Epson as described in your documentation." Epson Projector... -
Page 34: Restricting Operation (Control Panel Lock)
Security Functions Restricting Operation (Control Panel Lock) Using the control panel Do one of the following to lock the operation buttons on the control panel. • Full lock All of the buttons on the control panel are locked. You cannot perform any operations from the control panel, including turning the power on or off. -
Page 35: Anti-Theft Lock
Security Functions Select "Yes" when the confirmation message is Anti-Theft Lock displayed. As the projector is often setup on ceiling mounts and left in rooms The control panel buttons are locked according to the setting you unattended, it is possible that someone may try and take the projector, so chose. -
Page 36: Configuration Menu
Configuration Menu This chapter explains how to use the configuration menu and its functions. Using the Configuration Menu (For EB-W6)..37 Using the Configuration Menu (For EB-X6)..38 Using the Configuration Menu (For EB-S6)..39 List of Functions ..........40 •... -
Page 37: Using The Configuration Menu (For Eb-W6)
Using the Configuration Menu (For EB-W6) Selecting from the top menu Selecting from the sub menu Changing the selected item Exit Top menu Guide Sub menu (Settings) Buttons used Using the control panel Select the setting to change Using the remote control... -
Page 38: Using The Configuration Menu (For Eb-X6)
Using the Configuration Menu (For EB-X6) Selecting from the top menu Selecting from the sub menu Changing the selected item Exit Top menu Guide Sub menu (Settings) Buttons used Using the control panel Select the setting to change Using the remote control... -
Page 39: Using The Configuration Menu (For Eb-S6)
Using the Configuration Menu (For EB-S6) Selecting from the top menu Selecting from the sub menu Changing the selected item Exit Top menu Guide Sub menu (Settings) Buttons used Using the control panel Select the setting to change Using the remote control... -
Page 40: List Of Functions
List of Functions Image Menu Items that can be set vary depending on the image signal currently being projected as shown in the following screen shots. Setting details are saved for each image signal. Computer image Component video /Composite video /S-video Sub Menu Function... -
Page 41: Signal Menu
List of Functions Signal Menu Items that can be set vary depending on the image signal currently being projected as shown in the following screen shots. Setting details are saved for each image signal. Computer image HDMI image (EB-W6 only) Component video Composite video /S-video... - Page 42 List of Functions Sub Menu Function Reset You can reset all adjustment values in the "Signal" menu to their default settings, except for "Input Signal". To return all menu items to their default settings, see s p.47...
-
Page 43: Settings Menu
List of Functions Settings Menu EB-W6/X6 EB-S6 Sub Menu Function Keystone You can correct vertical keystone distortion in images. s Quick Start Guide Auto Keystone Performs automatic keystone correction. (EB-W6/X6 only) (This can only be specified when "Front" is selected from "Extended" - "Projection".) Zoom Set Tele/Wide. -
Page 44: Extended Menu
List of Functions Extended Menu Sub Menu Function Display You can make settings related to the projector's display. Messages: You can set whether to display (On) or not display (Off) the source name when you change the input source, the color mode name when you change the Color Mode, a message when no image signal is input, and so on. - Page 45 List of Functions Sub Menu Function Operation Direct Power On: You can set whether Direct Power On is enabled (On) or disabled (Off). When it is set to "On" and the projector power cable is connected to an electrical outlet, be aware that sudden surges of electricity may cause the projector to turn on automatically.
-
Page 46: Info Menu (Display Only)
List of Functions Info Menu (Display only) Lets you check the status of the image signals being projected and the status of the projector. Items displayed vary depending on the image signal currently being projected as shown in the following screen shots. USB Display/Slideshow Signal from the computer image/component Composite video... -
Page 47: Reset Menu
List of Functions Reset Menu Sub Menu Function Reset All You can reset all items in all menus to their default settings. The following items are not reset to their defaults: "Input Signal", "User's Logo", "Lamp Hours", and "Language". Reset Lamp Hours You can clear the cumulative Lamp Hours use time, and return it to "0H". -
Page 48: Troubleshooting
Troubleshooting This chapter describes how to identify problems and what to do if a problem is found. Using the Help............. 49 Problem Solving ..........51 • Reading the Indicators............51 t Power indicator lights red ............52 i · o Indicator is lit or flashing orange.........54 •... -
Page 49: Using The Help
Using the Help If a problem occurs with the projector, Help uses on-screen displays to Select a menu item. assist you in solving the problem. By answering the questions, you can make the correct settings. Procedure Press the [Help] button. The help screen is displayed. - Page 50 Using the Help Confirm the selection. Using the remote control EB-W6 EB-X6/S6 Using the control panel EB-W6/X6 EB-S6 Questions and solutions are displayed as shown on the screen below. Press the [Help] button to exit Help. • If Help does not provide a solution to the problem, refer to "Problem Solving".
-
Page 51: Problem Solving
Problem Solving If you are having a problem with the projector, first check the projector's indicators and refer to "Reading the Indicators" below. If the indicators do not show clearly what the problem might be, refer to "When the Indicators Provide No Help". s p.55 Reading the Indicators The projector is provided with the following three indicators that indicate the operating status of the projector. -
Page 52: Power Indicator Lights Red
Stop using the projector, disconnect the power cable from the electrical outlet, and contact your local dealer or the nearest address provided in the Support and Service Guide. s Epson Projector Contact List Fan Error Stop using the projector, disconnect the power cable from the electrical outlet, and contact your local dealer or the nearest Sensor Error address provided in the Support and Service Guide. - Page 53 Support and Service Guide. Epson Projector Contact List If it is cracked - Replace it with a new lamp, or contact your local dealer for further advice. If replacing the lamp yourself, be careful to avoid pieces of broken glass (you cannot continue projecting until the lamp is replaced).
-
Page 54: I O Indicator Is Lit Or Flashing Orange
• If an indicator is displaying a status not described in the tables, stop using the projector, disconnect the power cable from the electrical outlet, and contact your local dealer or the nearest address provided in the Support and Service Guide. Epson Projector Contact List... -
Page 55: When The Indicators Provide No Help
Problem Solving When the Indicators Provide No Help Problems when projection starts If any of the following problems occur and the indicators do not offer a Power does not turn on s p.60 solution, refer to the pages given for each problem. Problems relating to images Other problems No images appear s... -
Page 56: Problems Relating To Images
Problem Solving Problems relating to images No images appear Check Remedy Did you press the [t] button? Press the [t] button to turn the power on. Are the indicators switched off? The power cable is not connected correctly or power is not being supplied normally. Connect the projector's power cable correctly. - Page 57 Problem Solving The message "Not supported." is displayed Check Remedy Is the image signal format setting correct? Change the setting according to the signal for the connected equipment. s"Signal" - "Video Signal" p.41 Only when projecting images from a video source Do the image signal resolution and the refresh rate Refer to the computer's documentation for how to change the image signal resolution and the refresh rate correspond to the mode?
- Page 58 Problem Solving Interference or distortion appear in images Check Remedy Is the image signal format setting correct? Change the setting according to the signal for the connected equipment. s"Signal" - "Video Signal" p.41 Only when projecting images from a video source Are the cables connected correctly? Check that all the cables required for projection are securely connected.
- Page 59 Problem Solving Image colors are not right Check Remedy Do the input signal settings match the signals from the Change the following settings according to the signal for the connected equipment. connected device? When projecting images from equipment connected to Computer Input port, see s "Signal" - "Input Signal"...
-
Page 60: Problems When Projection Starts
Support and Service Guide. s Epson Projector Contact List Is the control panel lock set to "Full Lock"? When you press and hold down the [Enter] button on the control panel for about seven seconds, a message is displayed and the lock is released. -
Page 61: Other Problems
Problem Solving Other problems There is no audio or the audio is too low Check Remedy Is the audio source connected correctly? Check that the cable is connected to the Audio port. Is the volume adjusted to the minimum setting? Adjust the volume so that sound can be heard. -
Page 62: Appendices
Appendices This chapter provides information on maintenance procedures to ensure the best level of performance from the projector for a long time to come. Installation Methods ........... 64 Connecting and Removing a USB Device (EB-W6 only)............79 Cleaning............... 65 • Connecting a USB Device ..........79 •... - Page 63 Using Slideshow (EB-W6 only)......90 List of Supported Monitor Displays ....102 • Image Files that can be Projected in a Slideshow ..90 • EB-W6 ................102 • Basic Slideshow Operations ..........90 Computer images (analog RGB)..........102 Component Video ................ 103 Starting Slideshow................90 Composite video/S-video.............
-
Page 64: Installation Methods
Installation Methods The projector supports the following four different projection methods. • Suspend the projector from • Suspend the projector from Install according to the conditions of the installation location. the ceiling and project images the ceiling and project images from front of the screen. -
Page 65: Cleaning
Cleaning You should clean the projector if it becomes dirty or if the quality of projected images starts to deteriorate. Attention If dust collects on the air filter it can cause the internal temperature of the projector to rise, and this can lead to problems with operation Cleaning the Projector's Surface and shorten the optical engine's service life. -
Page 66: Replacing Consumables
Replacing Consumables This section explains how to replace the remote control batteries, the Replace the old batteries with new batteries. lamp, and the air filter. Caution Check the positions of the (+) and (-) marks inside the battery Replacing the Remote Control Batteries holder to ensure the batteries are inserted the correct way. -
Page 67: Replacing The Lamp
Replacing Consumables Replace the battery cover. • The lamp indicator flashes orange. Press the battery cover until it clicks into place. Flashing orange EB-W6 EB-X6/S6 Replacing the Lamp The illustration is of the EB-W6. Lamp replacement period • The projected image gets darker or starts to deteriorate. It is time to replace the lamp when: •... -
Page 68: How To Replace The Lamp
Replacing Consumables How to replace the lamp Attention Warning • The lamp replacement message is set to appear after the following time periods in order to maintain the initial brightness and quality When replacing the lamp because it has stopped illuminating, there of the projected images. - Page 69 + head screwdriver. Then slide the lamp cover straight forward and lift it to remove. Take out the old lamp. If the lamp is cracked, replace it with a new lamp, or contact your local dealer for further advice. s Epson Projector Contact List...
-
Page 70: Resetting The Lamp Operating Time
Replacing Consumables Install the new lamp. Replace the lamp cover. Insert the new lamp along the guide rail in the correct direction so that it fits in place, push down firmly at the location marked "PUSH", and once it is fully inserted tighten the two screws. Attention •... -
Page 71: Replacing The Air Filter
Replacing Consumables Replacing the Air Filter Install the new air filter. Slide the air filter in from the outside and push until it clicks into place. Air filter replacement period It is time to replace the air filter when: • The air filter is ripped. •... -
Page 72: Saving A User's Logo
Saving a User's Logo You can save the image that is currently being projected as a user's From the configuration menu, select "Extended" - logo. "User's Logo". EB-W6 s p.37 EB-X6 s p.38 When registering a user logo , the current user logo is EB-S6 p.39 erased and the default setting is not resumed. - Page 73 Saving a User's Logo When "Choose this image as the User's Logo?" is Using the control panel displayed, select "Yes". When you press the [Enter] button on the remote control or the control panel, the screen size may change as it changes to the resolution of the image signal.
- Page 74 Saving a User's Logo When the message "Save this image as the User's Logo?" is displayed, select "Yes". The image is saved. After the image has been saved, the message "Completed" is displayed. Saving the user's logo may take about 15 seconds. Do not use the projector or any connected equipment while it is saving.
-
Page 75: Screen Size And Distance
Screen Size and Distance See the following table to choose the best position for your projector. The values are only a guide. EB-W6 Units: cm (in.) Units: cm (in.) Units: cm (in.) Projection Distance Projection Distance Projection Distance 16:10 Screen Size 4:3 Screen Size 16:9 Screen Size Minimum (Wide) to... -
Page 76: Eb-X6
Screen Size and Distance EB-X6 Units: cm (in.) Units: cm (in.) Projection Distance Projection Distance 4:3 Screen Size 16:9 Screen Size Minimum (Wide) to Minimum (Wide) to Maximum (Tele) Maximum (Tele) 30" 61 ^ 46 (24 ^ 18) 84 to 101 (33 to 40) -5 (-1.9) 30"... -
Page 77: Eb-S6
Screen Size and Distance EB-S6 Units: cm (in.) Units: cm (in.) Projection Distance Projection Distance 4:3 Screen Size 16:9 Screen Size Minimum (Wide) to Minimum (Wide) to Minimum (Wide) to Minimum (Wide) to Maximum (Tele) Maximum (Tele) Maximum (Tele) Maximum (Tele) 30"... -
Page 78: Connecting To External Equipment
Connecting to External Equipment Connecting to an External Monitor (EB-X6/S6 only) Computer images being input the Computer Input port can be displayed on an external monitor and the screen at the same time when connected to the projector. This means that you can check projected images on an external monitor when giving presentations even if you cannot see the screen. -
Page 79: Connecting And Removing A Usb Device (Eb-W6 Only)
Connecting and Removing a USB Device (EB-W6 only) You can connect a digital camera, hard disk drive and USB memory compatible with USB 2.0 or 1.1. You can project image files from a Attention connected digital camera or USB storage device in Slideshow. •... -
Page 80: Inserting And Ejecting A Sd Card (Eb-W6 Only)
Inserting and Ejecting a SD Card (EB-W6 only) You can project image files from a inserted SD card or SDHC (SD Reading the SD Card Access Lamp High Capacity) card in Slideshow. s p.90 The SD card access lamp is lit or flashing as follows to indicate the access From here on these are referred to as SD cards. -
Page 81: Ejecting A Sd Card
Inserting and Ejecting a SD Card (EB-W6 only) Ejecting a SD Card Attention Do not remove the card while its access lamp is flashing. You may damage the card or projector. Procedure Lightly press the SD card. The SD card ejects. SD Card Access Lamp Grip the SD card and pull it straight out. -
Page 82: Connecting With Usb Cable For Projection (Usb Display)
Connecting with USB Cable for Projection (USB Display) The projector can project computer images when connected via the supplied USB cable to a Windows computer. This function is called USB Display. Attention Computer images can quickly be projected simply by connecting with a USB Do not connect via a USB hub: connect the projector directly to the cable. -
Page 83: How To Connect (For Eb-X6/S6)
Connecting with USB Cable for Projection (USB Display) How to Connect (For EB-X6/S6) Procedure Turn the power on for the Connect the supplied USB cable. computer. Also connect an audio cable (commercially available) when you want to output audio from the projector's speaker. s "When connecting for the first time"... -
Page 84: When Connecting For The First Time
• When images are not projected, click "All Programs" - be possible. In this case, update Windows to the latest status and "EPSON Projector" - "EPSON USB Display" - "EPSON then reconnect. For more details, contact the nearest address USB Display Vx.x". -
Page 85: From The Second Time
Connecting with USB Cable for Projection (USB Display) From the second time Computer images are projected. It may take a little time before computer images are projected. Leave the equipment as it is during this period. -
Page 86: Connecting A Usb Cable
Connecting a USB Cable Connect the computer’s USB port and the USB port (Type B) on the Page Up/Down by Remote Control rear of the projector with a supplied USB cable to use functions other When projecting a computer screen image, you can operate Page Up/ than those available with USB Display. -
Page 87: Operating The Mouse Pointer By Remote Control (Wireless Mouse Function)
Connecting a USB Cable Example of Use: When showing a slideshow in PowerPoint, the previous Operating the Mouse Pointer by Remote Control and next slides are displayed as follows. (Wireless Mouse function) To display previous slide/next slide in PowerPoint slideshow The supplied remote control has a mouse pointer operation function. -
Page 88: Wireless Mouse Operation (Eb-W6 Only)
Connecting a USB Cable Wireless mouse operation (EB-W6 only) • You may not be able to use the Wireless Mouse function Moving mouse pointer Mouse click operation depending on your version of the Windows or Macintosh operating system. • You may need to make settings on the computer side to use the mouse. -
Page 89: Wireless Mouse Operation (Eb-X6/S6 Only)
Connecting a USB Cable Wireless Mouse operation (EB-X6/S6 only) • When the left and right mouse buttons are set oppositely Moving mouse pointer Mouse click operation on your computer, the remote control operations are also reversed. • You cannot use the Wireless Mouse function when using the following functions. -
Page 90: Using Slideshow (Eb-W6 Only)
Using Slideshow (EB-W6 only) You can make presentations by connecting the projector to a digital Basic Slideshow Operations camera, USB storage device or SD card. The image files stored on The following explains the basic operating method for Slideshow. these devices can be projected directly. This makes projection easy, The following operations are all performed by remote control. -
Page 91: Exiting Slideshow
Using Slideshow (EB-W6 only) Exiting Slideshow When the projector is connected to multiple storage devices, the following kind of drive selection screen is displayed containing icons that indicate the type of storage. In this case, press the [ ] button, and after selecting Procedure the drive for the content you want to display, press the [Enter] button. - Page 92 Using Slideshow (EB-W6 only) The following explains the file browser screen. Item names Function Contents screen Displays folder and thumbnails of image files. Status display • Press the [ ] button, and select a folder or Control panel (top) thumbnailed image file. The selected folder and image file are surrounded by a colored border (cursor).
-
Page 93: Playing Individual Images
Using Slideshow (EB-W6 only) Playing individual images Press the [Enter] button. The selected image file is played. Procedure Press the [ ] button, and position the cursor on the image file you want to project. • Position the cursor on the image file, press the [Esc] button, and the following sub-menu is displayed. -
Page 94: Running Slideshow
Using Slideshow (EB-W6 only) Running Slideshow • When you want to start a slideshow from a particular You can play image files in a folder one by one in sequence. This function image file, play the file and press the [Enter] button. is known as Slideshow. -
Page 95: Setting Image File Display And Slideshow
Using Slideshow (EB-W6 only) Rotating images Setting Image File Display and Slideshow. You can rotate the image being played in 90° units. You can also rotate To set the browser's image display order and set Slideshow, display the images being played in a slideshow. Use the following procedure to rotate option menu. - Page 96 Using Slideshow (EB-W6 only) Position the cursor over the item you want to change, press the [Enter] button, and the setting becomes effective. Refer to the following table for details of each item. Item Function Display Setting Sets the order of files for display. Files can be selected in order of name or ascending order of update.
-
Page 97: Optional Accessories And Consumables
Contact your dealer or the nearest address provided in the Support and Soft carrying case ELPKS16B Service Guide if you want to use this installation method. s Epson Projector Use this case if you need to travel with the projector. Contact List 60"... -
Page 98: Glossary
Glossary This section briefly explains terms that are used with the projector and difficult terms that are not explained in the text of this guide. For details, refer to other commercially available publications. Aspect ratio The width-to-height ratio of a projected image or screen. When the width-to-height ratio is 16:9 or 16:10, the elongated screen is known as wide-screen. - Page 99 Glossary SXGA A type of video signal with a resolution of 1280 (horizontal) ^ 1024 (vertical) dots that is used by IBM PC/AT-compatible computers. Synchronization The signals output from computers have a specific frequency. If the projector frequency does not match this frequency, the resulting images are not of a good quality.
-
Page 100: Esc/Vp21 Commands
ESC/VP21 Commands Command List Cable Layouts The ESC and VP21 commands are commands sent from the computer to USB connection control the projector. Connector shape: USB (Type B) When the power ON command is transmitted to the projector, the power turns on and it enters warm-up mode. -
Page 101: Usb Connection Setup
"USB Display". In addition to that, the following preparations are required. Procedure Download the USB driver (USB-COM Driver) from the Epson Web site to your computer. Go to http://www.epson.com and select the support section of your local Epson Web site. -
Page 102: List Of Supported Monitor Displays
List of Supported Monitor Displays EB-W6 Computer images (analog RGB) Aspect Mode Refresh Rate Resolution Signal (Hz) (dots) Normal 16:9 Full Zoom Through VGAEGA 640^350 1280^700 1280^720 1280^800 1280^700 640^350 60/72/75/85, iMac 640^480/640^360 1066^800 1280^720 1280^800 1280^800 640^480 SVGA 56/60/72/75/85, iMac 800^600/800^450 1066^800 1280^720... -
Page 103: Component Video
List of Supported Monitor Displays Component Video Units: dots Aspect Mode Refresh rate Signal Resolution (Hz) Normal 16:9 Full Zoom Through SDTV (480i) 720^480/720^360 1066^800 1280^720 1280^800 1280^800 640^480 SDTV(576i) 720^576/720^432 1066^800 1280^720 1280^800 1280^800 768^576 SDTV(480p) 720^480/720^360 1066^800 1280^720 1280^800 1280^800 640^480... -
Page 104: Input Signal From Hdmi Input Port
List of Supported Monitor Displays Input signal from HDMI input port Units: dots Aspect Mode Refresh rate Signal Resolution (Hz) 16:9 Full Zoom Through 640^480/640^360 1280^720 1280^800 1280^800 640^480 SVGA 800^600 1280^720 1280^800 1280^800 800^600 1024^768 1280^720 1280^800 1280^800 1024^768 1280^960 1280^720 1280^800... -
Page 105: Eb-X6
List of Supported Monitor Displays EB-X6 Computer images (analog RGB) Units: dots Aspect Mode Refresh rate Signal Resolution (Hz) Normal 16:9 VGAEGA 640^350 1024^560 1024^768 1024^576 60/72/75/85/iMac 640^480/640^360 1024^768 1024^768 1024^576 56/60/72/75/85/ SVGA 800^600/800^450 1024^768 1024^768 1024^576 iMac 60/70/75/85/iMac 1024^768/1024^576 1024^768 1024^768 1024^576... -
Page 106: Component Video
List of Supported Monitor Displays Component Video Units: dots Aspect Mode Refresh rate Signal Resolution (Hz) 16:9 SDTV (480i) 720^480/720^360 1024^768 1024^576 SDTV(576i) 720^576/720^432 1024^768 1024^576 SDTV(480p) 720^480/720^360 1024^768 1024^576 SDTV(576p) 720^576/720^432 1024^768 1024^576 HDTV (720p) 50/60 1280^720 1024^768 1024^576 HDTV(1080i) 50/60 1920^1080... -
Page 107: Eb-S6
List of Supported Monitor Displays EB-S6 Computer images (analog RGB) Units: dots Aspect Mode Refresh rate Signal Resolution (Hz) Normal 16:9 VGAEGA 640^350 800^438 800^600 800^450 60/72/75/85/iMac 640^480/640^360 800^600 800^600 800^450 56/60/72/75/85/ SVGA 800^600/800^450 800^600 800^600 800^450 iMac 60/70/75/85/iMac 1024^768/1024^576 800^600 800^600 800^450... -
Page 108: Component Video
List of Supported Monitor Displays Component Video Units: dots Aspect Mode Refresh rate Signal Resolution (Hz) 16:9 SDTV (480i) 720^480/720^360 800^600 800^450 SDTV(576i) 720^576/720^432 800^600 800^450 SDTV(480p) 720^480/720^360 800^600 800^450 SDTV(576p) 720^576/720^432 800^600 800^450 HDTV (720p) 50/60 1280^720 800^600 800^450 HDTV(1080i) 50/60 1920^1080... -
Page 109: Specifications
Specifications Specifications Product name EB-W6 EB-X6 EB-S6 Dimensions 327 (W) ^ 92 (H) ^ 245 (D) mm Panel size 0.56" 0.63" 0.55" Display method Polysilicon TFT active matrix Resolution 1,024,000 pixels WXGA 786,432 pixels XGA 480,000 pixels SVGA (1280 (W) ^ 800 (H) dots) ^ 3 (1024 (W) ^ 768 (H) dots) ^ 3 (800 (W) ^ 600 (H) dots) ^ 3 Focus adjustment... - Page 110 Specifications Product name EB-W6 EB-X6 EB-S6 Connectors Computer input port Mini D-Sub15-pin (female) blue Audio input port RCA pin jack S-Video input port Mini DIN 4-pin Video input port RCA pin jack Audio input port RCA pin jack HDMI input port HDMI Monitor Out port Mini D-Sub15-pin (female) black...
- Page 111 If this equipment does cause interference to radio and television reception, which can be determined by turning the equipment off and on, the Epson America, Inc. user is encouraged to try to correct the interference by one or more of the...
-
Page 112: Operating Requirements Of Supplied Software
Specifications Operating Requirements of Supplied Software The following computer requirements must be satisfied to operate USB Display supplied with this projector. Requirements Windows 2000 SP4 Windows XP SP1 Windows XP SP2 Windows Vista Windows Vista SP1 Mobile Pentium III 1.2GHz or greater Recommended: Pentium M 1.6 GHz or greater Memory capacity... -
Page 113: Appearance
Appearance External dimensions are the same for the EB-W6/X6/S6, but the EB-S6 differs only in the distance from the lens center to the ceiling mount. The illustration is of the EB-W6. -
Page 114: Index
Index A/V Mute ............. 22 ESC/VP21 ............100 Lamp cover ............6 A/V mute slide ............6 Extended menu ...........44 Lamp Hours ............46 Air exhaust vent ............ 6 External dimension diagram ......113 Lamp indicator ............ 51 Air filter ..............15 External monitor ..........78 Lamp replacement period ........ - Page 115 Index Rear ..............44 Temp indicator .............51 Rear foot ............. 15 Theater ..............19 Rear screen ............64 Tint ...............40 Refresh rate ............46 Top menu ..........37, 38, 39 Remote control ............ 13 Tracking ...............41 Remote control light-emitting area ....12, 14 Remote receiver ..........
- Page 116 Microsoft Corporation in the U.S and/or other countries. Dolby is a trademark of Dolby Laboratories. Neither Seiko Epson Corporation nor its affiliates shall be liable to the HDMI and High-Definition Multimedia Interface are trademarks or purchaser of this product or third parties for damages, losses, costs, or registered trademarks of HDMI Licensing LLC.