
Related Manuals for Kenwood DPX-MP3110


Summary of Contents for Kenwood DPX-MP3110
- Page 1 DUAL DIN SIZED CD RECEIVER DPX-MP5110U DPX-MP4110 DPX-MP3110 INSTRUCTION MANUAL © B64-4186-00/00 (MW)
-
Page 2: Table Of Contents
Contents Before use Appendix Basic Operation Accessories/ Installation Procedure 20 General functions Connecting Wires to Terminals Tuner functions Disc & Audio file play functions Installation Cassette play functions Troubleshooting Guide General Operation Audio Control Specifications Adjusting the detail of Audio Control Audio Setup Speaker Setting Sound Enhancer Select... -
Page 3: Before Use
To prevent injury or fire, take the following • When you purchase optional accessories, check with precautions: your Kenwood dealer to make sure that they work • To prevent a short circuit, never put or leave any with your model and in your area. -
Page 4: Basic Operation
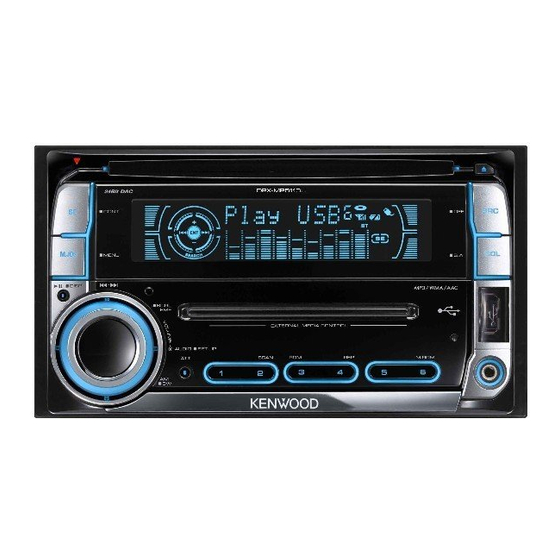
Basic Operation DPX-MP5110U DSI indicator Display Disc slot [SRC] [SE] [M.JOG] [COL] USB Terminal Auxiliary input [1] [2] [ATT] Control knob General functions Muting volume upon reception of phone call When there is a call, “CALL” is displayed and the audio system is paused. -
Page 5: Disc & Audio File Play Functions
: Indicates the button etc. to operate. Disc & Audio file play functions Folder search Control knob Changes the folder containing the audio fi le when Disc play Disc slot pushing toward up or down. Starts playing when a disc is inserted. When a CD is inserted, the indicator is ON. -
Page 6: Cassette Play Functions
Basic Operation : Indicates the button etc. to operate. Cassette tape slot DPX-MP4110 DSI indicator Display Disc slot [SRC] [SE] [M.JOG] [COL] Tape [1] [2] [ATT] Auxiliary input Control knob Cassette play functions Dolby B NR When Dolby B NR is ON, “B NR” indicator is ON. Cassette play Cassette tape slot Starts playing when a cassette tape is inserted. -
Page 7: General Operation
General Operation Audio Control Adjusting the detail of Audio Control You can adjust following Audio Control items ; Among the Basic Audio items, you can adjust the Bass level, Middle level, and Treble level in detail. Adjustment Item Display Range Bass level Rear volume “R-VOL”... -
Page 8: Audio Control
General Operation Audio Setup Speaker Setting You can set Sound system, such as follows; Fine-tuning so that the System Q value is optimal when setting the speaker type as follows; Adjustment Item Display Range Front High Pass Filter “HPF” Through/40/60/80/100/120/ Speaker type Display 150/180/220 Hz... -
Page 9: Sound Enhancer Control
⁄ Sound Enhancer Control • Scan of Spectrum Analyzer: Adjusts each function of Sound effect individually. The items from “PeakHold” to “Jump” are displayed in sequence. Enter the Sound Effect Control mode Press the [SE] button for at least 1 second. “SE CTRL”... -
Page 10: Illumination Color Select
General Operation In Tape source User Color Setting Information Display Adjust the illumination color with R(Red), G(Green), Play time (Tape counter) “Counter” B(Blue) setting. Adjusted set value is memorized in Clock “Clock” the <Illumination color Select> of User setting area. Graphic “Graphic”... -
Page 11: Tuner Operation
Tuner Operation Auto Memory Entry Frequency Step Setting Putting stations with good reception in the memory Changing the tuning frequency step. automatically. The original setting is FM band 50 kHz, and AM band 9 kHz. Select the band for Auto Memory Entry Push the Control knob towards up or down. -
Page 12: Music Disc/Audio File Operation
Music disc/Audio fi le Operation Function of disc changers with remote control Play Functions of Disc Changer Direct Disc Search While a disc in the disc changer is being played, the following play functions can be used. Doing Disc Search by entering the disc number. Playing the Current Song or Disc Repeatedly. -
Page 13: Track Select
Cassette Operation Function of Music CD DPSS with the Remote control Track Select Designating the music to be skipped with the remote control number buttons. Select the song you want to listen to by turning the control knob. Designate the music to skip Press number buttons on the remote. -
Page 14: Menu Operation
Menu Operation Menu System : Can be set during Tuner reception. : Can be set while accessing AUX source. Set up the following functions; — : Can be set during all sources. Display Setting Setting overview Source Enter Menu mode “Code Set”... -
Page 15: Menu System
Confirm the Security Code Adjust the time Press the Control knob for at least 3 seconds. Push the control knob towards up or down to When “RE-Enter” is displayed, “Code” is also adjust the hours and right or left to adjust the displayed. -
Page 16: Demonstration Mode Setting
Menu Operation Basic Operations of remote control Demonstration mode Setting Turning the demonstration mode ON/OFF. Select Demonstration item during Menu mode Select the “DEMO” display. For how to select menu items, refer to <Menu System>(page 14). – FM/AM/ Set the Demonstration mode Press the Control knob for at least 2 second. -
Page 17: In Cassette Tape Source
⁄ Dual Zone control About [ This button is used when Bluetooth HANDS FREE Dual zone system on and off [2-ZONE] BOX is connected. For more information, refer to the instruction manual of Bluetooth HANDS FREE BOX. Rear channel volume control [5]/ [∞] ¤... -
Page 18: Appendix
• If the cassette tape label is peeling off glue it on An online manual about audio files is put on the again. site, www.kenwood.com/audiofile/. On this online • Don’t use deformed cassette tape. manual, detailed information and notes which are not •... - Page 19 Menu Glossary For operating KCA-BT100 • SWPRE (Switching Preout) To control KCA-BT100, operate as follows; Switches the preout between rear output (“R”) and To make setting for <Selecting the Dialing Mode>, subwoofer output (“SW”). select <Menu System> (page 14). Pressing the [ATT] button at least 1 second after selecting the “DIALING •...
-
Page 20: Accessories/ Installation Procedure
6. Install the unit in your car. or later can be connected to this unit. 7. Reconnect the - battery. Refer to the catalog or consult your Kenwood dealer for connectable models of disc changers/ CD players. 8. Press the reset button. -
Page 21: Connecting Wires To Terminals
Connect to the terminal that is grounded when either the MUTE telephone rings or during conversation. ⁄ To connect the Kenwood navigation system, consult your navigation manual. Motor antenna control wire (Blue) Depending on what antenna you are using, connect either ANT. -
Page 22: Installation
Installation Installation Install onto the car bracket using the supplied screws (M5 × 6 mm, M5 × 7 mm). The holes of the car bracket to use will differ depending on the car model. Car Bracket Accessory3 (M5 × 7 mm) or Accessory4(M5 ×... -
Page 23: Troubleshooting Guide
Troubleshooting Guide Some functions of this unit may be disabled by Audio file source some settings made on this unit. The sound skips when an Audio file is being played. ✔ The media is scratched or dirty. • Cannot set up the subwoofer. ☞... - Page 24 Troubleshooting Guide NA File: An Audio file is played with a format that this The messages shown below display your unit can’t support. systems condition. Copy PRO: A copy-protected file is played. Eject: • No disc magazine has been loaded in the changer.
-
Page 25: Specifications
Specifi cations MP3 decode FM tuner section : Compliant with MPEG-1/2 Audio Layer-3 Frequency range WMA decode 200 kHz space : 87.9 MHz – 107.9 MHz : Compliant with Windows Media Audio 50 kHz space : 87.5 MHz – 108.0 MHz AAC decode Usable sensitivity (S/N = 30dB) : AAC-LC ".m4a"...