Electrolux ERW3313AOX User Manual
Large capacity in-column wine cellar. a energy rated.
Hide thumbs
Also See for ERW3313AOX:
- User manual (84 pages) ,
- User manual (72 pages) ,
- User manual (52 pages)
Table of Contents
Advertisement
Quick Links
Download this manual
See also:
User Manual
Advertisement
Table of Contents

Related Manuals for Electrolux ERW3313AOX


Summary of Contents for Electrolux ERW3313AOX
- Page 1 ....................ERW3313AOX EN WINE CELLAR USER MANUAL...
-
Page 2: Table Of Contents
9. ENVIRONMENT CONCERNS ..........19 WE’RE THINKING OF YOU Thank you for purchasing an Electrolux appliance. You’ve chosen a product that brings with it decades of professional experience and innovation. Ingenious and stylish, it has been designed with you in mind. -
Page 3: Safety Information
ENGLISH SAFETY INFORMATION In the interest of your safety and to ensure Keep ventilation openings, in the appliance the correct use, before installing and first enclosure or in the built-in structure, clear using the appliance, read this user manual of obstruction. carefully, including its hints and warnings. - Page 4 If the power plug socket is loose, do appliance if it is damaged. Report possi- not insert the power plug. There is a ble damages immediately to the place risk of electric shock or fire. you bought it. In that case retain pack- ing.
-
Page 5: Control Panel
ENGLISH 2. CONTROL PANEL Display Bottom Compartment Appliance ON/OFF button Light button It is possible to change predefined sound Alarm button of buttons to a loudly one by pressing to- Temperature colder button gether Light button and Temperature cold- Temperature warmer button er button for some seconds. -
Page 6: Daily Use
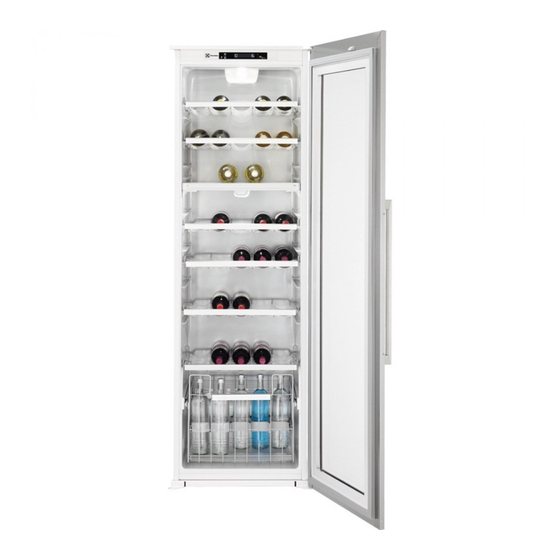
The temperature indicators show the set The light has no negative effect on the temperature. quality on the wine. The set temperature will be reached within 24 hours. 2.6 Door open alarm Refer to "Daily use - Wine Arrangement". - Page 7 ENGLISH 3.2 Wine arrangement Top Compartment: The temperature can be adjusted between +6 and + 11°C. This compartment is ideal for wines, especially new reds and whites, to be consumed immediately. Operation compartments with differentiated tempera- tures. Bottom Compartment: The temperature can be adjusted between + 11 and + 18°C.
- Page 8 3.4 Wine Cellar shelves Remove the shelves for cleaning. 3.5 Wine Cellar Bottle Holder Remove the shelf and insert it between the two guides. The maximum possible weight on the bot- tle shelves is 30 kg. The shelf can be arranged between guides 100 mm apart to favour display of the bot- tles.
- Page 9 ENGLISH The bottom compartment is arranged with a sliding drawer to be used for placing the bottles upright. The drawer has two dividers that adapt to bottles of different diameters. 3.6 Humidifier The right humidity is vitally important for the proper storage of wine.
-
Page 10: Care And Cleaning
10 www.electrolux.com 4. CARE AND CLEANING CAUTION! Clean the condenser (black grill) and the Unplug the appliance before carry- compressor at the back of the appliance ing out any maintenance operation. with a brush. This operation will improve the performance of the appliance and save This appliance contains hydrocar- electricity consumption. -
Page 11: What To Do If
ENGLISH 5. WHAT TO DO IF… WARNING! There are some sounds during nor- Before troubleshooting, disconnect mal use (compressor, refrigerant the mains plug from the mains circulation). socket. Only a qualified electrician or com- petent person must do the trouble- shooting that is not in this manual. - Page 12 12 www.electrolux.com Problem Possible cause Solution The temperature in The temperature regulator Set a higher/lower tempera- the appliance is too is not set correctly. ture. low/high. The door is not closed cor- Refer to "Closing the door". rectly. Many products are stored Store less products at the at the same time.
-
Page 13: Installation
ENGLISH At the same time, free the middle hook and slide off the cover in the direction of the arrows. Replace the used lamp with a new lamp of the same type and specifically designed for household appliances and having the same characteris- tics. - Page 14 14 www.electrolux.com WARNING! As the colours of the wires in the mains This appliance must be earthed. lead of this appliance may not correspond The manufacturer declines any lia- with the coloured markings identifying the bility should these safety measures terminals in your plug, proceed as follows: not be observed.
- Page 15 ENGLISH Apply the adhesive sealing strip to the ap- pliance as shown in figure. Install the appliance in the niche. Attach the appliance to the niche with 4 screws.
- Page 16 16 www.electrolux.com Fix the covers on the screws. Do a final check to make sure that: • The sealing strip is attached tightly to the cabinet. • All screws are tightened. • The door opens and closes correctly. 6.5 Assembly instructions for the compensator lower part of the door...
-
Page 17: Noises
ENGLISH Align the compensator with the steel door panel and tighten the screws. Insert the steel carter inside the compen- sator as indicated in the figure. 7. NOISES There are some sounds during normal run- ning (compressor, refrigerant circulation). HISSS! BRRR! - Page 18 18 www.electrolux.com BRRR! BRRR! BLUBB! BLUBB! HISSS! HISSS! SSSRRR! SSSRRR!
-
Page 19: Technical Data
ENGLISH CRACK! CRACK! 8. TECHNICAL DATA Dimension of the recess Height 1780 mm Width 560 mm Depth 550 mm Voltage 230-240 V Frequency 50 Hz The technical information are situated in the rating plate on the internal left side of the appliance and in the energy label. - Page 20 www.electrolux.com/shop...