
Related Manuals for KitchenAid 9KSM5580X


Summary of Contents for KitchenAid 9KSM5580X
- Page 1 Stand Mixer 9KSM5580X W11629946B.indb 1 W11629946B.indb 1 6/16/2023 7:46:56 PM 6/16/2023 7:46:56 PM...
-
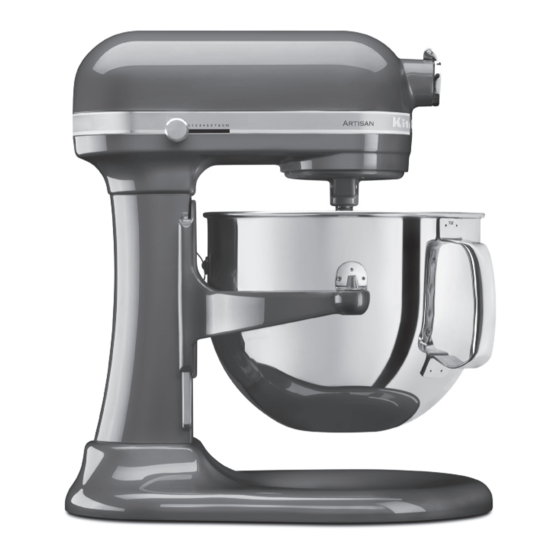
Page 2: Parts And Features
PARTS AND FEATURES Motor Head Attachment Knob Speed Control Lever Attachment Hub (see the “Attachments” section) Beater Height Adjustment Screw Pouring Shield** Bowl Support Flex Edge Beater* Locating Pins Dough Hook* Bowl* Wire Whip* Bowl Handle* Beater Shaft Bowl Lift Lever (not shown) *Material, style, and size may differ depending on model. - Page 3 The hub and shaft housings are tapered to assure a snug fit, even after prolonged use and wear. KitchenAid attachments require no extra power unit to operate them; the power unit is built-in.
-
Page 4: Product Safety
Authorised Service Facility for examination, repair, or electrical or mechanical adjustment. 8. If the supply cord is damaged, it must be replaced by KitchenAid, its service agent or similarly qualified persons in order to avoid a hazard. 9. Do not let cord hang over edge of table or counter. -
Page 5: Electrical Requirements
PRODUCT SAFETY 13. The use of accessories/attachments not recommended or sold by KitchenAid may cause fire, electric shock, or injury. 14. To avoid product damage, do not use the mixer bowls in areas of high heat such as an oven, microwave, or on a stovetop. -
Page 6: Product Assembly
PRODUCT ASSEMBLY ATTACHING THE BOWL AND BEATERS off (O) Turn Speed Control Lever to , and Place Bowl Lift Lever into down position. unplug Stand Mixer. Spring Latch Locating Pin Fit Bowl Supports over Locating Pins; Slip a beater (Flat, Wire Whip, or Dough press down on back of the Bowl until Hook) onto the Beater Shaft and press bowl Pin snaps into the spring latch. - Page 7 PRODUCT ASSEMBLY ADJUSTING BEATER TO BOWL CLEARANCE Your Stand Mixer is adjusted at the factory so the Flat Beater just clears the bottom of the bowl. If, for any reason, the Flat Beater hits the bottom of the Bowl or is too far away from the Bowl, you can correct the clearance easily.
-
Page 8: Product Usage
PRODUCT USAGE SPEED CONTROL GUIDE Speed Control Guide - 10 Speed Stand Mixers All speeds have the Soft Start feature that automatically starts the Stand Mixer at a lower speed to help avoid ingredient splash-out and “flour puff” at start-up, then quickly increases to the selected speed for optimal performance. - Page 9 PRODUCT USAGE REMOVING THE BOWL AND BEATERS off (O) Turn Speed Control Lever to , and Lower the Bowl to the down position. unplug Stand Mixer. Press the beater up as far as possible Grasp the Bowl Handle and lift it straight and turn left, then pull beater from the up and off the Locating Pins.
-
Page 10: Tips For Great Results
Mixer. This is normal. death, fire, or electrical shock. MIXING TIME Your KitchenAid Stand Mixer will mix faster To help determine the ideal mixing time, and more thoroughly than most other observe the batter or dough and mix electric mixers. -
Page 11: Care And Cleaning
CARE AND CLEANING IMPORTANT: Allow the appliance to cool completely before putting on or taking off parts, and before cleaning the appliance. WARNING Electrical Shock Hazard Plug into an earthed outlet. Do not remove an earth prong. Do not use an adapter. Do not use an extension cord. -
Page 12: Troubleshooting
30 minutes before turning it back on. If the problem is not due to one of the above items, see the “Customer service” section. ©2023 All rights reserved. KITCHENAID and the design of the stand mixer are trademarks in the U.S. and elsewhere. W11629946B.indb 12 W11629946B.indb 12... - Page 13 部品と機能 モーター部 アタッチメントのノブ スピードコントロールレバー アタッチメントハブ ( 「アタッチメント」 の章参照) ボウルの高さ調整ネジ 注入用カバー** ボウルサポート フレックスエッジビーター* 位置決めピン 14 ドゥーフック* ボウル* ワイヤーホイップ* ボウルハンドル* 蓋 ビーターシャフト ボウルリフトレバー (図示されていません) *モデルによって素材、 スタイル、 サイズが異なる場合があります。 **注入用カバーはオプションアクセサリーです。 W11629946B.indb 13 W11629946B.indb 13 6/16/2023 7:46:58 PM 6/16/2023 7:46:58 PM...
- Page 14 アタッチメン ト キッチンエイドのオプションアタッチメントは、 長寿命を保証するように設計されています。 アタッ チメントパワーシャフトとアタッチメントハブソケッ トは四角形のデザインであるため、 アタッチ メントへ動力が伝達される際に滑ることがありません。 ハブとシャフトのハウジングは先細になっ ており、 長時間の使用や摩耗が生じた場合でも、 ぴったり とフ ィ ッ トします。 キッチンエイドのアタ ッチメントは、 操作するために追加の電源ユニッ トを必要としません。 ビルトイン式電源ユニッ ト が搭載されています。 アタッチメント*ハウジング ハブカバー** ピン アタッチメントハブソケッ ト アタッチメント*シャフトハウジング アタッチメントのノブ アタッチメント* パワーシャフト 位置決めの刻み *ミキサーの付属品ではなく 、 オプションのアタッチメントです。 **スタイルはモデルにより異なる場合があります。 W11629946B.indb 14 W11629946B.indb 14 6/16/2023 7:46:58 PM 6/16/2023 7:46:58 PM...
- Page 15 製品安全性 使用者ご自身や周囲の方の安全に十分注意してく ださい。 本マニュアルにも機器本体にも安全に関する重要な注意事項が記載されてい ます。 すべての注意事項をよく読み、 守るようにしてください。 安全に関する注意喚起の記号です。 この記号は使用者ご自身や周囲の方の死亡事故または傷害につ ながる危険に対する注意喚起のために使用します。 安全に関する注意事項はすべてこの注意喚起の記号と 「危険」 また は 「注意」 の文字表記に続いて記載されます。 文字表記は次の意味 で使用されます。 注意事項に直ちに従わないと死亡事故また 危険 は重傷事故につながる可能性があります。 警告 注意事項に従わないと死亡事故または重傷 事故につながる可能性があります。 安全に関する注意事項はすべて、 潜在的危険要因と傷害事故発生を抑える方法、 使用方法を守らないと発生する事態について記載しています。 重要な安全対策 電気機器を使用するときには、 次の注意事項をはじめ、 安全に関する基本的注意事項を遵 守してく ださい : 1. 本書の説明をすべてお読みください。 本機器の誤用は、 ケガを招く場合があります。 2. 感電の危険を防ぐため、 スタンドミキサーを水やその他の液体に浸さないでください。 3. 身体的、...
- Page 16 製品安全性 13. キッチンエイドの推奨品、 純正品以外のアクセサリ/アタッチメントを使用すると火災、 感電、 人身事故が発生する可能性があります。 14. 製品の損傷を避ける意味で、 オーブン、 電子レンジ、 ストーブ上面といった高熱部位で、 ミキサーボウルを使用しないでください。 15. すべての付属品(ビーター、 生地フック、 泡立て器) は15 分以上使用しないでく ださい。 非常に重い負荷を混合する場合、 アプライアンスを10 分以上作動させ ないでくださ い。 16. 部品を着脱する前、 および機器を清掃する前に、 機器を完全に冷ましてください。 17. 本機器は家庭および以下の場所での使用を目的としています。 - 店、 オフィス、 その他調理する調理場 - 農家 - ホテル, モーテル及び他の住居タイプの環境での顧客が使用するもの - 朝食付き簡易宿泊施設 (ベッ ド及び朝食付きホテル) タイプの環境 この説明書を保管しておいてく ださい 電気仕様 電圧 : 100 V 警告...
- Page 17 製品の組み立て ボウルとビーターの取り付け 速度コントロールレバーをオフ(O)に回し、 ボウルリフトレバーを下のポジションに置 スタンドミキサーのプラグを抜き取ります。 きます。 スプリングラッチ 位置決めピン 位置決めピンにボウルサポートを取り付け ビーター (フラッ ト、 ワイヤーホイップ、 また ます。 ボウルのピンがスプリングラッチにカ は生地フック) をビーターシャフトに滑り込 チッとはまるまで、 ボウルの背面を押し下げ ませ、 できるだけ上に押します。 ビーターを ます。 しっかり とはめ込まれていないと、 使用 右に回し、 ビーターシャフトのピンに接続 中にボウルが不安定になり、 ぐらつきます。 します。 注入用シュート 注入用カバーを使用する場合は、 スタンド ボウルリフトレバーを反時計回りに真上位 ミキサーの前面から、 注入用カバーをボウ 置まで回転させて、 ボウルを混合位置に上 ルの中心に配置されるまで押し込みます。...
- Page 18 製品の組み立て ビーターとボウルの間隔の調整 ご購入のスタンドミキサーは、 工場出荷時に平面ビーターがボウル底面と適切な間隔を保っ て回転するよう調整されています。 もし、 何らかの理由で平面ビーターがボウル底面をこすった り、 離れすぎたり している場合、 間隔の調整は簡単に行うことができます。 速度コントロールレバーをオフ(O)に回し、 ボウルを下の位置まで下げます。 スタンドミキサーのプラグを抜き取ります。 ビーター高さ調整ねじ (A) を反時計回り に少し回すと、 フラッ トビーターが上がりま す。 または時計回り (右) に回してフラッ ト ビーターを下げます。 フラッ トビーターがボ ウルの表面に触れないように調整します。 ネジを回しすぎると、 ボウルリフトレバーが 正しい位置でロックされなくなる可能性が あります。 注記 : 調整が適切に行われているときには、 平面ビーターはボウルの底面や側面をこすること はありません。 フラッ トビーターまたはワイヤーホイップがボウルの底に接触すると、 フラッ トビ ーター...
- Page 19 製品の使用方法 スピードコントロールガイド スピードコン トロールガイ ド - スタンドミキサーの10段階の速度 材料が飛び散ることないように、 また 「小麦粉が散った状態」 にならないように開始時点ではゆっく りとスタートし、 その後 指定速度まで素早く速度を上げて最適な処理効率とするソ フトスタート機能が全ての速度の指定で働きます。 速度 動作 アタッチメント 説明 低速でのかき混ぜ、 合わせ、 すりつぶす、 およびすべてのかき混ぜ操作の開始 時。 小麦粉や乾燥した材料をバッター ( フレックスエッジ かき混ぜる ゆるめの生地) に加えるためさらに乾燥 ½ ビーター した材料に液体を加えるために使用し ます。 イースト生地を混ぜるかこねるた めに速度 ½ を使用しないでください。 低速でのかき混ぜ、 合わせ、 すりつぶす、 およびすべてのかき混ぜ操作の開始 時。 小麦粉や乾燥した材料をバッター フレックスエッジ...
- Page 20 製品の使用方法 ボウルとビーターの取り外し 速度コントロールレバーをオフ(O)に回し、 ス ボウルを下の位置まで下げます。 タンドミキサーのプラグを抜き取ります。 ビーターをできるだけ上に押し上げて左に ボウルハンドルをつかんでまっすぐ上に持 回し、 ビーターシャフトからビーターを引き ち上げ、 位置決めピンを外します。 抜きます。 W11629946B.indb 20 W11629946B.indb 20 6/16/2023 7:46:58 PM 6/16/2023 7:46:58 PM...
- Page 21 良好な仕上がりを得るためのヒン ト 警告 警告 傷害につながる危険 ミキサーのコードを抜いてからビー ターに触るようにしてください。 これを怠ると骨折や切り傷、打撲傷 につながる恐れがあります。 感電につながる危険要因 ボウルとビーターは頻繁にこすり落とすことを しないでも完全に混ぜることができるように アース付きコンセン トを使用してく ださい。 設計されています。 操作中には、 ボウルの内側 アース用突起を取り外さないでく ださい。 をこすらないでください。 混ぜている最中にボ ウル内側からこすり落とすのは通常 1、 2 回で アダプターを使用しないでく ださい。 十分です。 延長コードを使用しないでく ださい。 スタンドミキサーは使用中、 温度が上がりま す。 高負荷の状態で使用時間が長くなると、 ス この使用方法を守らないと死亡事故また タンドミキサーの上部が高温になり触ること は火災、 感電につながる恐れがあり ます。 ができなくなるかもしれません。...
- Page 22 お手入れと ク リーニング 重要 : 部品を着脱する前、 および機器を清掃する前に、 機器を完全に冷ましてください。 警告 感電につながる危険要因 アース付きコンセン トを使用してく ださい。 アース用突起を取り外さないでく ださい。 アダプターを使用しないでく ださい。 延長コードを使用しないでく ださい。 この使用方法を守らないと死亡事故または火災、 感電につながる恐れがあり ます。 ボウル、 コーティングされたフラッ トビータ 清掃するの前に、 必ずスタンドミキサーのプ ー、 およびコーティングされたドゥーフック ラグを抜き取ってください。 スタンドミキサ は、 食器洗い機で洗浄するか、 熱湯で洗浄す ーは、 柔らかい湿った布で拭き取ります。 家 ることができます。 コーティングされていない 庭用/商用の洗剤を使用しないでください。 ビーターの場合は、...
- Page 23 故障かなと思ったら 警告 感電につながる危険要因 アース付きコンセン トを使用してく ださい。 アース用突起を取り外さないでく ださい。 アダプターを使用しないでく ださい。 延長コードを使用しないでく ださい。 この使用方法を守らないと死亡事故または火災、 感電につながる恐れがあり ます。 問題 解決法 高負荷の状態で長時間使用すると、 装置の上部が高温にな スタンドミキサーは使用中、 温 り、 触れることができない場合があります。 これは正常な状 度が上がります 態です。 使い始めにスタンドミキサーか これは正常な状態です。 電気モーターではよく あることです。 ら刺激臭がする場合 フラッ トビーターがボウルに当 「スタンド ミキサーのセッ トアップ」 セクションを参照して たる場合 ください。 スピードコントロールレバー スピードコントロールレバーを設定する位置まで左右に動...
- Page 24 W11629946B.indb 24 W11629946B.indb 24 6/16/2023 7:46:59 PM 6/16/2023 7:46:59 PM...
- Page 25 9KSM5580X ©2023 無断転載禁止。 キッチンエイド およびスタンドミキサーのデザインは、 米国および他の地域において商標登録されています。 W11629946B.indb 25 W11629946B.indb 25 6/16/2023 7:46:59 PM 6/16/2023 7:46:59 PM...
- Page 26 NOTE W11629946B.indb 26 W11629946B.indb 26 6/16/2023 7:46:59 PM 6/16/2023 7:46:59 PM...
- Page 27 NOTE W11629946B.indb 27 W11629946B.indb 27 6/16/2023 7:46:59 PM 6/16/2023 7:46:59 PM...
- Page 28 NOTE W11629946B.indb 28 W11629946B.indb 28 6/16/2023 7:46:59 PM 6/16/2023 7:46:59 PM...
- Page 29 NOTE W11629946B.indb 29 W11629946B.indb 29 6/16/2023 7:46:59 PM 6/16/2023 7:46:59 PM...
- Page 30 NOTE W11629946B.indb 30 W11629946B.indb 30 6/16/2023 7:46:59 PM 6/16/2023 7:46:59 PM...
- Page 31 NOTE W11629946B.indb 31 W11629946B.indb 31 6/16/2023 7:46:59 PM 6/16/2023 7:46:59 PM...
- Page 32 ©2023 All rights reserved. KITCHENAID and the design of the stand mixer are trademarks in the U.S. and elsewhere. 無断転載禁止。 キッチンエイド およびスタンドミキサーのデザインは、 米国および他の地域において商標登録されています。 W11629946B 06/23 W11629946B.indb 32 W11629946B.indb 32 6/16/2023 7:46:59 PM 6/16/2023 7:46:59 PM...