Table of Contents
Advertisement
Available languages
Available languages
Advertisement
Chapters
Table of Contents

Related Manuals for Philips S7887/82


Summary of Contents for Philips S7887/82
- Page 1 Tripleheader shaver Tripleheader shaver Series 7000...
- Page 4 empty page before TOC...
- Page 5 English 6 Español 40...
-
Page 6: Table Of Contents
English Contents IMPORTANT SAFETY INSTRUCTIONS______________________ General description ____________________________________ Introduction __________________________________________ What do the icons on my product handle mean?___________ What does the icon on my Quick Clean Pod mean?_________ How do I charge my product? ___________________________ How do I use my product? ______________________________ How do I clean my shaver? ______________________________ How do I use the Quick Clean Pod? (S7885 and S7886 only) _ How do I connect my shaver and smartphone? (Fig. - Page 7 5 V, ≥ 1 A. For safe charging in a moist environment (e.g. in a bathroom), only use an IPX4 (splash-proof) power source. A suitable power source (e.g. Philips HQ87) is available via www.philips.com/support. If you need support finding the correct USB power source, contact Philips support at 1-800-243-3050.
- Page 8 - Use this product only for its intended household use as described in this manual. Misuse can lead to hazards or serious injuries. Do not use attachments not recommended by Philips North America LLC. Accessories supplied may vary for different products.
- Page 9 - The batteries used in this product may present a fire or chemical burn hazard if mistreated. Do not disassemble, heat above 100 °C (212 °F) or incinerate. - Only use original Philips accessories or consumables. - Charge, use and store the product at a temperature between 5 °C and 35 °C.
- Page 10 If irritation persists, get medical attention. - Keep out of reach of children. Electromagnetic fields (EMF) This Philips product complies with all applicable standards and regulations regarding exposure to electromagnetic fields. FCC Compliance - The frequency band in which the appliance operates is 2.4 GHz.
- Page 11 English Changes or modifications not expressly approved by Philips could void the users' authority to operate the equipment. This device complies with Part 15 of the FCC Rules. Operation is subject to the following two conditions: (1) this device may not cause harmful...
-
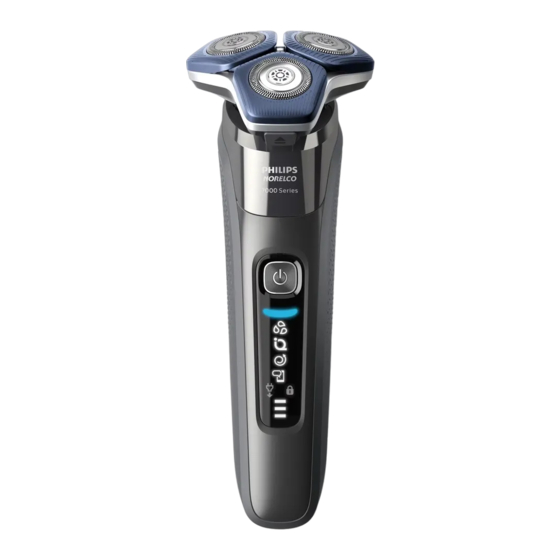
Page 12: General Description
6 Handle 7 Socket for small plug 8 Charging stand (S7885 only) 9 USB cable Note: A suitable supply unit (e.g. Philips HQ87) is available via www.philips.com/support. 10 Protection cap (S7887 only) 11 Travel case (S7885, S7886 only) 12 Quick Clean Pod Cartridge (S7885, S7886 only) -
Page 13: Introduction
English Introduction Congratulations on your purchase and welcome to Philips! To fully benefit from the support that Philips offers, register your product at www.philips.com/welcome or via the app. What do the icons on my product handle mean? Icon Behavior... - Page 14 English Icon Behavior Meaning Flashing quickly The cleaning program was stopped. If when you remove you wish to continue, you need to the shaver from restart the cleaning cycle by putting the the Quick Clean shaver into the Quick Clean Pod and Pod or press the pressing the on/off button.
-
Page 15: What Does The Icon On My Quick Clean Pod Mean
English Icon Behavior Meaning Flashing when The travel lock is activated (see 'Storage you press the and travel'). on/off button Lights up when The number of bars lit up show the you pick up the remaining battery charge. product Bottom light The battery is almost empty (see 'How flashing orange do I charge my product?'). - Page 16 English Quick Charge: After approx. 5 minutes of charging, the battery contains enough energy for one full shave. When the product is fully charged it has a cordless operating time of up to 60 minutes. Note: You cannot use the product while it is charging.
- Page 17 English - While the product charges, first the bottom light of the battery status indicator flashes and then lights up continuously. Next the second light flashes and then lights up continuously, and so on until the product is fully charged. - When the product is fully charged, all three battery status indicator lights light up continuously.
-
Page 18: How Do I Use My Product
English How do I use my product? Always check the product and all accessories before using. Do not use the product or any accessory if it is damaged, as this may cause injury. Always replace a damaged part with one of the original type. Note: This product is waterproof. - Page 19 English - Follow the advice obtained from the synchronized shaves and the personalized programs. Shaving You can use this product either wet or dry, or even in the shower. For a wet shave, apply some water and shaving foam or gel to your skin and rinse the shaving heads under the tap with warm water before following the steps below.
- Page 20 - Use your new shaver exclusively for 3 weeks to fully enjoy the closeness of a Philips Norelco shave. - At first you may not get as close a shave as you expect, or your face may even become slightly irritated.
- Page 21 English - Stick with it! If you alternate shaving methods during the adjustment period, it may make it more difficult to adapt to the Philips Norelco shaving system. - If you are still not convinced after 21 days, Philips Norelco will refund you the full purchase price as long as the request is received within 45 days of purchase.
- Page 22 English Trimming You can use the pop-up trimmer to groom your sideburns and moustache. 1 Push the trimmer release slide downwards to open the trimmer. 2 Switch on the product. 3 Hold the trimmer perpendicular to the skin and move it downwards while exerting gentle pressure.
- Page 23 English - Do not place or store the product where it can fall or be pulled into a tub or sink, water or other liquid while plugged in. Note: We advise you to let the product and its attachments dry completely before you store them for the next use.
-
Page 24: How Do I Clean My Shaver
English Once the travel lock is deactivated, the product switches on automatically. Note: The product unlocks automatically when connected to a power outlet. How do I clean my shaver? Clean the product and the attachments after each use for optimal performance. Cleaning the shaver with water Clean the shaver after each use to prevent clogging and damage. - Page 25 English 4 Rinse the hair chamber with warm water. 5 Rinse the shaving head holder warm water. 6 Carefully shake off excess water and let the shaving head holder air-dry completely. 7 Close the shaving unit. Thorough cleaning We advise you to clean the shaving heads thoroughly once a month or when the shaver does not shave as well as it used to.
- Page 26 English 3 Rinse the hair chamber and shaving head holder with warm water. 4 Remove the shaving heads. For detailed instructions, see 'How do I replace the shaving heads?'. Note: Do not clean more than one cutter and guard at a time, since they are all matching sets.
-
Page 27: How Do I Use The Quick Clean Pod? (S7885 And S7886 Only)
English 1 Make sure that the appliance is switched off and disconnected from the wall socket. 2 Push the trimmer release slide down to open the pop-up trimmer. 3 Switch on the appliance and rinse the pop-up trimmer with warm water. 4 After cleaning, switch off the appliance. - Page 28 English 3 Lift the tab on the seal and pull it by the corner to remove the seal from the Quick Clean Pod Cartridge. 4 Press the small circular piece on the handle of the Quick Clean Pod Cartridge to break the snap hook on the handle.
- Page 29 English rinse the shaving heads before you use the Quick Clean Pod (see 'How do I clean my shaver?'). Always shake excess water off the shaver before you place it in the Quick Clean Pod. 1 Place the shaver upside down into the Quick Clean Pod.
-
Page 30: How Do I Connect My Shaver And Smartphone? (Fig. A)
4 Place a new Quick Clean Pod Cartridge into the Quick Clean Pod (see 'Preparing the Quick Clean Pod for use'). Scan the QR code to the left or visit www.philips.com/cleaning-cartridge to order replacement Quick Clean Pod Cartridges. How do I connect my shaver and smartphone? (Fig. - Page 31 You can use the app to synchronize your shave data, change your personal settings and get routine-based coaching. The app is compatible with a wide range of iPhone and Android™ smartphones. More information is available at www.philips.com. 1 Download the app.
- Page 32 When it lights up, simply open the app on your smartphone and follow the easy tips that the app gives you. If you need further support, visit www.philips.com/support. Unpair the shaver and smartphone You can pair your shaver with only one smartphone at a time.
-
Page 33: How Do I Replace The Shaving Heads
Replace damaged shaving heads immediately. Always replace the shaving heads with original Philips Norelco shaving heads (see 'Accessories'). Replacing the shaving heads 1 Switch off the shaver. 2 Press the release button on the shaving unit and pull the shaving head holder off the shaving unit. - Page 34 English 4 Remove the shaving heads from the shaving head holder. Discard the used shaving heads immediately to avoid mixing them with the new shaving heads. 5 Place new shaving heads in the holder. 6 Place the retaining rings back onto the shaving heads and turn them clockwise to reattach the retaining rings.
-
Page 35: Accessories
The following accessories and spare parts are available: - SH71 Philips Norelco replacement shaving heads - CC12 Philips Norelco Quick Clean Pod Cartridge 2-pack Assistance For assistance, visit our website: www.philips.com/support or call toll free 1-800-243-3050. -
Page 36: Full Two-Year Warranty
Full Two-Year Warranty Philips North America LLC warrants this new product (except shaving heads) against defects in materials or workmanship for a period of two years from the date of purchase, and agrees to repair or replace any defective product without charge. -
Page 37: 45-Day Money-Back Guarantee
*Read enclosed instructions carefully. 45-DAY MONEY-BACK GUARANTEE To enjoy the closest and most comfortable shave from your new Philips Norelco Men’s Shaver, the shaver should be used exclusively for 3 weeks. This allows your hair and skin enough time to adapt to the Philips Norelco Shaving System. - Page 38 (2) this device must accept any interference received, including interference that may cause undesired operation. We, PHILIPS CONSUMER LIFESTYLE B.V., hereby declare that the equipment bearing the model name specified below was tested conforming to the applicable FCC Rules under the most accurate...
-
Page 39: Trademarks
Android is a trademark of Google Inc. Google Play and the Google Play logo are trademarks of Google Inc. The Bluetooth® word mark and logos are registered trademarks owned by the Bluetooth SIG, Inc. and any use of such marks by Philips Personal Care is under license. -
Page 40: Instrucciones Importantes De Seguridad
Español Contenido INSTRUCCIONES IMPORTANTES DE SEGURIDAD ___________ Información general ___________________________________ Introducción __________________________________________ ¿Qué significan los íconos que están en el mango del producto? ¿Qué significa el ícono que está en mi Quick Clean Pod? ____ ¿Cómo se carga el producto? ____________________________ ¿Cómo se usa el producto?______________________________ ¿Cómo se limpia la afeitadora? __________________________ ¿Cómo uso el Quick Clean Pod? (S7885 y S7886 solamente) _... - Page 41 Philips HQ87) se encuentra disponible en www.philips.com/support. Si necesita asistencia encontrando la fuente de alimentación USB correcta, comuníquese con asistencia de Philips al 1-800-243-3050. Usar una fuente de alimentación USB no certificada podría causar lesiones graves o peligrosas. - Mantenga el cable USB y la fuente de alimentación USB secos.
- Page 42 El uso inadecuado puede causar posibles riesgos o lesiones graves. No use accesorios que no estén recomendados por la corporación Philips North America LLC. Los accesorios incluidos pueden variar según el producto. - Nunca use este producto si tiene una fuente de alimentación USB dañada, si no funciona correctamente, después de haberse...
- Page 43 - Si el producto se pone anormalmente caliente, despide un olor extraño, cambia de color o tarda más tiempo de lo normal en cargarse, deje de usarlo y de cargarlo, y comuníquese con Philips.
- Page 44 Líquido para cartucho del Quick Clean Pod de Philips Norelco - No ingerir. - Evita el contacto con los ojos. En caso de que entre en contacto con los ojos, enjuaga bien con agua fría.
- Page 45 FCC y ha sido evaluado de acuerdo con la condición de exposición portátil. Las modificaciones o los cambios que no hayan sido aprobados expresamente por Philips podrían anular la autoridad del usuario para operar el equipo. Este dispositivo cumple con la Parte 15 de las reglas de la FCC.
- Page 46 La marca denominativa y los logotipos de Bluetooth® son marcas comerciales registradas propiedad de Bluetooth SIG, Inc. y todo uso que hace Koninklijke Philips N.V. de dichas marcas es conforme a una licencia.
-
Page 47: Información General
13 Quick Clean Pod (S7885, S7886 solamente) 14 Cepillo de limpieza Introducción ¡Felicidades por su compra y bienvenido a Philips! Para aprovechar al máximo el soporte que le ofrece Philips, registre su producto en www.philips.com/welcome o a través de la... -
Page 48: Qué Significan Los Íconos Que Están En El Mango Del
Español ¿Qué significan los íconos que están en el mango del producto? Íco Comportamien Significado Pulsaciones El programa de limpieza está en marcha. Parpadea Se interrumpió el programa de limpieza. lentamente Si vuelve a poner la afeitadora en el cuando quita la Quick Clean Pod antes de que pasen afeitadora del cuatro segundos, el programa de... - Page 49 Español Íco Comportamien Significado Se ilumina La tecnología SenseIQ está detectando activamente su modo de afeitarse. Se ilumina de Se utilizó el movimiento de afeitado color verde correcto (movimientos circulares). Se ilumina de Su movimiento de afeitado puede color naranja mejorarse.
-
Page 50: Qué Significa El Ícono Que Está En Mi Quick Clean Pod
Español Íco Comportamien Significado Se ilumina al El número de barras iluminadas muestra levantar el la carga que le queda a la batería. producto La luz inferior es La batería está casi completamente de color naranja y descargada (ver '¿Cómo se carga el parpadea producto?'). - Page 51 Español Carga rápida: Después de cargarla durante alrededor de cinco minutos, la batería tendrá suficiente energía para una afeitada completa. Cuando el producto está totalmente cargado, posee una autonomía de funcionamiento de hasta 60 minutos sin cable. Nota: No puede usar el producto mientras se carga.
- Page 52 Español - Mientras se está cargando el producto, primero parpadea la luz inferior del indicador de estado de la batería y luego se queda iluminada constantemente. Después empieza a parpadear la segunda luz y luego se queda iluminada constantemente y así sucesivamente hasta que el producto se haya cargado completamente.
-
Page 53: Cómo Se Usa El Producto
Español 5 Coloque el producto en la base de carga. 6 Después de cargarla, retire la fuente de alimentación USB del tomacorriente y retire la clavija pequeña del producto. ¿Cómo se usa el producto? Siempre revise el producto y todos los accesorios antes de usarlo. - Page 54 Español Recibirá consejos de 2 formas: afeitadas guiadas en tiempo real y afeitadas sincronizadas. Le aconsejamos que empiece con la afeitada guiada para mejorar su experiencia de afeitado. - El manejo correcto de su producto le ayudará a obtener los mejores resultados en el afeitado.
- Page 55 Español Nota: Si se va a afeitar con espuma o gel de afeitar, enjuague la unidad de afeitado con regularidad durante el afeitado para asegurar que se siga deslizando suavemente sobre la piel. 3 Desconecte y limpie el producto después de cada uso.
- Page 56 Philips Norelco. - Si después de 21 días todavía no está satisfecho con los resultados, Philips Norelco le reembolsará el precio total de la compra, siempre que la solicitud de reembolso se reciba dentro de los 45 días posteriores a la...
- Page 57 Español Recordatorio de limpieza Cuando apaga el producto, el recordatorio de limpieza destella para recordarle limpiar el producto. - Limpie el producto y los accesorios después de cada uso (ver '¿Cómo se limpia la afeitadora?') para evitar que se obstruya o se dañe. - Limpie los cabezales de afeitado a fondo una vez al mes o cuando el producto ya no afeite tan bien como antes.
- Page 58 Español 1 Deslice el botón de apertura de la cortadora hacia abajo para abrirla. 2 Encienda el producto. 3 Sostenga la cortadora perpendicular a la piel y muévala hacia abajo ejerciendo una presión suave. 4 También puedes usar el recortador para afeitar el área debajo de la nariz.
- Page 59 Español Nota: Le recomendamos que deje que el producto y los accesorios se sequen completamente antes de guardarlos para el próximo uso. - Coloque la tapa de protección (S7788 y S7786 solamente) en la afeitadora para protegerla. - Guarde el producto en la funda (S7783 y S7782 solamente).
-
Page 60: Cómo Se Limpia La Afeitadora
Español ¿Cómo se limpia la afeitadora? Para un óptimo desempeño, limpie el producto y los accesorios después de cada uso. Limpieza de la afeitadora con agua Limpie la afeitadora después de cada uso para evitar que se obstruya o se dañe. Nunca seque la unidad de afeitado con una toalla o pañuelo desechable, ya que esto puede dañar los cabezales de afeitado. - Page 61 Español 5 Enjuague el portacabezales de afeitado con agua tibia. 6 Elimine cuidadosamente el exceso de agua y deje que el soporte del cabezal de afeitado se seque al aire completamente. 7 Cierre la unidad de afeitado. Limpieza a fondo Le aconsejamos que limpie los cabezales de afeitado a fondo una vez al mes o cuando la afeitadora ya no afeite tan bien como antes.
- Page 62 Español protector de afeitado equivocado, tardará varias semanas en volver a lograr un desempeño óptimo del afeitado. 5 Limpie la cuchilla y la protección con agua tibia. 6 Sacuda el exceso de agua. 7 Vuelva a colocar los cabezales de afeitado en la unidad de afeitado.
-
Page 63: Cómo Uso El Quick Clean Pod? (S7885 Y S7886 Solamente)
Español 3 Encienda el dispositivo y enjuague la cortadora emergente con agua tibia. 4 Después de limpiarlo, apague el dispositivo. 5 Elimine cuidadosamente el exceso de agua y deje que la cortadora emergente se seque al aire. 6 Cierre la cortadora. Sugerencia: Para obtener un rendimiento óptimo, lubrique los dientes de la cortadora emergente con una gota de aceite mineral cada... - Page 64 Español 3 Levante la lengüeta del sello y jálela de la esquina para retirar el sello del cartucho del Quick Clean Pod. 4 Presione la pequeña pieza circular en el mango del cartucho del Quick Clean Pod para romper el broche de presión del mango. 5 Coloque el cartucho del Quick Clean Pod en el Quick Clean Pod.
- Page 65 Español antes de usar el Quick Clean Pod (ver '¿Cómo se limpia la afeitadora?'). Siempre sacuda la afeitadora para eliminar el exceso de agua antes de colocarla en el Quick Clean Pod. 1 Coloque la afeitadora de cabeza en el Quick Clean Pod.
- Page 66 Español Frecuencia de uso Ciclos Cuándo reemplazar el cartucho del Quick Clean Pod Todos los días Aproximadamente Cada mes Unas cuantas veces Aproximadamente Cada 2 meses por semana Cada semana Aproximadamente Cada 3 meses 1 Gire y retire la parte superior del Quick Clean Pod.
-
Page 67: Cómo Conecto La Afeitadora Con Mi Smartphone? (Fig. A)
Pod en el Quick Clean Pod (ver 'Preparación del Quick Clean Pod para el uso'). Escanea el código QR que se encuentra a la izquierda o visita www.philips.com/cleaning-cartridge para pedir cartuchos de repuesto del Quick Clean Pod. ¿Cómo conecto la afeitadora con mi smartphone? (Fig. - Page 68 La aplicación es compatible con una amplia gama de teléfonos inteligentes iPhone y Android™. Encontrará más información disponible en www.philips.com. 1 Descarga la aplicación. 2 Asegúrate de que el Bluetooth esté encendido en tu teléfono inteligente. S7920 3 Encienda la afeitadora.
- Page 69 Si necesita soporte adicional, visite www.philips.com/support. Desempareja la afeitadora y el teléfono inteligente Puedes emparejar tu afeitadora con un solo teléfono inteligente a la vez. Para desaparejar la afeitadora de tu teléfono inteligente (por...
-
Page 70: Cómo Se Reemplazan Los Cabezales De Afeitado
Reemplace los cabezales de afeitado dañados inmediatamente. Siempre reemplace los cabezales de afeitado con cabezales originales de Philips Norelco (ver 'Accesorios'). Reemplazo de los cabezales de afeitado 1 Apague la afeitadora. - Page 71 Español 4 Quite los cabezales de afeitado del soporte del cabezal de afeitado. Deseche inmediatamente los cabezales de afeitado usados para evitar mezclarlos con los nuevos cabezales de afeitado. 5 Coloque los nuevos cabezales de afeitado en el portacabezales. 6 Coloque los anillos de retención de nuevo en los cabezales de afeitado y gírelos hacia la derecha para volver a colocar el anillo de retención.
-
Page 72: Accesorios
Están disponibles los siguientes accesorios y piezas sueltas: - Cabezales de afeitado de repuesto Philips Norelco SH71. - Paquete de 2 cartuchos del Quick Clean Pod de Philips Norelco CC12 Asistencia Para asistencia, visite nuestro sitio web: www.philips.com/support o llame al número... -
Page 73: Garantía Total De Dos Años
Garantía Total de Dos Años Philips North America LLC garantiza este producto nuevo (excepto los cabezales de afeitado) contra defectos en los materiales o en la mano de obra por un período de dos años... -
Page 74: Garantía De Devolución De Su Dinero Por 45 Días
GARANTÍA DE DEVOLUCIÓN DE SU DINERO POR 45 DÍAS Para disfrutar de una afeitada cómoda y al ras con su nueva afeitadora para hombres Philips Norelco, la afeitadora se debe usar únicamente por 3 semanas. Esto permite que su cabello y su piel tengan tiempo suficiente para adaptarse al Sistema de afeitado Philips Norelco. - Page 75 El paquete del producto debe contar con matasellos que no supere los 45 días a partir de la fecha de compra. Philips se reserva el derecho a verificar el precio de compra del producto y limita los reembolsos al precio de venta minorista sugerido.
-
Page 76: Marcas Registradas
Español interferencia que reciba, inclusive aquella que pueda causar un funcionamiento no deseado. Por medio de la presente, nosotros, PHILIPS CONSUMER LIFESTYLE B.V., declaramos que el equipo que lleva el nombre de modelo especificado a continuación se probó de conformidad con las reglas aplicables de la Comisión Federal de Comunicaciones (Federal... - Page 77 Google Play y el logotipo de Google Play son marcas comerciales de Google Inc. La marca denominativa y los logotipos de Bluetooth® son marcas comerciales registradas propiedad de Bluetooth SIG, Inc. y todo uso que hace Philips Personal Care de dichas marcas es conforme a una licencia.
- Page 81 Empty page before back cover...
- Page 82 P.O. Box 10313, Stamford, CT 06904 This symbol on the product’s nameplate means it is listed by Underwriters’ Laboratories, Inc. Norelco and Tripleheader are registered trademarks of Philips North America LLC. PHILIPS and Philips shield are registered trademarks of Koninklijke Philips N.V.