LG L600V User Manual
Hide thumbs
Also See for L600V:
- User manual (204 pages) ,
- Service manual (13 pages) ,
- User manual (204 pages)
Table of Contents
Advertisement
Quick Links
Advertisement
Table of Contents

Related Manuals for LG L600V


Summary of Contents for LG L600V
- Page 1 ENGLISH User Manual LG L600V Designed for www.lgmobile.com P/N : Vodafone live!
- Page 2 T h i s d o c u m e n t i s t h e u s e r g u i d e f o r t h e LG L 6 0 0 V 3 G...
-
Page 3: Table Of Contents
Profiles Using the T9 Modes Efficient Use Security Using the ABC Mode Character encoding Using the 123 (Number) mode 28 L600V Features Scrolling control Using the symbol mode Parts of the phone Show image Overview of Menu Functions Cache Getting Started... - Page 4 Camera Memo Email Calculator Camera Info Service Converter Video recorder Service message Currency Messaging Surface My Files Create new Length Pictures Message Weight Sounds Email Temperature Videos Inbox Volume Games & Applications Drafts Velocity Bluetooth data Outbox World time Other files Sent messages Voice recorder External memory...
- Page 5 Table of Contents Own number Date & Time Call costs Settings Language Diverts Security Call waiting View contacts from Power save Voicemail Show image/avatar Memory status Video call Synchronise contact Handset Information Common setting Copy all Contact settings Reset settings Move all Display settings Connectivity...
-
Page 6: Introduction
Introduction Congratulations on your purchase of the advanced and compact L600V 3G video mobile phone, designed to operate with the latest digital mobile communication technology. This user’s guide contains important information on the use and operation of this phone. Please read all the information carefully for optimal performance and to prevent any damage to or misuse of the phone. -
Page 7: For Your Safety
For Your Safety Please read these simple guidelines. Not following CAUTION! these guidelines may be dangerous or illegal. Further • Switch off the phone in any area where required by special regulations. For example, do not use your phone in hospitals detailed information is given in this manual. -
Page 8: Guidelines For Safe And Efficient Use
Guidelines for Safe and Efficient Use Please read these simple guidelines. Not following tested frequency bands. Although the SAR is these guidelines may be dangerous or illegal. Further determined at the highest certified power level, the detailed information is given in this manual. actual SAR of the device while operating can be well below the maximum value. - Page 9 Guidelines for Safe and Efficient Use until the transmission is completed. The highest SAR The unit should be kept away from heat sources value for this device when tested for use at the body is such as radiators or cookers. 0.953 W/kg.
- Page 10 Use accessories, such as earphones and headsets, Some hearing aids might be disturbed by mobile with caution. Ensure that cables are tucked away phones. safely and do not touch the antenna unnecessarily. Minor interference may affect TVs, radios, PCs, etc. Please remove the data cable before powering on Road safety the handset.
- Page 11 Guidelines for Safe and Efficient Use If you are listening to music whilst outside and Do not transport or store flammable gas, liquid, or about, please ensure that the volume is at a explosives in the compartment of your vehicle, reasonable level so that you are aware of your which contains your mobile phone and accessories.
- Page 12 Unlike other battery systems, there is no memory effect that could compromise the battery's performance. Use only LG batteries and chargers. LG chargers are designed to maximize the battery life. Do not disassemble or short-circuit the battery pack.
-
Page 13: L600V Features
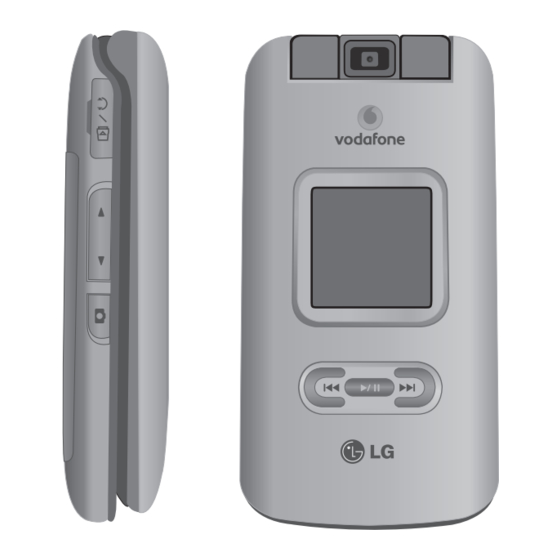
L600V Features Parts of the phone Front view Rear view Holes for a Camera lens carrying strap Battery release latch Front screen SIM card socket Music player Battery terminals hot keys Battery Antenna Note Never touch the antenna during a call or when using a Bluetooth connection. - Page 14 Left side view Right side view Headset/Charger/Cable connector Note Please ensure phone is powered on and in idle mode before connecting the USB cable. Slot for external memory card Side keys In standby mode (open): Key tone volume adjustment In standby mode (closed): Turns the LCD light on.
- Page 15 L600V Features Parts of the phone Main screen Open view Earpiece Top: Icons showing signal strength, battery level and various other functions Navigation keys In standby mode: Bottom: Soft key indications List of Profiles Camera lens Contacts Left soft key/Right soft key...
-
Page 16: Getting Started
Getting Started Installing the SIM card and battery 1. Installing the SIM card. Your SIM card contains your phone number, service details and contacts and must be inserted into your handset. To insert the SIM card If your SIM card is removed then your handset becomes unusable (except for emergency calls) until a valid one is inserted. - Page 17 Getting Started 2. Installing the battery. To remove the battery. Insert the battery aligning the gold contacts on the Turn the power off. (If the power is left on, there is a battery with the battery terminals (gold contacts) in chance you could lose the stored telephone numbers the battery compartment.
-
Page 18: Charging The Battery
Charging the Battery 2. Connect the other end of the travel adapter to the mains socket. Before connecting the travel adapter to the phone you must first install the battery. Note Only use the charger included in the box. 3. The moving bars on the battery icon will stop after charging is complete. -
Page 19: Disconnecting The Charger
Getting Started Disconnecting the charger CAUTION! Disconnect the travel adapter from the phone • Do not force the connector as this may damage the phone as shown in the diagram below. and/or the travel adapter. • If you use the battery pack charger when abroad, use an attachment plug adaptor for the proper configuration. -
Page 20: How To Use A Microsd Memory Card
How to use a microSD memory 3. Insert the memory card into the slot. The gold contacts must be kept on the back of the card microSD. Don’t push the microSD too much. If it doesn't go into the slot easily, you may be trying to insert it in the wrong way or there could be a foreign object in the slot. -
Page 21: Turning The Handset On/Off
Getting Started Attention: During formatting various folders will be created for different data types. Avoid using the Flash Memory Card when the battery is low. Turning the handset on/off When writing to the card, wait for the operation to complete before removing the card. Turning your handset on The card is designed to fit easily into the system Ensure that your SIM card is in your handset and the... -
Page 22: Access Codes
Access codes PUK code (4 to 8 digits) You can use the access codes described in this The PUK (PIN Unblocking Key) code is required to section to avoid unauthorised use of your phone. unblock a blocked PIN code. The PUK code may be The access codes (except the PUK and PUK2 codes) supplied with the SIM card. -
Page 23: Display Information
Getting Started Display information Idle screen The idle screen appears when you have installed No SIM idle screen a proper SIM card and turned the phone on. This is the initial screen of the phone that appears Screen structure when there is no SIM card installed in the phone, Idle screen consists of the operator's name, or the installed SIM card is invalid. - Page 24 Soft key Unlock function You can use the soft keys for several functions while If you press , a popup screen appears asking you dialling a number. Using the left soft key, you can to input the Security code to unlock the phone. make a video call, send a message to the number, The Security code is configured in the Change save the number to Contacts.
-
Page 25: General Functions
General Functions Making and answering calls 1. Input the phone number using the keypad, or select the phone number from the calls made/received lists by pressing Making a voice call To correct mistakes, press briefly to delete 1. Enter the number including the full area code, the last number, or press and hold to delete or select the phone number from call logs by... - Page 26 Making a voice/video call from Contacts Answering a call It is easy to call anyone whose number you have When you receive a call, the phone rings and the stored in your Contacts. flashing phone icon appears on the screen. If the caller can be identified, the caller’s phone number 1.
- Page 27 General Functions Shortcut to activate silent mode T9 mode You can activate the silent mode by pressing and This mode lets you enter words with only one holding down after opening the phone. keystroke per letter. Each key on the keypad has more than one letter.
-
Page 28: Changing The Text Input Mode
Changing the text input mode If the word is still incorrect after typing completely, press once or more to scroll 1. When you are in a field that allows characters to through the other word options. be entered, you will notice the text input mode Example indicator in the upper right corner of the LCD Press... -
Page 29: Using The 123 (Number) Mode
General Functions Using the 123 (Number) mode 2. To insert a space, press once. To delete letters, press . Press and hold down The 123 mode enables you to enter numbers in a clear the display. text message (a telephone number, for example). Refer to the following table for more information on Press the keys corresponding to the required digits the characters available using the alphanumeric keys. -
Page 30: Overview Of Menu Functions Cache
Overview of Menu Functions You can launch a menu by pressing in the idle screen. Move to the desired item and press to go into the sub menu. From the main menu you can also go into a submenu by directly pressing the corresponding numeric key as follows. -
Page 31: Entertainment
Entertainment Games & Applications The following items need to be configured. Menu 1.1 You can easily download games and other Enter an account name for the profile. Service name applications in this menu. It has two folders, Games and Applications, as default. Each folder has an Choose from the given list of connection Connection mode embedded link for downloading games or... - Page 32 Vodafone live! Homepage Bookmarks Menu 2.1 Menu 2.3 You can launch the web browser and access the You can store frequently accessed or favourite homepage of the web service provided by Vodafone. URLs/Pages. Open, Send, Add new, Edit, Mark/Unmark or Delete operations can be You can also directly access Vodafone live! by performed on Bookmarks.
- Page 33 Vodafone live! Saved pages Character encoding (Menu 2.5.3) Menu 2.4 Sets the browser default character set to one of The phone can save the page on display as an offline the following: file. Up to 20 pages can be saved. Automatic, English(ASCII), English(ISO), English(LATIN), Unicode(UCS2 BE), Browser settings...
- Page 34 Cache (Menu 2.5.6) Enabling Cache allows you to store accessed pages to your phone. Once a page has been stored in the cache it will greatly enhance the page loading speed on subsequent browsing of the same page. Cookies (Menu 2.5.7) Enabling Cookies allows you to store cookies sent from the server.
- Page 35 Music Recently played Music store Menu 3.1 Menu 3.5 This menu will be activated when there are some Connects to the Vodafone music download site. tracks currently played. Note Additional charges may be incurred when downloading All tracks Menu 3.2 music.
- Page 36 Camera Camera Menu 4.1 This application enables you to take a still picture. You can take a picture in the size you want and use it for the address book photo, home screen and other more general purposes. Once taken, the picture can be sent by Message, Email or Bluetooth. Displays the current camera settings.
- Page 37 Camera You can take better pictures at night by 1280x960 ( ), 640x480 ( ), 320x240 Night mode ), Wallpaper ( ), 176x144 ( Size selecting On. External display ( ), Contact ( You can apply one of 10 frame effects when Quality Super fine ( ), Fine (...
- Page 38 Video recorder Menu 4.2 This application enables you to record a video clip. You can play and watch a saved video file in this menu. Once recorded, a video clip can be sent by Message, Email or Bluetooth. Displays the current camera settings.
- Page 39 Camera You can take better shots at night by selecting Size 176x144 ( ), 128x96 ( Night mode Quality Super fine ( ), Fine ( ), Standard ( x1 ( ), x2 ( ) (Note: Available zoom level Effect None, Black & White, Negative, Sepia depends on the size.) Zoom Select the desired recording time.
- Page 40 Messaging Create new 5. Sounds: You can insert a sound file. (One Menu 5.1 sound per slide) Message 6. Record Sound: The voice recorder module (Menu 5.1.1) opens and you can record a sound. The You can write and edit a message containing recorded sound is inserted in the message.
- Page 41 Add recipients: You can add recipients from Email (Menu 5.1.2) your Contacts or enter the number directly. To send/receive an email, you should set up the Send: Select this to send the created message. email account. (Refer to page 48-50 for how to set up an Email account.) Save to drafts: Saves the message to drafts.
- Page 42 key [Options]. of the email you wish to send. Insert: Select this menu to insert special 5. When you have finished writing an email, press the characters, templates, and contacts. It is also right soft key [Send] to send the email. possible to attach multimedia files (pictures, Inbox videos and sounds).
- Page 43 Messaging Drafts Menu 5.3 Make video call: You can make a video call. You can view saved messages. Select a message and then press to edit the message. Delete: Deletes the current message. You can use the following functions by using left soft Create new message: You can write a new key [Options].
- Page 44 date and time and where it's saved. 1. Select a message and then press to view the message. Sent messages Menu 5.5 2. You can use the following functions by using the left soft key [Options]. Shows the messages you sent (Message/ Email). [For sending / waiting messages] [Options] Create new message: You can write a new message...
- Page 45 Messaging into handset or SIM. Create new message: Creates a new message or Email. Message info.: You can check the message type, date and time and where it is saved. Save address: Save sender's address to Contacts. Email Menu 5.6 Mark/Unmark: Use mark/unmark option for multiple deletion.
- Page 46 Reply all: Creates a reply to all the recipients. Note Depending on your service provider, useful phrases are saved Forward: Forwards the selected email message as a default. to others. Multimedia templates (Menu 5.7.2) Delete: Deletes the email. You can create, edit and view available templates Save address: Saves the sender's address to when creating multimedia messages.
- Page 47 Messaging Media Album 5. Character encoding: Auto/Default alphabet/ Menu 5.8 Unicode. Note: This service is not available in all countries. Auto(default): Message with single byte character Please contact your service provider for further information.) is normally encoded in Default alphabet(GSM7). Accessses the remote media album.
- Page 48 Request reply: Determines whether to request a (Menu 5.9.2) read confirmation mail for a Multimedia message. You can configure Multimedia message related Allow reply: Determines whether to allow options. sending a read confirmation mail for a read 1. Retrieval mode: You can set the retrieval mode confirmation mail request.
- Page 49 Messaging by pressing the right soft key [Edit]. The edit screen Email (Menu 5.9.3) also appears when creating a new profile under You can configure settings for receiving and Options. The meaning of each item is given below. transmitting emails. Title: Profile name.
- Page 50 be attached to the end of an email. The Creating a new email account configured signature text is automatically or 1. Select Add new from the Email account menu manually attached to the end of the email when it options. is sent.
- Page 51 Messaging 3. Press the right soft key [Done] to complete the Select the email inbox type either POP3 or Mailbox type email account configuration. IMAP4 using Determine whether to leave a copy of Editing an email account messages on the incoming server or not using 1.
- Page 52 My Files Pictures - Edit: Enables the image to be edited. Menu 6.1 - Make GIF animation: You can create an animated The Pictures folder consists of embedded links GIF file with different photos (up to 10 files of for downloading pictures through the Internet and 176X220 resolution with a 2Mbyte file size limit Default images.
- Page 53 My Files Sounds - Copy: Copies the file in handset memory or Menu 6.2 external memory. The Sounds folder consists of embedded links for - Rename: You can rename the video. downloading ringtones and music as well as folders - Info.: Shows information on the selected containing the Default sounds and Voice recordings.
- Page 54 When option 1. Play is selected, the video clip will Wide view: You can view the video in wide view be played with the Media Player. To pause the mode. playback, press during the playback. To resume Mute/Unmute: If the Volume is set to more than the paused playback, press once again.
- Page 55 My Files and Applications, as default. Each folder has an If relevant, you can set an image as the main embedded link for downloading games or display theme. applications. Please note that additional cost may be If relevant, start or set (normal or full screen, incurred when using online services.
- Page 56 Organiser & Tools Alarms 5. Select bell: Select the bell to ring at the alarm Menu 7.1 time using or opening the list by pressing If you set the alarm, the appears on the indicator bar. The specified alarm sounds at the scheduled 6.
- Page 57 Organiser & Tools Search schedule pressing move to the next year and pressing moves to today. Pressing moves to the You can add a schedule. You can configure the start previous month, and moves to the next date, end date, start time, end time, contents, type of month.
- Page 58 Set up and release holiday Tasks Menu 7.3 You can set up or release user holidays. Press the left You can view, edit and add tasks to do. Tasks are soft key [Options] and select Set holiday. The displayed in time order. Tasks that have been selected date will be displayed in red.
- Page 59 Organiser & Tools Memo Calculator Menu 7.4 Menu 7.5 Using the memo management function, you can view The calculator module allows you to perform basic and manage saved memo contents and add new arithmetic functions such as addition, subtraction, memo. multiplication, and division as well as some scientific functions.
- Page 60 Converter 3. Enter the standard unit and view the converted Menu 7.6 value. Using this menu, users can convert Currency, Surface, 4. Press [Reset] to clear the current input Field Length, Weight, Temperature, Volume and Velocity. and locate the cursor in the input field. Currency 5.
- Page 61 Organiser & Tools 3. Enter the standard unit and view the converted Volume (Menu 7.6.6) value. 1. Select the Volume menu. 4. Press [Reset] to clear the current input Field, 2. Select the desired unit to convert using [Unit]. and locate the cursor in the input field. 3.
- Page 62 World time 3. Pressing starts recording. When a recording is Menu 7.7 started, the recording time appears on the LCD. The World time function provides time information To cancel the recording, press the right soft key on major cities worldwide. [Cancel].
- Page 63 Organiser & Tools Send: To send the recorded file. Select one from Message, Email and Bluetooth using press Sound theme: You can set the recorded file as the Voice Ringtone, Video Ringtone, Start up sound or Power off sound. My Files: Opens the Voice recordings folder in My Files.
- Page 64 Contacts Add new Groups Menu 8.1 Menu 8.3 You can register a new contact address. You can Using this menu you can manage group information enter the name, different phone numbers and email (both stored in the Handset and the SIM). addresses of a new contact.
- Page 65 Contacts Own number Copy all (Menu 8.7.4) Menu 8.6 You can copy contacts from the phone memory to Allows you to display your phone number in the SIM the SIM or from the SIM to the phone memory. You card. You can save own numbers being used in the can copy all items or one at a time.
- Page 66 Calls You can check the record of missed, received, and Missed calls Menu 9.4 dialled calls only if the network supports Calling Line Allows you to view missed call records, make a call, Identification (CLI) within the service area. send a message and save the number in Contacts. The number and name (if available) are displayed together with the date and time at which the call was made.
- Page 67 Vodafone Menu Depending on whether you have SAT support services or not (i.e. SIM Application Toolkit) on the SIM card, this menu (Menu ) may be different. If the SIM card supports SAT services, this menu will be the operator-specific service name stored on the SIM card, for instance “Special”.
-
Page 68: Video Call
Video call You can make a video call using this menu. Hold/Resume 1. Enter the number you want to dial. Capture You can key in the number. View sender number You can select the number from Contact using Settings the left soft key [Contacts]. End call You can find the number from call logs by pressing... - Page 69 Video call Also, sound can be set for the incoming video call. The sound setting is used in the order of Contacts, Group ringtone and Profile. You can accept the incoming call by pressing the left soft key [Accept]. The incoming call ringing can be silenced by pressing the right soft key [Silent].
- Page 70 Settings Phone settings Voice ringtone Menu #.1 You can select the ringtone for incoming voice call. Profile (Menu #.1.1) Video ringtone You can select ringtone or vibration for an incoming You can select the ringtone for incoming video calls. call and configure the sound and volume of the Volume ringtone, key sound and sound effect, according to a profile.
- Page 71 Settings Flip tone Date & time (Menu #.1.2) Select the desired tone the phone will emit when you Time open/close the phone. 1. Select the Time item from the Date & time list, Confirmation tone and then press You can set the confirmation tone to be played by 2.
- Page 72 4. Press the right soft key [Done] to set the date Language (Menu #.1.3) with the specified value. Select the display language. You can select Auto update date/time Automatic language option to change display language to the SIM card supported language. When Auto Update is configured to On, the time and date are automatically updated according to the Security...
- Page 73 Settings Handset lock PIN code change procedure 1. Select ‘PIN code’ from the ‘Current PIN code’ list You can lock your phone. The following 4 lock and then press functions are available. 2. Enter the current PIN code and press When switching on: Locks the handset whenever the handset is switched on.
- Page 74 PIN2 code Memory status (Menu #.1.6) PIN2 is the abbreviation for Personal Identification User memory Number 2, and is used to restrict use by This function shows the status of the user memory unauthorised users as with the PIN. The PIN2 code of the mobile phone.
-
Page 75: Handset Information
Settings Format external memory Display settings Menu #.2 Select this to format the external memory. This menu allows you to personalise the display options of the screens and of the menus entire graphic interface. Handset Information (Menu #.1.7) Main display (Menu #.2.1) This functions shows the SIM card telephone number, model name and software version of the mobile... - Page 76 Theme Welcome message (Menu #.2.2) (Menu #.2.7) You can select the desired theme between Normal After selecting On, you can write a welcome message. and Extreme. Java settings Menu #.3 Menu style (Menu #.2.3) Activating a profile You can select the desired menu style from Grid style 1.
-
Page 77: Messaging Settings
Settings 2. Press the right soft key [Done] to save any Call barring (Menu #.5.2) configuration changes. Call barring menus for Voice and Video calls are You can edit and delete a profile by selecting Edit provided. and Delete from the Options menu. The menu consists of Voice calls, Video calls and Deactivate all. - Page 78 Voice calls The View status menu enables users to view the current network configuration. Selecting View Video calls status menu displays the Requesting message All outgoing with animation and the result of the operation when the network answers. Change password menu 1.
- Page 79 Settings All incoming Fixed dial numbers (Menu #.5.3) 1. When is selected, it operates in the same way ON/OFF: Select whether to activate FDN or not. as the Outgoing calls menu. PIN authentication is required. FDN List: Displays the current FDN list. You can 2.
- Page 80 2. To initialise, press the right soft key [Clear] and Voice calls enter the PIN2 code. All voice calls 3. You can select either Units or Currency in Set When busy call cost. According to your setting, the call cost No answer is displayed during a call (If SIM and Network support Advice Of Charge(AOC)).
- Page 81 Settings 3. When Recent divert number list is selected Video calls Divert registration is performed with the selected All video calls number. Select the number, and press . While 1. When the Deactivate menu is selected waiting for the result from the network, a Deletes Call Divert Number registered to the Requesting message and animation appears.
- Page 82 4. Options menu 3. When Recent divert number list is selected After activating the All video calls menu, selecting It operates the same as All voice calls menu. the Options menu at the bottom of the menus 4. When Options menu is selected displays the Deactivate, Activate, Deactivate all, It activates and operates If busy menu.
- Page 83 0Settings 2. When To a number is selected Voice mail (Menu #.5.8) It operates the same as All voice calls menu. You can add or modify voice mail centre. 3. When Recent divert number list is selected It operates the same as All voice calls menu. Video call (Menu #.5.9) 4.
-
Page 84: Common Setting
Common settings Send my number (Menu #.5.0) Set by network: Configures with the default Call reject settings determined by the service provider. You can set whether to reject incoming calls. On: Configures to send my phone number when 1. Select On in Reject menu to activate call reject. making an outgoing call. -
Page 85: Contact Settings
Settings wirelessly connected via a mobile phone. You can Handset: If you press on the handset to also exchange, for example, business cards, calendar answer a call, you can talk on the handset. If you items and pictures. press the Bluetooth headset key to answer a call, you can talk using the Bluetooth headset. - Page 86 Bluetooth device. If you select [Hidden], other Options devices will not be able to detect your phone when Add new: Using this menu, you can pair a new they are searching for a Bluetooth device. Bluetooth device with your phone. - My handset’s name: You can name or rename your Assign short name: Using this menu, you can phone as it will appear on other devices.
- Page 87 Settings 3. If Bluetooth devices are found, these devices are <Transmitting data using Bluetooth> listed on the screen. If no Bluetooth device is 1. To transmit data from your phone to another found, you will be asked if you want to search Bluetooth device, first select the application where again.
-
Page 88: Synchronisation 87
If another party attempts to transmit data, the <Connecting a handsfree kit> [Connection request] question will appear on the Menu > #. Settings > 7. Connectivity > 1. Bluetooth screen. If you select [Yes], the data will be 1. Connect the handsfree kit according to the transmitted to your phone. - Page 89 Settings Connect Contacts: Select whether to synchronise Contacts or not. 1. Select the Connect item and then press Contact name: Input the contacts database 2. Connect to the server with the selected server name for server access. profile and the synchronization animation is Calendar: Select whether to synchronise displayed while the synchronization is performed.
- Page 90 all the data in the server database. Network mode You can set a type of network to search for when - Restore networks are searched in the Network selection menu. The server sends all its data from a database to the phone.
-
Page 91: Access Points
Settings Move up: Moves the selected network upward. Browser settings (Menu #.7.5) Move down: Moves the selected network Profiles downward. Select the appropriate profile by pressing This will activate the profile to initiate browser Access points (Menu #.7.4) launch. This menu shows the access point list. You can create Security new profiles, delete or edit them by using the Option Menu. -
Page 92: Dial-Up Network
Automatic, English(ASCII), English(ISO), Cookies English(LATIN), Unicode(UCS2 BE), Enabling Cookies allows you to store cookies sent Unicode(UCS2 LE), Unicode(UCS2 Auto), from the server. Disabling this function will prevent Unicode(UTF-16 BE), Unicode(UTF-16 LE), cookies from being stored on your phone. Unicode(UTF-16 Auto), Unicode(UTF-8). JavaScript Scrolling control Select On/Off. -
Page 93: Accessories
Standard Battery Note Always use genuine LG accessories. Failure to do so may invalidate your warranty. Accessories may vary in different regions; please check with our regional service company or agent for further information. -
Page 94: Technical Data
Technical data General Product name : L600V System : GSM900/DCS1800/PCS 1900, WCDMA 2100 Net weight : 67.5g(Without battery) Ambient Temperatures Max : +55°C Min : -10°C... - Page 95 Index Call barring Camera Access codes Charging the battery Access points Converter Add memo Add new Alarms Data cable Answer mode Dialled calls Display information Display settings Backlight Diverts Barring password Battery 12, 92 Battery information and care Email 40, 44, 48 Bluetooth Entering text Bluetooth data...
- Page 96 Multimedia templates Inbox Music player hot keys JavaScript 33, 91 Network Java settings 30, 75 Network selection Key tone Own number Language PIN code PIN code request Memo PIN2 code 21, 73 Memory card formatting Playlists Memory status Profiles 32, 90 Message alert PUK code Message tone...
- Page 97 Index Received calls Videos Voice call 77 , 79 Voice mail Voice recorder Screen structure 22, 23 Volume 60, 69 Security 32, 71, 90 Signal Strength Speed dial numbers World time Stereo headset Tasks Templates SIM memory SIM Tool Kit...