Table of Contents
Advertisement
TABLE OF CONTENTS
Introduction ................................................................................... 1
Camera Features .......................................................................... 2
Parts and Names .......................................................................... 3
LC D Monitor ................................................................................. 5
Basic Operation•Quick Reference .............................................. 7
Preparations ................................................................................. 7
Taking Pictures ............................................................................. 8
Playback and Erasure .................................................................. 9
Safety Precautions ..................................................................... 10
Chapter 1. Getting Started
Before Using the Camera ............................................................. 16
Supplying Power to the Camera ................................................... 17
Before You Begin Recording ......................................................... 22
Taking Pictures ........................................................................... 28
Flash Mode .................................................................................. 36
Setting the White Balance Mode ............................................... 40
Confirming the Package Contents .................................... 16
Attaching the Wrist Strap .................................................. 16
Inserting Batteries ............................................................. 17
Inserting a Lithium Battery ................................................ 19
Using AC Power ................................................................ 21
Adjusting the Date and Time ............................................. 22
Adjusting the LCD ............................................................. 24
Holding the Camera .......................................................... 24
Picture-taking Sequence ................................................... 28
Turning on the Power ........................................................ 28
Selecting the Image Quality .............................................. 29
Taking Pictures .................................................................. 30
Exposure Compensation ................................................... 32
Selecting a Flash Mode ..................................................... 36
Flash Off Mode .................................................................. 37
Forced Flash Mode ........................................................... 38
Auto Flash Mode ............................................................... 39
Selecting a White Balance Mode ...................................... 40
Daylight Mode ................................................................... 41
15
Advertisement
Table of Contents

Related Manuals for Philips ESP 2


Summary of Contents for Philips ESP 2
-
Page 1: Table Of Contents
TABLE OF CONTENTS Introduction ... 1 Camera Features ... 2 Parts and Names ... 3 LC D Monitor ... 5 Basic Operation•Quick Reference ... 7 Preparations ... 7 Taking Pictures ... 8 Playback and Erasure ... 9 Safety Precautions ... 10 Chapter 1. - Page 2 Computer and DC Connections ... 63 Handling Precautions ... 66 Caring for Your Digital Camera ... 67 Troubleshooting ... 68 Using Your Digital Camera in Other Countries ... 71 Specifications ... 72 Fluorescent Mode ... 42 Tungsten Light Mode ... 43 Using the Self Timer ...
-
Page 3: Introduction
Radio-frequency interference Using the digital camera near electric devices could inhibit the performance of both the camera and nearby devices. Interference is likely to occur when the camera is placed near a radio or television. If this condition occurs, perform the following procedures: •... -
Page 4: Camera Features
Camera Features Recording quickly Recording can be performed quickly and simply by determining the image composition while observing the LCD monitor and pressing the shutter release button. The memory is stored in the main unit of the camera. Confirming a file after recording A recorded file can be confirmed by the LCD monitor right after the recording. -
Page 5: Parts And Names
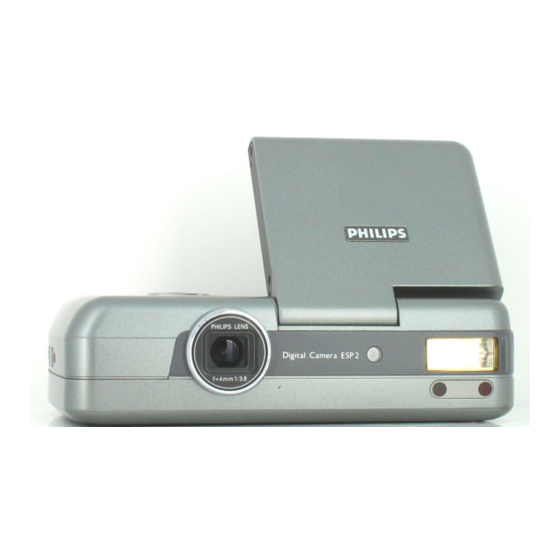
Parts and Names Camera (main unit) (Top) Macro dial Release button Wrist strap eyelet (Bottom) Clock Battery compartment Tripod screw hole LCD monitor Flash sensor reception window Self timer light Remote control Lens reception Flash... -
Page 6: Operation Panel
(Operation part) Terminal cover RS232C/AUX terminal Reset button (Operation panel) DATE button (FWD) button (REV) button AC adaptor (not supplied) • AY3140 (100V to 240V) Power cord Connection cable LCD monitor Operation panel PIC (Image Quality) switch RECORD/PLAY switch Brightness adjustment dial VIDEO OUT terminal Flash LED DATE... -
Page 7: Lcd Monitor
LCD Monitor The battery condition, number of possible recordings, current mode, and other camera conditions appear as symbols and numbers on the LCD monitor. Recording Display White balance display (No display) : AUTO : Daylight mode : Fluorescent light mode : Tungsten light mode Macro mode Message display... - Page 8 Warnings When the following warnings appear on the LCD monitor, verify the problem and correct Message Condition This indicates that the batteries are depleted. Re- Lights place or recharge the batteries. The clock battery is depleted or the clock battery is Lights not set.
-
Page 9: Basic Operation•Quick Reference
Basic Operation • Quick Reference This section describes the basic operations. Refer to the additional pages for further details. Preparations Inserting the batteries q Insert the batteries. When using the AC adaptor, connect the AC adaptor to the camera, then connect the adaptor to the wall outlet. -
Page 10: Taking Pictures
Taking Pictures Taking Pictures Pages 28 - 31 q Turn on the power. The recording mode is set. Open the LCD monitor. Set the REC(ord) /PLAY switch to the REC position. w Set the image quality mode. Set the PIC switch to F, N, or E. e While viewing the LCD monitor, move the camera toward the subject. -
Page 11: Playback And Erasure
Playback and Erasure Viewing a File (File Playback) q Open the LCD monitor and set the REC(ord)/ PLAY switch to PLAY. w Press the U U U U U and T T T T T buttons to move through the files. Erasing a File q Open the LCD monitor and slide the REC(ord)/PLAY switch to PLAY. -
Page 12: Safety Precautions
Safety Precautions Display Various messages enable you to use the product safely and prevent unexpected danger to people or damage to property. R Warning This symbol means operations may result in a serious injury or death if this message is ignored or if incorrect operation is performed. R Caution This symbol means mishandling may injure the users or damage ob- jects if the message is ignored. - Page 13 • When the LCD monitor is damaged, do not touch the fluid inside the display. If any of the following conditions occur, perform the appropriate action immediately. • If liquid crystals contact the skin, wipe the crystals off the skin and rinse the affected area with plenty of water.
- Page 14 • Do not touch the inside of the camera. The internal high-voltage circuits may cause an electrical shock. Remove the batteries right away, being careful to avoid electrical shock or burns. When the unit is damaged, contact the store where you purchased the prod- uct or contact the service representatives.
- Page 15 Observe the following precautions in order to use this unit safely. R Caution Fluid leaking from a battery can cause skin burns. If you touch a damaged battery, wash your hands with water immediately (do not use soap). If fluid leaks from the batteries, wipe off the fluid and replace the batteries with new batteries.
- Page 17 Chapter 1. Getting Started Before Using the Camera ... 16 Confirming the Package Contents ... 16 Attaching the Wrist Strap ... 16 Supplying Power to the Camera ... 17 Inserting Batteries ... 17 Inserting a Lithium Battery ... 19 Using AC Power ... 21 Before You Begin Recording ...
-
Page 18: Before Using The Camera
Confirming the Package Contents Check the packaging to ensure you have received the following items. Read the war- ranty, then store it in a safe place. • Digital Camera (main unit) • Video connection cable • Soft Case • Four AA Alkaline Batteries •... -
Page 19: Supplying Power To The Camera
Supplying Power to the Camera The procedures for loading the batteries (alkaline batteries, Lithium battery) are explained in this section. Electrical power supply by standard AC household current is also ex- plained in this section. Inserting Batteries Insert four AA alkaline batteries to begin using the camera. It is recommended to use the same type of batteries which are included in the package. -
Page 20: Insert The Batteries
R Caution Fluid leaking from a battery can cause skin burns. If you touch a damaged battery, wash your hands with water immediately (do not use soap). If fluid leaks from the batteries, wipe off the fluid and replace the batteries with new batteries. -
Page 21: Inserting A Lithium Battery
Recording and playback capacities The following table shows the number of recordable images and the playback time available with AA alkaline batteries (at temperatures between 10 C and 30 C). Type of battery AA alkaline batteries * The battery life varies according to flash usage and other factors. * Results may vary according to the type and brand of battery. - Page 22 e Insert the lithium battery in the battery tray so that the positive (+) pole surface is fac- ing down. Important • Use the lithium battery (CR2025) that is installed in the camera. Do not use any other type of battery that is not specifically recommended.
-
Page 23: Using Ac Power
Using AC Power If you intend to use your camera to record or playback files for a long period of time, use the optional AC adapter to connect the camera to a household electrical outlet. Caution • Make sure the electrical plug is plugged securely into the wall. About the AC Adaptor Be sure to read the safety precautions in the manual supplied with the AC adaptor. -
Page 24: Before You Begin Recording
Before You Begin Recording This section explains the initial camera adjustments and basic camera operations. Adjusting the Date and Time The camera records the date and time of every image that is recorded. You should set the correct date and time when you first begin using your camera, as well as when you travel to a different time zone. - Page 25 r Press the DATE button to advance to next item (the month, for example). Repeat steps 3 and 4 to correct the necessary items. Note: Every time the DATE button is pressed, the year, month, day, hour, and minute flashes (in that order). t After setting the minutes, press the DATE button again.
-
Page 26: Adjusting The Lcd
Adjusting the LCD This section explains how to adjust the brightness and angle of the LCD monitor. q Turn the brightness adjustment dial to the right or left to adjust the brightness. The brightness increases when you turn the bright- ness adjustment dial to the right. - Page 27 When holding the camera in a low position: Important • If you place your finger too far from the Release button, then press the button too fast, the camera may shake and a blurred picture may result. Note: Hold the camera vertically for a more vertical image. The image will appear vertically on the LCD monitor.
-
Page 29: Chapter 2. Recording Basics
Chapter 2. Recording Basics Taking Pictures ... 28 Picture-taking Sequence ... 28 Turning on the Power ... 28 Selecting the Image Quality ... 29 Taking Pictures ... 30 Exposure Compensation ... 32... -
Page 30: Taking Pictures
Taking Pictures This chapter explains the basic operations and other information needed to record im- ages. Picture-taking Sequence To take a picture follow these steps. Details of each steps follow. Turn on the power. Open the LCD monitor, then slide the REC(ord)/PLAY switch to the REC side. Select the image quality. -
Page 31: Selecting The Image Quality
58 for further details. Selecting the Image Quality This digital camera uses compression and decompression schemes to record a large amount of information. N (Normal) mode is standard; F (Fine) mode improves picture quality; and E (Economy) mode allows you to record and store more images. You may change the image quality for each image. -
Page 32: Taking Pictures
Standard Data Image Quality Mode Fine mode Normal mode Economy mode Note: The following chart indicates the maximum number of images that can be recorded when the image quality mode is selected. Image Quality Mode Fine mode Normal mode Economy mode Taking Pictures This section explains the basic operations and other information needed to record images. - Page 33 e To take the picture, depress the Release button completely. The Flash LED will light to indicate that an image is recorded. If the image is recorded, the remaining number of images that can be recorded appears on the LCD monitor.
-
Page 34: Exposure Compensation
Exposure Compensation When there is a significant difference in brightness between the background and the subject, the subject may be underexposed (too dark) or overexposed (too light). In such cases, adjust the exposure. This function allows you to intentionally underexpose or over- expose an image. - Page 35 w Press the U U U U U or T T T T T button to increase or decrease the exposure compensation. Each press the U or T button will increase or de- crease the exposure 0.5 EV. After adjusting the value, take the picture.
-
Page 37: Chapter 3. Picture-Taking Applications
Chapter 3. Picture-Taking Flash Mode ... 36 Selecting a Flash Mode ... 36 Flash Off Mode ... 37 Forced Flash Mode ... 38 Auto Flash Mode ... 39 Setting the White Balance Mode ... 40 Selecting a White Balance Mode ... 40 Daylight Mode ... -
Page 38: Flash Mode
Flash Mode This section explains how to change the flash mode. You can select the flash mode best suited to the lighting conditions. Selecting a Flash Mode Press the FLASH button repeatedly to select the desired mode. Flash Off Mode Important •... -
Page 39: Flash Off Mode
Flash Off Mode If this mode is used, the flash will not discharge, even in dark locations. This feature is convenient when you wish to take a picture where flash photography is prohibited. It is also convenient for using the available room light when taking a picture. q Press the FLASH button until the [ ] sym- bol appears on the LCD monitor. -
Page 40: Forced Flash Mode
Forced Flash Mode When taking photographs of subjects in strong light or with backlighting, dark shadows may appear on the image. Forced Flash Mode is used to soften shadows. The flash will operate in all lighting conditions. q When the REC(ord)/PLAY switch is set to REC, press the FLASH button until the [ ] symbol appears on the LCD monitor. -
Page 41: Auto Flash Mode
Auto Flash Mode The flash discharges automatically when shooting in dark locations or in backlighting. Take the photo according to the lighting conditions. q Press the FLASH button repeatedly until neither flash symbol ( on the LCD monitor. When shooting in a dark location, press the Re- lease button lightly. -
Page 42: Setting The White Balance Mode
Setting the White Balance Mode You may adjust the White Balance Mode so that subjects appear in natural colors, even when under a light source. Normally, Auto is the preferred setting. The white balance is adjusted automatically, using the white portion as a reference. The white balance sometimes cannot be adjusted correctly. -
Page 43: Daylight Mode
Daylight Mode Use Daylight Mode when shooting a picture outdoors or when the Auto White Balance does not work properly. q When the REC(ord)/PLAY switch is set to REC, press the FLASH button while press- ing the U U U U U button. w Within three seconds, press the U U U U U or T T T T T button repeatedly until the pears on the LCD monitor. -
Page 44: Fluorescent Mode
Fluorescent Mode Use the fluorescent mode when shooting a picture in fluorescent lighting or when the Auto White Balance does not work properly. q When the REC(ord)/PLAY switch is set to REC, press the FLASH button while press- ing the U U U U U button. w Within three seconds, press the U U U U U or T T T T T button to display the LCD monitor. -
Page 45: Tungsten Light Mode
Tungsten Light Mode Use the Tungsten Light mode when shooting a picture in incandescent lighting or when the Auto White Balance does not work properly. q When the REC(ord)/PLAY switch is set to REC, press the FLASH button while press- ing the U U U U U button. -
Page 46: Special Functions
Special Functions This camera has a variety of special functions available. Using the Self Timer This function is convenient for taking a group picture that includes the photographer. Before using the Self Timer, securely place the camera on a steady support or tripod. q When the REC(ord)/PLAY switch is set to REC, press the self timer mode button to display the... -
Page 47: Macro Shooting (Close-Up Shooting)
Macro Shooting (Close-up Shooting) Macro shooting is tight, close-up photography. q Approach the subject and compose the picture. Adjust the focus by turning the Macro to the dial right or left. When you turn the Macro dial, the pears on the LCD monitor. w When the subject is focused, press the Release button to take the picture. - Page 49 Chapter 4. Picture Playback/ Before Playback ... 48 Displaying Information ... 48 Connecting to a TV ... 49 File Playback ... 50 File Playback ... 50 Automatic Playback ... 50 File Erasing ... 52 Operation Flow ... 52 Erasing One File ... 52 Erasing All Files ...
-
Page 50: Before Playback
Before Playback This section explains the preparation file the playback and provides information about the images played back on the LCD monitor or TV. Displaying Information The file number of the recorded image appears on the monitor for three seconds as shown in the following figure. -
Page 51: Connecting To A Tv
Connecting to a TV The recorded images can be played back on a TV by connecting the Video cable to the camera and to the TV. Important • Refer to the TV manual for more information. VIDEO TONE q Close the LCD monitor and turn off the TV power. w Remove the terminal cover, then connect the Video cable to the VIDEO OUT terminal. -
Page 52: File Playback
File Playback This section explains how to view a recorded images. File Playback To view a file, follow these steps. q Open the LCD monitor, then slide the REC(ord)/PLAY switch to PLAY. The monitor displays the most recently recorded file. w Press the U U U U U or T T T T T button to move through the available files. - Page 53 w Press the U U U U U or T T T T T button to set the length of time for playback. To display the previous page or the next page Use the U or T button to select the previous page or the next page, then press the ENTER button on the remote control unit.
-
Page 54: File Erasing
File Erasing This section explains how to erase recorded files. You may erase one file at a time, or you may erase all files at one time. Operation Flow The following is the basic explanation of how to erase a file. Turn the power on. - Page 55 e Press the U U U U U or T T T T T button to select ERASE with the arrow, then press the RELEASE button. Note: To stop erasing, select EXIT, then press the Release button. The Release button is also referred to as the ENTER button in the LCD monitor.
-
Page 56: Erasing All Files
Erasing All Files The following section explains how to erase all the files at one time. Important • Erased files cannot be restored. Carefully confirm the contents of files before erasing them. q Open the LCD monitor, then slide the REC(ord)/PLAY switch of the camera to PLAY. -
Page 57: Chapter 5. Additional Information
Handling Precautions ... 66 Caring for Your Digital Camera ... 67 Troubleshooting ... 68 Using Your Digital Camera in Other Countries ... 71 Specifications ... 72 Setting the Auto Power Off mode ... 56 Setting the Power Saving Mode ... 57 Saving Your Settings ... -
Page 58: Changing A Camera Setting
Changing a Camera Setting You may change the camera setting to “Auto Power Off”, “Energy Saving” or “Power-Off memory” according to the usage. Setting the Auto Power Off mode If no buttons or switches are operated for five minutes, the Auto Power Off function turns off the main power in order to conserve power. -
Page 59: Setting The Power Saving Mode
Setting the Power Saving Mode This function saves battery power by adjusting the LCD monitor brightness. MODE 1, MODE 2, or MODE 3 can be set. However, the operations vary depending on whether the record mode and playback mode is set. Figure 57-1 Power saving mode Regular operation MODE1... -
Page 60: Saving Your Settings
Important • The power saving mode is automatically set to OFF when the LCD monitor is closed. • When the camera is used in an environment where the temperature is approximately 40 ° C or higher, the LCD monitor may have a certain uneven quality. The LCD monitor will return to normal when the temperature decreases. -
Page 61: Returning The Settings To The Original Position
Returning the Settings to the Original Position This section explains how to reset Flash mode, White Balance mode, Auto Power Off, Automatic Playback and Power Off Memory settings the original positions. q Remove the terminal cover on the side of the camera. -
Page 62: System Configuration Figure
Alkaline batteries Nickel Cadmium batteries Nickel-metal-hydride batteries Computer File transmission to a per- sonal computer Philips utility software for ESP2 and a serial cable are required. Image transmission to a per- sonal computer You can transmit your file to a personal computer using the utility software for the ESP2. - Page 63 Playback • LCD monitor • TV monitor (Connects to the cam- era with the Video cable that is in- cluded.) Output Color printer Color copier Once data is sent to your per- sonal computer, you can print it with a color printer or color copier.
-
Page 64: Accessories For Esp2
Accessories for ESP2 Item AC Adaptor Remote Control Unit Model AY3140 For operating on AC power. See page 21, “Using AC Power.” AY3740 For recording or playback by remote control. The Auto- matic Playback feature enables you to program the se- quence of pictures to be played back. -
Page 65: Computer And Dc Connections
Computer and DC Connections Macintosh adaptor • PC/AT compatible unit (RS232C D-sub 9-pin) • Macintosh 3. Connect the other end of the cable to the serial port of the computer. RS232C/AUX Connection cable 1. Open the terminal cover on the side of the camera. - Page 66 The new catalogue window is displayed. e Set the REC(ord)/PLAY switch to PLAY. r Select [Load from Philips Camera] in the File menu. The dialog box is displayed. t Set the serial port and the communication speed (Baud Rate) then click the OK button.
-
Page 67: For Windows
For Windows Transfer files from the camera q Select [DOWNLOAD Philips FILES] from the FILE menu. w Specify the communication speed (Baud Rate) and the serial port for the cable connection. Select whether a file is to be added to the album or to be developed on the desktop. -
Page 68: Handling Precautions
Handling Precautions This camera is not waterproof. Take great care to avoid water, rain, or spilled drinks. If the camera gets wet, contact your local Philips service office. Never drop the camera or subject it to strong shock. To avoid overheating the system, do not continuously operate the built-in flash unit more than necessary. -
Page 69: Caring For Your Digital Camera
Caring for Your Digital Camera Camera Care • Keep the lens of the camera clean; stains or dirt on the lens may lessen the precision of the image quality. • Do not attempt to remove dust or smears on the lens with your fingers. Use a blower to blow the dust away, or wipe the surface gently with a soft cloth. -
Page 70: Troubleshooting
Troubleshooting Before sending the unit for repairs, first refer to the following checklist for a possible solution to the problem. If you still cannot correct the problem, please contact the service representatives. Power Source Problems Problem No power The batteries are not installed properly or are depleted. - Page 71 Problem The flash discharged The distance to the subject ex- properly but the image ceeds approximately 3.0 meters. is dark. T h e p i c t u r e i s t o o The flash discharged when dis- tance to the subject was less than bright.
-
Page 72: Other Problems
Other Problems Problem The camera buttons The batteries are dead. and switches do not function. The camera does not function properly. The date is incorrect. The correct date and time have not been set. The date cannot be dis- The batteries are dead. played. -
Page 73: Using Your Digital Camera In Other Countries
Using Your Digital Camera in Other Countries AY3140 AC adaptor (optional) • The AC adaptor adjusts automatically to voltages ranging from 100 V to 240 V and adjust to frequencies of 50 Hz to 60 Hz. • Some countries use electrical outlets which have different shapes. Before leaving on a trip, obtain the necessary plug adaptor from a travel agent or electric store. -
Page 74: Specifications
Specifications General Video signal method Dimensions (W Weight Operating humidity range Operating temperature range Storage temperature range Camera Lens • Focal length • Minimum shooting range • Macro shooting range • Composition LCD Monitor • Screen size • Drive system •... - Page 75 Built-in flash • Method • Interval between flash • Effective distance • G no. • Operating modes Image Data Recording Internal memory Picture element File format Compression method Number of recording files Economy mode Normal mode Fine mode Input/Output Power input Video output RS232C/AUX Body...
-
Page 76: Information To The User
Properly shielded and grounded cables and connectors must be used for connection to a host computer in order to meet FCC emission limits. (FCC 15.27) COMPLIANCE INFORMATION STATEMENT Product Name: Philips Digital Camera Model Number: ESP2/17 This device complies with Part 15 of the FCC Rules.