Table of Contents
Advertisement
Quick Links
Advertisement
Table of Contents

Related Manuals for Zanussi ZOPNX6X2


Summary of Contents for Zanussi ZOPNX6X2
- Page 1 User Manual GETTING STARTED? EASY. ZOPNX6X2 EN User Manual Oven...
-
Page 2: Table Of Contents
VISIT OUR WEBSITE TO: Get usage advice, brochures, trouble shooter, service and repair information: www.zanussi.com/support Subject to change without notice. CONTENTS 1. SAFETY INFORMATION................2 2. SAFETY INSTRUCTIONS................4 3. INSTALLATION....................7 4. PRODUCT DESCRIPTION................9 5. CONTROL PANEL..................9 6. BEFORE FIRST USE..................10 7. - Page 3 be kept away from the appliance unless continuously supervised. • Children should be supervised to ensure that they do not play with the appliance. • Keep all packaging away from children and dispose of it appropriately. • WARNING: The appliance and its accessible parts become hot during use.
-
Page 4: Safety Instructions
• WARNING: The appliance and its accessible parts become hot during use. Care should be taken to avoid touching heating elements or the surface of the appliance cavity. • Always use oven gloves to remove or insert accessories or ovenware. •... - Page 5 2.2 Electrical connection Cable types applicable for installation or re‐ placement for Europe: WARNING! Risk of fire and electric shock. H07 RN-F, H05 RN-F, H05 RRF, H05 VV-F, H05 V2V2-F (T90), H05 BB-F • All electrical connections should be made For the section of the cable refer to the total by a qualified electrician.
- Page 6 • Do not put flammable products or items • Be careful when you remove the door from that are wet with flammable products in, the appliance. The door is heavy! near or on the appliance. • Clean regularly the appliance to prevent the deterioration of the surface material.
-
Page 7: Installation
• Non-stick surfaces on pots, pans, trays, • Use only lamps with the same utensils etc., can be damaged by the high specifications. temperature pyrolytic cleaning operation of 2.7 Service all pyrolytic ovens and can be also a source for low level harmful fumes. •... - Page 8 (*mm) min. 550 min. 560 ±1 3.2 Securing the oven to the cabinet ENGLISH...
-
Page 9: Product Description
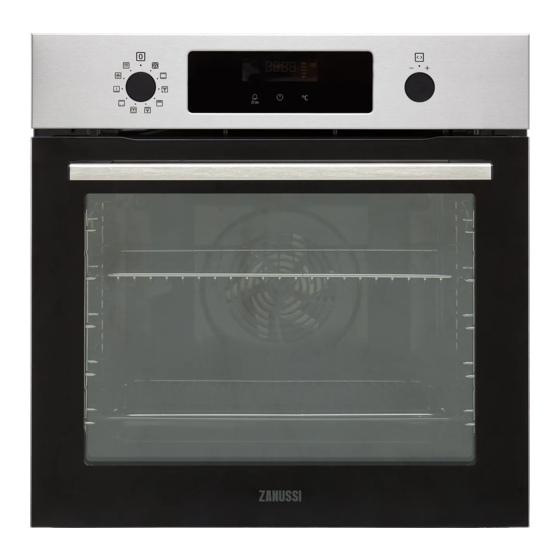
4. PRODUCT DESCRIPTION 4.1 General overview Control panel Knob for the heating functions Display Control knob (for the temperature) Heating element Lamp Shelf support, removable Shelf positions 4.2 Accessories For roasting and grilling. • Wire shelf For cookware, cake tins, roasts. Use the trivet only with the Grill- / •... -
Page 10: Before First Use
5.3 Display A. Timer / Temperature B. Heat-up and residual heat indicator C. Food Sensor (selected models only) D. Door lock (selected models only) E. Hours / minutes F. Demo Mode (selected models only) G. Clock functions 6. BEFORE FIRST USE Set the time before you use the oven. - Page 11 7.2 Heat-up indicator Heating func‐ Application When the oven function operates, the bars in tion the display appear one by one when the To bake pizza. To make inten‐ temperature in the oven increases, and sive browning and a crispy bot‐ disappear when it decreases.
-
Page 12: Clock Functions
8. CLOCK FUNCTIONS 8.1 Clock functions table Clock function Application To show or change the time of day. You can change the time of day only when the oven is off. Time of Day To set the length of cooking. Use only when a heating function is set. Duration To set the oven turn-off time. - Page 13 Step 4 Turn the knob for the temperature to set the hour. - press to confirm. When the set time ends the signal sounds for 2 min. Time setting flashes in the display. The oven turns off automatically. Step 5 Press any button to stop the signal.
-
Page 14: Using The Accessories
8.6 How to set function: Minute Minder Minute minder can be both set when the oven is turned on and off. Step 1 - press repeatedly. , 00 - flash. Step 2 Turn the knob for the temperature to set the seconds and then the minutes. When the time you set is longer than 60 min, hr flashes. -
Page 15: Additional Functions
Deep pan: Push the tray between the guide bars of the shelf support. 9.2 Trivet and Grill- / Roasting pan Step 1 Put the trivet into a deep pan. Step 2 Put the deep pan on the recommended shelf position. Roasting larger pieces of meat or poultry on one Grilling and toasting thin pieces of food in large shelf position. -
Page 16: Hints And Tips
Loc appears on the display when you turn the control knob or press any button when the Function lock is on. When you turn the knob (°C) for the oven functions, the oven stops. 120 - 195 When you turn off the oven while the Function Lock is on, the Function Lock 200 - 245 switches automatically to the Child Lock. - Page 17 Initially, monitor the performance when you cooking time, etc.) for your cookware, recipes cook. Find the best settings (heat setting, and quantities when you use this appliance. 11.2 Baking and roasting Conventional Cooking True Fan Cooking CAKES (min) (°C) (°C) Whisked recipes 3 (2 and 4) 45 - 60...
- Page 18 Conventional Cooking True Fan Cooking CAKES (min) (°C) (°C) Eclairs 25 - 35 Baking tray Eclairs, two lev‐ 2 and 4 35 - 45 Baking tray Plate tarts 45 - 70 Cake mould, Ø 20 Rich fruit cake 110 - 120 Cake mould, Ø...
- Page 19 Conventional Cooking True Fan Cooking FLANS (min) (°C) (°C) Lasagne 180 - 190 180 - 190 25 - 40 Cannelloni 180 - 190 180 - 190 25 - 40 Use the second shelf position. Use the wire shelf. Conventional Cook‐ True Fan Cook‐...
- Page 20 Conventional Cook‐ True Fan Cooking FISH (min) (°C) (°C) Trout / Sea bream, 3 - 4 fish 40 - 55 Tuna / Salmon, 4 - 6 fillets 35 - 60 11.3 Grill Preheat the empty oven. Use the fourth shelf position. Grill with the maximum temperature setting.
- Page 21 PORK POULTRY (°C) (min) (°C) (min) Shoulder / Neck / Ham 160 - 180 90 - 120 Poultry, portions, 0.2 - 200 - 220 30 - 50 joint, 1 - 1.5 kg 0.25 kg each Chops / Spare rib, 1 - 170 - 180 60 - 90 Chicken, half, 0.4 - 0.5...
- Page 22 (kg) Defrosting time Further defrosting (min) time (min) Butter 0.25 30 - 40 10 - 15 Gateau 11.6 Dehydrating - True Fan Cooking Cover trays with grease proof paper or baking VEGETA‐ parchment. BLES (°C) For a better result, stop the oven halfway Vegetables for soup 60 - 70 5 - 6...
- Page 23 (°C) (min) Sweet rolls, 16 pieces baking tray or dripping pan 20 - 30 Rolls, 9 pieces baking tray or dripping pan 30 - 40 Pizza, frozen, 0.35 kg wire shelf 10 - 15 Swiss roll baking tray or dripping pan 25 - 35 Brownie baking tray or dripping pan...
- Page 24 ( °C) (min) Small Conventional Baking tray 20 - 35 cakes, 20 Cooking per tray Small True Fan Baking tray 150 - 160 20 - 35 cakes, 20 Cooking per tray Small True Fan Baking tray 2 and 4 150 - 160 20 - 35 cakes, 20 Cooking...
-
Page 25: Care And Cleaning
12. CARE AND CLEANING WARNING! Refer to Safety chapters. 12.1 Notes on cleaning Clean the front of the appliance only with a microfibre cloth with warm water and a mild de‐ tergent. Use a cleaning solution to clean metal surfaces. Clean stains with a mild detergent. - Page 26 12.3 How to use: Pyrolysis CAUTION! Clean the oven with Pyrolysis. If there are other appliances installed in the same cabinet, do not use them at the WARNING! same time as this function. It can cause There is a risk of burns. damage to the oven.
- Page 27 Step 1 Open the door fully and hold both hinges. Step 2 Lift and pull the latches until they click. Step 3 Close the oven door halfway to the first opening position. Then lift and pull to remove the door from its seat. Step 4 Put the door on a soft cloth on a stable sur‐...
- Page 28 Step 9 After cleaning, install the glass panels and the oven door. If the door is installed correctly, you will hear a click when closing the latches. Make sure that you put the glass panels (A and B) back in the correct sequence. Check for the symbol / printing on the side of the glass panel, each of the glass panels looks different to make the disassembly and assembly easier.
-
Page 29: Troubleshooting
13. TROUBLESHOOTING WARNING! Error codes Refer to Safety chapters. The oven door is closed or the door lock is not 13.1 What to do if... broken. In any cases not included in this table please F102 The oven door is closed. contact with an Authorised Service Centre. -
Page 30: Energy Efficiency
......... 14. ENERGY EFFICIENCY 14.1 Product Information and Product Information Sheet Supplier's name Zanussi Model identification ZOPNX6X2 949498206 Energy Efficiency Index 81.2 Energy efficiency class Energy consumption with a standard load, conventional mode 0.93 kWh/cycle Energy consumption with a standard load, fan-forced mode 0.69 kWh/cycle... -
Page 31: Environmental Concerns
Keep food warm Moist Fan Baking Choose the lowest possible temperature Function designed to save energy during setting to use residual heat and keep a meal cooking. warm. The residual heat indicator or When you use this function the lamp temperature appears on the display. - Page 32 WWW.ZANUSSI.COM/SHOP...