
Related Manuals for Panasonic MCO-230AIC Series


Summary of Contents for Panasonic MCO-230AIC Series
- Page 1 Operating Instructions Incubator Please read the operating instructions carefully before using this product, and save the operating instructions for future use. See page 96 for all model numbers.
- Page 2 CONTENTS...
- Page 3 CONTENTS...
-
Page 4: Intended Use And Precautions
INTRODUCTION CAUTION INTENDED USE AND PRECAUTIONS... -
Page 5: Precautions For Safe Operation
PRECAUTIONS FOR SAFE OPERATION It is imperative that the user complies with the operating instructions as it contains important safety advice. WARNING CAUTION WARNING... - Page 6 WARNING Do not use the unit outdoors. Only qualified engineers or service personnel should install the unit. Install the unit on a sturdy floor and take an adequate precaution to prevent the unit from turning over. Never install the unit in a humid place or a place where it is likely to be splashed by water. Never install the unit in a flammable or volatile location.
- Page 7 PRECAUTIONS FOR SAFE OPERATION WARNING Ensure you do not inhale or consume medication or aerosols Never splash water directly onto the unit Never put containers with liquid on the unit Never bind, process, or step on the power supply cord, or never damage or break the power supply plug.
- Page 8 CAUTION Never store corrosive substances such as acid or alkali Check the setting when starting up of operation after power failure or turning off of power switch. Be careful not to tip over the unit Prepare a safety check sheet Wear rubber gloves when handling the H reagent Perform H...
-
Page 9: Labels On Incubator
LABELS ON INCUBATOR Warning/Caution Type Hot Surface Hazardous UV Light Hazardous UV Light Gas Poisoning or Oxygen Deprivation make sure that there adequate ventilation Gas Poisoning or Oxygen Deprivation... -
Page 10: Symbols On Incubator
SYMBOLS ON INCUBATOR ENVIRONMENTAL CONDITIONS... -
Page 11: Incubator Components
INCUBATOR COMPONENTS Unit Access port Silicon cap Rear left cover Handles Leveling Leveling feet Foot Tray 4 Electric key* Lower right side Removal power Sample air outlet cap supply cord port 18 17 16*... - Page 12 1. Outer door: 2. Inner door: 3. Tray catches: 4. Fan cover: 5. Duct: 6. Fan (inside the duct): 7. UV lamp* 8. Humidity control bar: 9. Humidifying pan cover: 10. Humidifying pan: 11. Door switch: 12. Key hole* 13. Switch cover: 14.
-
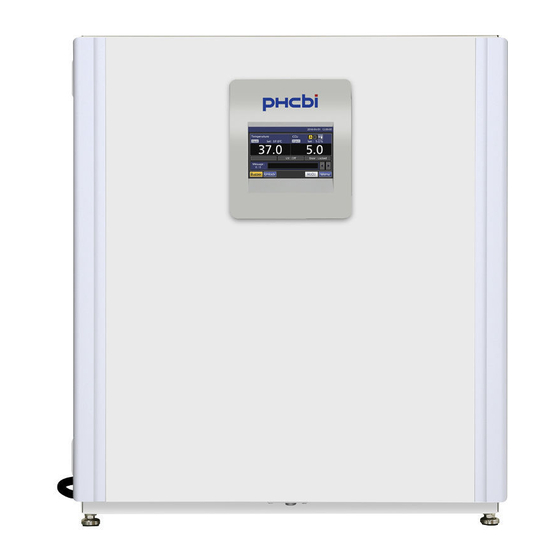
Page 13: Lcd Touch Panel
INCUBATOR COMPONENTS LCD touch panel Note: 1. Present temperature display field 6. CO gas injection indicator 2. Set temperature value display field 7. CO gas supply line indicator A and B* 3. Heating indicator 4. Present CO density display field 8. - Page 14 9. Present date/time display field 12. Outer door (opening/closing) display 10. Over heat display 13. Message display field Note: 11. UV lamp condition display Note: 14. Message select key 15. Menu key...
-
Page 15: Remote Alarm Terminal
INCUBATOR COMPONENTS 16. H key* 18. Buzzer key 17. Unlock key* Note: Remote alarm terminal Note: Table 1 The behavior of the remote alarm when pressing the Buzzer key... -
Page 16: Installation Site
INSTALLATION Installation site WARNING make sure that there is an adequate ventilation Normal air environment Do not expose to direct sunlight Separate from heat sources Ambient temperature at least 5 C lower than set temperature Strong and level floor WARNING Install the incubator at a location that can support the weight. - Page 17 INSTALLATION Low humidity WARNING Do not use the incubator outdoors. Never install the incubator in a moist location, such as near a sink or water line, or where it is likely to be exposed to water. do not install it near water or steam pipes No inflammable or corrosive gas No falling objects...
- Page 18 Installation 1. Remove the packing tape and clean up. Note: WARNING Do not leave the plastic wrapping bags within reach of children.
- Page 19 INSTALLATION 4. Adjust the leveling feet. Note: 5. Ground the incubator. When a ground must be installed WARNING always ground the incubator. Never connect the ground wire to a gas pipe, water pipe, lightning rod, or telephone ground wire. Installing a ground fault circuit breaker CAUTION Do not climb on the incubator or place objects on top of it.
- Page 20 In case of double stack Note: Note: When the incubator is not in use Before moving the incubator...
- Page 21 INSTALLATION Connecting CO gas cylinder WARNING confirm the gas type Confirm that the connections are secure and that no gas will leak Be sure to use the specified pressure Install the incubator in a location with adequate ventilation. Note: Lower right side Note: Note: Note:...
-
Page 22: Before Commencing Operation
BEFORE COMMENCING OPERATION Initial cleaning method Before using the incubator for the first time, clean dirt (tape residue, smear, etc.) from the chamber and the inner attachments thoroughly. To keep the chamber clean is essential to get the proper performance out of the incubator. Use the following steps to clean the incubator properly. -
Page 23: Removing Inner Attachments
BEFORE COMMENCING OPERATION Removing inner attachments CAUTION Wear rubber gloves when performing maintenance on the chamber. - Page 25 BEFORE COMMENCING OPERATION Installing inner attachments Note: CAUTION Note: CAUTION Note: CAUTION Note:...
-
Page 26: Filling Humidifying Pan
Filling humidifying pan Note: Note:... -
Page 27: For Better Cultivation
FOR BETTER CULTIVATION Precautions for cultures Leave space between culture containers. Do not place harmful materials in the chamber. Close the inner door. Open and close the doors gently. Be careful when closing the outer door. Be careful of the inside of the outer door. Avoid using excessive force on the inner door. -
Page 28: Preventing Contamination
Preventing contamination Avoid locations with high temperatures or humidity. Avoid locations with passers-by or drafts. If possible, use a cleanroom. Use clean containers. Keep the chamber clean. Use sterile distilled water in the humidifying pan. Keep the incubator out of direct airflows from air conditioners or fans. -
Page 29: Correct Operation
CORRECT OPERATION Note: WARNING Always use the removal power supply cord that is provided. The provided removal power supply cord is only for this product. When the incubator is not in use Before moving the incubator... -
Page 30: Basic Operation On Lcd Touch Panel
BASIC OPERATION ON LCD TOUCH PANEL Menu screen Stand-by Setting screen Log screen Chart screen Export screen Lock screen Auto-Lock screen* Key Lock screen Auto-Lock User screen Tools#1 screen Tools#2 screen... - Page 31 BASIC OPERATION ON LCD TOUCH PANEL Note: Note:...
-
Page 32: Basic Parameters
BASIC PARAMETERS Numerical input to input window Note: Note:... - Page 33 BASIC PARAMETERS...
- Page 34 Note:...
- Page 35 BASIC PARAMETERS Setting key lock...
- Page 36 Note:...
- Page 37 BASIC PARAMETERS Removing key lock...
- Page 38 Note:...
-
Page 39: Alarm Parameters
ALARM PARAMETERS... - Page 40 Note: Note: Note:...
- Page 41 ALARM PARAMETERS Note:...
-
Page 42: Operation/Alarm Log
OPERATION/ALARM LOG Setting log interval... -
Page 43: Displaying Operation Log
OPERATION/ALARM LOG Note: Note: Displaying operation log... - Page 45 OPERATION/ALARM LOG Note:...
-
Page 46: Exporting Operation Log
Exporting operation log Note:... - Page 47 OPERATION/ALARM LOG Note: Note:...
- Page 48 Note: Note: Note:...
- Page 49 OPERATION/ALARM LOG Displaying alarm log Note:...
- Page 50 Note: Note: Note:...
- Page 51 OPERATION/ALARM LOG Exporting alarm log Note:...
- Page 52 Note: Note:...
- Page 53 OPERATION/ALARM LOG Note: Note:...
-
Page 54: Other Parameters
OTHER PARAMETERS Setting date and time Note:... - Page 55 OTHER PARAMETERS Setting brightness and sleep...
- Page 56 Note:...
- Page 57 OTHER PARAMETERS Setting DAQ...
-
Page 58: Uv Lamp Parameters
UV LAMP PARAMETERS Using UV lamp Note: Note: Note: WARNING Do not look directly at UV light. Note:... - Page 59 UV LAMP PARAMETERS Setting UV lamp ON period...
- Page 60 Note:...
- Page 61 UV LAMP PARAMETERS Lighting UV lamp for 24 hours...
- Page 62 Note:...
- Page 63 DECONTAMINATION WARNING Use the reagent specified by our company for H decontamination Do not use chemicals other than the H reagent, such as alcohol. WARNING make sure that the outer and inner doors are securely closed WARNING CAUTION CAUTION Perform H decontamination with the inner attachments arranged as specified by our company CAUTION Wear rubber gloves when handling the H...
- Page 64 decontamination Duct lower part Note: Front Note: Note:...
- Page 65 DECONTAMINATION Note: Note:...
- Page 66 Note: CAUTION WARNING Do not use the unlock key to unlock the outer door during H decontamination or during H gas resolve by UV. Note:...
- Page 67 DECONTAMINATION Note: Note: Note: Note: Note:...
-
Page 68: Precautions When Handling H
Note: Precautions when handling H reagent Using unlock key Unlocking when power is interrupted Note: WARNING Do not use the unlock key to unlock the outer door during H decontamination or during H gas resolve by UV. -
Page 69: Electric Lock (Option)
ELECTRIC LOCK (OPTION) Setting User-ID... - Page 70 Note: Note:...
- Page 71 ELECTRIC LOCK (OPTION) Note: Setting auto lock...
- Page 72 Note:...
- Page 73 ELECTRIC LOCK (OPTION) Note: Note:...
- Page 74 Using unlock key Unlocking when power is interrupted Note:...
- Page 75 ELECTRIC LOCK (OPTION) Removing auto lock...
-
Page 76: Gas Auto Changer (Option)
GAS AUTO CHANGER (OPTION) Connecting CO gas cylinder Note: Lower right side Note: Note:... - Page 77 GAS AUTO CHANGER (OPTION) Automatic CO gas supply line changeover...
- Page 78 Table 2 CO gas supply line automatic changeover Note:...
- Page 79 GAS AUTO CHANGER (OPTION) Manual CO gas supply line changeover Note: Table 3 After changed into CO gas cylinder B because CO gas cylinder A is empty, if you changed into A manually.
-
Page 80: Std Gas Auto Calibration Kit (Option)
STD GAS AUTO CALIBRATION KIT (OPTION) Lower right side Note:... - Page 81 STD GAS AUTO CALIBRATION KIT (OPTION)
-
Page 83: Routine Maintenance
ROUTINE MAINTENANCE... -
Page 84: Alarms, Safety, And Self-Diagnosis
ALARMS, SAFETY, AND SELF-DIAGNOSIS Table 4 Alarms, safety, and self-diagnosis for culture operations Alarm or safety Remote Safety Conditions Display Buzzer function alarm operation... - Page 85 ALARMS, SAFETY, AND SELF-DIAGNOSIS Alarm or safety Remote Safety Conditions Display Buzzer function alarm operation Table 5 In the cases of other than table 6 or table 7. Note: Table 6 In the cases of high limit temperature alarm or Err38 (The outer door opens during H decontamination;...
- Page 86 Table 8 Alarms and Safety functions for H decontamination Alarm or safety Remote Conditions Display Buzzer Safety operation function alarm Table 9 Alarm and Safety functions for STD Gas Calibration Alarm or safety Remote Conditions Display Buzzer Safety operation function alarm Note: WARNING...
-
Page 87: Troubleshooting
TROUBLESHOOTING Symptom Items to check and countermeasures... - Page 88 Symptom Items to check and countermeasures...
- Page 89 TROUBLESHOOTING Symptom Items to check and countermeasures Note:...
-
Page 90: Disposal Of Unit
DISPOSAL OF UNIT WARNING The CO incubator must be dismantled and disposed of by qualified personnel only... - Page 91 DISPOSAL OF UNIT Note: This symbol mark and recycle system are applied only to EU countries and not applied to the countries in the other area of the world. Waste Electrical and Electronic Equipment (WEEE) Directive (English) (German)
- Page 92 (French) (Spanish)
- Page 93 DISPOSAL OF UNIT (Portuguese) (Italian)
- Page 94 (Dutch) (Swedish)
-
Page 95: Specifications
SPECIFICATIONS... - Page 96 Note Table 10 Optional accessories for each function...
- Page 97 SPECIFICATIONS Table 11 Required bracket/plate for each incubator combination of double stacking PERFORMANCE Note:...
- Page 98 CAUTION Please fill in this form before servicing. Hand over this form to the service engineer to keep for his and your safety.
- Page 99 Original Operating Instructions < EU countries only > 0123 Winsbergring 15, 22525 Hamburg, Germany Printed in Japan 1-1-1 Sakata, Oizumi-Machi, Ora-Gun, Gunma 370-0596 Japan LDCL001000-1 S0115-10515 © Panasonic Healthcare Co., Ltd. 2015 2015.05.11...