Table of Contents
Advertisement
Quick Links
global_main.book.book Page 1 Friday, November 5, 2021 3:27 PM
OWNER'S MANUAL
WASHING MACHINE
Before beginning installation, read these instructions
carefully. This will simplify installation and ensure that the
product is installed correctly and safely. Leave these
instructions near the product after installation for future
reference.
ENGLISH
FT015V9BL
MFL71852939
Rev.01_041622
Copyright © 2021-2022 LG Electronics Inc. All Rights Reserved.
www.lg.com
Advertisement
Table of Contents

Related Manuals for LG FT015V9BL


Summary of Contents for LG FT015V9BL
- Page 1 This will simplify installation and ensure that the product is installed correctly and safely. Leave these instructions near the product after installation for future reference. ENGLISH FT015V9BL www.lg.com MFL71852939 Rev.01_041622 Copyright © 2021-2022 LG Electronics Inc. All Rights Reserved.
-
Page 2: Table Of Contents
Preparing the Wash Load ................18 Adding Detergents and Softeners ..............19 Control Panel and Programme Table............22 Extra Options and Functions ................25 SMART FUNCTIONS Using LG ThinQ Application................26 Smart Diagnosis ....................28 MAINTENANCE Cleaning After Every Wash................30 Cleaning the Appliance Periodically ..............30 TROUBLESHOOTING... -
Page 3: Safety Instructions
global_main.book.book Page 3 Friday, November 5, 2021 3:27 PM SAFETY INSTRUCTIONS SAFETY INSTRUCTIONS READ ALL INSTRUCTIONS BEFORE USE The following safety guidelines are intended to prevent unforeseen risks or damage from unsafe or incorrect operation of the appliance. The guidelines are separated into ‘WARNING’ and ‘CAUTION’ as described below. - Page 4 global_main.book.book Page 4 Friday, November 5, 2021 3:27 PM SAFETY INSTRUCTIONS • Children should be supervised to ensure that they do not play with the appliance. • If the power cord is damaged, it must be replaced by the manufacturer, its service agent or similarly qualified persons in order to avoid a hazard.
- Page 5 global_main.book.book Page 5 Friday, November 5, 2021 3:27 PM SAFETY INSTRUCTIONS • This appliance is equipped with a power cord having an equipment- earthing / grounding conductor (earthing pin) and a grounding power plug. The power plug must be plugged into an appropriate outlet socket that is installed and earthed / grounded in accordance with all local codes and ordinances.
- Page 6 • Do not touch the door during a high temperature programme. • In case of a water leak from the appliance or flood, disconnect the power plug and contact the LG Electronics customer information centre. • Turn off water taps to relieve pressure on hoses and valves and to minimize leakage if a break or rupture should occur.
- Page 7 • Only qualified service personnel from LG Electronics service centre should disassemble, repair, or modify the appliance. Contact an LG Electronics customer information centre if you move and install the appliance in a different location.
-
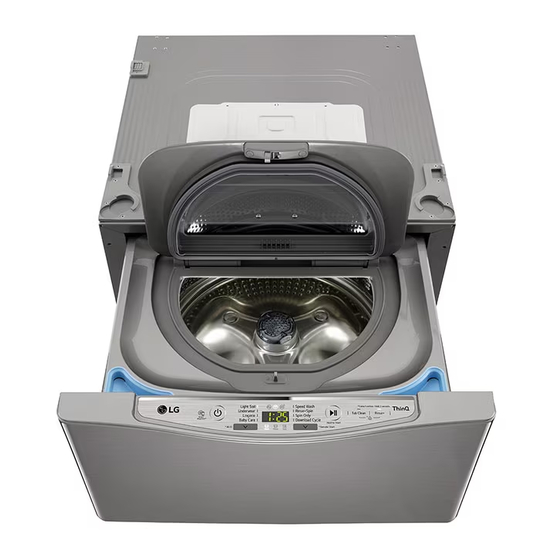
Page 8: Installation Parts And Specifications
Liquid Detergent Dispenser Power Plug Control Panel Levelling Feet Liquid Softener Dispenser Specifications Model FT015V9BL Power Supply 220 - 240 V~, 50 Hz Dimension (Width X Depth X Height) 595 mm X 654 mm X 365 mm Product Weight 42 kg... - Page 9 global_main.book.book Page 9 Friday, November 5, 2021 3:27 PM INSTALLATION Accessories *1 The included accessories vary depending on the model you purchased. Water supply hose(for Connecting Supply Hose Connecting Supply Hose cold water) and Disassembled with Assembled Connector Connector Water Drain Hose Water Drain Hose Band Clamps (3 EA) Connector...
-
Page 10: Installation Place Requirements
global_main.book.book Page 10 Friday, November 5, 2021 3:27 PM INSTALLATION Installation Place 114 cm Requirements 125 cm Installation Location 10 cm • This appliance must be installed on firm flooring 0.5 cm to minimize vibration during the spin cycle. Concrete flooring is best, being far less prone to 125 cm vibration during the spin cycle than wooden 5 cm... -
Page 11: Stacking Mini Washer And Main Washer
Repairs carried out by inexperienced persons may cause injury or serious malfunctioning. Contact your local authorised LG repairer. • The power plug must be plugged into an appropriate outlet socket that is installed and grounded/earthed in accordance with all local codes and ordinances. - Page 12 global_main.book.book Page 12 Friday, November 5, 2021 3:27 PM INSTALLATION Type 2: The bottom of the Main Attach the two back brackets on the rear top of the Mini Washer by inserting 4 machine screws Washer is plastic and its colour is in each bracket.
-
Page 13: Connecting The Water Supply Hose
global_main.book.book Page 13 Friday, November 5, 2021 3:27 PM INSTALLATION • Place the leveling feet of the Main Washer Turn the feet of the Main Washer slightly until inside the bracket openings on the Mini they are firmly snug up against the Mini Washer, and align the bracket screw holes. - Page 14 global_main.book.book Page 14 Friday, November 5, 2021 3:27 PM INSTALLATION Note for Connection Connecting the Hose to the Water Tap • Water pressure must be between 50 kPa and 800 kPa (0.5 – 8.0 kgf/cm²). If the water pressure Connecting Screw-Type Hose to Tap with Thread is more than 800 kPa, a decompression device Screw the supply hose connector onto the water should be installed.
-
Page 15: Installing The Drain Hose
global_main.book.book Page 15 Friday, November 5, 2021 3:27 PM INSTALLATION Connecting the Drain Hose to Connect one end of the cold water supply hose connector to the cold water supply hose of the Mini Washer the Main Washer first. The drain hose should not be placed higher than 100 cm above the floor. -
Page 16: Levelling The Appliance
(check both directions). stand or elevated surface unless it is • If the appliance rocks when pushing the top manufactured by LG Electronics for use with this plate of the appliance diagonally, adjust the feet model. again. - Page 17 • It must not ‘Seesaw’ across corners under the NOTE load. • Additional anti-slip sheets are available at LG • Do not let the feet of the appliance get wet. Electronics service centre. Failure to do so may cause vibration or noise.
-
Page 18: Operation Operation Overview
Mini Washer, and then wash heavily drum evenly. or normally soiled items to LG Main Washer. • Colour (White, Lights, Darks): Wash dark or dyed clothes separately from whites or light colours. -
Page 19: Adding Detergents And Softeners
• If power failure occurs during product operation, the door cannot be opened. Restore the power again or contact the LG service centre. • The Lid may not open due to high ambient temperatures, if this occurs after a wash and •... - Page 20 global_main.book.book Page 20 Friday, November 5, 2021 3:27 PM OPERATION fabric and the washing temperature. Use only Add the detergent and softener into the detergents that are suitable for Drum (front appropriate compartments. load) type washers. • If too many suds occur, reduce the detergent amount.
- Page 21 global_main.book.book Page 21 Friday, November 5, 2021 3:27 PM OPERATION • Do not pour liquid detergent and fabric softener directly onto the clothes in the wash drum, doing so will cause dark staining on the clothes that will be difficult to remove. •...
-
Page 22: Control Panel And Programme Table
• This allows you to select an additional programmes and will light when selected. Remote Start With the LG ThinQ app, you can use a smartphone to control your appliance remotely. • In order to use this function, refer to SMART FUNCTIONS. - Page 23 global_main.book.book Page 23 Friday, November 5, 2021 3:27 PM OPERATION Time and Status Display Description lights up when the programme starts and the door is locked. lights up when the appliance is connected to Wi-Fi network at home. lights up when the remote control feature is activated. Estimated Time Remaining •...
- Page 24 global_main.book.book Page 24 Friday, November 5, 2021 3:27 PM OPERATION Washing Programme Light Soil Max. Load: Rating Description Washes small loads of lightly soiled clothes, except delicate fabrics such as wool or silk. • Pressing the Start/Pause button without selecting a programme will cause the Light Soil programme to begin immediately, using the default settings.
-
Page 25: Extra Options And Functions
global_main.book.book Page 25 Friday, November 5, 2021 3:27 PM OPERATION Extra Options and Press and hold the Tub Clean and Rinse+ buttons at the same time for 3 seconds to Functions activate/deactivate this function. Adjusting the Number of Rinse Press the Rinse+ button to increase the number of rinse. -
Page 26: Smart Functions
Allows you to set various options on the appliance and in the application. Push Alert When the cycle is complete or the appliance has problems, you have the option of receiving push notifications on a smartphone. The notifications are triggered even if the LG ThinQ application is off. - Page 27 You can also monitor your cycle operation so you know how much time is left in the • LG ThinQ is not responsible for any network cycle. connection problems or any faults, malfunctions, or errors caused by network Using this function connection.
-
Page 28: Smart Diagnosis
For consideration of the user, this device should be installed and operated with a minimum distance of • Launch the LG ThinQ application and select the 20 cm between the device and the body. Smart Diagnosis feature in the menu. Follow the instructions provided in the LG ThinQ application. - Page 29 global_main.book.book Page 29 Friday, November 5, 2021 3:27 PM SMART FUNCTIONS Press and hold the Tub Clean button for 3 seconds or longer while holding the smartphone mouthpiece to the Power button until the data transfer is complete. • Keep the smartphone in place until the data transfer has finished.
-
Page 30: Maintenance
global_main.book.book Page 30 Friday, November 5, 2021 3:27 PM MAINTENANCE MAINTENANCE WARNING • Unplug the appliance before cleaning to avoid the risk of electric shock. Failure to follow this warning may result in serious injury, fire, electric shock, or death. •... - Page 31 • Do not operate the washing machine without the lint filter. NOTE • When the lint filter is damaged, contact an LG service centre. Cleaning the Water Inlet Filter The water inlet filter collects lime or any sediment that may be in water that is supplied to the...
- Page 32 global_main.book.book Page 32 Friday, November 5, 2021 3:27 PM MAINTENANCE so, or more often if the water is very hard or contains traces of limescale. • Turn off the water supply taps to the appliance if the appliance is to be left for a certain period of time (e.g.
-
Page 33: Troubleshooting
Operation of your appliance can lead to errors and malfunctions. The following tables contain possible causes and notes for resolving an error message or malfunction. It is recommended to read the tables carefully below in order to save your time and money that may cost for calling to LG Electronics service centre. - Page 34 • Mini Washer will not operate as a standalone unit. It must be stacked under a suitable LG front-loading washing machine. Stacking switch is not working properly. • The product is for use only in combination with LG authorized appliances. Call the customer information centre to check out LG authorized appliances.
- Page 35 global_main.book.book Page 35 Friday, November 5, 2021 3:27 PM TROUBLESHOOTING Symptoms Possible Cause & Solution is not an error. This prevents children from changing cycles or operating the appliance. CHILD LOCK FUNCTION • Turn off the Child Lock function in the control panel. Noises You Might Hear Symptoms Possible Cause &...
- Page 36 global_main.book.book Page 36 Friday, November 5, 2021 3:27 PM TROUBLESHOOTING Symptoms Possible Cause & Solution Appliance does not Control panel has powered off due to inactivity. operate. • This is normal. Press the Power button to turn the appliance on. Appliance is unplugged.
- Page 37 global_main.book.book Page 37 Friday, November 5, 2021 3:27 PM TROUBLESHOOTING Symptoms Possible Cause & Solution Appliance is not filling Inlet filter clogged. properly. • Make sure the inlet filters on the fill valves are not clogged. Inlet hoses may be kinked. •...
- Page 38 After Sales Service (Egypt Only) • Shelf Life Time: 6 Years • LG is committed to providing all spare parts of this appliance during the shelf life time.
- Page 39 ar_main.book.book Page 34 Friday, November 5, 2021 2:30 PM ﻣﺫﻛﺭﺓ...
- Page 40 ﺇﺫﺍ ﻛﺎﻧﺕ ﺍﻟﻣﺳﺎﻓﺔ ﺑﻳﻥ ﺍﻟﺟﻬﺎﺯ ﻭﺟﻬﺎﺯ ﺍﻟﺗﻭﺟﻳﻪ ﺃﺑﻌﺩ ﻣﻥ ﺍﻟﻼﺯﻡ، ﻗﺩ ﺗﻛﻭﻥ ﺍﻹﺷﺎﺭﺓ ﺿﻌﻳﻔﺔ ﻭﻗﺩ ﻳﺗﻌﺫﺭ ﺗﻛﻭﻳﻧﻪ ﺑﺷﻛﻝ • .ﺻﺣﻳﺢ. ﺍﻧﻘﻝ ﺟﻬﺎﺯ ﺍﻟﺗﻭﺟﻳﻪ ﻣﻥ ﻣﻛﺎﻧﻪ ﺣﺗﻰ ﻳﺻﺑﺢ ﺃﻗﺭﺏ ﺇﻟﻰ ﺍﻟﺟﻬﺎﺯ (ﺧﺩﻣﺔ ﻣﺎ ﺑﻌﺩ ﺍﻟﺑﻳﻊ )ﻣﺻﺭ ﻓﻘﻁ ﺍﻟﻌﻣﺭ ﺍﻻﻓﺗﺭﺍﺿﻲ : ٦ ﺳﻧﻭﺍﺕ • . ﺑﺗﻭﻓﻳﺭ ﺟﻣﻳﻊ ﻗﻁﻊ ﺍﻟﻐﻳﺎﺭ ﺍﻟﺧﺎﺻﺔ ﺑﻬﺫﻩ ﺍﻷﺟﻬﺯﺓ ﺧﻼﻝ ﻓﺗﺭﺓ ﺍﻟﻌﻣﺭ ﺍﻻﻓﺗﺭﺍﺿﻲLG ﺗﻠﺗﺯﻡ ﺷﺭﻛﺔ •...
- Page 41 ar_main.book.book Page 32 Friday, November 5, 2021 2:30 PM ﺍﺳﺗﻛﺷﺎﻑ ﺍﻷﻋﻁﺎﻝ ﻭﺇﺻﻼﺣﻬﺎ ﺍﻟﺳﺑﺏ ﺍﻟﻣﺣﺗﻣﻝ ﻭﺍﻟﺣﻝ ﺍﻷﻋﺭﺍﺽ .ﺍﻧﺳﺩﺍﺩ ﻓﻠﺗﺭ ﺍﻹﺩﺧﺎﻝ .ﻻ ﻳﺗﻡ ﻣﻝء ﺍﻟﺟﻬﺎﺯ ﺑﻁﺭﻳﻘﺔ ﺻﺣﻳﺣﺔ .ﺗﺄﻛﺩ ﻣﻥ ﺃﻥ ﻓﻼﺗﺭ ﺇﺩﺧﺎﻝ ﺍﻟﻣﻳﺎﻩ ﺍﻟﻣﻭﺟﻭﺩﺓ ﻋﻧﺩ ﺻﻣﺎﻣﺎﺕ ﺍﻟﻣﻝء ﻏﻳﺭ ﻣﺳﺩﻭﺩﺓ • .ﻗﺩ ﺗﻛﻭﻥ ﺧﺭﺍﻁﻳﻡ ﺇﺩﺧﺎﻝ ﺍﻟﻣﻳﺎﻩ ﻣﻠﺗﻭﻳﺔ .ﺗﺄﻛﺩ...
- Page 42 ar_main.book.book Page 31 Friday, November 5, 2021 2:30 PM ﺍﺳﺗﻛﺷﺎﻑ ﺍﻷﻋﻁﺎﻝ ﻭﺇﺻﻼﺣﻬﺎ ﺍﻟﺳﺑﺏ ﺍﻟﻣﺣﺗﻣﻝ ﻭﺍﻟﺣﻝ ﺍﻷﻋﺭﺍﺽ .ﺗﻡ ﺇﻳﻘﺎﻑ ﺗﺷﻐﻳﻝ ﻟﻭﺣﺔ ﺍﻟﺗﺣﻛﻡ ﺑﺳﺑﺏ ﺍﻟﺗﻭﻗﻑ ﻋﻥ ﺍﻟﺗﺷﻐﻳﻝ .ﺍﻟﺟﻬﺎﺯ ﻻ ﻳﻌﻣﻝ .ﻟﺗﺷﻐﻳﻝ ﺍﻟﺟﻬﺎﺯ ﺍﻟﻁﺎﻗﺔ ﻫﺫﺍ ﺃﻣﺭ ﻁﺑﻳﻌﻲ، ﺍﺿﻐﻁ ﻋﻠﻰ ﺍﻟﺯﺭ • .ﺍﻟﺟﻬﺎﺯ ﻏﻳﺭ ﻣﺗﺻﻝ ﺑﺎﻟﺗﻳﺎﺭ ﺍﻟﻛﻬﺭﺑﺎﺋﻲ .ﺗﺄﻛﺩ...
- Page 43 ar_main.book.book Page 30 Friday, November 5, 2021 2:30 PM ﺍﺳﺗﻛﺷﺎﻑ ﺍﻷﻋﻁﺎﻝ ﻭﺇﺻﻼﺣﻬﺎ ﺍﻟﺳﺑﺏ ﺍﻟﻣﺣﺗﻣﻝ ﻭﺍﻟﺣﻝ ﺍﻷﻋﺭﺍﺽ ﺍﻟﻐﺳﺎﻟﺔ ﺗﺻﺩﺭ ﺻﻭ ﺗ ً ﺎ ﻏﻳﺭ ﺍﻋﺗﻳﺎﺩﻱ .ﻗﺩ ﻳﻧﺗﺞ ﻋﻥ ﺍﻟﻣﻼﺑﺱ ﺍﻟﺛﻘﻳﻠﺔ ﺇﺻﺩﺍﺭ ﺻﻭﺕ ﻏﻳﺭ ﺍﻋﺗﻳﺎﺩﻱ. ﻫﺫﺍ ﺃﻣﺭ ﻁﺑﻳﻌﻲ ﻋﺎﺩﺓ ﻓﻲ ﺣﺎﻟﺔ ﺍﺳﺗﻣﺭﺍﺭ ﺇﺻﺩﺍﺭ ﺍﻟﺻﻭﺕ، ﻓﻣﻥ ﺍﻟﻣﺣﺗﻣﻝ ﺃﻥ ﻳﻛﻭﻥ ﺍﻟﺟﻬﺎﺯ ﻣﺛﺑ ﺗ ً ﺎ ﺑﺷﻛ ﻝ ٍ ﻏﻳﺭ ﻣﺗﻭﺍﺯﻥ. ﻗﻡ ﺑﺈﻳﻘﺎﻑ ﺍﻟﺗﺷﻐﻳﻝ •...
- Page 44 ar_main.book.book Page 29 Friday, November 5, 2021 2:30 PM ﺍﺳﺗﻛﺷﺎﻑ ﺍﻷﻋﻁﺎﻝ ﻭﺇﺻﻼﺣﻬﺎ ﺍﻟﺳﺑﺏ ﺍﻟﻣﺣﺗﻣﻝ ﻭﺍﻟﺣﻝ ﺍﻷﻋﺭﺍﺽ ﻟﻡ ﻳﺗﻡ ﺇﻏﻼﻕ ﺍﻟﺑﺎﺏ ﺑﺷﻛﻝ ﺳﻠﻳﻡ ﺧﻁﺄ ﻓﻲ ﺍﻟﺑﺎﺏ .ﺍﻓﺗﺢ ﺍﻟﺩﺭﺝ ﻭﺗﺄﻛﺩ ﻣﻥ ﻋﺩﻡ ﻭﺟﻭﺩ ﻣﻼﺑﺱ ﺃﻭ ﻋﻭﺍﺋﻖ ﺃﺧﺭﻯ ﻋﻧﺩ ﻣﻛﺎﻥ ﺍﻟﻣﺯﻻﺝ • .ﺃﻏﻠﻖ ﺍﻟﺑﺎﺏ، ﺃﻏﻠﻖ ﺍﻟﺩﺭﺝ، ﻭﺍﺿﻐﻁ ﻋﻠﻰ ﺍﻟﺗﺷﻐﻳﻝ/ﺍﻹﻳﻘﺎﻑ ﺍﻟﻣﺅﻗﺕ ﻟﺑﺩء ﺍﻟﺩﻭﺭﺓ •...
- Page 45 .ﻗﺩ ﻳﺅﺩﻱ ﺗﺷﻐﻳﻝ ﺟﻬﺎﺯﻙ ﺇﻟﻰ ﺣﺩﻭﺙ ﺃﺧﻁﺎء ﻭﺃﻋﻁﺎﻝ. ﺗﺣﺗﻭﻱ ﺍﻟﺟﺩﺍﻭﻝ ﺍﻟﺗﺎﻟﻳﺔ ﻋﻠﻰ ﺍﻷﺳﺑﺎﺏ ﺍﻟﻣﺣﺗﻣﻠﺔ ﻭﺍﻟﻣﻼﺣﻅﺎﺕ ﺍﻟﺗﻲ ﺗﻘﻭﻡ ﺑﻣﻌﺎﻟﺟﺔ ﺃﻱ ﺭﺳﺎﻟﺔ ﺧﻁﺄ ﺃﻭ ﻋﻁﻝ LG Electronics ﻳ ُﻭﺻﻰ ﺑﻘﺭﺍءﺓ ﺍﻟﺟﺩﺍﻭﻝ ﺍﻟﺗﺎﻟﻳﺔ ﺑﻌﻧﺎﻳﺔ ﺗﻭﻓﻳﺭ ً ﺍ ﻟﻠﻭﻗﺕ ﻭﺍﻟﻣﺎﻝ ﺍﻟﺫﻱ ﻗﺩ ﺗﺗﻛﺑﺩﻩ ﻋﻧﺩ ﺍﻟﺗﻭﺍﺻﻝ ﻣﻊ ﻣﺭﻛﺯ ﺧﺩﻣﺔ...
- Page 46 ar_main.book.book Page 27 Friday, November 5, 2021 2:30 PM ﺍﻟﺻﻳﺎﻧﺔ ﺗﻧﻅﻳﻑ ﻓﻠﺗﺭ ﺍﻟﻭﺑﺭ .ﻻ ﺗﻘﻡ ﺑﺗﺷﻐﻳﻝ ﺍﻟﻐﺳﺎﻟﺔ ﺑﺩﻭﻥ ﻓﻠﺗﺭ ﺍﻟﻭﺑﺭ • ﻳ ُﻌﺩ ﺍﻟﻔﻠﺗﺭ ﻣﻥ ﺍﻷﺟﺯﺍء ﺍﻟﻬﺎﻣﺔ ﻟﺗﺣﻘﻳﻖ ﻓﻌﺎﻟﻳﺔ ﺃﺩﺍء ﺍﻟﻐﺳﻳﻝ، ﻟﺫﻟﻙ ﻓﻬﻭ ﻳﺣﺗﺎﺝ ﻣﻧﻙ .ﺇﻟﻰ ﻋﻧﺎﻳﺔ ﺧﺎﺻﺔ. ﻧﻭﺻﻲ ﺑﺗﻧﻅﻳﻑ ﺍﻟﻔﻠﺗﺭ ﺑﺻﻔﺔ ﻣﻧﺗﻅﻣﺔ ﻣﻼﺣﻅﺔ...
- Page 47 ar_main.book.book Page 26 Friday, November 5, 2021 2:30 PM ﺍﻟﺻﻳﺎﻧﺔ ﺍﻟﺻﻳﺎﻧﺔ ﺗﺣﺫﻳﺭ ﺍﻓﺻﻝ ﺍﻟﺟﻬﺎﺯ ﻗﺑﻝ ﺍﻟﺗﻧﻅﻳﻑ ﻟﺗﺟﻧﺏ ﺧﻁﺭ ﺍﻟﺗﻌﺭﺽ ﻟﺻﺩﻣﺔ ﻛﻬﺭﺑﺎﺋﻳﺔ. ﻗﺩ ﻳﺅﺩﻱ ﻋﺩﻡ ﺍﺗﺑﺎﻉ ﻫﺫﺍ ﺍﻟﺗﺣﺫﻳﺭ ﺇﻟﻰ ﺍﻟﺗﻌﺭﺽ ﺇﻟﻰ ﺇﺻﺎﺑﺔ ﺧﻁﻳﺭﺓ، ﺃﻭ ﻧﺷﻭﺏ ﺣﺭﻳﻖ، ﺃﻭ • .ﺍﻟﺗﻌﺭﺽ ﻟﺻﺩﻣﺔ ﻛﻬﺭﺑﺎﺋﻳﺔ، ﺃﻭ ﺣﺩﻭﺙ ﻭﻓﺎﺓ .ﻻ...
- Page 48 ﻋﻥ ﺗﻘﺻﻳﺭ ﻣﻥ ﻗﺩ ﺗﺗﻌﺭﺽ ﻫﺫﻩ ﺍﻟﻣﻳﺯﺓ ﻟﺗﻐﻳﺭﺍﺕ ﺩﻭﻥ ﺳﺎﺑﻖ ﺇﻧﺫﺍﺭ ﻭﻗﺩ ﻳﺧﺗﻠﻑ ﺷﻛﻠﻬﺎ ﻭﻓ ﻘ ً ﺎ • .ﻟﻠﻣﻧﻁﻘﺔ ﺍﻟﺗﻲ ﺗﺳﻛﻥ ﻓﻳﻬﺎ ﺑﻐﺭﺽ ﺗﺷﺧﻳﺹ LG ThinQ ﺍﺳﺗﺧﺩﺍﻡ ﺗﻁﺑﻳﻖ ﺍﻟﻣﺷﻛﻼﺕ ، ﻓﺣﻳﻧﻬﺎ ﻳﻣﻛﻥ Wi-Fi ﺇﺫﺍ ﻭﺍﺟﻬﺕ ﻣﺷﻛﻠﺔ ﺃﺛﻧﺎء ﺍﺳﺗﺧﺩﺍﻡ ﺍﻟﺟﻬﺎﺯ ﺍﻟﻣﺯﻭﺩ ﺑﺷﺑﻛﺔ...
- Page 49 ﻗﺩﺭﺓ ﺍﻟﺧﺭﺝ )ﺍﻟﺣﺩ .( ﺛﻡ ﺃﻋﺩ ﺗﺳﺟﻳﻝ ﺍﻟﻣﻧﺗﺞ WPA2 ) ﻳ ُﻧﺻﺢ ﺑﺎﺧﺗﻳﺎﺭ ﻭﺍﺕ (ﺍﻷﻗﺻﻰ IEEE 802.11 g: 17.39 dBm IEEE 802.11 n (HT20): 16.64 LG ThinQ ﺗﺛﺑﻳﺕ ﺗﻁﺑﻳﻖ ﺩﻳﺳﻳﺑﻝ ﺑﺎﻟﻣﻠﻲ ﻭﺍﺕ Google ﺃﻭ Apple App Store ﻋﻠﻰ LG ThinQ ﺍﺑﺣﺙ...
- Page 50 Page 23 Friday, November 5, 2021 2:30 PM ﺍﻟﻭﻅﺎﺋﻑ ﺍﻟﺫﻛﻳﺔ ﺍﻟﻭﻅﺎﺋﻑ ﺍﻟﺫﻛﻳﺔ LG ThinQ ﺍﺳﺗﺧﺩﺍﻡ ﺗﻁﺑﻳﻖ LG ThinQ ﻗﺑﻝ ﺍﺳﺗﺧﺩﺍﻡ ﺗﻁﺑﻳﻖ Wi-Fi ﺗﺄﻛﺩ ﻣﻥ ﺍﻟﻣﺳﺎﻓﺔ ﺑﻳﻥ ﺍﻟﺟﻬﺎﺯ ﻭﺟﻬﺎﺯ ﺍﻟﺗﻭﺟﻳﻪ ﺍﻟﻼﺳﻠﻛﻲ )ﺷﺑﻛﺔ LG ThinQ ﻣﺯﺍﻳﺎ ﺗﻁﺑﻳﻖ ﺇﺫﺍ ﻛﺎﻧﺕ ﺍﻟﻣﺳﺎﻓﺔ ﺑﻳﻥ ﺍﻟﺟﻬﺎﺯ ﻭﺟﻬﺎﺯ ﺍﻟﺗﻭﺟﻳﻪ ﺍﻟﻼﺳﻠﻛﻲ ﺑﻌﻳﺩﺓ ﺃﻛﺛﺭ ﻣﻥ...
- Page 51 ar_main.book.book Page 22 Friday, November 5, 2021 2:30 PM ﺍﻟﺗﺷﻐﻳﻝ ﺧﻳﺎﺭﺍﺕ ﻭﻭﻅﺎﺋﻑ ﺇﺿﺎﻓﻳﺔ ﺿﺑﻁ ﻋﺩﺩ ﻣﺭﺍﺕ ﺍﻟﺷﻁﻑ .ﻟﺯﻳﺎﺩﺓ ﻋﺩﺩ ﻣﺭﺍﺕ ﺍﻟﺷﻁﻑ (+)ﺷﻁﻑ Rinse ﺍﺿﻐﻁ ﻋﻠﻰ ﺯﺭ .ﺟ ﻬ ّ ِ ﺯ ﺍﻟﻣﻼﺑﺱ ﻭﺿﻌﻬﺎ ﺩﺍﺧﻝ ﺣﻭﺽ ﺍﻟﻐﺳﻝ ﺍﻟﻁﺎﻗﺔ ﺍﺿﻐﻁ ﻋﻠﻰ ﺍﻟﺯﺭ .ﺃﺿﻑ...
- Page 52 ar_main.book.book Page 21 Friday, November 5, 2021 2:30 PM ﺍﻟﺗﺷﻐﻳﻝ ﺑﺭﻧﺎﻣﺞ ﺍﻟﻐﺳﻳﻝ ﺍﻟﺣﺩ ﺍﻷﻗﺻﻰ ﻟﻠﺣﻣﻭﻟﺔ: ﻣﻘﻧﻥ ()ﻣﺗﺳﺦ ﺧﻔﻳﻑ Light Soil .ﻳﻐﺳﻝ ﻛﻣﻳﺎﺕ ﺻﻐﻳﺭﺓ ﻣﻥ ﺍﻟﻣﻼﺑﺱ ﺍﻟﻣﺗﺳﺧﺔ ﻗﻠﻳ ﻼ ً .، ﻣﺎ ﻋﺩﺍ ﺍﻷﻗﻣﺷﺔ ﺍﻟﺣﺳﺎﺳﺔ ﻣﺛﻝ ﺍﻟﺻﻭﻑ ﻭﺍﻟﺣﺭﻳﺭ ﺍﻟﻭﺻﻑ ()ﻣﺗﺳﺦ ﺧﻔﻳﻑ Light Soil ﺩﻭﻥ...
- Page 53 ar_main.book.book Page 20 Friday, November 5, 2021 2:30 PM ﺍﻟﺗﺷﻐﻳﻝ ﺷﺎﺷﺔ ﺍﻟﻭﻗﺕ ﻭﺍﻟﺣﺎﻟﺔ ﺍﻟﻭﺻﻑ .ﻳﻛﻭﻥ ﻗﻳﺩ ﺍﻹﺿﺎءﺓ ﻋﻧﺩ ﺑﺩء ﺍﻟﺑﺭﻧﺎﻣﺞ ﻭﺇﻏﻼﻕ ﺍﻟﺑﺎﺏ .ﻓﻲ ﺍﻟﻣﻧﺯﻝ Wi-Fi ﻳﻛﻭﻥ ﻗﻳﺩ ﺍﻹﺿﺎءﺓ ﻋﻧﺩ ﺗﻭﺻﻳﻝ ﺍﻟﺟﻬﺎﺯ ﺑﺷﺑﻛﺔ .ﻳﻛﻭﻥ ﻗﻳﺩ ﺍﻹﺿﺎءﺓ ﻋﻧﺩ ﺗﻧﺷﻳﻁ ﻣﻳﺯﺓ ﺍﻟﺗﺣﻛﻡ ﻋﻥ ﺑﻌﺩ ﺍﻟﻭﻗﺕ...
- Page 54 • .ﻳﺳﻣﺢ ﻟﻙ ﻫﺫﺍ ﺍﻟﺧﻳﺎﺭ ﺑﺗﺣﺩﻳﺩ ﺑﺭﻧﺎﻣﺞ ﺇﺿﺎﻓﻲ ﻭﺳﻳﺿﺊ ﻋﻧﺩﻣﺎ ﻳﺗﻡ ﺗﺣﺩﻳﺩﻩ • ()ﺍﻟﺗﺷﻐﻳﻝ ﻋﻥ ﺑﻌﺩ Remote Start .ﻓﻲ ﺃﻱ ﻫﺎﺗﻑ ﺫﻛﻲ ﻟﻠﺗﺣﻛﻡ ﻓﻲ ﺟﻬﺎﺯﻙ ﻋﻥ ﺑﻌﺩ LG ThinQ ﻳﻣﻛﻧﻙ ﺍﺳﺗﺧﺩﺍﻡ ﺗﻁﺑﻳﻖ ﺍﻟﻭﻅﺎﺋﻑ ﺍﻟﺫﻛﻳﺔ ﻻﺳﺗﺧﺩﺍﻡ ﻫﺫﻩ ﺍﻟﻭﻅﻳﻔﺔ، ﺭﺍﺟﻊ • Wi-Fi LG ThinQ ﺛﻭﺍﻥ...
- Page 55 ar_main.book.book Page 18 Friday, November 5, 2021 2:30 PM ﺍﻟﺗﺷﻐﻳﻝ ﺇﺿﺎﻓﺔ ﺍﻟﻣﻧﻅﻑ ﻭﺍﻟﻣﻧ ﻌ ّ ﻡ ﻻ ﺗﺿﻑ ﺍﻟﻣﻧﻅﻑ ﻭﻣﻧ ﻌ ّ ﻡ ﺍﻟﻘﻣﺎﺵ ﺍﻟﺳﺎﺋﻝ ﺇﻟﻰ ﺍﻟﻣﻼﺑﺱ ﻣﺑﺎﺷﺭ ﺓ ً ﺩﺍﺧﻝ ﺣﻭﺽ • .ﺍﻟﻐﺳﻝ، ﻓﻘﺩ ﻳﺅﺩﻱ ﺫﻟﻙ ﺇﻟﻰ ﺗﻛﻭﻳﻥ ﺑﻘﻊ ﻋﻠﻰ ﺍﻟﻣﻼﺑﺱ ﻳﺻﻌﺏ ﺇﺯﺍﻟﺗﻬﺎ ﺍﺳﺗﺧﺩﺍﻡ...
- Page 56 ar_main.book.book Page 17 Friday, November 5, 2021 2:30 PM ﺍﻟﺗﺷﻐﻳﻝ ﻓﻲ ﺣﺎﻟﺔ ﺗﻌﺫﺭ ﻓﺗﺢ ﺍﻟﺩﺭﺝ ﺑﺷﻛﻝ ﻛﺎﻣﻝ، ﺍﺳﺣﺏ ﺍﻟﺩﺭﺝ ﺇﻟﻰ ﺍﻷﻣﺎﻡ ﺑﺑﻌﺽ ﺍﻟﻘﻭﺓ • ﻻ ﻳﺟﺏ ﺃﻥ ﺗﺯﻳﺩ ﺍﻷﻏﺭﺍﺽ ﺍﻟﻛﺑﻳﺭﺓ ﻋﻥ ﻧﺻﻑ ﺇﺟﻣﺎﻟﻲ ﺍﻟﺣﻣﻭﻟﺔ. ﻭﻻ ﺗﻐﺳﻝ • .ﻣﺳﺗﺧﺩ ﻣ ً ﺎ ﻛﻠﺗﺎ ﻳﺩﻳﻙ ﺃﻏﺭﺍ...
- Page 57 ar_main.book.book Page 16 Friday, November 5, 2021 2:30 PM ﺍﻟﺗﺷﻐﻳﻝ ﺍﻟﺗﺷﻐﻳﻝ ﻧﻅﺭﺓ ﻋﺎﻣﺔ ﻋﻠﻰ ﺍﻟﺗﺷﻐﻳﻝ ﺩﺭﺟﺔ ﺍﻻﺗﺳﺎﺥ )ﺷﺩﻳﺩﺓ، ﻋﺎﺩﻳﺔ، ﺧﻔﻳﻔﺔ(: ﺍﻓﺭﺯ ﺍﻟﻣﻼﺑﺱ ﺣﺳﺏ ﺩﺭﺟﺔ • ﺍﻻﺗﺳﺎﺥ. ﺍﻏﺳﻝ ﺍﻟﻣﻼﺑﺱ ﺍﻟﻣﺗﺳﺧﺔ ﻗﻠﻳ ﻼ ً ﻓﻲ ﺍﻟﻐﺳﺎﻟﺔ ﺍﻟﺻﻐﻳﺭﺓ، ﺛﻡ ﺍﻏﺳﻝ .ﺍﻟﺭﺋﻳﺳﻳﺔ ﺍﻟﻣﻼﺑﺱ ﺷﺩﻳﺩﺓ ﺍﻻﺗﺳﺎﺥ ﺃﻭ ﺍﻟﻣﺗﺳﺧﺔ ﺑﺷﻛﻝ ﻋﺎﺩﻱ ﻓﻲ ﻏﺳﺎﻟﺔ ﺍﺳﺗﺧﺩﺍﻡ...
- Page 58 ar_main.book.book Page 15 Friday, November 5, 2021 2:30 PM ﺍﻟﺗﺭﻛﻳﺏ ﺇﺫﺍ ﻛﺎﻥ ﻣﻥ ﺍﻟﺻﻌﺏ ﻭﺿﻊ ﺍﻟﺷﺭﺍﺋﺢ ﺍﻟﻣﺎﻧﻌﺔ ﻟﻼﻧﺯﻻﻕ ﺗﺣﺕ ﺍﻷﺭﺟﻝ • ﻋﻥ ﻁﺭﻳﻖ ﺗﺩﻭﻳﺭﻫﺎ ﺃﺣﻛﻡ ﺿﺑﻁ ﺍﻷﺭﺟﻝ ﺑﺎﺳﺗﺧﺩﺍﻡ ﺻﻭﺍﻣﻳﻝ ﺍﻟﻘﻔﻝ ﺍﻷﻣﺎﻣﻳﺔ، ﻓﺿﻌﻬﺎ ﺗﺣﺕ ﺍﻷﺭﺟﻝ ﺍﻟﺧﻠﻔﻳﺔ. ﻳﻌﺩ ﺗﺛﺑﻳﺕ ﺍﻟﺷﺭﺍﺋﺢ ﺍﻟﻣﺎﻧﻌﺔ .ﻋﻛﺱ ﺍﺗﺟﺎﻩ ﻋﻘﺎﺭﺏ ﺍﻟﺳﺎﻋﺔ ﺑﻌﻛﺱ ﺍﺗﺟﺎﻩ ﺍﻟﺟﺯء ﺍﻟﺳﻔﻠﻲ ﻣﻥ ﺍﻟﺟﻬﺎﺯ .ﻟﻼﻧﺯﻻﻕ...
- Page 59 • ﺿﺑﻁ ﻣﺳﺗﻭﻯ ﺍﻟﺟﻬﺎﺯ .ﺑﺻﻧﺎﻋﺗﻪ ﻟ ﻳ ُﺳﺗﺧﺩﻡ ﻣﻊ ﻫﺫﺍ ﺍﻟﻁﺭﺍﺯ LG Electronics ﺍﻟﺗﺣﻘﻖ ﻣﻥ ﺿﺑﻁ ﺍﻟﻣﺳﺗﻭﻯ ﺗﺄﻛﺩ ﻣﻥ ﺍﺳﺗﻭﺍء ﺍﻟﺟﻬﺎﺯ ﻋﻠﻰ ﺍﻷﺭﺽ ﺗﻣﺎ ﻣ ً ﺎ ﻣﺳﺗﺧﺩ ﻣ ً ﺎ ﻣﻳﺯﺍﻥ ﺍﻟﻣﺎء ﻋﻧﺩ ﺍﻟﺿﻐﻁ ﻋﻠﻰ ﺣﻭﺍﻑ ﺍﻟﻠﻭﺣﺔ ﺍﻟﻌﻠﻭﻳﺔ ﻟﻠﺟﻬﺎﺯ ﺑﺷﻛﻝ ﻗﻁﺭﻱ، ﻓﻳﺟﺏ ﺃ ﻻ ّ ﻳﺗﺣﺭﻙ...
- Page 60 ar_main.book.book Page 13 Friday, November 5, 2021 2:30 PM ﺍﻟﺗﺭﻛﻳﺏ ﺧﻁﻭﻁ ﺍﻟﻣﺎء. ﻭﺍﺟﻌﻝ ﺍﻟﻣﺎء ﻳﺗﻡ ﺗﺻﺭﻳﻔﻪ ﻓﻲ ﺩﻟﻭ، ﻭﺗﺣﻘﻖ ﻣﻥ ﺩﺭﺟﺔ ﺣﺭﺍﺭﺓ ﻣﻼﺣﻅﺔ .ﺍﻟﻣﺎء .ﺗﺄﻛﺩ ﻣﻥ ﺃﻥ ﺧﺭﻁﻭﻡ ﺍﻹﻣﺩﺍﺩ ﺑﺎﻟﻣﻳﺎﻩ ﻏﻳﺭ ﻣﺗﺷﺎﺑﻛﺔ ﺃﻭ ﻣﻣﺯﻋﺔ • ﺗﻭﺻﻳﻝ ﺧﺭﺍﻁﻳﻡ ﺇﻣﺩﺍﺩ ﺍﻟﻣﺎء ﺍﻟﺑﺎﺭﺩ ﺑﺎﻟﻐﺳﺎﻟﺗﻳﻥ ﺗﺭﻛﻳﺏ...
- Page 61 ar_main.book.book Page 12 Friday, November 5, 2021 2:30 PM ﺍﻟﺗﺭﻛﻳﺏ ﺩﺭﺟﺔ ﻣﺋﻭﻳﺔ ﺇﻟﻰ ﺇﺗﻼﻑ ﺑﻌﺽ ﻳﻣﻛﻥ ﺃﻥ ﻳﺅﺩﻱ ﺗﺟﺎﻭﺯ ﺩﺭﺟﺔ ﺣﺭﺍﺭﺓ • ﻋﻘﺎﺭﺏ ﺍﻟﺳﺎﻋﺔ ﻟﻣﺩﺓ ﻧﺻﻑ ﺩﻭﺭﺓ ﺑﺎﺳﺗﺧﺩﺍﻡ ﻣﻔﺗﺎﺡ ﺭﺑﻁ. ﺛﻡ ﺃﺣﻛﻡ ﺭﺑﻁ .ﺍﻟﻣﻼﺑﺱ .ﺻﻭﺍﻣﻳﻝ ﺍﻟﻘﻔﻝ ﺍﻷﺭﺑﻌﺔ. ﻳﺟﺏ ﺇﺣﻛﺎﻡ ﺭﺑﻁ ﺟﻣﻳﻊ ﺻﻭﺍﻣﻳﻝ ﺍﻟﻘﻔﻝ ﺩﺭﺟﺎﺕ...
- Page 62 ar_main.book.book Page 11 Friday, November 5, 2021 2:30 PM ﺍﻟﺗﺭﻛﻳﺏ ﺿﻊ ﺃﺭﺟﻝ ﺍﻟﺗﺳﻭﻳﺔ ﻟﻠﻐﺳﺎﻟﺔ ﺍﻟﺭﺋﻳﺳﻳﺔ ﺩﺍﺧﻝ ﻓﺗﺣﺎﺕ ﺍﻟﺩﻋﺎﻣﺎﺕ ﻓﻲ • ﻗﻡ ﺑﺗﺛﺑﻳﺕ ﺍﻟﺩﻋﺎﻣﺗﻳﻥ ﺍﻷﻣﺎﻣﻳﻳﻥ ﺑﺄﺳﻔﻝ ﺍﻟﻐﺳﺎﻟﺔ ﺍﻟﺭﺋﻳﺳﻳﺔ ﺛﻡ ﺍﺭﺑﻁ ﻛﻝ ﺩﻋﺎﻣﺔ .ﺍﻟﻐﺳﺎﻟﺔ ﺍﻟﺻﻐﻳﺭﺓ، ﻭﻗﻡ ﺑﻣﺣﺎﺫﺍﺓ ﻓﺗﺣﺎﺕ ﺑﺭﺍﻏﻲ ﺍﻟﺩﻋﺎﻣﺎﺕ ) ﺑﺎﺳﺗﺧﺩﺍﻡ ﺑﺭﺍﻏﻲ ﺍﻟﻐﺳﺎﻟﺔ : ﺍﻟﺟﺯء...
- Page 63 ar_main.book.book Page 10 Friday, November 5, 2021 2:30 PM ﺍﻟﺗﺭﻛﻳﺏ ﺇﺫﺍ ﻛﺎﻥ ﻣﻥ ﺍﻟﺿﺭﻭﺭﻱ ﺃﻥ ﻳﺗﻡ ﻧﻘﻝ ﺍﻟﻐﺳﺎﻟﺔ ﺍﻟﺻﻐﻳﺭﺓ ﻣﺳﺗﻘﺑ ﻼ ً ، ﺳﺗﺳﺎﻋﺩ ﺭﺹ ّ ﺍﻟﻐﺳﺎﻟﺔ ﺍﻟﺻﻐﻳﺭﺓ ﻭﺍﻟﻐﺳﺎﻟﺔ ﺍﻷﺳﺎﺳﻳﺔ • .ﻛﺗﻠﺔ ﺍﻟﻔﻠﻳﻥ ﻋﻠﻰ ﻣﻧﻊ ﺗﻠﻑ ﺍﻟﻐﺳﺎﻟﺔ ﺍﻟﺻﻐﻳﺭﺓ ﺃﺛﻧﺎء ﻋﻣﻠﻳﺔ ﺍﻟﻧﻘﻝ ﺍﻟﻣﻠﺣﻘﺎﺕ...
- Page 64 ar_main.book.book Page 9 Friday, November 5, 2021 2:30 PM ﺍﻟﺗﺭﻛﻳﺏ ﺗﺭﻛﻳﺏ ﻣﻛﺎﻥ ﺍﻟﺗﺭﻛﻳﺏ ﻣﻡ ﻣﻛﺎﻥ ﺍﻟﺗﺭﻛﻳﺏ ﺳﻡ ﻳﺟﺏ ﺗﺭﻛﻳﺏ ﻫﺫﺍ ﺍﻟﺟﻬﺎﺯ ﻋﻠﻰ ﺃﺭﺿﻳﺔ ﺛﺎﺑﺗﺔ ﻭﺫﻟﻙ ﻟﻠﺣﺩ ﻣﻥ ﺣﺩﻭﺙ ﺍﻫﺗﺯﺍﺯ • ﺗﺣﺫﻳﺭ ﺃﺛﻧﺎء ﺩﻭﺭﺓ ﺍﻟﺩﻭﺭﺍﻥ. ﺍﻷﺭﺿﻳﺔ ﺍﻟﺧﺭﺳﺎﻧﻳﺔ ﻫﻲ ﺃﻓﺿﻝ ﺍﺧﺗﻳﺎﺭ، ﻓﻬﻲ ﺃﻗﻝ ﻋﺭﺿﺔ...
- Page 65 ar_main.book.book Page 8 Friday, November 5, 2021 2:30 PM ﺍﻟﺗﺭﻛﻳﺏ ﺍﻟﻣﻠﺣﻘﺎﺕ .ﺗﺧﺗﻠﻑ ﺍﻟﻣﻠﺣﻘﺎﺕ ﺍﻟﻣﺭﻓﻘﺔ ﺗﺑ ﻌ ً ﺎ ﻟﻠﻣﻭﺩﻳﻝ ﺍﻟﺫﻱ ﺍﺷﺗﺭﻳﺗﻪ ﺗﻭﺻﻳﻝ ﺧﺭﻁﻭﻡ ﺍﻹﻣﺩﺍﺩ ﺑﺎﺳﺗﺧﺩﺍﻡ ﺗﻭﺻﻳﻝ ﺧﺭﻁﻭﻡ ﺍﻹﻣﺩﺍﺩ ﻭﺍﻟﻣﻭﺻﻝ (ﺧﺭﻁﻭﻡ ﺇﻣﺩﺍﺩ ﺍﻟﻣﺎء )ﺧﺎﺹ ﺑﺎﻟﻣﺎء ﺍﻟﺑﺎﺭﺩ ﺍﻟﻣﻭﺻﻝ ﺍﻟﻣﺭﺑﻭﻁ ﺍﻟﻣﻔﻛﻙ (ﻋﺩﺩ ) ﻣﺷﺎﺑﻙ ﺷﺭﻳﻁﻳﺔ ﻣﻭﺻﻝ...
- Page 66 ﻓﺗﺣﺔ ﺍﻟﺗﺻﺭﻳﻑ ﺯﺭ ﻓﺗﺢ/ﺇﻏﻼﻕ ﺍﻟﺑﺎﺏ (ﻣﺩﺧﻝ ﺍﻟﻣﺎء )ﺍﻟﺑﺎﺭﺩ ﻓﻘﻁ ﻣﻭﺯ ّ ِ ﻉ ﻣﻧﻅﻔﺎﺕ ﺍﻟﻐﺳﻳﻝ ﺍﻟﺳﺎﺋﻠﺔ ﻗﺎﺑﺱ ﺍﻟﻁﺎﻗﺔ ﻟﻭﺣﺔ ﺍﻟﺗﺣﻛﻡ ﺃﻗﺩﺍﻡ ﺍﻟﺗﺳﻭﻳﺔ ﻣﻭﺯ ّ ﻉ ﻣﻧﻌﻡ ﺍﻟﻘﻣﺎﺵ ﺍﻟﺳﺎﺋﻝ ﺍﻟﻣﻭﺍﺻﻔﺎﺕ FT015V9BL ﺍﻟﻁﺭﺍﺯ ﻫﺭﺗﺯ ،~ﻓﻭﻟﺕ ‒ ﻣﺻﺩﺭ ﺍﻟﻁﺎﻗﺔ ﻣﻡ × ﻣﻡ × ﻣﻡ...
- Page 67 ﺍﺣﺭﺹ ﺩﺍﺋ ﻣ ً ﺎ ﻋﻠﻰ ﻋﺩﻡ ﻓﺻﻝ ﺍﻟﻁﺎﻗﺔ ﻋﻥ ﺍﻟﺟﻬﺎﺯ ﻣﻥ ﺧﻼﻝ ﺷﺩ ﻛﺎﺑﻝ ﺍﻟﻁﺎﻗﺔ. ﺍﺣﺭﺹ ﺩﺍﺋ ﻣ ً ﺎ ﻋﻠﻰ ﺍﻹﻣﺳﺎﻙ • .ﺑﻪ ﺑﺈﺣﻛﺎﻡ ﻭﻗﻡ ﺑﺟﺫﺑﻪ ﻣﻥ ﻣﺄﺧﺫ ﺍﻟﺗﻳﺎﺭ ﺍﻟﻛﻬﺭﺑﻲ ﻓﻲ ﻭﺿﻌﻳﺔ ﻣﺳﺗﻘﻳﻣﺔ ﺑﺗﻔﻛﻳﻙ ﺍﻟﺟﻬﺎﺯ ﺃﻭ LG Electronics ﻳﺟﺏ ﺃﻥ ﻳﻘﻭﻡ ﻓﻘﻁ ﻣﻭﻅﻑ ﺧﺩﻣﺔ ﻣﺅﻫﻝ ﻣﻥ ﻣﺭﻛﺯ ﺧﺩﻣﺔ ﺷﺭﻛﺔ • ﻓﻲ ﺣﺎﻝ ﻛﻧﺕ ﺗﻧﻘﻝ...
- Page 68 .ﻻ ﺗﻘﺗﺭﺏ ﺃﺑ ﺩ ًﺍ ﻣﻥ ﺍﻟﺟﻬﺎﺯ ﻓﻲ ﺃﺛﻧﺎء ﺗﺷﻐﻳﻠﻪ. ﺍﻧﺗﻅﺭ ﺣﺗﻰ ﺗﺗﻭﻗﻑ ﺣﻠﺔ ﺍﻟﻐﺳﻝ ﺗﻣﺎ ﻣ ً ﺎ • .ﻳﺟﺏ ﻋﺩﻡ ﻟﻣﺱ ﺍﻟﺑﺎﺏ ﺃﺛﻧﺎء ﺍﻟﺑﺭﺍﻣﺞ ﺫﺍﺕ ﺩﺭﺟﺔ ﺍﻟﺣﺭﺍﺭﺓ ﺍﻟﻣﺭﺗﻔﻌﺔ • LG Electronics ﻓﻲ ﺣﺎﻝ ﺗﺳﺭﺏ ﺍﻟﻣﻳﺎﻩ ﺃﻭ ﻓﻳﺿﻬﺎ ﻣﻥ ﺍﻟﺟﻬﺎﺯ، ﺍﻓﺻﻝ ﻣﻘﺑﺱ ﺍﻟﻁﺎﻗﺔ ﻭﺍﺗﺻﻝ ﺑﻣﺭﻛﺯ • .ﻟﺗﻘﺩﻳﻡ ﺍﻟﻣﻌﻠﻭﻣﺎﺕ ﺇﻟﻰ ﺍﻟﻌﻣﻼء...
- Page 69 ar_main.book.book Page 4 Friday, November 5, 2021 2:30 PM ﺇﺭﺷﺎﺩﺍﺕ ﺍﻟﺳﻼﻣﺔ .ﻫﺫﺍ ﺍﻟﺟﻬﺎﺯ ﻏﻳﺭ ﻣﺧﺻﺹ ﺇﻻ ﻟﻼﺳﺗﺧﺩﺍﻡ ﻓﻲ ﺍﻟﺗﻁﺑﻳﻘﺎﺕ ﺍﻟﻣﻧﺯﻟﻳﺔ ﻓﻘﻁ • .ﻛﻳﻠﻭ ﺑﺎﺳﻛﺎﻝ ﻛﻳﻠﻭ ﺑﺎﺳﻛﺎﻝ ﻭ ﻳﺟﺏ ﺃﻥ ﻳﺗﺭﺍﻭﺡ ﺿﻐﻁ ﺇﺩﺧﺎﻝ ﺍﻟﻣﻳﺎﻩ ﻣﺎ ﺑﻳﻥ • ﺍﻟﺳﻌﺔ ﺍﻟﻘﺻﻭﻯ ﻛﺟﻡ ﺗﺑﻠﻎ ﺍﻟﺳﻌﺔ ﺍﻟﻘﺻﻭﻯ ﻓﻲ ﺑﻌﺽ ﺩﻭﺭﺍﺕ ﺍﻟﻣﻼﺑﺱ ﺍﻟﺟﺎﻓﺔ ﺍﻟﻣﻘﺭﺭ ﻏﺳﻠﻬﺎ ﺍﻟﺗﺭﻛﻳﺏ...
- Page 70 ar_main.book.book Page 3 Friday, November 5, 2021 2:30 PM ﺇﺭﺷﺎﺩﺍﺕ ﺍﻟﺳﻼﻣﺔ ﺇﺭﺷﺎﺩﺍﺕ ﺍﻟﺳﻼﻣﺔ ﺍﻗﺭﺃ ﺟﻣﻳﻊ ﺍﻹﺭﺷﺎﺩﺍﺕ ﻗﺑﻝ ﺍﻻﺳﺗﺧﺩﺍﻡ ﻳﺗﻣﺛﻝ ﺍﻟﻐﺭﺽ ﻣﻥ ﺇﺭﺷﺎﺩﺍﺕ ﺍﻟﺳﻼﻣﺔ ﺍﻟﺗﺎﻟﻳﺔ ﻓﻲ ﺍﻟﺣﻳﻠﻭﻟﺔ ﺩﻭﻥ ﻭﻗﻭﻉ ﺍﻟﻣﺧﺎﻁﺭ ﻏﻳﺭ ﺍﻟﻣﺗﻭﻗﻌﺔ ﺃﻭ ﺍﻷﺿﺭﺍﺭ .ﺍﻟﻧﺎﺟﻣﺔ ﻋﻥ ﺍﻟﺗﺷﻐﻳﻝ ﻏﻳﺭ ﺍﻵﻣﻥ ﺃﻭ ﻏﻳﺭ ﺍﻟﺻﺣﻳﺢ ﻟﻠﻣﻧﺗﺞ .ﻳﺗﻡ...
- Page 71 ﺗﺟﻬﻳﺯ ﺣﻣﻭﻟﺔ ﺍﻟﻐﺳﻳﻝ ................... ﺇﺿﺎﻓﺔ ﺍﻟﻣﻧﻅﻔﺎﺕ ﻭﺍﻟﻣﻭﺍﺩ ﺍﻟﻣﻧﻌﻣﺔ ..................ﻟﻭﺣﺔ ﺍﻟﺗﺣﻛﻡ ﻭﺟﺩﻭﻝ ﺍﻟﺑﺭﻧﺎﻣﺞ ................... ﺧﻳﺎﺭﺍﺕ ﻭﻭﻅﺎﺋﻑ ﺇﺿﺎﻓﻳﺔ ﺍﻟﻭﻅﺎﺋﻑ ﺍﻟﺫﻛﻳﺔ ..................LG ThinQ ﺍﺳﺗﺧﺩﺍﻡ ﺗﻁﺑﻳﻖ ................ ()ﺍﻟﺗﺷﺧﻳﺹ ﺍﻟﺫﻛﻲ Smart Diagnosis ﺍﻟﺻﻳﺎﻧﺔ ﺍﻟﺗﻧﻅﻳﻑ ﺑﻌﺩ ﻛ ﻝ ّ ﻏ ﺳ ْﻠﺔ ......................................
- Page 72 ﻗﺑﻝ ﺍﻟﺑﺩء ﻓﻲ ﺗﺭﻛﻳﺏ ﺍﻟﺟﻬﺎﺯ، ﺍﻗﺭﺃ ﻫﺫﻩ ﺍﻟﺗﻌﻠﻳﻣﺎﺕ ﺑﻌﻧﺎﻳﺔ. ﺣﻳﺙ ﺳﻳﺑﺳﻁ ﺫﻟﻙ ﻋﻣﻠﻳﺔ ﺍﻟﺗﺭﻛﻳﺏ ﻭﻳﺿﻣﻥ ﺗﺭﻛﻳﺏ ﺍﻟﺟﻬﺎﺯ ﺑﺷﻛﻝ ﺻﺣﻳﺢ ﻭﺁﻣﻥ. ﻭﺍﺣﺗﻔﻅ ﺑﻬﺫﻩ ﺍﻟﺗﻌﻠﻳﻣﺎﺕ ﺑﺎﻟﻘﺭﺏ ﻣﻥ ﺍﻟﻣﻧﺗﺞ ﺑﻌﺩ .ﺍﻟﺗﺭﻛﻳﺏ ﻟﻠﺭﺟﻭﻉ ﺇﻟﻳﻬﺎ ﻓﻲ ﺍﻟﻣﺳﺗﻘﺑﻝ ﺍﻟﻌﺭﺑﻳﺔ FT015V9BL www.lg.com MFL71852939 ﺣﻘوق اﻟﻧﺷر 1202-2202 إل ﺟﻲ ﻟﻼﻟﻛﺗروﻧﯾﺎت. ﻛل اﻟﺣﻘوق ﻣﺣﻔوظﺔ...