HP Designjet 700 User Manual
Hp designjet 700: user guide
Hide thumbs
Also See for Designjet 700:
- Quick reference manual (33 pages) ,
- Quick reference manual (33 pages)
Table of Contents
Advertisement
Quick Links
Advertisement
Chapters
Table of Contents

Related Manuals for HP Designjet 700


Summary of Contents for HP Designjet 700
- Page 1 HP DesignJet 700 Plotter HP DesignJet 750C Plus Plotter User’s Guide...
- Page 2 Printed in Europe AutoCAD is a trademark of Customer re-order number AutoDesk Inc. C4705-60021 Bi-Tronics, HP-GL and HP-GL/2 are trademarks of Hewlett-Packard Company. Macintosh is a product of Apple Computer Inc. Microsoft and MS-DOS are registered trademarks of Microsoft Corporation.
- Page 3 C4705-90031 English User’s Guide HP DesignJet 700 Plotter HP DesignJet 750C Plus Plotter C4705A, C4706A, C4708A and C4709A...
-
Page 5: Finding Information
Finding Information This User’s Guide for the HP DesignJet 700 and 750C Plus plotters contains the following types of information: Set Up Maintenance Troubleshooting Reference Material. To help find specific information, a comprehensive table of contents is provided at the front and an alphabetical index is provided at the back. - Page 6 Where To Find the Most Commonly Needed Information To find how to ... Install the plotter Connect the plotter Choose media Load media Replace the cartridges See the plotter’s current configuration Clear a media jam Solve print quality problems Interpret a front-panel message Order accessories To find any other information ...
-
Page 7: Table Of Contents
Contents Finding Information ........Welcome . - Page 8 Contents 3 Working with Media and Cartridges Choosing Media ..........Five Important Points about Media Types Supported Media Types .
- Page 9 4 Controlling the Page Format Page Size ............Do You Need to Adjust the Page Size in the Front Panel? To Adjust the Page Size from the Front Panel Page Size and Clipped Plots...
- Page 10 To Prioritize a Page in the Queue To Delete a Page from the Queue To Make Copies of a Page in the Queue To Replot an Image Using the Plotter’s Memory (DesignJet 700) Avoiding Media Waste by Nesting Pages (Roll Media Only) What Is Nesting? .
- Page 11 To Upgrade Your Plotter with a Network Interface HP JetDirect Print Server ........
- Page 12 Contents 9 Troubleshooting Using the Documentation to Help Solve Problems Locating the Source of the Problem Solving Media-Handling Problems If the Front Panel Keeps Telling you Media Is Misaligned or ositioned........... . . If Media Crumples when you Load It If Plots Do Not Feed Out Properly From the Plotter If The Automatic Cutter Does Not Cut Immediately When a Plot Has...
- Page 13 If the Plotter Produces a Black and White Plot When You Expected a Color Plot (DesignJet 750C Plus) ........If the Plotter Has Printed a Different Plot Than the One You Were Expecting .
- Page 14 ..........HP-GL/2 and HP RTL Programming Information...
-
Page 15: Welcome
750C Plus disposable print cartridge The HP DesignJet 700 will print only in black. It uses a single cartridge, containing black ink, two of which are supplied with your plotter. The HP DesignJet 750C Plus will print in color or black. Your plotter uses a set of four disposable print cartridges: yellow, cyan, magenta and black. -
Page 16: Print Quality
Translucent bond Natural tracing paper Vellum 750C Plus Coated paper (one roll is supplied with your plotter) Heavy coated paper Matte and clear film. In addition for the HP DesignJet 750C Plus: 750C Plus High-gloss and semi-gloss photo paper High-gloss film. -
Page 17: User Interface
– the key is to use the correct driver for the combination of your application software and your plotter, and to be confident that it is configured correctly. Two types of HP drivers are supplied with your plotter: One or more for AutoCAD users, One for users of Microsoft These drivers come with printed and on line documentation to help you install and configure them correctly. - Page 18 A PostScript upgrade kit (including a ROM SIMM for the plotter and an Adobe PostScript driver for your software). A network interface card (the HP JetDirect Print Server). 1 Note that there is not a one-for-one relationship between the plotter’s memory and the maximum size of file that it can plot.
-
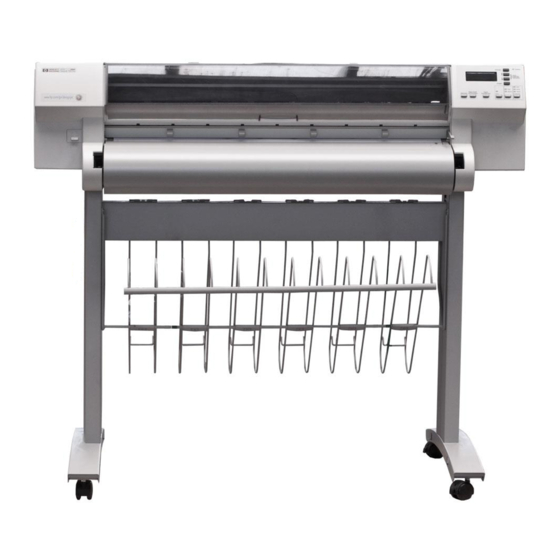
Page 19: Front View
Welcome Front View Window Print Cartridge(s) (Inside) Front Panel Display Front Panel Media Lever Media-Entry Slot ON/OFF Switch Roll Cover Media Bin 1835 xvii... -
Page 20: Rear View
Welcome Rear View Parallel-Interface Serial-Interface Slot For Optional Network Interface Socket For Power Cord Pocket For Quick Reference Guide And Media Knife Slots For Memory Expansion Modules and Upgrades (Behind Cover Plate) 1844 xviii... - Page 21 Fast Track ......... Set Up Checklist .
-
Page 22: Setting Up The Plotter
You want English as the language of the front-panel display and of the plotter’s internal plots. You are experienced at installing printers or plotters. You don’t want to add extra memory. For the HP DesignJet 700: You are going to use roll media. For the HP DesignJet 750C Plus: 750C Plus You are going to use roll media and print in color. - Page 23 Close the plotter’s window and let the plotter run its automatic cartridge-alignment procedure. Switch off the plotter and your computer, connect the interface cable, and then switch them on again. Choose your driver disk(s), read the instructions on the label, and follow any printed instructions accompanying the disks.
-
Page 24: Set Up Checklist
Setting Up the Plotter Set Up Checklist Set Up Checklist You should already have unpacked and assembled the plotter, following the Assembly Instructions in the box. Now you can set up the plotter, using the checklist below as you complete each task explained in this chapter. Task Check that you have all the items required. -
Page 25: Task 1: Check That You Have All The Items Required
However, different power cords (international options) are available. If necessary, contact your dealer or HP Sales and Support Office. A roll of HP Opaque Bond Paper (for the HP DesignJet 700) A roll of HP Coated Paper (for the HP DesignJet 750C Plus) -
Page 26: Task 2: Install Memory Expansion Modules (Optional)
Supported sizes are 4 MB, 8 MB, 16 MB and 32 MB. So the maximum standard memory for your plotter is: 750C Plus For HP part numbers, see page 11-14. Make sure that the plotter is switched OFF and that neither the power cord nor an interface cable is connected. - Page 27 Setting Up The Plotter Task 2: (Optional) Install Memory Expansion Modules Using a flat-blade screwdriver, unscrew the cover plate at the back of the plotter, and remove it. Unscrew only the four screws on the cover plate. Cover plate The two slots on the right are for memory expansion modules. Use slot 3 first, and then slot 4.
- Page 28 Setting Up the Plotter Task 2: (Optional) Install Memory Expansion Module Before handling a memory module, either put on a grounding wrist strap and C A U T I O N attach the end to the metal chassis of the plotter, or touch the outer metal surface of the plotter with your hand.
-
Page 29: Task 3: Switch On And Change The Language From English (Optionally)
Task 3: Switch On and (Optional) Change the Language From English Task 3: Switch On and Change the Language From English (Optional) The plotter’s front-panel menus and all the plotter’s sample plots are available in the following languages and Spanish. By default, the language is English. Be sure that the power cord supplied with your plotter matches your ac power W A R N I N G connection requirements. - Page 30 Setting Up the Plotter Setup Task 3: Switch On and (Optional) Change the language From English If English not OK Hold down the or if you want pushing the power switch. to change the language Press and hold Switch on Release the screen.
-
Page 31: Task 4: Load Media
– for example, opaque bond (plotter paper) for the DesignJet 700 or coated paper for the DesignJet 750C Plus, as this necessary for the alignment procedure. A roll of suitable HP Media is supplied with your plotter. - Page 32 Setting Up the Plotter Task 4: Load Media Remove the new roll from its wrapping. Remove the end cap from the top of the spindle, and slide the new roll onto the spindle. The leading edge of the media must wind clockwise. If the media stop falls off, push it back in until it snaps into position.
- Page 33 Insert the spindle so that the large media stop (A) is to the right and the small end cap (B) to the left. Push in firmly on both ends. Be sure the media remains flush against the media stop. The relationship of the media to the roller must be as shown in the diagram above.
- Page 34 Setting Up the Plotter Task 4: Load Media The media cutting knife used in the next step is sharp. Make sure the plotter’s W A R N I N G wheels are locked. Keep fingers clear of the cutting path. Keep media cutting knife away from children.
- Page 35 Pull the media towards you and, holding it from the sides, align its right edge with the perforated line on the entry platen. Insert the leading edge into the plotter, until the page buckles slightly. Let go of the media when the plotter begins to pull it in. Press the key next to the front-panel display to indicate you are loading a roll.
- Page 36 Setting Up the Plotter Task 4: Load Media Press the then press the (if you are using the roll supplied with the plotter, scroll to 750C Plus (if you are using the roll supplied with the plotter, scroll to 1-16 key until the display shows the type of media you are loading and key.
- Page 37 11 a When the front panel instructs you, lift the media lever. Take hold of the edges of the media now extending from the exit slot and pull the media toward you until taut. Then align the left and right edges of the media so that they are flush with the edges of the roll.
- Page 38 Setting Up the Plotter Task 4: Load Media To Load a Sheet You can load a sheet in either portrait or landscape orientation. (Your choice of orientation is significant when sending a plot from your software, but for the moment it doesn’t matter.) Printing will be on the underside.
- Page 39 Press the key next to the front-panel display to indicate you are loading a sheet. Sheet load ––––––––> Roll load ––––––––> Press the key until the display shows the type of media you are loading (if you are using regular plotter paper, scroll to scroll to ), and then press the Coated paper...
-
Page 40: Task 5: Load The Print Cartridge(S)
11-15, and samples of which are supplied with the plotter. The HP DesignJet 700 is supplied with two black cartridges (one is a spare cartridge). The HP DesignJet 750C Plus is supplied with five cartridges: 750C Plus –... - Page 41 Do not touch the stainless steel strip that runs the length of the plotter behind W A R N I N G the cartridge carriage; its edge is very sharp. Keep hair, jewelry, clothing, and foreign objects away from the plotter mechanisms. Press the to come to a complete stop next to the front panel.
- Page 42 Setting Up Your Plotter Task 5: Load the Print Cartridge(s) For each cartridge in the set: Take the cartridge out of its box. Remove the colored protective tape and tab from the cartridge’s nozzles. For the 750C Plus, match the color of the cartridge’s label with the color of the dot above the stall.
- Page 43 Setting Up Your Plotter Task 5: Load the Print Cartridge(s) When the cartridges are successfully installed, the plotter automatically runs the cartridge alignment procedure. When the front-panel displays STATUS / Ready the procedure is complete. You can throw away the small print produced during the cartridge alignment procedure.
-
Page 44: Task 6: Print A Demonstration Plot (Optional)
Setting Up the Plotter Task 6: (Optional) Print a Demonstration Plot Task 6: Print a Demonstration Plot (Optional) Before you connect your plotter to a computer, it is a good idea to print one of the internal sample plots. This ensures that the plotter itself is operating properly. If media is not already loaded, load a roll or a sheet, as explained earlier in task 4. - Page 45 On the front-panel display, go to Ready Press Enter Queueing & Nesting Press Demos Press Enter 750C Plus Palette Press Enter to choose this or Samples Press Enter to choose this or Menu Press Enter 750C Plus Palette prints the accesses a list of sample demonstration plots stored in the plotter’s Samples firmware.
- Page 46 On sheet media, wait until the ink is dry, if necessary (see the front-panel display for an ink-drying message), and then gently pull the sheet out from the plotter. On HP Coated Paper you don’t need to wait at all. Examine the plot, with the following questions particularly in mind:...
-
Page 47: Task 7: Connect The Plotter To Your Computer
You can connect your plotter directly to a Local Area Network using an optional network interface card such as the HP JetDirect Print Server. Depending on your needs, you may want to use the network interface instead of, or in addition to, the parallel and serial interfaces. - Page 48 Choose an interface cable. A list of recommended HP cables for various computers starts on page 11-8. IMPORTANT To achieve the best performance from your plotter, we recommend you only use genuine Hewlett-Packard interface cables, whose reliability and performance have been thoroughly tested to give trouble-free performance.
-
Page 49: Task 8: Configure The Interface (Serial Interface Users Only)
Task 8: (Serial Interface Users Only) Configure the Interface Task 8: Configure the Interface (Serial Interface Users Only) The following table shows the settings available for the plotter’s serial interface parameters, the factory defaults and the most likely requirements for different computers. - Page 50 Setting Up the Plotter Task 8: (Serial Interface Users Only) Configure the Interface To Change the Plotter’s Serial Interface Settings Through the front-panel display, you can create and save two sets of configurations for the serial interface, called Configurations A and B. By default they are set to the factory defaults shown in the table on page 1-29.
- Page 51 Task 8: (Serial Interface Users Only) Configure the Interface On the front-panel display, change the STATUS Ready Press Enter SHORT MENUS Queueing & Nesting Press SHORT MENUS Demos Press UTILITIES Menu mode=Short Press Enter MENU MODE Short* Press MENU MODE Full Press Enter UTILITIES...
- Page 52 Setting Up the Plotter Task 8: (Serial Interface Users Only) Configure the Interface Get to the routine for defining a new serial configuration. FULL MENUS Utilities Press FULL MENUS I/O setup Press Enter I/O SETUP Modular Press I/O SETUP RS–232–C Press Enter RS–232–C Config=Factory...
- Page 53 Task 8: (Serial Interface Users Only) Configure the Interface Configure the serial interface to match your software configuration. CONFIG A Baudrate=9600 Press Enter BAUDRATE 9600* Press BAUDRATE 19200 Press Enter CONFIG A Baudrate=19200 Press CONFIG A parity=None(0) Press Enter PARITY none(0)* Press PARITY...
- Page 54 Setting Up the Plotter Task 8: (Serial Interface Users Only) Configure the Interface Switch to the new configuration. RS–232–C Config=Factory Press Enter CONFIG Factory* Press CONFIG Config A Press Enter RS–232–C Config=A Press Previous until you return to ... 1-34 STATUS Ready...
-
Page 55: Task 9: Set Up Your Software
Task 9: Set Up Your Software This section gives a simple overview of the software-configuration tasks you need to perform and is designed for those users unfamiliar with this type of task. It also points to documents containing detailed, application-specific advice. More experienced users may prefer to go straight to those documents. - Page 56 IMPORTANT In most cases these settings will override any settings you make on the front panel of the plotter. 1-36 Printer setup (in Microsoft Windows applications) or CONFIG / Add a Plotter Printer type...
- Page 57 Driver for Microsoft Windows 95 and 3.1 Applications PostScript Upgrade Kit Macintosh HP JetDirect Print Server Macintosh Unix These items are updated from time to time. For details of which software versions are supported, see the documentation included with them.
-
Page 58: Other Applications
The device list in your software may not be up to date with the latest plotters available. If the HP DesignJet 700 or HP DesignJet 750C Plus is not quoted by name in your application’s device list, select an alternative plotter as follows:... -
Page 59: Task 10: Print A Test Plot
Task 10: Print a Test Plot The sample plots explained in task 6 simply verify the operation of the plotter itself. Having connected the plotter to your computer and configured the drivers or other software for your requirements, you should now be in a position to send a test plot using one of your own files. -
Page 60: Extra Tips For Unix Users
Setting Up the Plotter Extra Tips For UNIX Users Extra Tips for UNIX Users Which Interface? You can connect the plotter to your workstation in one of two ways: Via the UNIX print-spooling system, using any of the interfaces: network, parallel or serial Directly using the serial interface The print-spooling system is recommended, so that printing takes place in the... - Page 61 You must assign a /etc/printcap name to each printer or plotter managed by the print spooler. Refer to the example below if you need help completing this step. Add these lines to your...
- Page 62 Make sure the plotter’s baud rate is 9600 and parity is even. Example 3: Configuring the SunOS 4.1.3 print spooler for Sun SPARCstations (HP JetDirect Print Server) See the Configuration Guide shipped with the HP JetDirect Print Server. 1-42 file if:...
- Page 63 Item Select Printer Name: For example, HP DesignJet 700 or HP DesignJet 750C Plus, de ending on the lotter you have HP DesignJet 750C Plus depending on the plotter you have purchased Printer Type: Other, and set it to Unknown...
- Page 64 1-44...
- Page 65 The Front Panel ........The Display Section .
-
Page 66: The Front Panel
Learning How To Use the Front-Panel Display The Front Panel The Front Panel The front panel of the HP DesignJet 700 and 750C Plus plotters is shown below: 750C Plus Display section Plotting mode keys Action keys Display section Plotting mode keys... -
Page 67: The Display Section
The purpose of this tutorial is to explain the use of the display section. The other sections and their use are described later in this manual. The display section is used primarily for setting the plotter’s configuration, so, before the tutorial, print the current configuration. You can then return to this afterwards. - Page 68 Learning How To Use the Front-Panel Display The Front Panel The display can show two lines of text and is used for displaying: Menus, for example UTILITIES Menu mode=short In this case, you can use the display keys to navigate the menu system and select menu options.
-
Page 69: Printing The Menus Plot
Printing the Menus Plot You can see the complete menu structure available on the plotter by printing the Front Panel Menus plot. To help you understand the menu structure and how to navigate it, print it now Check that media is loaded. See page 3-10 for loading information. Select the Menu option from the... -
Page 70: Entering The Menu System
Learning How To Use the Front-Panel Display Entering the Menu System Entering the Menu System With a STATUS screen displayed, for instance: STATUS Ready press the Enter key. Either the SHORT MENUS screen: SHORT MENUS Queueing & Nesting or the FULL MENUS screen: FULL MENUS Queueing &... -
Page 71: Navigating The Menu System
Navigating the Menu System Once in the first-level menu, you navigate the system using the display keys. Press Previous to display the previous menu level, without changing any menu selections (equivalent to moving left [ ] one column in the Front-Panel Menus plot). Press to scroll up, or to scroll down... - Page 72 Learning How To Use the Front-Panel Display Navigating the Menu System Use this example to practice navigating the menu system. It assumes that you have entered the menu system from the change the Merge setting in Pen settings excerpt of the Front-Panel Menus plot below correspond to the numbered instructions.
-
Page 73: Menu Graphics Used In This Manual
Menu Graphics Used in this Manual At the end of this chapter, there are some examples of navigating the menu system, showing all the menu displays available. In the rest of this manual, when you need to use the menu system, a simple menu graphic will appear in the left margin giving a concise explanation of how to navigate to the exact place. -
Page 74: Other Types Of Screens
Learning How To Use the Front-Panel Display Other Types of Screen Other Types of Screens Other screen, such as those displayed for selecting media type during media loading: SELECT MEDIA Opaque bond or for changing the language: LANGUAGE English are in fact further examples of selection menus which are not part of the main menu system. -
Page 75: Examples
Examples Example 1: Changing Margins In the section of this manual that describes how to adjust the page margins, the Page format icon on the left is shown, indicating that you should go to the follows. Margins Full menu mode With the STATUS Default: Normal... -
Page 76: Example 2: Changing The Drying Time
Learning How To Use the Front-Panel Display Examples Press the key twice, or the key twice, to display the required option. Press the Use the required is displayed, press the Margins Example 2: Changing the Drying Time The section on adjusting the drying time, to suit different environmental Device setup conditions, contains the icon shown on the left, indicating that you should go to the DRYING TIME... - Page 77 (If the display is in short menu mode, you will Enter notice that the screen shown after instruction this point, so go to instruction 5.) DEVICE SETUP Lang=7586, HP–GL/2 Press the key once, or the key 4 times, to display the required option. DEVICE SETUP Drying time=Normal Press the...
- Page 78 2-14...
-
Page 79: Working With Media And Cartridges
Choosing Media ........Caring For Your Media . -
Page 80: Choosing Media
Most media types are supported , However the quality of some plots may not be as good if you do not use HP media. For media details, see the table on page 3-5. Whenever you load a roll or a sheet, the plotter’s front-panel display prompts you to specify which media type you are loading. -
Page 81: Supported Media Types
High-gloss white film 750C Plus From time to time, new media types may become available. For up-to-date information, please contact your HP dealer or local HP Sales and Support Office. Working With Media and Cartridge(s) Commercial Name of HP Media... -
Page 82: Physical Characteristics Of Media Types
Working With Media and Cartridge(s) Choosing Media Physical Characteristics of Media Types Media Type on the Media Type on the Front-panel Display Opaque bond Translucent bond Natural tracing paper Vellum Coated paper Heavy coated paper Matte film Clear film High-gloss photo 750C Plus Semi-gloss photo High-gloss film... - Page 83 Working With Media and Cartridge(s) Choosing Media Cost (Relative to Recommended for Each Other) Color? CAD drawings only Moderate CAD drawings only HP media only HP media only Moderate Low / moderate Moderate High High High High High...
-
Page 84: Combinations Of Media Type And Print Quality
Working With Media and Cartridge(s) Choosing Media Combinations of Media Type and Print Quality The table below shows that some combinations of media type and print quality are not recommended. Media Type on the Front Panel Display Opaque bond Translucent bond Translucent bond 750C Plus Natural tracing paper... -
Page 85: Typical Media Type Choices By Application
Typical Media Type Choices by Application Application Drafts Final versions Archives Diazo reproductions CAD = Computer-Aided Design Working With Media and Cartridge(s) Typical Choice of Media Opaque bond Translucent bond Natural tracing paper Vellum Opaque bond Matte film Clear film Vellum Matte film Clear film... - Page 86 Working With Media and Cartridge(s) Choosing Media Application Drafts monochrome Final versions 750C Plus Archives Diazo reproductions and GIS Drafts color Final versions 750C Plus Archives Overlays Imaging and graphics Matte package(s) color color Gloss 750C Plus Clear film CAD = Computer-Aided Design GIS = Geographical Information or Mapping Systems Typical Choice of Media Opaque bond...
-
Page 87: Caring For Your Media
Caring For Your Media Handle film and glossy media by the edge(s) or wear cotton gloves. Skin oils can interact with ink and cause your plot to smear. Make sure the media bin is installed between the plotter’s legs. When the plotter finishes each plot on roll media, it automatically cuts the plot and drops it into the bin. -
Page 88: Loading Media
Working With Media and Cartridge(s) Loading Media Loading Media To Change a Roll Make sure the plotter wheels are locked (the brake lever pressed down) to prevent the plotter from moving. If the old roll is not used up, then to remove the media from the media path: Raise the media lever to release the media. - Page 89 Remove the old roll of media by pulling firmly on each end of the spindle. Rest the old roll upright on the floor so that the media stop (A) is on top. Pull out the media stop and the spindle and set it aside. Working With Media and Cartridge(s) Loading Media 1837a...
- Page 90 Working With Media and Cartridge(s) Loading Media From the other end of the old media roll, pull out the endcap (B). If you are not immediately loading another roll of media into the plotter, replace the endcap on the spindle and place the spindle back in the plotter. You can skip the rest of these steps.
- Page 91 Push the endcap back in, making sure that the tabs are flush against the ends of the roll. Push it far enough to be firm, but do not use excessive force as this may result in broken tabs. Insert the spindle so that the media stop (A) is to the right and the endcap (B) to the left.
- Page 92 Working With Media and Cartridge(s) Loading Media The media cutting knife used in the next step is sharp. Make sure the plotter’s W A R N I N G wheels are locked. Keep fingers clear of the cutting path. Keep media cutting knife away from children.
- Page 93 Pull the media up and, holding it from the sides, align its right edge with the perforated line on the entry platen. Insert the leading edge into the plotter, until the page buckles slightly. Release the media when the plotter begins to pull it in. Press the key next to the front-panel display to indicate you are loading roll media.
- Page 94 Working With Media and Cartridge(s) Loading Media Use the keys until the display shows the type of media you are loading , and then press the SELECT MEDIA Coated paper If you are using software that offers a “special print mode” for this plotter, then simply press Enter on the first media type displayed (whatever it is), as in this...
- Page 95 When the plotter instructs you to close the roll cover, rewind the media stop in the direction shown by the large arrow below, to take up any slack in the roll. Make sure the leading edge of the media is outside the roll cover, and then close the cover.
-
Page 96: To Load A Sheet
Both sides are the same. If the sheet is curled, load with the curve (hollow) side towards you. Load with the coated side down. On HP Coated Paper and Heavyweight Coated Paper, look for the small notch in the corner: When loading in a portrait orientation, make sure the notch is on the right side of the leading edge. - Page 97 If you need to, unload any roll media, see page 3-10. Make sure the media lever is down and the roll cover is closed. Holding the media from the sides, align the right edge with the perforated line on the entry platen. Insert the media until it buckles slightly.
- Page 98 Working With Media and Cartridge(s) Loading Media Scroll until the display shows the type of media you are loading*, and then press the key. Enter SELECT MEDIA Opaque bond *For advice on media types, see page 3-2. The plotter moves the sheet in and out to check its size and alignment, then advances it to the start of the page.
-
Page 99: Compensating For Badly Cut Media
Compensating for Badly Cut Media You can only use this feature when sheet media is selected on the front panel. If the media is persistently difficult to load, it could be an indication that it has been badly cut. That is, it has been cut unevenly with the media width on the leading edge different to the width of the trailing edge. -
Page 100: Unloading Media
Working With Media and Cartridge(s) Unloading Media Unloading Media Drying Time On some media types the ink needs to dry before the plot is unloaded. For roll media the plotter automatically allows the appropriate drying time before cutting the plot and dropping it into the media bin. For sheet media you should wait for the times shown in the table below before unloading the plot. -
Page 101: Drying Time
To Adjust Drying Time You can make a global adjustment to the plotter’s automatic drying times through the front-panel menus. Drying Time Selected Device setup in Front Panel None* Drying time Less All menu modes Default: Normal Normal More * Not recommended if you are using roll media and leaving the plotter unattended, as the ink may smear when the plots are dropped into the media bin. -
Page 102: To Unload A Sheet After Plotting
Working With Media and Cartridge(s) Unloading Media To Unload a Sheet After Plotting Wait until the appropriate drying time has passed (see table on previous page – no drying time is necessary for some media types). Gently pull the sheet out from the plotter. 3-24 1842... -
Page 103: To Remove An Unused Sheet
To Remove an Unused Sheet Either ... Press Form Feed and Cut. When the plotter has finished feeding it out, pull out the sheet. or ... Lift the media lever. Pull out the sheet. Lower the media lever. Working With Media and Cartridge(s) Unloading Media Form Feed and Cut... -
Page 104: Replacing Cartridges
Note that your HP DesignJet 700 contains only one black cartridge. 750C Plus Note that your HP DesignJet 750C Plus has three color and one black cartridge(s). Replace the cartridge(s) in the following three circumstances. When the plotter prompts you to replace one or more cartridge(s) -
Page 105: Before Replacing Cartridges
C A U T I O N With the HP DesignJet 750C Plus plotter, it is absolutely essential to load the cartridge(s) in the correct stalls, or your colors will be wrong and print quality 750C Plus may be impacted. -
Page 106: To Replace A Cartridge
Working With Media and Cartridge(s) Replacing Cartridge(s) To Replace a Cartridge If you are responding to a Service cartridge(s) Start with the plotter switched ON. Make sure the front-panel display reads media Press the Access Cartridge(s) key and wait for the cartridge carriage to come to a complete stop next to the front panel. - Page 107 When the carriage stops, open the window. Press down lightly on the cartridge you are replacing and pull it toward you. Remove the cartridge from its stall and discard it. 750C Plus Notice that each stall in the carriage has a dot indicating the color: when loading the new cartridge you must put the correct cartridge in the correct stall.
- Page 108 Take the new cartridge out of its box. Remove the colored protective tape and tab from the cartridge’s nozzles. For the HP DesignJet 750C Plus, match the color of the 750C Plus cartridge’s label with the color of the dot above the stall.
- Page 109 Page Size ......... . Adjusting the Margins (Roll Media Only) Rotating a Plot .
-
Page 110: Controlling The Page Format
Controlling the Page Format Page Size Page Size This chapter explains how to make sure that the plotter prints your plot in the page size you want. Terminology Media Page size Margin Plotting area Inked area This can be specified from the front panel or in the software, where it may be Page size called ‘‘Page Size”, ‘‘Media Size”, ‘‘Paper Size”... -
Page 111: Do You Need To Adjust The Page Size In The Front Panel
To save wasting media you can plot a page size equal to the inked area plus the margins. This setting may be available in your driver, it can also be selected by changing the front panel menu to “ Inked area Do You Need to Adjust the Page Size in the Front Panel? Depending on the driver you are using, you may not need to change the page size in the front panel. -
Page 112: To Adjust The Page Size From The Front Panel
Controlling the Page Format Page Size To Adjust the Page Size from the Front Panel Size Page format In Front Panel Software Size All menu modes Default: Software Inked area ANSI ARCH Oversize If you need to adjust the page size from the front panel, do so before sending the plot file from your computer, as the plotter determines the size of a plot at the time it is received from your application. -
Page 113: Page Size And Clipped Plots
Controlling the Page Format Page Size Page Size and Clipped Plots If you specify in your software a page size that is larger than the media size loaded in the plotter, the plotter will still print what it can, but may clip your plot. A2 media in the plotter Clipped area A1 page size in software or front panel... -
Page 114: Adjusting The Margins (Roll Media Only)
Controlling the Page Format Adjusting the Margins (Roll Media Only) Adjusting the Margins (Roll Media Only) Besides nesting and setting the page size, you can also change the margin settings and expand the plotting area of the page, therefore reducing the amount of media waste. -
Page 115: Rotating A Plot
Rotating a Plot Rotating a Drawing from the Front Panel Your Drawing can only be rotated from the Page panel if: Queueing the file contains no raster data. If you are using the Microsoft Windows driver supplied with this plotter, your files do contain raster data and therefore you cannot use this line drawings of most CAD software do not contain raster data, and can use this option. -
Page 116: Exactly What Is Rotated
Controlling the page format Rotating a plot Exactly What Is Rotated? With roll media, both the drawing and the page orientation are rotated. Notice that the narrow margins are always at the side, regardless of the orientation. With sheet media, the drawing is rotated, but the page orientation specified in your software is retained. -
Page 117: How Does Rotate Interact With Your Software
How Does Rotate Interact with Your Software? The plotter adds the rotation setting to any rotation angle you specify in your software. For example: For software applications which, like the plotter, rotate counter-clockwise (for example, CorelDRAW!) the result is the sum. For example, if your software has specified a rotation of 180 degrees, and you set your plot’s final rotation will be 270 degrees. -
Page 118: Plotting A Mirror Image
Controlling the Page Format Plotting a Mirror Image Plotting a Mirror Image You can plot a mirror image of the plot from the plotter’s front panel, without changing the drawing in your software. Page format Mirroring Full menu mode Default: Off Affects current plot Resets after power off Do not change the setting during a plot, as the change becomes effective... - Page 119 Ways to Control the Plot’s Appearance Changing Pen Widths and Colors Using the Plotter’s Internal Palettes ........Changing the Treatment of Overlapping Lines (Merge Features) .
-
Page 120: Controlling A Plot's Overall Appearance Ways To Control The Plot's Appearance
Print quality is controlled from the front-panel keys. This chapter explains them in the sequence of the list at the top of this page. For the HP DesignJet 750C Plus the pen color can be controlled using the 750C Plus front-panel menus. -
Page 121: Changing Pen Widths And Colors/Shades Using The Plotter's Internal Palettes
HP DesignJet 700 any of the plotter’s 11 pen shades. 750C Plus HP DesignJet 750C Plus, any combination of the plotter’s internal 256 colors To See the Current Palette Settings Make sure either a roll or a sheet of media is loaded. -
Page 122: To See The Colors Available For A Palette (Designjet 750C Plus)
Controlling a Plot’s Overall Appearance Changing Pen Widths and Colors Using the Plotter’s Internal Palettes To See the Colors Available for a Palette 750C Plus Make sure that the front-panel Color/Mono switch is set to To print the Palette Demo, go to the Demos In the Palette Demo... -
Page 123: To Change The Palette Settings
Changing Pen Widths and Colors Using the Plotter’s Internal Palettes To Change the Palette Settings There are three palettes: Factory, Palette A and Palette B. You cannot change the Pen settings Factory palette, but you can define Palettes A and B to be whatever you choose. Define palette Item Palettes... -
Page 124: To Change The Selection Of The Current Palette
Controlling a Plot’s Overall Appearance Changing Pen Widths and Colors Using the Plotter’s Internal Palettes To Change the Selection of the Current Palette Palette Pen settings Software Palette Palette A All menu modes Default: Software Palette B Factory Comments The plotter looks to your software for pen settings and ignores all three internal palettes. -
Page 125: Changing The Treatment Of Overlapping Lines (Merge Feature)
Changing the Treatment of Overlapping Lines (Merge Feature) There are two alternative settings for controlling overlapping lines. The feature is called Merge You can set this feature from your software in some applications, for example in Pen settings AutoCAD. Merge Merge off. -
Page 126: Changing The Overall Lightness/Darkness Of A Plot
Controlling a Plot’s Overall Appearance Changing the Overall Lightness/Darkness of a Plot Changing the Overall Lightness/Darkness of a Plot You can change the overall lightness/darkness of a plot by adjusting the amount of ink used in your plots. The feature is called Device setup Lightness Full menu mode... -
Page 127: Printing Color Drawings In Monochrome
Printing Color Drawings in Monochrome Examples of why you may want to print a color drawing in monochrome are: Because you want a draft where color is not important, for example to check that the plot is not going to be clipped. Because you want a version for photocopying in black and white. -
Page 128: To Switch Between Color And Monochrome
Controlling a Plot’s Overall Appearance Printing Color Drawings in Monochrome To Switch between Color and Monochrome Affects next plot sent Use the front-panel key shown below to toggle between color and monochrome. 750C Plus If you are using one of the software drivers supplied with the plotter, you can also make this setting (or an equivalent) within the driver. -
Page 129: Choosing An Appropriate Print Quality
Choosing an Appropriate Print Quality Affects next plot sent You can set the overall print quality from the front panel. The main effects of your print quality setting are shown in the table below. Print Quality Setting Speed Ink Used By choosing General tips choosing... - Page 130 (other than CAD drawings or other line drawings): When loading the paper, specify “Heavy coated paper” on the front panel, rather than “Coated paper”. Set Print Quality to “Best”. 5-12 Resolution in dpi DesignJet 700 Color Monochrome 300 x 300 300 x 300 300 x 300...
-
Page 131: To Change The Print Quality
To Change the Print Quality Affects next plot sent. Software setting takes priority. Use the front-panel settings. If you are using one of the software drivers supplied with the plotter, you can also make this setting (or an equivalent) within the driver. In this case, the driver setting will override the front-panel setting. -
Page 132: Improving Line Quality And Graphics Detail (Designjet 750C Plus)
300 or 600 dpi resolution, depending on lines 750C Plus the print quality that you have selected. Sharp lines either through the front-panel menu or HP supported Windows drivers factory default setting is Auto With Sharp lines when you send the following files: Mixed lines and scanned color images. - Page 133 For further information on 750C Plus With the Sharp lines may not always produce an addressable 600 dpi plot. This may be because: You have not selected Best on the front-panel page 5-13. You are using media other than Coated paper, Opaque bond or Matte film.
- Page 134 5-16...
-
Page 135: Managing Your Plots
Managing Plots Being Printed or Drying Managing Plots Not Yet Printed (The Queue) To Replot an Image Using the Plotter’s Memory Avoiding Media Waste by Nesting Pages (Roll Media Only) Managing Your Plots .... -
Page 136: Managing Plots Currently Being Printed Or Drying
Managing Your Plots Managing Plots Currently Being Printed or Drying Managing Plots Currently Being Printed or Drying To Cancel a Plot Press Cancel The plotter advances the media as though the plot were finished. If queueing is on and there are no more plots in the queue, the cancelled plot is placed in the queue and you can replot it as explained on page 6-8. -
Page 137: To Pause While Printing A Series Of Plots
Managing Plots Currently Being Printed or Drying To Pause while Printing a Series of Plots You can pause between two plots already sent from your computer, for example to change the media type or replace the cartridges. Press on the front panel. Pause The plotter finishes the current plot and pauses (indicated by the being on) until your press... -
Page 138: Managing Plots Not Yet Printed (The Queue)
Managing Your Plots Managing Plots Not Yet Printed (The Queue) Managing Plots Not Yet Printed (The Queue) The normal sequence of events is: You send a plot from your computer (or choose one of the internal sample plots from the menu). -
Page 139: What Is The Queue
What is the Queue? Your plotter can store plots in a queue at the same time as plotting the current file. It stores them by page, though if you send only single-page files, you can regard these as plots. The size of the queue is limited by the number of pages (maximum 32) and the total memory occupied by the queue;... -
Page 140: To Identify A Page In The Queue
Managing Your Plots Managing Plots Not Yet Printed (The Queue) To Identify a Page in the Queue Queueing & Nesting Queueing & Nesting Queue mgmt Page ID Each has an identifier, comprising: All menu modes <position in queue> : The page currently being plotted is in position 0. The next page to be plotted is in Position in queue position 1, the one after in position 2, etc. -
Page 141: To See The Size Of A Page In The Queue
To See the Size of a Page in the Queue Statistic Page ID Width Statistics Length All menu modes To Prioritize a Page in the Queue To make any page in the queue the next one to be plotted, select it and choose Page ID Move to top Move to top... -
Page 142: To Make Copies Of A Page In The Queue
Managing Your Plots Managing Plots Not Yet Printed (The Queue) To Make Copies of a Page in the Queue Has The Page Already Been Printed? In all cases, the page must be still in the queue. Having selected the page and chosen Page ID number of copies required, and press number of pages to be printed;... - Page 143 Replot an Image Using the Plotter’s Memory If you have sent an image from your computer, the plotter will retain this image in its memory until another image is sent from your computer. The current image can be plotted again using Press Replot The Replot light flashes briefly while the plotter prints the current...
-
Page 144: Avoiding Media Waste By Nesting Pages (Roll Media Only)
Managing Your Plots Avoiding Media Waste by Nesting Pages (Roll Media Only) Avoiding Media Waste by Nesting Pages (Roll Media Only) What is Nesting? Nesting means placing pages side-by-side on the media (rather than one after the other), to avoid wasting media. direction of roll paper flow... -
Page 145: When Does The Plotter Try To Nest Pages
When Does the Plotter Try to Nest Pages? When all the following are true: The plotter is loaded with roll media rather than sheet media. In the front-panel menus, In the front-panel menus, See page 6-12. Which Pages Qualify for Nesting? In order to be in the same nest, the individual pages must be compatible on both the following criteria: Color or monochrome... -
Page 146: To Turn Nesting On Or Off And Choose The Nesting Method
Managing Your Plots Avoiding Media Waste by Nesting Pages (Roll Media Only) To Turn Nesting On or Off and Choose the Nesting Method Nest Setting Queueing & Nesting Selected Nest Optimal All menu modes Default: Off In order What Happens to Nesting if you Turn Queueing Off? Turning queueing off does not turn nesting off for pages already in the queue. -
Page 147: Getting The Best From Nesting (Nesting And Margins)
Getting the Best from Nesting (Nesting and Margins) In order to “squeeze in” one more page, the plotter may reduce the right margin of What the plotter may do the right-most page by up to 3 mm (0.08 in). This is done only if: your Page format / Size size, and if... - Page 148 6-14...
- Page 149 To See the Current Overall Configuration of the Plotter To See the Current Configuration of the Front-Panel Settings To Change the Front-Panel Settings Recalibrating the Plotter for Accuracy Changing the Graphics Language Setting for a Different Application ........Changing the Serial Interface Settings Changing the I/O Timeout Setting To Upgrade Your Plotter with More Memory...
-
Page 150: To See The Current Overall Configuration Of The Plotter
Reconfiguring Your Plotter To See the Current Overall Configuration of the Plotter To See the Current Overall Configuration of the Plotter Item Utilities Max X Statistics Max Y Full menu mode only Code rev RAM present Media 750C Plus ROM SIMM Comments These two figures, in millimeters, give the size of the current plotting area, that is, the area in which the plotter will print the... -
Page 151: To See The Current Configuration Of The Front-Panel Settings
Current Configuration Plot available in the front-panel menus, together with their current settings (in red italics, for the HP DesignJet 750C Plus). Note that some of the items do not appear in the front-panel display unless you have set (the default is , so that they do not appear). -
Page 152: To Change The Front-Panel Settings
Reconfiguring Your Plotter To Change the Front-Panel Settings To Change the Front-Panel Settings Chapter 2 of this manual explains how to use the front-panel display, including These graphics how to change any of the settings. It also explains the small menu graphics that appear in the left margins of this manual whenever a particular menu item is are explained in explained. -
Page 153: Recalibrating The Plotter For Accuracy
Recalibrating the Plotter for Accuracy When to Recalibrate the Plotter Your plotter was calibrated at the factory using HP Matte Film, with a thickness of 0.12 mm (0.0048 in); at 23 C (73 F), with 50-60% relative humidity. It will operate with greatest accuracy in similar environmental conditions. If you are operating under significantly different conditions, you should recalibrate the plotter as explained here. -
Page 154: To Recalibrate The Plotter
To Recalibrate the Plotter Choose your media type (sheet or roll). If recalibrating for a non-standard media Utilities type, use that type. Otherwise, HP Matte Film will give greatest accuracy. Choose your media size. Sheet media must be either E/A0 or D/A1. Accuracy... -
Page 155: Changing The Graphics Language Setting For A Different Application
HP RTL The plotter’s default setting is designed to work successfully with most applications, and is called 7586, HP-GL/2. However, it’s possible that with some older or less common applications, you may need to change this setting to HP-GL/2, as explained in the table below. -
Page 156: Graphics Language And Networks
Reconfiguring Your Plotter Changing the Graphics Language Setting for a Different Application Graphics Language and Networks Note for system administrator. If you are using the plotter with a network spooler, consider modifying the spooler to automatically insert the PJL language-switching commands at the beginning and end of each file. This allows the plotter to switch automatically into the correct graphics language for your current plot and returns the plotter to the front panel graphics language setting for subsequent plots. -
Page 157: Changing The Serial Interface Settings
Changing the Interface Settings With a network interface (such as HP JetDirect Print Server), refer to your network Network interface documentation for advice on any front-panel configuration. With a parallel interface, no front-panel configuration is necessary. Parallel With a serial interface, you should have configured it when installing the plotter, as Serial explained on page 1-29. -
Page 158: To Upgrade Your Plotter With More Memory
MB of printing memory). You can expand this up to a maximum of 75 MB of standard memory by adding one or two memory expansion modules. For HP part numbers, see page 11-14. For installation details, see the task starting on page 1-6. -
Page 159: To Upgrade Your Plotter With The Postscript Option
Note that you must install the PostScript ROM SIMM in the second slot from the left. Reconfiguring Your Plotter For the HP Slot for PostScript Option (Back of Plotter) 7-11... -
Page 160: To Upgrade Your Plotter With A Network Interface
You can connect your plotter directly to a LAN using an optional network interface card such as the HP JetDirect Print Server. Depending on your needs, you may want to use the network interface instead of or in addition to the parallel and serial interfaces. - Page 161 Replacing the Print Cartridge(s) Cleaning the Plotter ........“Normal”...
-
Page 162: Replacing The Print Cartridge(S)
Maintaining Your Plotter Replacing the Print Cartridge(s) and Cleaning the Plotter Replacing the Print Cartridge(s) Replaceable print cartridge(s) have been used in your plotter, greatly reducing its user maintenance requirements, as these are the components that experience the greatest wear and tear. Under normal use, you will probably find that you have to replace the black 750C Plus cartridge more often than the color cartridges. -
Page 163: Normal" Plotter Use
20,000 pages printed or 4,500,000 passes of the cartridge carriage. Contact your local HP dealer or HP service engineer to arrange a service. After the service the message will disappear. If you choose not to have the service, you may continue to use the plotter as normal, but may encounter a number of operational or print-quality problems. -
Page 164: To Print The Service Configuration Plot
Maintaining Your Plotter “Normal” Plotter Use To Print the Make sure media is loaded. Utilities In the front-panel menus choose the option shown on the left. Service config Full menu mode Service Configuration Plot... -
Page 165: Troubleshooting
Using the Documentation to Help Solve Problems Locating the Source of Problem Solving Media-Handling Problems Solving Print Cartridge Problems Clearing a Media Jam ....... . Solving Communication Problems Solving Problems with Plot Position or Content Solving Print Quality Problems... -
Page 166: Using The Documentation To Help Solve Problems
Solving miscellaneous problems. If the problem could be related to your software driver, and you are using an HP driver, refer to the drivers’ troubleshooting documentation and the ‘On-Line-Help’ in your application software. If the problem has no obvious cause, read “Locating the source of the problem”... -
Page 167: Locating The Source Of The Problem
Locating the Source of the Problem Look at the front-panel display for any error message. For an explanation, see chapter 10. Test the plotter. Switch the plotter off. Ensure that the power cord is firmly inserted in the plotter and plugged in to an outlet that you know works. Switch the plotter on. -
Page 168: Solving Media-Handling Problems
Troubleshooting Solving Media-Handling Problems Solving Media-Handling Problems If the Front Panel Keeps Indicating that Media Is Misaligned or Incorrectly Positioned. Have you: Roll media Loaded the roll the wrong way. The media should load over the roll toward you. Loaded the media at an angle. The right-hand edge must be parallel to the perforated line on the plotter. -
Page 169: If Media Crumples When You Load It
If Media Crumples When You Load it Clear any obstructions in the media path. Be sure the leading edge is straight and free of tears. Cut a straight edge with the knife if necessary. If your media is curled, and if both sides are the same, load it with the curved (hollow) side towards you (Certain media types –... -
Page 170: If The Automatic Cutter Does Not Work
Troubleshooting Solving Media-Handling Problems If the Automatic Cutter Does Not Work The automatic cutter is activated only when roll media is loaded. Your software application may have disabled the automatic cutter. Refer to your software documentation or contact your software vendor for more information. If Plots Fall on the Floor After Being Cut Do not let more than twenty plots accumulate in the bin. -
Page 171: Solving Print Cartridge Problems
Solving Print-Cartridge Problems If the Access Cartridge(s) Make sure the window is closed before you press If the Plotter Runs the Cartridge-Alignment Routine Unexpectedly The plotter runs the automatic cartridge alignment procedure every time you load, replace or even reseat a cartridge, whether it is a new cartridge or not. Do not remove the cartridge(s) unnecessarily. -
Page 172: Clearing A Media Jam
Troubleshooting Clearing a Media Jam Clearing a Media Jam Switch OFF the plotter, open the window and raise the media lever. Don’t touch the stainless steel strip that runs the length of the plotter behind W A R N I N G the cartridge carriage;... -
Page 173: Solving Communication Problems
Solving Communication Problems If There is a Problem Communicating between Your Computer and the Plotter Some symptoms of a communication problem are: – The front-panel – The front-panel display does not show – Your computer displays an error message when you are trying to print. –... -
Page 174: Solving Problems With Plot Position Or Content
– HP plotter drivers for AutoCAD – HP plotter driver for Microsoft Windows applications The documentation supplied with your application software, for example the AutoCAD Reference Manual. If the Plot Is Completely Blank Check the print cartridge(s) to be sure you have removed the protective nozzle tape from all of them. -
Page 175: If The Output Contains Only A Partial Plot
Solving Problems with Plot Position or Content If the Output Contains Only a Partial Plot Did you press Form Feed and Cut plotter? If so, you have ended the data transmission and will have to print the plot again. (You normally don’t need to press the plot.) I/O Setup / I/O Timeout setting may be too short. -
Page 176: If The Plot Is Clipped
Troubleshooting Solving Problems with Plot Position or Content If the Plot Is Clipped This normally indicates a discrepancy between the actual plotting area on the loaded media and the plotting area as understood by your software. For general advice on plotting areas and page size, see chapter 4. Check the actual plotting area for the media size you have loaded. -
Page 177: If The Entire Plot Is In One Quadrant Of The Correct Plotting Area
Solving Problems with Plot Position or Content If the Entire Plot Is in One Quadrant of the Correct Plotting Area Is the page size configured in the software too small? Are you sure that your software does not believe the drawing to be in one quadrant of the page? Otherwise, this indicates an incompatibility between the software and the plotter: Is your software configured for this plotter? For general advice, see page 1-35. -
Page 178: If The Plot Is Distorted Or Unintelligible
Check the front panel software. 750C Plus 9-14 setting may be too long. Decrease the setting and is set to 7586,HP–GL/2 (the default) setting and send the files again. Pen settings / Define palette Pen settings / Palette, is not set to Software. -
Page 179: Expecting
If the Plotter Has Printed a Different Plot Than the One You Were Expecting One possibility is that you have accidentally initiated one of the plotter’s internal plots: The Cartridge Alignment Plot. printed automatically every time you replace, or reseat a cartridge. The Current Configuration Plot configuration details) This is plotted by simultaneously pressing the two arrow keys on the front-panel... -
Page 180: Solving Print Quality Problems
HP accessories and supplies, whose reliability and performance have been thoroughly tested to give trouble-free performance and best-quality plots. For details of HP media, see page 3-3 and the Supplies Source catalog supplied with the plotter. If the Color Is Not as Expected The means of accurately managing the colors printed by your plotter vary with the software application and driver being used. -
Page 181: If There Are Other Gaps In Solid Areas Or In Lines (Designjet 750C Plus)
If There are Other Gaps in Solid Areas or in Lines One or more of your cartridges may be out of ink. For an explanation of how to check, see page 3-26. If the ink levels are OK, try to assess which cartridge has the problem. Look at your plot;... -
Page 182: If There Are Jagged Vertical Or Horizontal Lines
Troubleshooting Solving Print-Quality Problems If There are Jagged Vertical or Horizontal Lines Did you specify the right media type when loading the media? For details of front-panel media types, see page 3-3. To find out the plotter’s current type of media setting, see page 7-2. -
Page 183: If There Are Blurred Lines (Ink "Bleeds" From Lines)
If There are Blurred Lines (Ink “Bleeds” from Lines) Perhaps you are not using HP media. For details of HP media, see page 3-3 and the Supplies Source catalog supplied with the plotter. The plotter may be operating in an area where the temperature and humidity are too high. -
Page 184: If There Is Pronounced Banding In Area Fills
Some banding is normal, especially in dark or dense area fills. If the banding is unacceptable, try the following: Make sure you are using HP media. Try changing the Print Quality setting. If the banding is in a black or gray area, then try reducing the percentage of black in grayscales, either in your software or in the plotter’s palette. -
Page 185: Solving Front Panel Problems
Solving Front-Panel Problems If the Access Cartridge(s) Make sure the plotters’ window is closed before you press Cartridge(s) If None of the Front-Panel Keys Work Turn the plotter off and then on again. If the problem persists, have your plotter serviced. -
Page 186: If A "System Error" Message Is Displayed
Troubleshooting Solving Front-Panel Problems If a “System Error” Message Is Displayed Press . If the message does not clear, turn the plotter off, then on again to Enter try to clear the system error. If media appears to be jammed, clear it. If the message is still displayed, record the alphanumeric code and have the plotter serviced. -
Page 187: Solving Miscellaneous Problems
Solving Miscellaneous Problems If the Plotter Does not Plot You may have a power problem. If there is no activity at all from the plotter, and no lights on the front panel, check that the power cable is connected correctly and that there is power available at the socket. You may have a problem with your application driver. -
Page 188: If The Plotter Waits Too Long To Plot A Nest
Troubleshooting Solving Miscellaneous Problems If the Plotter Waits Too Long to Plot a Nest Change the setting. See page 6-12. Nest wait If the Plotter Performs the Cartridge Alignment Routine Unexpectedly This is a normal plotter operation. The plotter will align the cartridge(s) every time you replace, or even reseat, a cartridge, whether or not it is new. -
Page 189: Getting Help
If the problem appears to be related to your software application, first contact your software vendor. If you still have difficulty, refer to the HP Support Services booklet shipped with this plotter. This document contains a comprehensive list of various support services available to help solve plotter problems. - Page 190 9-26...
-
Page 191: Front Panel Messages
Front-Panel Messages 10-1... - Page 192 Front-Panel Messages Front-Panel Messages This is a list of all possible messages in the front-panel display. If you need to do something, it is shown in italics in the The messages are listed in alphabetical order. Message Explanation and Action Alignment error The alignment procedure has failed.
- Page 193 Message Explanation and Action You lifted the media lever while the processor was busy. Lower the lever to Lower lever to continue continue. Lower window You opened the window while the processor was busy. Close the window to continue. to continue Media too small The media you loaded for accuracy calibration or cartridge alignment is too small.
- Page 194 You are using the plotter more intensively than the recommended duty cycle and Maintenance advised should contact your local HP dealer or HP service engineer to arrange a service . For the duty cycle specification, see page 11-4. If you choose to not to call for service, you may continue to use the plotter as normal, but may encounter operational or print-quality problems.
- Page 195 Message Explanation and Action STATUS The cartridge carriage is returning to its station at the left of the plotter. Returning cartridge(s) STATUS The plotter is trimming the edge of roll media. Roll feed edge trim STATUS The plotter is doing an internal check during power-up. Initializing STATUS The plotter has received a file, is ready to print, but has no media loaded.
- Page 196 10-6...
-
Page 197: Reference
Plotter Specifications ....... . Interface Specifications ......Interface Cables . -
Page 198: Plotter Specifications
C4706A and C4709A = E/A0-size plotter. Functional Specifications Cartridges HP DesignJet 700, one black. For part number, see page 11-15. HP DesignJet 750C Plus . yellow, cyan, magenta and black. For part numbers, see 750C Plus page 11-15. Media sizes... - Page 199 750C Plus Normal print quality: Best print quality: Accuracy 0.38 mm (0.015 in) or (Maximum at 23 C (73 F), 50–60% relative humidity, on HP Matte Film. accumulated error) Programming HP-GL (7586B), HP-GL/2, HP RTL, PJL languages supported Except for glossy media types, on which the resolution is always 300 dpi.
- Page 200 Reference Plotter Specifications Environmental Specifications Operational Mechanical and electrical: With cartridges and media: For optimal print quality and media handling: Storage Plotter and media: Cartridges: Power Specifications Source 100–240V ac Frequency 50–60 Hz Consumption 140 W max. (2.0 A max.) Energy Star rating Maximum power in idle state: 45 watts (USA)
- Page 201 EMC (Electromagnetic Compatibility) Specifications Canada Canadian Department of Communications, Radio Interference Regulations Class B compliant. European Union Japan Korea South Africa Safety Specifications Canada European Union Mexico DGN, NOM019-SCFI-1993 certified Norway Reference Plotter Specifications 11-5...
- Page 202 Reference Plotter Specifications Plotting Area (= Media Size Minus Margins). Media size (and orientation of media ) di ) ANSI media (portrait) (landscape) (portrait) (landscape) (portrait) (landscape) (portrait) (landscape) (portrait) Architectural media (portrait) (landscape) (portrait) (landscape) (portrait) (landscape) (portrait) (landscape) E1 (portrait) (portrait) ISO media...
-
Page 203: Interface Specifications
Interface Specifications Below are the parallel and serial interface specifications. Parallel (Bi-Tronics/Centronics) Interface Interface The connector on the plotter is The connector on the plotter is 36-pin female. Most existing parallel cables support Most existing parallel cables s pport Bi-Tronics communication, but for use with this plotter, the cable must meet the specification in this table. -
Page 204: Interface Cables
HP Vectra or HP 24541A/B serial-interface card (9-pin connector) IBM AT and compatibles using 9-pin serial connectors HP Vectra PC with HP 24541A/B dual serial- interface card using the 25-pin connector IBM PC, PC/XT, PC/AT, PS/1, PS/2 and compatibles Interface type... - Page 205 Note: You may need a Sun serial adapter cable to convert the DIN connector found on certain Sun SPARC stations to the 25-pin connector on the HP cable. Contact your Sun dealer for part numbers. Cables for Unix systems HP part...
-
Page 206: Regulatory Notices
To Obtain a Material Safety Data Sheet (MSDS) You can obtain current Material Safety Data Sheets for the print cartridges used in the plotter (HP Part numbers 51644C [cyan], 51644M [magenta], 51644Y [yellow] and 51645A [black]) by mailing a request to this address: Hewlett-Packard Customer Information Center, 19310 Pruneridge Avenue, Dept. -
Page 207: Telecommunications Statement
Normalbetrieb nach DIN 45635 T. 19 Telecommunications Statement Tele- The HP DesignJet 700 and the HP DesignJet 750C Plus plotters, models C4705A, communications C4706A, C4708A and C4709A are approved under Approval Number General Approval NS/G/1234/5/100003 for indirect connection to public telecommunication systems (UK) within the United Kingdom. -
Page 208: Declaration Of Conformity
The product was tested with a Hewlett-Packard system, consisting of: a Vectra 486/33M personal computer, VGA monitor, keyboard, mouse, and a Printer DeskJet 550C as the second peripheral. Product options with interface cards exhibit Class A operation. Sant Cugat del Vallès (Barcelona), September 1st, 1996... -
Page 209: Ordering Accessories
The Product Comparison Guide for HP-GL/2 and HP RTL Peripherals PJL Technical Reference Manual 1 This item is updated regularly. For details of the latest version available, please contact your HP dealer or sales representative. 2 See note on page 11-16. - Page 210 HP d l local authorized HP dealer. 1 This item is updated regularly. For details of the latest version available, please contact your HP dealer or sales representative, or, for drivers, use one of the support resources for your area listed in the Hewlett-Packard Support Services Booklet shipped with your plotter.
- Page 211 Network Interface Hewlett-Packard supply a variety of internal or external, single or multi port Network Interfaces which are constantly being upgraded. Contact your Dealer or Hewlett-Packard support services for current HP part numbers suitable for your application. Print Cartridges Although other cartridges may appear to fit in the stalls, use only these part numbers.
-
Page 212: Hp-Gl/2 And Hp Rtl Programming Information
The HP-GL/2 and HP RTL Reference Guide provides complete explanations and examples of the HP-GL/2 and HP RTL graphic and interface instructions. If you are writing an HP-GL/2 or RTL driver for your plotter, you will find this guide an invaluable source of general instruction information. It is published by Addison-Wesley Publishing Company and you can can order it through most book stores (ISBN 0-201-63325-6). -
Page 213: Glossary
Glossary 12-1... - Page 214 An external item connected to the computer: printer, plotter, tape drive etc. Your HP DesignJet is a device. Dots per inch, a measure of print resolution. driver The software that controls the communication between a computer and a device.
- Page 215 A glossy, opaque photographic paper. HP-GL One of Hewlett-Packard’s standard graphics languages for plotters and printers. Produces vector data. Forerunner to HP-GL/2. HP-GL/2 One of Hewlett-Packard’s standard graphics languages for plotters and printers. Produces vector data. Newer than HP-GL. Input/output. The transmission of data between a computer and a device.
- Page 216 Glossary PostScript A standard page markup language, commonly used by graphics and desktop publishing software applications. queueing Placing each page of each file received by the device in chronological order of receipt (unless changed by prioritizing), before and after printing. parity An error-checking method in a serial interface between a computer and a device.
-
Page 217: Index
Index Access Cartridge(s) key, 1-21, 3-28 problems, 9-7 accessories, 1-5–1-6 list, 11-13 ordering, 11-16 accuracy, specification, 11-3 acoustic specifications, 11-4 action keys, 2-2 addressable 600 dpi, Sharp lines, 5-15 addressable dpi, 5-14 Apollo, cables to connect, 11-9 Apple, cables to connect, 11-8 archiving plots, 3-9 area fill problems, 9-19 AutoCAD, drivers, 11-14... - Page 218 9-25–9-27 HP DesignJets, other, 1-38 HP JetDirect, 1-27 HP JetDirect Print Server, 7-12 HP RTL, 7-7 documentation, 11-13, 11-16 HP Special Inkjet paper, 11-2, 11-3 HP-GL (7586B), 7-7 HP-GL/2, 7-7 documentation, 11-13, 11-16 humidity, 11-4 I/O Setup, 7-9 I/O timeout, changing, 7-9 ink problems, 9-16–9-21...
- Page 219 menu plot, printing, 2-5 menu system entering, 2-6 navigating, 2-7–2-9 navigation examples, 2-11–2-13 printing, 2-5 Merge, 5-7 messages, front panel, 10-2–10-6 Microsoft Windows, driver, 11-14 minimum media sizes, 11-2 Mirroring an image, 4-10 monochrome, printing color in, 5-9 Monochrome plotting, media types for, 11-3 monochrome/color switching, 5-10 Move to top, 6-7...
- Page 220 Index page information, 6-7 prioritizing a page, 6-7 queue, interaction with nesting, 6-12 queueing, 6-5 Recalibrate, 7-6 recalibration for accuracy, 7-5–7-7 restoring factory settings, 7-6 Receiving light, 1-26 regulations Declaration of Conformity (EC), 11-12 EMC, 11-5 notices, 11-10–11-13 safety, 11-5 regulatory notices, 11-10–11-13 replacing cartridges, 3-26 Replot, 6-9...
- Page 221 HP Customer Support in the Phone For support details, see the section “Getting help” in chapter 9. (208) 323 2551...
- Page 222 Customer re-order number: C4705-60021 Manual Part Number: C4705-90031 Edition 1, September 1996 English Printed in U.S.A. This manual has been printed on chlorine-free bleached paper...