Fujitsu FI-4010CU Operator's Manual
Image scanner
Hide thumbs
Also See for FI-4010CU:
- Specification sheet (2 pages) ,
- Quick installation manual (2 pages) ,
- Installation procedures manual (7 pages)
Table of Contents
Advertisement
Quick Links
Advertisement
Table of Contents

Related Manuals for Fujitsu FI-4010CU


Summary of Contents for Fujitsu FI-4010CU
- Page 1 P3PC-E702-03EN fi-4010CU Image Scanner Operator’s Guide...
- Page 2 Disclaimers FCC declaration This equipment has been tested and found to comply with the limits for a Class B digital device, pursuant to Part 15 of the FCC Rules. These limits are designed to provide reasonable protection against harmful interference in a residential installation.
- Page 3 Bescheimigung des Herstellers / Importeurs Hiermit wird bescheinigt, daß der/dieldas • fi-4010CU in Übereinsstimmung mit den Bestimmungen der • AmtsblVfg 243/1991 funkentstört ist. Der Deutschen Bundespost wurde das Inverkehrbringen dieses Gerätes angezeigt und die Berechtigung zur Überprüfung der Serie auf Einhaltung der Bestimmungen eingeräumt.
- Page 4 Put the substance in the lamp into mouth as it contains mercury. Vaporize, crumb, condense the scanner. Aspirate the chemical liquid contained in scanner parts. Dispose of the scanner should be conducted as required by local ordinances or regulations. Copying...
- Page 5 Fujitsu Group Offices Please send your comments on this manual or on Fujitsu products to the following addresses: FUJITSU COMPUTER PRODUCTS OF AMERICA, INC. 2904 Orchard Parkway, San Jose, CA 95134-2009, U.S.A. Phone: (1-800)591-5924; (1-408)432-6333 Technical Assistance Center: (1-800)626-4686 Fax: (1-408)894-1709 Website: http://www.fcpa.com/...
- Page 6 12th Fl., Olympia Thai Tower, 444 Rachadapisek Road, Samsennok, Huay kwang, Bangkok 10320, Thailand Phone: (662)512-6066 Fax: (662)512-6068 Website: http://th.fujitsu.com/ FUJITSU MALAYSIA SDN, BHD. 7th Fl., Wisma Damansara, Jalan Semantan 50490 Kuala Lumpur, MALAYSIA Phone: (60-3)254-3644 Fax: (60-3)253-3940 Website: http://my.fujitsu.com/ FUJITSU PHILIPPINES, INC 2nd Fl., United Life Building, Pasay...
- Page 7 Note, Liability READ ALL OF THIS MANUAL CAREFULLY BEFORE USING THIS PRODUCT. IF NOT USED CORRECTLY, UNEXPECTED INJURY MAY BE CAUSED TO USERS OR BYSTANDERS. While all efforts have been made to ensure the accuracy of all information in this manual, PFU assumes no liability to any party for any damage caused by errors or omissions or by statements of any kind in this manual, its updates or supplements, whether such errors are omissions or statements resulting from...
- Page 8 Preface This manual explains how to use the fi-4010CU image scanner. This manual contains chapters on the following topics: COMPONENTS INSTALLATION AND CONNECTIONS OPERATING INSTRUCTIONS MAINTENANCE TROUBLESHOOTING INSTALLATION SPECIFICATIONS It also contains a Glossary of Terms and an Index.
- Page 9 CAUTION CAUTION indicates that minor personal injury, loss of data, or damage to the scanner may result if you do not follow a procedure correctly. NOTE A NOTICE provides “how to” tips or suggestions to help you perform a procedure correctly.
-
Page 10: Screen Examples In This Manual
User's Manual of the scanner application you are using. Furthermore, the screenshots in this manual are for the FUJITSU TWAIN32 scanner driver and the Image Capturing Software Utilities "ScandAll 21" for... - Page 11 Precautions This section describes precautions to follow when installing the scanner. To ensure the longevity and proper functioning of your scanner, do not install the scanner in the places and environments described below. Warning Important warnings employed in this manual are as follows.
- Page 12 Do not use the equipment in areas with high levels of oil smoke, steam, humidity, or dust. Installation in areas with high levels of oil smoke, steam, humidity, or dust may result in fire or electric shock. Do not use the equipment if an abnormal smell or noise is apparent. If the equipment overheats, emits smoke or abnormal smells, or makes abnormal noises, switch power OFF immediately and remove the power plug from the socket.
- Page 13 OFF, remove the plug from the socket, and call your dealer or maintenance service center. Do not place in wet areas. Do not place the scanner where liquid spills may occur. Caution Important cautions employed in this manual are as follows.
- Page 14 Always ensure that the equipment is installed in a stable location. Ensure that no part of the scanner is liable to fall from the desk, and that the base of the equipment is level. Ensure that the equipment is installed in a stable location. The equipment should be installed in a location that is level and subject to minimal vibration.
- Page 15 Ensure that the equipment is installed in a well ventilated area. Do not use aerosol spray near the scanner. Do not use aerosol sprays, for example, to clean the scanner. Air sprayed from aerosol sprays cause dirt and dust to enter the scanner, resulting scanner failure and malfunction.
-
Page 16: Table Of Contents
CONTENTS Chapter 1. COMPONENTS 1.1 Overview ___________________________________________________________ 1 1.1.1 Features of fi-4010CU image scanner _________________________________ 1 1.2 Checking the Components _____________________________________________ 2 Chapter 2. INSTALLATION AND CONNECTIONS 2.1 Unlock the Shipping lock ______________________________________________ 5 2.2 Installation of the ADF paper chute A, ADF paper chute B and Document stopper _______________________________________________________________________ 6 2.3 Connecting the interface cables _________________________________________ 7... - Page 17 4.3.1 Cleaning materials _______________________________________________ 17 4.3.2 Cleaning the Flatbed unit ___________________________________________ 18 4.3.3 Cleaning the ADF unit ____________________________________________ 19 4.4 Consumables _______________________________________________________ 22 4.4.1 Part number and Replacement cycle _________________________________ 22 4.4.2 Replacing Pad ASY ______________________________________________ 23 Chapter 5. TROBLESHOOTING A.
-
Page 18: Chapter 1. Components
1.1 Overview This section describes overview and features of fi-4010CU. 1.1.1 Features of fi-4010CU image scanner fi-4010CU image scanner (this equipment) can scan high-quality image. The scanner can perform the following functions when used in conjunction with software applications. - Save images in several formats such as TIFF and Bitmap - Output data to a printer when connected to a personal computer. -
Page 19: Checking The Components
If any component is missing, please contact your sales agent. Operator’s Guide Quick Installation Guide (this book) USB cable AC adaptor Power cable ADF paper chute A ADF paper chute B User Manual (CD-ROM) Scanner driver (CD-ROM) Adobe Acrobat 5.0 (CD-ROM) PAD ASY Document stopper... -
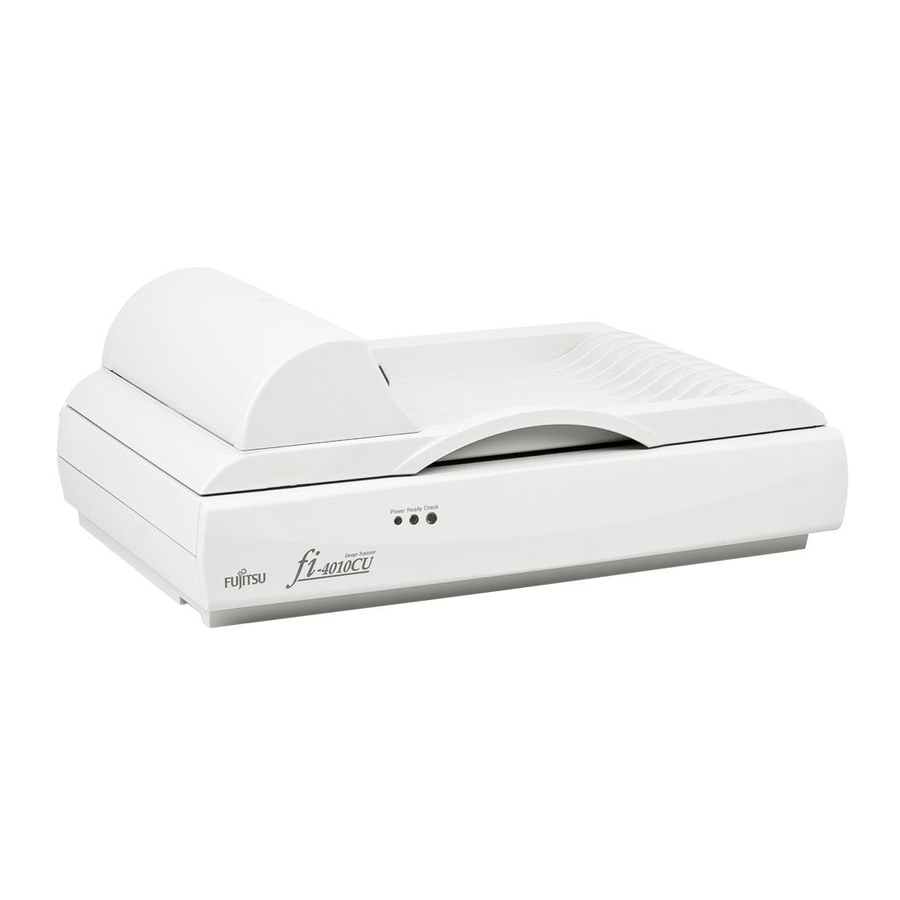
Page 20: Units And Assemblies
1.3 Units and Assemblies This section shows the exterior view and assemblies of the scanner. This section also provides the name of each part and describes its functions. Units Front side Automatic document feeder (ADF) ADF cover Power lamp Part... - Page 21 ADF cover Flatbed Power lamp Ready lamp Check lamp Backside USB connector Part Power switch AC adaptor connector ADF cable connector USB connector Open when paper jam occurs to remove the document paper. It is used when reading one page at a time. It is turned on when the power is turned on.
-
Page 22: Chapter 2. Installation And Connections
See chapter A. “Installation Specifications” for device appearance. 2.1 Unlock the Shipping lock To keep the scanner from being damaged during shipping, the carrier unit is fixed with a Shipping lock. After placing the scanner where it will be installed, release the Shipping lock as explained below. -
Page 23: Installation Of The Adf Paper Chute A, Adf Paper Chute B And Document Stopper
2.2 Installation of the ADF paper chute A, ADF paper chute B and Document stopper Place ADF paper chute A, ADF paper chute B and Document stopper. Document stopper ADF paper chute B ADF paper chute A... -
Page 24: Connecting The Interface Cables
We do not confirm the correct operation of a commercial USB cable. When connecting to a USB hub, use the first stage USB hub that is closest to the computer. If you use the second or later, the scanner may not operate correctly. 2.3.2 Connecting ADF cable Plug the ADF cable into the ADF cable connector and secure with the two fasteners. -
Page 25: Installation Of Scanner Driver And Software
USB cable Connect to outlet Connect to PC 2.3.4 Installation of scanner driver and software Install the scanner driver and software from the scanner driver CD-ROM included with the scanner. Installation method is described in the attached Quick Installation Guide. -
Page 26: Chapter 3. Operating Instructions
Chapter 3. OPERATING INSTRUCTIONS Place the documents into the ADF paper chute and scan using the ADF. This section describes how to scan the document. NOTE Refer to “4.3.3” for periodic cleaning. 3.1 Loading Documents on the Flatbed Place the document face down and align the top left corner with the reference mark. 3.1.1 Check the document condition Follow the instruction below when the document is smaller than the Document bed. -
Page 27: Reading A Page From A Thick Book
Landscape Place the document align the top left corner. Open the document cover. Place the document face down and align the top left corner with the reference mark. Extend the folded document before scanning. Slowly close the document cover. Issue the read command from the host system. 3.1.2 Reading a Page from a Thick Book Thick documents such as books should be scanned as follows. -
Page 28: Scanning Document With Adf
3.2 Scanning document with ADF This section explains the operation required before scanning a document. If you operate the equipment by a method other than described in this section, a paper jam or reading error may occur. 3.2.1 Confirming document condition This section explains documents that can be read and those that are difficult to read. - Page 29 Paper larger than letter size in width (216 mm) and legal size in Length • (356 mm) Materials other than paper (for example, cloth, metal foil, or OHP film) • Light sensitive paper • Paper perforated peripherally • Nonrectangular paper •...
-
Page 30: Setting Documents
3.2.2 Setting documents This section explains how to set documents. Loosening documents Before setting documents, sufficiently loosen them by the following procedure: Grasp no more than 25 sheets in a stack. • Hold the ends of stack with both hands, and bend the documents. •... - Page 31 Reading direction Standard side...
-
Page 32: Scanning Documents
3.3 Scanning documents This section explains how to scan documents. 1) Make sure that the power to the personal computer and the scanner is ON. 2) Check the document condition. For details, see Section 3.2.1, "Confirming Document Condition." 3) Before setting documents, sufficiently loosen them. -
Page 33: Chapter 4. Maintenance
Chapter 4. MAINTENANCE This chapter explains how to resolve paper jams, perform daily maintenance and cleaning. NOTE Clean the ADF unit as described in section 4.3.3. 4.1 How to solve paper jams CAUTION Inside ADF may become extremely hot. When a paper jam occurs while scanning using the ADF, follow the procedure below to remove the paper. -
Page 34: Daily Maintenance
To keep scanner performance stable, keep the following notes in mind during maintenance. Follow the procedure in section 4.3 below to clean the scanner surface, the Flatbed, and the ADF unit. Cleaning the ADF unit is especially essential. 4.3 Cleaning This section describes how to clean the scanner. -
Page 35: Cleaning The Flatbed Unit
For details on Cleaner F1, consult the agent where you bought your scanner. 4.3.2 Cleaning the Flatbed unit NOTE Detergent for cleaning windows or glass cleaner can be used instead of cleaning fluid. However, do not use paint thinner or other organic solvents. -
Page 36: Cleaning The Adf Unit
4. Gently close the document cover. 4.3.3 Cleaning the ADF unit CAUTION When the scanner is in use, the surface of the glass inside the ADF becomes hot. Before cleaning ADF, disconnect the AC adapter from the power outlet, and wait at least 15 minutes for the glass to cool down. -
Page 37: Adf Paper Chute
Plastic roller Clean Plastic roller softly not to damage its surface. Try to remove any black stain witch may degrade the performance of paper feeding, ADF paper chute Clean ADF paper chute A and B softly. ADF paper chute A ADF paper chute B Plastic rollers Pick roller... - Page 38 Sensor lever Pick Spring Mylar sheet 3. Close the ADF. NOTE Make sure that the ADF is closed completely after cleaning. Otherwise, a paper jam or reading error may occur.
-
Page 39: Consumables
The following table lists consumables used in the scanner. Be sure to keep some consumables in stock. The customer is responsible for changing these items periodically. If they are not changed as recommended, the scanner may not function properly. Name Pad ASY Replacement cycle may differ depending on the type of paper being scanned. -
Page 40: Replacing Pad Asy
4.4.2 Replacing Pad ASY CAUTION Inside ADF may become extremely hot. Avoid injury. To remove Pad ASY: 1. Open ADF cover. 2. Push both sides of the clamp so that Pad ASY can be lifted up for removal. To mount Pad ASY: 3. - Page 41 6. Reset the pad counter. The following shows the procedure for resetting the pad counter. (1) When turning on the power, check that the scanner and the personal computer are connected. (2) Double click the " Scanners and Cameras " icon on the operator panel of the host computer.
- Page 42 This chapter explains samples of the screens in Windows® 2000. The screens and operations may differ slightly if the OS that you are using is other than Windows® 2000. Also, when FUJITSU TWAIN32 scanner driver is updated the screens and operations noted in this chapter will differ slightly.
-
Page 43: Chapter 5. Trobleshooting
Connect the AC adapter correctly. Disconnect AC adapter and turn off the scanner. Connect power cable and power the scanner turned on again. If the power still does not turned on, contact the manufacturer’s authorized service center or the distributor from which you purchased your scanner. - Page 44 (Refer to section 4.1) Follow the procedure described in section 2.2 to release scanner lock. First, turn off the scanner and PC. Then power on again to see if Check lamp is still blinking. If Check lamp is still blinking, contact the manufacturer’s authorized...
-
Page 45: Installation Specifications
A. Installation Specifications Item Dimension (mm) Weight (kg) Voltage Input Phases power Frequency During Power operation consumption Stand by Device status Operating Temperature environment Humidity Dimensions Specifications Width Depth AC100 to 240 V Single phase 50 / 60 Hz Less than 24W Less than 7 W At Operation At Stand by... -
Page 46: Glossary Of Terms
ASCII is a set of 256 codes (numbered 0 to 255) used to communicate information between a computer and another device such as a scanner. The smallest unit of information in computer memory. A bit is a single digit, either a 1 or a 0, in the binary numbering system. -
Page 47: Paper Jam
The connection that allows communication from one part of a system to another. For example, electrical signals are transferred between the computer and scanner over an interface cable. Landscape orientation A document is transported and read with the long side vertical to the moving direction. -
Page 48: Serial Interface
An error correctable by the operator. Time-out limit This is the time the scanner waits for the next document insertion after the last document has been fed. The scanner returns Paper Empty when no document is set after time-out limit. -
Page 49: Index
Daily maintenance…………………… 17 Dimensions…………………………….28 Document bed……….………………… 9 Document cover……………….…….3, 9 Document stopper……………………...3 Document size…………………………11 Document type………………………...11 Driver installation………………………..8 Feeding direction...…….……….14 Flatbed……………………….…………. 3 Fujitsu Group Offices…………………..iv Installation specifications…...….….…28 Interface connectors…………..….…4, 7 Lamp……………………………….…….3 Landscape……………………………..10 Maintenance…………………………..16 Mylar sheet…………………..……19, 21 Operation environment……………….28 Pad ASY…………………………….…22 Paper chute……………………………..3 Paper length...………….………...…12... - Page 50 Weight...……...……………………..28...
-
Page 51: Declaration Of Conformity
Declaration of Conformity... - Page 52 This manual uses recycled paper.