Table of Contents
Advertisement
Available languages
Available languages
Quick Links
IMPORTANT:
Read Before Using
GWS13-52TG
Call Toll Free for
Consumer Information
& Service Locations
1-877-BOSCH99 (1-877-267-2499) www.boschtools.com
For English Version
See page 2
IMPORTANT :
Lire avant usage
Operating/Safety Instructions
Consignes de sécurité/d'utilisation
Instrucciones de funcionamiento y seguridad
Pour obtenir des
informations et les
adresses de nos centres de
service après-vente,
appelez ce numéro gratuit
Version française
Voir page 14
Versión en español
1
IMPORTANTE:
Leer antes de usar
Llame gratis para
obtener información
para el consumidor y
ubicaciones de servicio
Ver la página 27
Advertisement
Table of Contents

Related Manuals for Bosch GWS13-52TG


Summary of Contents for Bosch GWS13-52TG
- Page 1 IMPORTANTE: Read Before Using Lire avant usage Leer antes de usar Operating/Safety Instructions Consignes de sécurité/d’utilisation Instrucciones de funcionamiento y seguridad GWS13-52TG Call Toll Free for Pour obtenir des Llame gratis para Consumer Information informations et les obtener información & Service Locations...
-
Page 2: General Power Tool Safety Warnings
General Power Tool Safety Warnings Read all safety warnings and all instructions. Failure to follow the warn- ings and instructions may result in electric shock, fire and/or serious injury. SAVE ALL WARNINGS AND INSTRUCTIONS FOR FUTURE REFERENCE The term “power tool” in the warnings refers to your mains-operated (corded) power tool or battery-operated (cordless) power tool. - Page 3 and/or the battery pack from the power tool Keep cutting tools sharp and clean. Prop- before making any adjustments, changing erly maintained cutting tools with sharp cutting accessories, or storing power tools. Such edges are less likely to bind and are easier to preventive safety measures reduce the risk of control.
-
Page 4: Kickback And Related Warnings
wheel may fly away and cause injury beyond wheel to climb out or kickout. The wheel may immediate area of operation. either jump toward or away from the operator, depending on direction of the wheel’s move- l) Hold the power tool by insulated grip- ment at the point of pinching. -
Page 5: Safety Warnings Specific For Grinding And Abrasive Cutting-Off Operations
Risk of injury to user. The power cord must only be serviced by a Bosch Factory Service Center or Authorized Bosch Service Station. - Page 6 Symbols IMPORTANT: Some of the following symbols may be used on your tool. Please study them and learn their meaning. Proper interpretation of these symbols will allow you to operate the tool better and safer. Symbol Name Designation/Explanation Volts Voltage (potential) Amperes Current Hertz...
- Page 7 Symbols (continued) IMPORTANT: Some of the following symbols may be used on your tool. Please study them and learn their meaning. Proper interpretation of these symbols will allow you to operate the tool better and safer. Symbol Name Designation/Explanation Eye protection symbol Alerts user to wear eye protection Eye and ear protection symbol Alerts user to wear eye and ear protection...
-
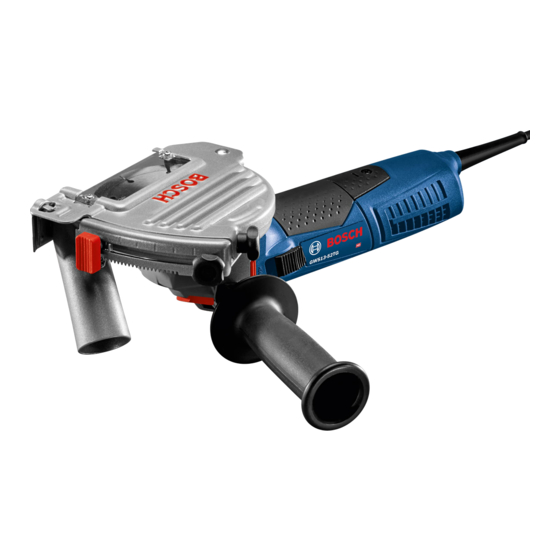
Page 8: Functional Description And Specifications
KNOB DEPTH ADJUST LOCK KNOB DEPTH SCALE ADJUSTABLE DEPTH STOP BUTTON Model number: GWS13-52TG Amps: 13.0 Volts AC: 120 Rated Speed (RPM), /min: 9300 Spindle thread: 5/8”-11 Flanges/Nuts: 1600A002TP Backing Flange 1600A002TR Lock Nut Wheel diameter and type: 5" (125mm) Tuckpointing wheel 5”... - Page 9 Assembly Installing Tuckpointing Guard Fig. 3 The tool comes with the Tuckpointing SLIDE Guard completely assembled. However, if it SWITCH becomes necessary to make adjustments to the guard, follow these instructions. To remove wheel guard: 1. Unplug tool from power source. 2.
- Page 10 Installing and Removing Wheels der of the lock nut (provided together with the guard). 1. Loosen and remove guard cover lock knob (Fig. 4). 5. Tighten lock nut with supplied lock nut wrench while holding spindle lock. 2. Push raised portion of guard cover near locking clip (Fig.
- Page 11 Always use the auxil- does not interfere with the On/Off switch. iary handle for maximum control and ease of operation. The GWS13-52TG can only be used with the tuckpointing guard provided. Tuckpointing This tool is intended to be used as a tuckpoint- Slide On-Off Switch With Lock er.
-
Page 12: Overload Protection
Use the adjustable depth stop to obtain the proper control. Ladders are not considered desired depth of mortar removal. The tuck- solid support structures. pointer is held with the guard window facing 8. Avoid overloading tool. Do not allow the upward so that the user can easily see the wheel to bind or stall. -
Page 13: Maintenance
Tool Lubrication or performing any maintenance. Your Bosch tool has been properly lubricated Ventilation openings and switch levers must and is ready to use. It is recommended that be kept clean and free of foreign matter. Do... - Page 14 Avertissements généraux concernant la sécurité des outils électroportatifs Veuillez lire tous les avertissements et toutes les consignes de sécurité. Si l’on n’observe pas ces avertissements et ces consignes de sécurité, il ex- iste un risque de choc électrique, d’incendie et/ou de blessures corporelles graves. CONSERVEZ TOUS LES AVERTISSEMENTS ET TOUTES LES CONSIGNES DE SÉCURITÉ...
- Page 15 Utilisation et entretien des outils Entretenez les outils électroportatifs. Vérifiez que électroportatifs les pièces mobiles sont alignées correctement et ne coincent pas. Vérifiez qu’il n’y a pas de pièces cas- Ne forcez pas sur l’outil électroportatif. Utilisez sées ou d’autre circonstance qui risquent d’affecter l’outil électroportatif qui convient à...
- Page 16 nelle. Suivant le travail effectué, portez un masque çonnage de maçonnerie abasive. Lisez tous les aver- de protection, des lunettes à coques ou des lunettes tissements relatifs à la sécurité, les instructions, les de sécurité. S’il y a lieu, portez un masque antipous- illustrations et les spécifications fournies avec cet sières, des dispositifs de protection de l’ouïe, des outil électrique.
- Page 17 pression excessive sur celle-ci. Ne tentez pas de d) Utilisez toujours des brides de fixation de meules réaliser une coupe d’une profondeur excessive. La non endommagées qui ont la forme et le diamètre surcharge de la meule augmente sa susceptibilité à la correct pour la meule que vous avez sélectionnée.
- Page 18 Avertissements supplémentaires concernant la sécurité L’emploi d’un GFCI et de dispositifs de protection per- Centre de service usine de Bosch ou par une Station sonnelle tels que gants et chaussures d’électricien en service agréée de Bosch. caoutchouc améliore votre sécurité personnelle.
- Page 19 Symboles IMpORTANT: Certains des symboles suivants peuvent être utilisés sur votre outil. Veuillez les étudier et apprendre leur signification. Une interprétation appropriée de ces symboles vous permettra d’utiliser l’outil de façon plus efficace et plus sûre. Symbol Name Designation/Explanation Volts Tension (potentielle) Ampères Courant...
- Page 20 Symboles (suite) IMPORTANT: Certains des symboles suivants peuvent être utilisés sur votre outil. Veuillez les étudier et apprendre leur signification. Une interprétation appropriée de ces symboles vous permettra d’utiliser l’outil de façon plus efficace et plus sûre. Symbol Name Designation/Explanation Symbole de port de lunettes de Alerte l’utilisateur pour qu’il porte des lunettes sécurité...
-
Page 21: Description Fonctionnelle Et Spécifications
BOUTON DE BLOCAGE DU ÉCHELLE DE RÉGLAGE DE PROFONDEUR PROFONDEUR BUTÉE DE PROFONDEUR RÉGLABLE Numéro de modèle : GWS13-52TG Ampéres : 13.0 Volts AC : 120 Vitesse nominale (RPM), /min : 9300 Filet d’arbre : 5/8”-11 Brides de fixation/Écrous : Bride d’adossement 1600A002TP Écrou de blocage 1600A002TR... - Page 22 Assemblage Installation du protecteur de la meuleuse pour Fig. 3 jointoiements saillants INTERRUpTEUR L’outil est fourni avec le dispositif de protection pour COULISSANT le jointoiement saillant complètement assemblé. Cependant, s’il est nécessaire de procéder à des réglages de ce dispositif de protection, suivez ces instructions.
- Page 23 Montage et démontage des meules écrou de blocage fournie tout en maintenant en place le dispositif de blocage de l’arbre. 1. Desserrez et enlevez le bouton de blocage du cou- vercle du protecteur (Fig. 3) 6. Ramenez le couvercle du protecteur à sa position initiale et encliquetez-le dans le clip pour le maintenir 2.
-
Page 24: Consignes De Fonctionnement
Meuleuse pour jointoiements saillants l’interrupteur de marche-arrêt. Cet outil est prévu pour décaper les jointoiements sail- Le modèle GWS13-52TG ne peut être utilisé qu’avec le lants. On s’en sert pour enlever les joints de mortier protecteur pour jointoiements saillants fourni. - Page 25 la profondeur désirée de mortier à enlever. La meu- ne permettrait pas de le contrôler totalement. Les leuse pour jointoiements saillants est tenue avec la échelles ne sont pas considérées comme des struc- fenêtre du protecteur orientée vers le haut de façon tures de soutien suffisamment solides.
-
Page 26: Entretien
CUNE pIÈCE SUSCEpTIBLE D’ÊTRE ENTRE TENUE fier le remplacement des roulements à un centre de pAR L’UTILISATEUR. L’entretien préventif exécuté service-usine Bosch ou à un centre de service après- par des personnes non autorisés peut entraîner un vente Bosch agréé. Les roulements qui sont devenus positionnement erroné... - Page 27 Advertencias generales de seguridad para herramientas mecánicas Lea todas las advertencias de seguridad y todas las instrucciones. Si no se siguen las advertencias e instrucciones, el resultado podría ser sacudidas eléctri- cas, incendio y/o lesiones graves. GUARDE TODAS LAS ADVERTENCIAS E INSTRUCCIONES pARA REFERENCIA FUTURA La expresión “herramienta mecánica”...
- Page 28 desee realizar. La herramienta mecánica correcta hará herramienta mecánica. Si la herramienta mecánica el trabajo mejor y con más seguridad a la capacidad está dañada, haga que la reparen antes de usarla. nominal para la que fue diseñada. Muchos accidentes son causados por herramientas mecánicas mantenidas deficientemente.
- Page 29 didos al ser generados por diversas operaciones. La accesorio rotativo que resulte pellizcado o engancha- máscara antipolvo o el respirador debe ser capaz de do. El pellizcamiento o el enganche causan una parada filtrar las partículas generadas por la operación que rápida del accesorio que rota, lo cual a su vez hace que usted realice.
-
Page 30: Advertencias De Seguridad Adicionales
Centro de Servicio de Fábrica Bosch cista, mejorarán más su seguridad personal. o una Estación de Servicio Bosch Autorizada. - Page 31 Símbolos IMpORTANTE: Es posible que algunos de los símbolos siguientes se usen en su herramienta. Por favor, es- túdielos y aprenda su significado. La interpretación adecuada de estos símbolos le permitirá utilizar la herramienta mejor y con más seguridad. Símbolo Nombre Designación/explicación Volt...
- Page 32 Símbolos (continuación) IMpORTANTE: Es posible que algunos de los símbolos siguientes se usen en su herramienta. Por favor, es- túdielos y aprenda su significado. La interpretación adecuada de estos símbolos le permitirá utilizar la herra- mienta mejor y con más seguridad. Símbolo Nombre Designación/explicación...
-
Page 33: Descripción Funcional Y Especificaciones
POMO DE FIJACIÓN DEL ESCALA DE AJUSTE DE PROFUNDIDAD PROFUNDIDAD TOPE DE PROFUNDIDAD AJUSTABLE Número de modelo: GWS13-52TG Ampere: 13.0 Voltios CA: 120 Velocidad nominal (RPM), /min: 9300 Rosca del husillo: 5/8”-11 Pestañas/Tuercas: Pestaña de soporte 1600A002TP Tuerca de fijación 1600A002TR Tipo de rueda y diámetro: Rueda para rejuntar de 5 pulgadas (125 mm) - Page 34 Ensamblaje Instalación del protector Fig. 3 para rejuntar INTERRUpTOR La herramienta viene con el protector para rejuntar DESLIZANTE completamente ensamblado. Sin embargo, si llega- ra a ser necesario hacer ajustes al protector, sigue estas instrucciones. para retirar el protector de la rueda: 1.
- Page 35 Instalación y remoción de las ruedas 5. Apriete la tuerca de fijación con la llave de tuercas de fijación suministrada, mientras sujeta el cierre del 1. Afloje y quite el pomo de fijación de la cubierta del husillo. protector (Fig. 4). 6.
-
Page 36: Instrucciones De Funcionamiento
La GWS13-52TG solo se puede utilizar con el protector para rejuntar suministrado. Rejuntado Esta herramienta está diseñada para utilizarse como Interruptor corredizo “on/off”... - Page 37 máquina de corte abrasivo pequeña, la herramienta que estén cerca. sólo está aprobada para cortar o estriar productos de 7. No se recomienda utilizar esta herramienta por en- mampostería como: cima de la cabeza ni en cualquier posición que no permitiría un control apropiado.
-
Page 38: Mantenimiento
Recomenda- del motor. mos que todo el servicio de las herramientas sea real- izado en un Centro de servicio de fábrica Bosch o en Limpieza una Estación de servicio Bosch autorizada. para evitar acciden- Lubricación de las herramientas... - Page 39 Notes: Remarques : Notas:...
- Page 40 Robert Bosch Tool Corporation (“el vendedor”) garantiza, únicamente al comprador original, que todas las herramientas mecánicas portátiles y para tablero de banco BOSCH estarán libres de defectos de material o de fabricación durante un período de un año a partir de la fecha de compra. la uniCa OBligaCiOn del vendedOR y el ReCuRSO exCluSivO Que uSTed Tiene bajo esta garantía limitada y, hasta donde la ley lo permita, bajo cualquier garantía o condición...