Table of Contents
Advertisement
Quick Links
Advertisement
Table of Contents

Related Manuals for Epson T-B Series


Summary of Contents for Epson T-B Series
- Page 1 SCARA ROBOT T-B series MANUAL Rev.1 EM217R4788F...
- Page 3 SCARA ROBOT T-B series Manual Rev.1 Copyright 2021 SEIKO EPSON CORPORATION. All rights reserved. T-B series Rev.1...
- Page 4 Contact information is described in “SUPPLIERS” in the first pages of the following manual: Robot System Safety Manual Read this manual first DISPOSAL When disposing this product, dispose in accordance with the laws and regulations of each country. T-B series Rev.1...
- Page 5 For other countries, please contact your local government to investigate the possibility of recycling your product. The battery removal/replacement procedure is described in the following manuals: Maintenance Manual For California customers only The lithium batteries in this product contain Perchlorate Material - special handling may apply, See www.dtsc.ca.gov/hazardouswaste/perchlorate T-B series Rev.1...
- Page 6 T3-B series T6-B series NOTE T-B series Manipulators can use the Teach Pendant (TP2, TP3). Do not connect the other devices to TP port except TP2 and TP3. Connecting other devices may result in malfunction of the device since the pin assignments are different.
- Page 7 Structure of Robot System The T-B series Manipulators can be used with the following combinations of software. Controller Firmware 401S, T6-B602S 7.5.51.1 Ver. or later Ver.7.5.1 or earlier EPSON RC+ 7.0 Ver.7.5.1A or later OK: Compatible All functions of the EPSON RC+ 7.0 and the robot system are available.
- Page 8 - The method of firmware update and controller setting backup etc. EPSON RC+ 7.0 User’s Guide (PDF) This manual describes general information about program development software. EPSON RC+ 7.0 SPEL+ Language Reference (PDF) This manual describes the robot programming language “SPEL+”. Other Manual (PDF) Manuals for each option are available.
-
Page 9: Table Of Contents
3.3 Power On Procedure ................8 3.4 Saving the Factory Default ..............8 4. First Step 4.1 Installing EPSON RC+ 7.0 Software ........... 9 4.2 Development PC and Manipulator Connection ......... 11 4.2.1 About Development PC Connection Port ......12 4.2.2 Precautions ................ - Page 10 3.6.3 Breaker ................... 55 3.6.4 Power Unit ................56 3.7 Connecting the Cables ............... 57 3.8 Pneumatic Tubes ................60 3.9 Relocation and Storage..............62 3.9.1 Precautions for Relocation and Storage ........ 62 3.9.2 Relocation................63 viii T-B series Rev.1...
- Page 11 6.2 Switch Operation Mode ..............85 6.3 Program Mode (AUTO) ..............86 6.3.1 What is Program Mode (AUTO)? .......... 86 6.3.2 Setup from EPSON RC+ 7.0 ..........86 6.4 Auto Mode (AUTO) ................87 6.4.1 What is Auto mode (AUTO)? ..........87 6.4.2 Setup from EPSON RC+ 7.0 ..........
- Page 12 8.2.2 Adoptable USB Memory ............93 8.3 Controller Status Storage Function ............ 94 8.3.1 Controller Status Storage ............94 8.3.2 Load Data with EPSON RC+ 7.0 ........... 95 8.3.3 Transfer with E-mail ............... 96 8.4 Details of Data ..................97 9.
- Page 13 17.3.3 PG Commands ..............138 17.3.4 R-I/O Commands ............... 138 17.3.5 Force Sensing Commands ..........138 17.3.6 Robot Control Commands ..........138 17.3.7 Other (FineDist) ..............138 17.3.8 Other (HealthCalcPeriod) ..........139 17.3.9 Other (ChDisk) ..............139 T-B series Rev.1...
- Page 14 T3-B Time and Distance of Free Running When Safeguard Is Opened ......................164 T3-B401S: J1 ................... 164 T3-B401S: J2 ................... 164 T3-B401S: J3 ................... 164 T6-B Time and Distance of Free Running When Safeguard Is Opened ......................165 T6-B602S: J1 ................... 165 T6-B602S: J2 ................... 165 T-B series Rev.1...
- Page 15 TABLE OF CONTENTS T6-B602S: J3 .................. 165 Appendix D: Open Source Software License T-B series Rev.1 xiii...
- Page 16 TABLE OF CONTENTS T-B series Rev.1...
-
Page 17: Installation
Installation This volume describes the flow from unpacking to operation, and designing the robot system. -
Page 19: Safety
WARNING This symbol indicates that a danger of possible harm to people or physical damage to equipment and facilities exists if the associated instructions are not followed properly. CAUTION T-B series Rev.1... -
Page 20: Installation
Option Fieldbus Slave (Illustration: T3-B401S) *1 EPSON RC+ 7.0 supports the following OS Windows 8.1 Pro (EPSON RC+7.0 Ver.7.1.0 or later) Windows 10 Pro (EPSON RC+7.0 Ver.7.2.0 or later) *2 Either teaching pendant is available. *3 If connecting to T3-B/T6-B Manipulator, dedicated convert cable is necessary. -
Page 21: Unpacking
* When holding the bottom of the base by hand, be very careful not to get your hands or fingers caught. The number of people to transport: At least two Prohibited part to hold: Power unit Power unit Arm #1 (Illustration: T3-B401S) T-B series Rev.1... -
Page 22: Environments And Installation
2.5 Connection to EMERGENCY Connector Connect a safeguard switch or Emergency Stop switch to the EMERGENCY connector for safety. When nothing is connected to the EMERGENCY connector, Controller does not operate normally. For details, refer to “T3-B T6-B Manipulator 11. EMERGENCY”. T-B series Rev.1... -
Page 23: Power-On
Manipulator may fall down. When supplying the power again: When supplying the power to the Manipulator again, turn OFF the Controller and wait for 5 seconds or more. Then, turn ON the Manipulator again. T-B series Rev.1... -
Page 24: Power On Procedure
The manipulator you purchased is set up in the manipulator as the factory default. It is recommended to save the factory default state of the Controller in case of emergency. For saving, prepare a USB memory. For saving the Controller state, refer to “T3-B T6-B Manipulator 8. Memory Port”. T-B series Rev.1... -
Page 25: First Step
Installation 4. First Step 4. First Step This section indicates the procedure to install the development PC EPSON RC+, and execute simple program after connecting the development PC and Manipulator with a USB. Make sure that the Robot system is installed safely by following the description in “1. Safety”... - Page 26 Installation 4. First Step (4) Select the drive where you want to install EPSON RC+ 7.0 and click <Next>. The installation directory is called EpsonRC70. This cannot be changed. (5) The dialog for selecting the options to be installed will be displayed.
-
Page 27: Development Pc And Manipulator Connection
Installation 4. First Step Adobe Reader needs to be installed on your PC in order to view the EPSON RC+ NOTE 7.0 manuals. If the installer cannot find Adobe Reader on your system, it will be installed at this time. Follow the instructions in the Adobe installer. Do not restart the system after the Adobe Reader installation has completed. -
Page 28: About Development Pc Connection Port
4.2.3 Software Setup and Connection Check The following is the steps of connecting the development PC and the Manipulator. (1) Make sure that the EPSON RC+ 7.0 is installed on the Manipulator connected to the development PC. (Install the software when it is not installed.)) (2) Connect the development PC and the Manipulator by the USB cable. -
Page 29: Backup The Initial Condition Of The Manipulator
4.2.5 Disconnection of Development PC and Manipulator Disconnection of the development PC and the Manipulator is indicated. (1) Select the EPSON RC+ 7.0 menu-[Setup]-[PC to Controller Communications] to display the [PC to Controller Communications] dialog. (2) Click the <Disconnect> button. -
Page 30: Moving The Manipulator To Initial Position
The arm falling may cause equipment damage to and/or malfunction of the Manipulator. (1) Start EPSON RC+ 7.0. Double click the <EPSON RC+ 7.0> icon on the desktop. (2) Open the command window. EPSON RC+ 7.0 menu-[Tool]-[Command Window] (3) Execute the following command in [Command Window]. - Page 31 Following explains the example of moving all joints to the 0 pulse positions by specifying the pulse for each joint. (1) Start the EPSON RC+ 7.0. Double click the <EPSON RC+ 7.0> icon on the desktop. (2) Open the command window. EPSON RC+ 7.0 menu-[Tools]-[Command Window] (3) Execute the following command in [Command Window].
- Page 32 (5) Move the Manipulator with Jog motion. 1. Select [Jog & Teach] tab. 2. Select “Joint” in [Jogging]-<Mode>. Move the Manipulator by joint by clicking J1-J4 jog keys. Manipulator can be moved by setting to other modes or setting the jog distance. T-B series Rev.1...
-
Page 33: Writing Your First Program
4.3 Writing Your First Program After installing the Manipulator and EPSON RC+ 7.0 software on your PC, follow the instructions below to create a simple application program so that you will become more familiar with the EPSON RC+ 7.0 development environment. - Page 34 Installation 4. First Step 3. Edit the program Type the following program lines in the Main.prg edit window. Function main Print "This is my first program" Fend T-B series Rev.1...
- Page 35 (3) Click the <Start> button on the Run window to run the program. (4) The tasks like the following will be displayed in the status window. 19:32:45 Task main started 19:32:45 All tasks stopped On the Run window, you will see the output of the print statement. T-B series Rev.1...
- Page 36 [Robot Manager] window. (2) Click the [Control Panel] tab. Then, click the <Motor On> button to turn on the Manipulator motors. You will be prompted to confirm the operation. (3) Click the <Yes> button to continue. T-B series Rev.1...
- Page 37 (12)Select “P2” in the [Point (P)] dropdown list which is next to the <Teach> button. The current point is set to P2. (13)Click the <Teach> button. You will see a confirmation message to teach the point. (14)Click the <Yes> button. (15)Click the <Save Project> toolbar button to save the changes. T-B series Rev.1...
- Page 38 Even though this is only a sample project, we will backup the project and Manipulator configuration. Backup can be done easily with EPSON RC+ 7.0. It is important that you keep regular backups of your applications on an external media such as a USB memory key.
-
Page 39: Second Step
This section shows the manuals which contains information of necessary settings and setting procedure. 5.1 Connection with External Equipment 5.1.1 Remote Control EPSON RC+ 7.0 User’s Guide “Remote Control” “T3-B T6-B Manipulator 14. I/O Remote Set Up” EPSON RC+ 7.0 User’s Guide “I/O Setup” “T3-B T6-B Manipulator 12. Standard I/O Connector”... - Page 40 Installation 5. Second Step T-B series Rev.1...
-
Page 41: T3-B T6-B Manipulator
T3-B T6-B Manipulator This volume contains information for setup and operation of the Manipulators. Please read this volume thoroughly before setting up and operating the Manipulators. -
Page 43: Safety
WARNING not followed properly. This symbol indicates that a danger of possible harm to people or physical damage to equipment and facilities exists if the CAUTION associated instructions are not followed properly. T-B series Rev.1... -
Page 44: Design And Installation Safety
Working without protective gear may cause serious safety problems. Work clothes suitable for work Helmet Safety shoes Further precautions for installation are described in “3. Environment and Installation”. Please read this chapter carefully to understand safe installation procedures before installing the robots and robotic equipment. T-B series Rev.1... -
Page 45: Strength Of The Ball Screw Spline
■ Immediately press the Emergency Stop switch whenever the Manipulator moves abnormally while the robot system is operated. Continuing the operation while the Manipulator moves abnormally is extremely hazardous and may result in serious bodily injury and/or severe equipment damage to the robot system. T-B series Rev.1... - Page 46 ■ Manipulator may be heated due to motor heat etc. Do not touch the Manipulator until temperature falls. After confirming that the temperature of the Manipulator falls and is not hot when you touch it. Then perform teaching or maintenance. T-B series Rev.1...
-
Page 47: Emergency Stop
Whether or not the reduction gear is damaged Whether or not the joints are in their proper positions If there is a position gap, perform calibration by referring to “T-B series Maintenance Manual 17. Calibration”. Also, the same troubles may occur if an error occurs and the Manipulator stops in emergency during the operation. - Page 48 In addition, time and distance of the free running vary by following factors: Hand weight WEIGHT Setting ACCEL Setting Workpiece weight SPEED Setting Posture etc. For time and distance of the Manipulator free running, refer to “Appendix B: Time and Distance of Free Running in Emergency”. T-B series Rev.1...
-
Page 49: Safeguard
Hand weight WEIGHT Setting ACCEL Setting Workpiece weight SPEED Setting Posture etc. For time and distance of the Manipulator free running, refer to “Appendix C: Time and Distance of Free Running When the Safeguard is Opened”. T-B series Rev.1... -
Page 50: Emergency Movement Without Drive Power
Check the cable connections and remove the error causes. Then, apply the power again and release the brake. Errors: 1552, 2118, 4003, 4004, 4009, 4100, 4101, 4103, 4187, 4188, 4189, 4191, 4192, 4233, 4240, 4285-4292, 9633, 9640, 9691, 9685-9692 T-B series Rev.1... -
Page 51: Accels Setting For Cp Motions
Z-axis height 0 (Origin position) If the Manipulator is operated in CP motion with the wrong set values, make sure to check the following points. - Whether or not the ball screw spline shaft is deformed or bent T-B series Rev.1... -
Page 52: Labels
NOTE The product name, model name, serial number, information which laws and regulations are supported, product specifications, manufacturer, importer, date of manufacture, country of manufacture, etc. are listed. For details, see the label affixed to the product. T-B series Rev.1... - Page 53 T3-B T6-B Manipulator 1. Safety Location of Labels T3-B D-(1) D-(2) C-(1) C-(2) Location of Labels T6-B C-(1) C-(2) T-B series Rev.1...
-
Page 54: Response For Emergency Or Malfunction
When the operator is caught between the Manipulator and a mechanical part such as a base table, press the emergency stop switch to release the brake on the subject arm, and then move the arm by hand. How to release a brake For details, refer to “1.6 Emergency Movement Without Drive Power”. T-B series Rev.1... -
Page 55: Specifications
Joint #3 stroke : 150 mm : 200 mm Arm length 40 : 400 mm 60 : 600 mm Payload : 3 kg : 6 kg For details on the specifications, refer to “Appendix A: T3-B T6-B Specifications”. T-B series Rev.1... -
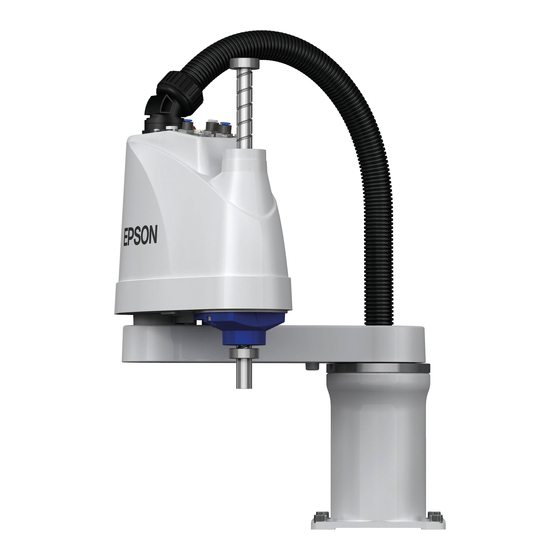
Page 56: Part Names
- While the LED lamp is on, the current is being applied to the manipulator. Performing any work with the power ON is extremely hazardous and it may result in electric shock and/or improper function of the robot system. Make sure to turn OFF the Manipulator power before the maintenance work. T-B series Rev.1... -
Page 57: T6-B
- While the LED lamp is ON, current is applied to the manipulator. Performing any work with the power ON is extremely hazardous and it may result in electric shock and/or improper function of the robot system. Make sure to turn OFF the Manipulator power before maintenance work. T-B series Rev.1... -
Page 58: Outer Dimensions
T3-B T6-B Manipulator 2. Specifications 2.3 Outer Dimensions 2.3.1 T3-B T-B series Rev.1... -
Page 59: T6-B
T3-B T6-B Manipulator 2. Specifications 2.3.2 T6-B T-B series Rev.1... -
Page 60: System Example
Option Fieldbus Slave (Illustration: T3-B401S) *1 EPSON RC+ 7.0 supports the following OS Windows 8.1 Pro (EPSON RC+7.0 Ver.7.1.0 or later) Windows 10 Pro (EPSON RC+7.0 Ver.7.2.0 or later) *2 Either teaching pendant is available. *3 When connecting to T3-B/T6-B, specified convert cable is necessary. -
Page 61: Specifications
(MT***) and contact the supplier of your region when necessary. The Manipulator model can be set from software. Refer to the chapter Robot Configuration in the EPSON RC+ User’s Guide. T-B series Rev.1... -
Page 62: Environments And Installation
10 minutes. NOTE Manipulators are not suitable for operation in harsh environments such as painting areas, etc. When using Manipulators in inadequate environments that do not meet the above conditions, please contact the supplier of your region. T-B series Rev.1... - Page 63 ■ Use an earth leakage breaker on the AC power cable of the Manipulator to avoid electric shock and circuit breakdown caused by short circuit. WARNING ■ When cleaning the Manipulator, do not rub it strongly with alcohol or benzene. It may lose luster on the coated face. CAUTION T-B series Rev.1...
-
Page 64: Base Table
If you are passing cables through the holes on the base table, see the figures below. EMERGENCY Connector I/O (Input) Connector (Unit: mm) I/O(Output) Connector AC Power Connector ■ To ensure safety, a safeguard must be installed for the robot system. For details on the safeguard, refer to the 1.5 Safeguard. WARNING T-B series Rev.1... -
Page 65: Mounting Dimensions
Ensure distance to the safeguard from the maximum motion range is more than 100 mm. T3-B Center of Joint #3 Maximum space Motion range Area limited by mechanical stop Base mounting face T-B series Rev.1... - Page 66 T3-B T6-B Manipulator 3. Environments and Installation T6-B Center of Joint #3 Motion range Maximum space Area limited by mechanical stop Base mounting face T-B series Rev.1...
-
Page 67: Unpacking And Transportation
■ Make sure not to hold the power unit when carrying the manipulator. ■ When transporting the Manipulator for a long distance, secure it to the delivery equipment directly so that the Manipulator never falls. If necessary, pack the Manipulator in the same style as it was delivered. T-B series Rev.1... -
Page 68: Installation Procedure
Use bolts with specifications conforming to ISO898-1 Property Class: 10.9 or 12.9. Tightening torque: 32.0±1.6 N·m NOTE Make sure to remove wire tie for mechanical stop protector. 4-M8×30 Spring Washer Plane Washer Screw Hole (depth 20 mm or more) 10 mm (Illustration: T3-B401S) T-B series Rev.1... -
Page 69: Power Supply
T6-B: 6.0A Peak Current T3-B: Max. 30A (2 ms or less) T6-B: Max. 60A (2 ms or less) (When AC power is turned ON) Leakage Current Max. 10 mA Ground Resistance TN ground (100 Ω or less) T-B series Rev.1... -
Page 70: Ac Power Cable
When you attach to a plug, refer to the picture on the right. Directly connect the ground line to the Manipulator using bolt hole in the figure below. It is recommended that the core size of the grounding wire be 5.5 mm or more. Bolt hole (for grounding) T-B series Rev.1... -
Page 71: Breaker
If you install a circuit breaker, please select one that can handle the “peak current” described in the following section. Reference: 3.6.1 Specifications The power receptacle shall be installed near the equipment and shall be easily accessible. T-B series Rev.1... -
Page 72: Power Unit
■ Do not apply a load by applying weight to power unit. Doing so may result in deformation or damage of parts. ■ NEVER connect deformed or damaged power unit to the Robot system or WARNING related equipment. It may result in the fire or electric shock. T3-B T6-B Power unit Power unit T-B series Rev.1... -
Page 73: Connecting The Cables
PC for development (6) LAN (Ethernet) Manipulator (7) I/O (Input) connector Output device (8) I/O (Output) connector Input device (9) AC power connector 100-240VAC Option Fieldbus I/O Accessible connector Included cable when shipping Not supplied cable (Prepare by yourself) T-B series Rev.1... - Page 74 (5) PC for develop ment Connect the PC for development. For details, refer to “ 7 . Development PC Connection Port”. (6) LAN (EtherNet Communication) Connect the EtherNet cable. For details, refer to “9. LAN (Ethernet Communication) Port ” . T-B series Rev.1...
- Page 75 - As they are easily influenced by noise, keep cable such as USB, Ethernet, or fieldbus away from peripheral noise sources. T-B series Rev.1...
-
Page 76: Pneumatic Tubes
Fittings for ø6 mm and ø4 mm (outer diameter) pneumatic tubes are supplied on both ends of the pneumatic tubes. T3-B Detail view from B Fitting (blue) for ø4 mm pneumatic tube Fitting (blue) for ø6 mm pneumatic tube Fitting (white) for ø6 mm pneumatic tube T-B series Rev.1... - Page 77 T3-B T6-B Manipulator 3. Environments and Installation T6-B T-B series Rev.1...
-
Page 78: Relocation And Storage
Transport and store the Manipulator in the range of -20 to +60 °C. Humidity 10 to 90% (no condensation) is recommended. When condensation occurs on the Manipulator during transport or storage, turn ON the power only after the condensation dries. Do not shock or shake the Manipulator during transport. T-B series Rev.1... -
Page 79: Relocation
#2. For details on the motion range, refer to “5.2 Motion Range Setting by Mechanical Stops”. Cover the Arm #2 and Power Supply Unit with a sheet so that the arm will not be damaged. Example of Arm Retaining Posture Arm #2 Power Supply Unit Arm #1 (Illustration: T3-B401S) T-B series Rev.1... - Page 80 T3-B T6-B Manipulator 3. Environments and Installation Hold the bottom of Arm #1 by hand to unscrew the anchor bolts. Then, remove the Manipulator from the base table. T3-B401S Center of gravity Center of gravity T6-B602S Center of gravity Center of gravity T-B series Rev.1...
-
Page 81: Setting Of End Effectors
The shaft may be lowered by the weight - Be careful of the shaft while the brake release of the end effector. switch is being pressed because the shaft may be lowered by the weight of the end effector. T-B series Rev.1... - Page 82 Manipulator because of the outer diameter of the end effector, the size of the work piece, or the position of the arms. When designing your system layout, pay attention to the interference area of the end effector. T-B series Rev.1...
-
Page 83: Attaching Cameras And Valves
T3-B T6-B Manipulator 4. Setting of End Effectors 4.2 Attaching Cameras and Valves The bottom of the Arm #2 has threaded holes as shown in the figure below. Use these holes for attaching cameras, valves, and other equipment. T3-B T6-B T-B series Rev.1... -
Page 84: Weight And Inertia Settings
4.3.1 Weight Setting ■ The total weight of the end effector and the work piece must not exceed T3-B: 3kg / T6-B: 6kg. The T-B series Manipulators are not designed to work with loads exceeding T3-B: 3kg / T6-B: 6kg. - Page 85 Joint #2) with a load weight of “1 kg”. Shaft =175 Weight of =225 camera =1×225 /175 M=1kg =1.653 1.7 (round up) Joint #2 =1+1.7=2.7 Enter “2.7” for the Weight Parameter. =175 mm W=1kg =225 mm T-B series Rev.1...
- Page 86 * The percentage in the graph is based on the speed at rated weight (1 kg) as 100%. T6-B 6 (kg) End effector weight parameter * The percentage in the graph is based on the speed at rated weight (2 kg) as 100%. T-B series Rev.1...
- Page 87 * The percentage in the graph is based on the speed at rated weight (1 kg) as 100%. T6-B 6 (kg) End effector weight parameter * The percentage in the graph is based on the speed at rated weight (2 kg) as 100%. T-B series Rev.1...
-
Page 88: Inertia Setting
Manipulator. Also, the life cycle of parts is shortened and positional gap due to belt tooth bumping occurs. The acceptable moment of inertia of load for a T-B series Manipulator: T3-B: default rating 0.003 kg·m , the maximum 0.01 kg·m T6-B: default rating 0.01 kg·m... - Page 89 ■ The eccentric quantity of load (weight of the end effector and work piece) must be T3-B: 100mm / T6-B: 150mm or less. The T-B series Manipulators are not designed to work with eccentric quantity exceeding T3-B: 100mm / T6-B: 150mm.
- Page 90 Joint #3 shaft End effector (a) Work piece (c) Work piece (b) Whole moment Moment of inertia Moment of inertia Moment of inertia of inertia of end effector (a) of work piece (b) of work piece (c) T-B series Rev.1...
- Page 91 + m × L (b) Moment of inertia of a cylinder Cylinder’s center of gravity Rotation center + m × L (c) Moment of inertia of a sphere Sphere’s center of gravity Rotation center + m × L T-B series Rev.1...
-
Page 92: Precautions For Auto Acceleration/Deceleration Of Joint #3
* Figures on the graph (%) are the proportion to the acceleration/deceleration speed at the shaft upper limit position. NOTE When moving the Manipulator horizontally while the shaft is being lowered, it may cause over-shoot at the time of final positioning. T-B series Rev.1... -
Page 93: Motion Range
Manipulator does not move. The pulse range can be set on the [Range] panel shown by selecting [Tools]-[Robot EPSON Manager]. (You may also execute the Range command from the [Command Window].) T-B series Rev.1... -
Page 94: Max. Pulse Range Of Joint #1
(+) and the clockwise pulse value is defined as the negative (-). 0 pulse − A − B A: Max. Motion Range B: Max. Pulse Range T3-B ± 141° ± 320854 pulse T6-B ± 150° ± 341334 pulse T-B series Rev.1... -
Page 95: Max. Pulse Range Of Joint #3
Arm #2. With the 0 pulse as a starting point, the counterclockwise pulse value is defined as the positive (+) and the clockwise pulse value is defined as the negative (-). Counterclockwise (+value) T3-B: 0 ± 71760 pulse T6-B: 0 ± 245760 pulse Clockwise (-value) T-B series Rev.1... -
Page 96: Motion Range Setting By Mechanical Stops
Install the bolts for the mechanical stop to the following position. Joint #1 Mechanical Stops (Views from the bottom of Arm #1) 110° −110° Setting Angle T3-B 455112 pulse −45512 pulse Pulse Value 115° −115° Setting Angle T6-B 466489 pulse −56889 pulse Pulse Value T-B series Rev.1... - Page 97 (2) Install a hexagon socket head cap bolt into the hole corresponding to the setting angle, and tighten it. T3-B Joint #2 only Remove the user plate on the arm cover. For details, refer to T-B series Maintenance Manual “7. Cover”. Hexagon socket The number Recommended...
-
Page 98: Setting The Mechanical Stop Of Joint #3
When you press the brake release switch, the shaft may lower due to the weight of the end effector. Be sure to hold the shaft by hand while pressing the button. (3) Turn OFF the Manipulator. (4) Loosen the lower limit mechanical stop screw (T3-B: M3×10, T6-B: M4×15). T-B series Rev.1... - Page 99 NOTE If it is difficult to check whether Joint #3 hits a mechanical stop, turn OFF the Manipulator and lift the arm top cover to check the condition causing the problem from the side. T-B series Rev.1...
-
Page 100: Setting The Cartesian (Rectangular) Range In The Xy Coordinate System Of The Manipulator (For Joints #1 And #2)
60 mm, add the “Area limited by mechanical stop” and “radius of the end effector”. The total value is specified as the maximum area. For the motion area figures, refer to “3.3 Mounting Dimensions”. T-B series Rev.1... -
Page 101: Operation Mode & Led
AUTO mode. TEST mode Turn the mode selector key switch to “Teach” for “TEACH” mode. Push <F1> key-[Test Mode] in [Jog & Teach] dialog of TEACH mode. The mode will be changed to TEST T-B series Rev.1... -
Page 102: Program Mode (Auto)
Follow the procedures below to switch to the Program mode. 6.3.2 Setup from EPSON RC+ 7.0 Switch the mode to Program mode from the EPSON RC+ 7.0. (1) Select EPSON RC+ 7.0 menu-[Setup]-[System Configuration] to display the [System Configuration] dialog. -
Page 103: Auto Mode (Auto)
Auto mode (AUTO) is for automatic operation of the Robot system. Procedures for switching to the Auto mode (AUTO) are the following. A : Set the start mode of the EPSON RC+ 7.0 to “Auto” and start the EPSON RC+ 7.0. -
Page 104: Setup From Control Device
T3-B T6-B Manipulator 6. Operation Mode & LED 6.4.3 Setup from Control Device Set the control device from EPSON RC+ 7.0. (1) Select EPSON RC+ 7.0 menu-[Setup]-[System Configuration] to display the [System Configuration] dialog. (2) Select [Controller]-[Configuration]. (3) Select [Control Device] to select the control device from the following two types. -
Page 105: Led
ERROR turns ON Warning ERROR blinks. E-STOP turns ON. Emergency Stop TEACH mode TEACH blinks. Auto mode (AUTO mode) AUTO blinks. Program mode (AUTO mode) PROGRAM blinks. AC power supply drop TEACH, AUTO turn ON. TEST mode TEST blinks. T-B series Rev.1... -
Page 106: Development Pc Connection Port
7.0 User’s Guide 5.12.1 PC to Controller Communications Command. - Be sure to install the EPSON RC+ 7.0 to the development PC first, then connect the development PC and Manipulator with the USB cable. If Manipulator and the development PC are connected without installing the EPSON RC+ 7.0 to the development PC, [Add New Hardware Wizard] appears. -
Page 107: Precaution
7.3 Software Setup and Connection Check Connection of the development PC and the Manipulator is indicated. (1) Make sure that software EPSON RC+ 7.0 is installed to the Manipulator connected to the development PC. (Install the software when it is not installed. Refer to “EPSON RC+ 7.0 User’s Guide”. -
Page 108: Disconnection Of Development Pc And Manipulator
EPSON RC+ 7.0. 7.4 Disconnection of Development PC and Manipulator Disconnection of the development PC and the Manipulator communication. (1) Select the EPSON RC+ 7.0 menu-[Setup]-[PC to Controller Communications] to display the [PC to Controller Communications] dialog. (2) Click the <Disconnect> button. -
Page 109: Memory Port
8.1 What is Controller Status Storage Function? This function saves various kinds of Manipulator data to the USB memory. Data saved in USB memory is loaded to EPSON RC+ 7.0 to get the status of the Manipulator and the program simply and accurately. -
Page 110: Controller Status Storage Function
Also, this function influences the Manipulator cycle time and the communication CAUTION with EPSON RC+ 7.0. Other than only when it is necessary, do not execute this function when operating the Manipulator. Use this procedure to save the status of the Manipulator to USB memory. -
Page 111: Load Data With Epson Rc+ 7.0
T3-B T6-B Manipulator 8. Memory Port 8.3.2 Load Data with EPSON RC+ 7.0 The following shows the procedure to load the data stored in the USB memory by EPSON RC+ 7.0 and display the Controller status. (1) Insert the USB memory into the PC with EPSON RC+ 7.0. -
Page 112: Transfer With E-Mail
(3) Send all the folders by e-mail. NOTE Delete files that do not relate to the project before transfer. This function is used to send the data to the system director and EPSON from the end users for problem analysis. T-B series Rev.1... -
Page 113: Details Of Data
VXDWORK.bin All files related to Project When [Include project files when status exported] check box project except is checked in EPSON RC+ 7.0 menu-[Setup]- ProjectName.obj *1 [System Configuration]-[Controller]- [Preference], the project file is stored. Includes program files. *1 Storage of “All files related to project except ProjectName.obj” can be specified by a setting. -
Page 114: Lan (Ethernet Communication) Port
From the following firmware version password authentication is required when connecting Controllers and PCs to a global accessible network. F/W : Ver.7.4.58.x For details of setting password, refer to “EPSON RC+ 7.0 User's Guide 1.9.1 Setting NOTE Password for PC Ethernet Controller Connection”. -
Page 115: Changing Manipulator Ip Address
(1) For connection between the development PC and the Manipulator. Reference: 7. Development PC Connection Port (2) Select the EPSON RC+ 7.0 menu-[Setup]-[Controller] to display the following dialog. (3) Select [Controller]-[Configuration]. (4) Enter the proper IP address and subnet mask and click the <Apply> button. -
Page 116: Connection Of Development Pc And Manipulator With Ethernet
(1) Connect the development PC and the Manipulator using the Ethernet cable. (2) Turn on the Manipulator. (3) Start EPSON RC+ 7.0. (4) Display the [PC to Controller Communication] dialog from [Setup] in EPSON RC+ 7.0 menu. (5) Click the <Add> button. -
Page 117: Disconnection Of Development Pc And Manipulator With Ethernet
<Close> button to close the [PC to Controller Communications] dialog. Connection between the development PC and the Manipulator is complete. Now the robot system can be used via an Ethernet connection from EPSON RC+ 7.0. 9.5 Disconnection of Development PC and Manipulator with Ethernet Disconnection of the development PC and the Manipulator is shown below. -
Page 118: Tp Port
The TP port connects the Teach Pendant to the manipulator. You can connect the Teach Pendant (TP2, TP3). Dedicated convert cable* is necessary if connecting TP2 to T-B series manipulator. Contact the supplier of your region if only convert cable is necessary. -
Page 119: Emergency
T3-B T6-B Manipulator 11. EMERGENCY 11. EMERGENCY The details of safety requirements for this section are described in EPSON RC+ 7.0 User’s NOTE Guide 2. Safety. Please refer to them to keep the robot system safe. Make sure that emergency stop or safeguard operate properly before operating, not only booting but also usage changed such as options added or parts replaced as maintenance. -
Page 120: Safeguard Switch
When the latched TEACH mode is released while the safeguard is open, the status of NOTE Manipulator power is operation-prohibited because the safeguard is open at that time. To execute a Manipulator operation, close the safeguard again, and then close the latch release input. T-B series Rev.1... -
Page 121: Checking Latch Release Switch Operation
Therefore, make sure that the Emergency Stop switch has double contacts and that each circuit connects to the specified pins on the EMERGENCY connector at the Manipulator. Refer to “11.4 Circuit Diagrams”. Give the emergency stop function to all the equipment which have executable token. T-B series Rev.1... -
Page 122: Checking Emergency Stop Switch Operation
To recover from the emergency stop condition, follow the procedure of safety check as required by the system. After safety check, the operations below are required to recover from the emergency stop condition. - Release the Emergency Stop Switch - Execute the RESET command T-B series Rev.1... -
Page 123: Pin Assignments
■ The 24 V output is for emergency stop. Do not use it for other purposes. Doing so may result in system malfunction. ■ Do not apply reverse voltage to the Emergency Stop circuit. Doing so may result CAUTION in system malfunction. T-B series Rev.1... -
Page 124: Circuit Diagrams
Motor Driver ESTOP1− AC Input ESTOP2− Emergency Stop detection External +24V Safety Door input 1 Safety Door input 2 Latch release input External +24V Latch release input Close :Latch off NOTE:+24V GND Open :Latch on + 5V GND T-B series Rev.1... -
Page 125: Example 2: External Safety Relay Typical Application
AC Input Emergency Stop detection External +24V GND External +24V Safety Door input 1 Safety Door input 2 Latch Release input External NOTE:+24V GND Latch release input Close :Latch off +24V + 5V GND Open :Latch on T-B series Rev.1... -
Page 126: Standard I/O Connector
: +10.8 V (min.) OFF Voltage : +5 V (max.) Input Current : 10 mA (TYP) at +24 V input Two types of wiring are available for use with the two-way photo coupler in the input circuit. T-B series Rev.1... -
Page 127: Typical Input Circuit Application 1: Source Type
17 Input No.5 4 Input No.6 18 Input No.7 19 Input No.8 to 15 common 6 Input No.8 20 Input No.9 Omit 23 Input No.15 14 Input No.16 to 17 common 10 Input No.16 24 Input No.17 T-B series Rev.1... -
Page 128: Typical Input Circuit Application 2: Sink Type
17 Input No.5 4 Input No.6 18 Input No.7 19 Input No.8 to 15 common 6 Input No.8 20 Input No.9 Omit 23 Input No.15 14 Input No.16 to 17 common 10 Input No.16 24 Input No.17 T-B series Rev.1... -
Page 129: Pin Assignments Of Input Circuit
“14. I/O Remote Settings”. Connector Connector model DMC 0,5/14-G1-2,54 P20THR R72 (Board side) I/O (Input) Connector DFMC 0,5/14-ST-2,54 (Cable side) (PHOENIX CONTACT) * I/O connector is included with shipment. I/O (Input) Connector pin assignment T-B series Rev.1... -
Page 130: Output Circuit
Plus common (PNP) connection I/O connector Output No.0 CAUTION Load Ground fault Omit Output common (+DC) Even if a ground fault occurs, the current does not flow to the load and does not operate. T-B series Rev.1... -
Page 131: Typical Output Circuit Application 1: Sink Type (Npn)
11 Output No.3 3 Output No.4 12 Output No.5 4 Output No.6 13 Output No.7 5 Output No.0 to 7 common (GND) 6 Output No.8 15 Output No.9 Omit 16 Output No.11 14 Output No.8 to 11 common (GND) T-B series Rev.1... -
Page 132: Typical Output Circuit Application 2: Source Type (Pnp)
“14. I/O Remote Settings”. Connector Connector model DMC 0,5/9-G1-2,54 P20THR R44 (Board side) I/O (Output) Connector DFMC 0,5/ 9-ST-2,54 (Cable side) (PHOENIX CONTACT) * I/O connector is included with shipment. I/O (Output) Connector pin assignment T-B series Rev.1... -
Page 133: I/O Cable Product Procedure
12.3.2 How to Fix the I/O Cable You can fix the I/O cables using cable clamp on the back of the manipulator. Cable clamp (Illustration: T3-B401S) NOTE Fixing cables with I/O cable clamp, wiring of I/O cables is difficult to disconnect. T-B series Rev.1... -
Page 134: Hand I/O Connector
Hand I/O connector has a power supply which user can use. Enable to use this power supply to operate external devices. Be careful not to exceed allowable current when using power supply. Voltage: 24V ±5% Allowable current: T3-B: 500mA T6-B: 700mA T-B series Rev.1... -
Page 135: Input Circuit
13.2.2 Typical Input Circuit Application 2: Sink Type Hand I/O connector 4 Input No.18 to 23 common 1 Input No.18 9 Input No.19 (Same as above) 2 Input No.20 10 Input No.21 3 Input No.22 11 Input No.23 13 GND 5 +DC T-B series Rev.1... -
Page 136: Output Circuit
Do not exceed the Hand I/O Connector allowable current of the hand I/O 6 Output Load 14 Output No.13 (Same as above) 7 Output No.14 15 Output No.15 8 Output No.12 to 15 common (GND) 13 GND 5 +DC T-B series Rev.1... -
Page 137: Pin Assignments
* I/O connector is included with shipment. 13.5 How to Control Hand I/O T-B series has I/O (Input: 6 bit, Output: 4 bit) for hand control I/O. Input bit port: 18, 19, 20, 21, 22, 23 Output bit port: 12, 13, 14, 15 How to operate Hand I/O is only supported for bit port operation commands. - Page 138 “0” is read for upper 6 bits “0” is read for upper 6 bits Input 0000 00xx 0000 00xx xxxx xxxx Always specify “0” for upper 4 bits. Always specify “0” for upper 4 bits. Output 0000 xxxx 0000 xxxx xxxx xxxx T-B series Rev.1...
-
Page 139: I/O Remote Settings
Remote function is initially assigned to both input and output from 0 to 8. To accept external remote inputs, assign the remote function and the control device is remote. For further details, refer to the section, Remote Control Software Configuration in EPSON RC+ 7.0 User’s Guide - Remote Control. -
Page 140: I/O Signal Description
14.1 I/O Signal Description Remote function is initially assigned to both input and output from 0 to 8. To change the function assignment from the initial setting, use EPSON RC+ 7.0. To use all signals, you will need to add Fieldbus I/O module. - Page 141 EStopOff output ON position where the safeguard is open. RecoverReqd output ON Pause input OFF Stop input OFF ResetAlarm Not Set Cancel the alarm (*11) SelAlarm1 SelAlarm2 Not Set Specify the alarm number to cancel (*10) SelAlarm4 SelAlarm8 T-B series Rev.1...
- Page 142 Main63 0=OFF, 1=ON (*3) “NoPause task” and “NoEmgAbort task” do not pause. For details, refer to EPSON RC+ 7.0 Online Help or Pause in SPEL Language Reference. (*4) Turns OFF the I/O output and initializes the manipulator parameter. For details, refer to EPSON RC+ 7.0 Online Help or Reset in SPEL Language Reference.
- Page 143 For details, refer to EPSON RC+ 7.0 Online Help or Motor in SPEL Language Reference. (*7) For details, refer to EPSON RC+ 7.0 Online Help or MCal in SPEL Language Reference. (*8) This is for experienced users only. Make sure that you fully understand the input specification before using.
-
Page 144: Remote Output Signals
Turns ON in remote input acceptable status. (*2) Not set TeachMode Turns ON in TEACH mode. Not set TestMode Not set Turns ON in TEST mode. EnableOn Not set Turns ON when the enable switch is ON. T-B series Rev.1... - Page 145 Outputs the current torque value of Joint #6 (*6) (*7) Torque6 Not set Outputs the CPU load factor of the user program (*8) Not set Outputs how many times emergency stops have been ESTOP Not set executed. T-B series Rev.1...
- Page 146 - The setting is Auto mode and the control device is remote. - The setting is Program mode and Remote I/O is enabled. (*3) For details, refer to EPSON RC+ 7.0 Online Help or Box in SPEL Language Reference. (*4) For details, refer to EPSON RC+ 7.0 Online Help or Plane in SPEL Language Reference.
- Page 147 (*12) The occurrence of battery alarm and grease alarm is monitored every 5 minutes. The alarm occurrence and output timing of the controller are different. It may be output up to 5 minutes after the controller alarm occurs. T-B series Rev.1...
-
Page 148: Timing Specifications
Running Output * Paused Output SelProg1 Input Start Input Pause Input Continue Input Stop Input * The duration varies depending on the Quick Pause (QP) setting and the program’s operating status at the time of Pause input T-B series Rev.1... -
Page 149: Timing Diagram For Safety Door Input Sequence
ESW Signal (*1) Reset Signal Input [Unit: msec] (*1) A logical signal to explain the timing of internal processing of the controller. For details about input signals name and operating conditions, refer to the 11.3 Pin Assignments. T-B series Rev.1... -
Page 150: Sd Card Slots
SD card slot (Option slot: inside) (Illustration: T3-B401S) SD card slot is a slot for inserting SD card. Firmware to operate the manipulator is written on SD card. Reference: T-B series Maintenance Manual 14.3 Replacement of SD card T-B series Rev.1... -
Page 151: Fieldbus I/O
T3-B T6-B Manipulator 16. Fieldbus I/O 16. Fieldbus I/O Fieldbus I/O of the T-B series supports the following model. DeviceNet™ CC-Link PROFIBUS-DP PROFINET EtherNet/IP™ EtherCAT® Modbus For details, refer to the following manuals. Robot Controller Option Fieldbus I/O EPSON RC+ 7.0 User’s Guide 11.7 Fieldbus Slave I/O For installing method of Fieldbus I/O module, refer to the following manual. -
Page 152: Restrictions
T3-B T6-B Manipulator 17. Restrictions 17. Restrictions For T-B series manipulator, there are commands with restrictions or may cause an error if executing. However, error does not occur when building a program. Also, some functions have restrictions. 17.1 Commands Cannot Use The following commands/ functions are not available. -
Page 153: Conveyor Tracking Commands
Returns the conveyor being tracked by a robot. Cnv_Speed Function Returns the current speed of a conveyor. Cnv_Trigger Latches current conveyor position next Cnv_QueAdd statement. Cnv_Upstream Function Returns the upstream limit for the specified conveyor. Cnv_Upstream Sets the upstream limit for the specified conveyor. T-B series Rev.1... -
Page 154: Pg Commands
You cannot use the command: FineDist Robot determines the position by set value of Fine even if using FineDist. Fine Specifies and displays the positioning error limits. (Unit: pulse) FineDist Specifies and displays the positioning error limits (Unit: mm) T-B series Rev.1... -
Page 155: Other (Healthcalcperiod)
17.4.2 Loop Processing If the created robot control program is consisted of the multi-tasking and also there are some task with infinite loop, the system may become unstable and the connection with EPSON RC+ is disconnected. The controller detects infinite loop tasks. -
Page 156: Camera Searching By Cv1/Cv2
Next 17.4.3 Camera Searching by CV1/CV2 You may not be able to use Camera searching by T-B series Manipulator if CV1/CV2 is used and the following two conditions are fulfilled. - When connecting PC and T-B series Manipulator by USB connection - When the configuration of default gateway of T-B series Manipulator is None, or “0.0.0.0”. -
Page 157: Error Code List
T3-B T6-B Manipulator 18. Error Code List 18. Error Code List For the error number, refer to the following manual. Status Code/Error Code List T-B series Rev.1... - Page 158 T3-B T6-B Manipulator 18. Error Code List T-B series Rev.1...
-
Page 159: Regular Inspection
Regular Inspection Performing inspection properly is essential to prevent trouble and ensure safety. This volume describes the inspection schedule and contents. Inspect according to the schedule. -
Page 161: Regular Inspection For T3-B T6-B Manipulator
8 months (2000 h) √ 9 months (2250 h) √ √ 10 months (2500 h) √ 11 months (2750 h) √ 12 months (3000 h) √ √ √ √ 13 months (3250 h) √ √ 20000 h h = hour T-B series Rev.1... -
Page 162: Inspection Point
Turn OFF and ON the power supply, and check that it starts without any error. Check behavior of the emergency With the motor turned ON, operate the emergency stop button and the stop button and safeguard. safeguard to check that the motor turns OFF. T-B series Rev.1... -
Page 163: Overhaul (Parts Replacement)
Normal grease Discolored grease Perform greasing at 50 km of operation for the first time of greasing. For the EPSON RC+ 7.0 the recommended replacement time for the grease on the ball screw NOTE spline unit can be checked in the [Maintenance] dialog box. - Page 164 - Move the shaft to its lower limit from Arm #1 EPSON RC+ 7.0 [Tools]-[Robot Manager]-[Jog & Teach]. NOTE Make sure that the hand does not ...
- Page 165 Run for about 5 minutes to spread the grease over the shaft. Turn OFF the Manipulator. (10) Wipe off excess grease on the end of the spline nut and mechanical stop. End of spline nut (Illustration T3-B401S) T-B series Rev.1...
-
Page 166: Tightening Hexagon Socket Head Cap Bolts
Bolt hole two or three and fasten the bolts securely with a hexagonal wrench. Then, use a torque wrench so that the bolts are fastened with tightening torques shown in the table above. T-B series Rev.1... -
Page 167: Appendix
Appendix This volume describes the specifications table for each model and detailed data of time and distance of free running. -
Page 169: Appendix A: Specifications T3-B Specifications
1 pneumatic tubes (ø4 mm): 0.59 MPa (6 kgf/cm : 86 psi) 120 × 120 mm Mounting hole 4-M8 Ambient temp. 5 to 40 °C *3 Environmental Ambient relative 20 to 80% (no condensation) requirements humidity Noise level *4 = 70 dB (A) or under T-B series Rev.1... - Page 170 Supported for USB 2.0 High Speed / Full Speed Supported for 10/100 Mbps Ethernet port Available up to 8 ports RESET switch Enable to use for resetting of system TEACH, AUTO, PROGRAM, TestMode, Error, Display Mode display LED E-STOP T-B series Rev.1...
- Page 171 Although values larger than 100 can be set to Accel, it is recommended to minimize the use of large values to necessary motions since operating the manipulator continuously with the large Accel setting may shorten the product life remarkably. T-B series Rev.1...
-
Page 172: T6-B Specifications
: 86 psi) 150 × 150 mm Mounting hole 4-M8 Ambient temp. 5 ~ 40 °C *3 Environmental Ambient relative 20 ~ 80 % (no condensation) requirements humidity Noise level *4 = 70 dB (A) or under T-B series Rev.1... - Page 173 Supported for USB 2.0 High Speed / Full Speed Supported for 10/100 Mbps Ethernet port Available up to 8 ports RESET switch Enable to use for resetting of system TEACH, AUTO, PROGRAM, TestMode, Error, Display Mode display LED E-STOP T-B series Rev.1...
- Page 174 Although values larger than 100 can be set to Accel, it is recommended to minimize the use of large values to necessary motions since operating the manipulator continuously with the large Accel setting may shorten the product life remarkably. T-B series Rev.1...
-
Page 175: Appendix B: Time And Distance Of Free Running In Emergency
Horizontal axis : Weight setting value Vertical axis : Time and distance of free running in each Weight setting value Weight [kg] : Weight setting value Time [sec] : Free running time Distance [degrees] : Free running distance T-B series Rev.1... -
Page 176: T3-B Time And Distance Of Free Running In Emergency
0.20 40.0 0.15 30.0 0.10 20.0 0.05 10.0 0.00 Weight [kg] Weight [kg] T3-B401S: J3 0.66 Speed [%] 0.66 Speed [%] 0.25 35.0 30.0 0.20 25.0 0.15 20.0 15.0 0.10 10.0 0.05 0.00 Weight [kg] Weight [kg] T-B series Rev.1... -
Page 177: T6-B Time And Distance Of Free Running In Emergency
40.0 0.50 0.40 30.0 0.30 20.0 0.20 10.0 0.10 0.00 Weight [kg] Weight [kg] T6-B602S: J3 100% Speed [%] 100% Speed [%] 0.25 50.0 0.20 40.0 0.15 30.0 0.10 20.0 0.05 10.0 0.00 Weight [kg] Weight [kg] T-B series Rev.1... - Page 178 Appendix B: Time and Distance of Free Running in Emergency T-B series Rev.1...
-
Page 179: Appendix C: Time And Distance Of Free Running When Safeguard Is Opened
Horizontal axis : Weight setting value Vertical axis : Time and distance of free running in each Weight setting value Weight [kg] : Weight setting value Time [sec] : Free running time Distance [degrees] : Free running distance T-B series Rev.1... -
Page 180: T3-B Time And Distance Of Free Running When Safeguard Is Opened
40.0 0.15 30.0 0.10 20.0 0.05 10.0 0.00 Weight [kg] Weight [kg] T3-B401S: J3 0.66 Speed [%] 0.66 Speed [%] 0.35 100.0 0.30 80.0 0.25 60.0 0.20 0.15 40.0 0.10 20.0 0.05 0.00 Weight [kg] Weight [kg] T-B series Rev.1... -
Page 181: T6-B Time And Distance Of Free Running When Safeguard Is Opened
0.80 50.0 0.60 40.0 30.0 0.40 20.0 0.20 10.0 0.00 Weight [kg] Weight [kg] T6-B602S: J3 100% Speed [%] 100% Speed [%] 0.40 120.0 100.0 0.30 80.0 0.20 60.0 40.0 0.10 20.0 0.00 Weight [kg] Weight [kg] T-B series Rev.1... - Page 182 Appendix C: Time and Distance of Free Running When Safeguard Is Opened T-B series Rev.1...
- Page 183 This product includes cryptographic software written by Eric Young (eay@cryptsoft.com). (5) The license terms of each open source software program are described on Section (7). (6) The list of open source software programs which the T-B series product includes are as follows. bash...
- Page 184 Linux http://www.kernel.org/ Xenomai http://www.xenomai.org/ T-B series Rev.1...