
Related Manuals for GE Giraffe Blue Spot PT Lite


Summary of Contents for GE Giraffe Blue Spot PT Lite
- Page 1 GE Healthcare Giraffe Blue Spot PT Lite™ ® Operation, Maintenance, and Service Manual...
- Page 2 Warranty This product is sold by GE Healthcare with a period of 12-month of GE depot repair warranty that covers labor and parts (except for the LED Module assembly which has a 24-month warranty and the expendable parts like fan which have a 30-day warranty) under the terms and conditions set forth in the GE Healthcare Warranty Statement presented to the customer at the point of sale.
-
Page 3: Table Of Contents
Table of Contents About this Manual ................................5 Scope and Intended Users ............................5 Conventions .................................5 User Responsibility ..............................6 Part I: Operation and Maintenance ..................7 Important Operation Safety Information ........................9 Contraindications ..............................11 Symbol Definitions ..............................11 Chapter 1: Product Overview ............................13 1.1 Intended Use .............................. - Page 4 Table of Contents 7.2 Environmental Requirements ........................47 7.3 Tool Requirements ............................47 7.4 Installation Procedure ........................... 48 Chapter 8: Service Maintenance and Checkout ....................51 8.1 Procedures Schedule............................. 51 8.2 Environmental Requirements ........................51 8.3 Tool Requirements ............................52 8.4 Maintenance and Checkout Procedures .....................
-
Page 5: About This Manual
The intended users for the Service part of this manual are hospital biomedical engineering services and GE Service personnel. This device should only be operated by personnel trained in its operation and familiar with the risks and benefits of this type of device. -
Page 6: User Responsibility
Should such repair or replacement become necessary, GE Healthcare recommends that a telephone or written request for service advice be made to the nearest GE Healthcare Regional Service Center. This Product or any of its parts should not be repaired other than in accordance with written instructions provided by GE Healthcare and by GE Healthcare trained personnel. -
Page 7: Part I: Operation And Maintenance
Part I: Operation and Maintenance... - Page 8 Part I: Operation and Maintenance This page is intentionally left blank.
-
Page 9: Important Operation Safety Information
Important Operation Safety Information WARNING: Do not use the Giraffe Blue Spot PT Lite in the presence of flammable anesthetics (e.g. ether) mixture with air or with oxygen or nitrous oxide which can support combustion; a possible explosion hazard exists under these conditions. - Page 10 Periodically check that the patient is in the treatment area of the device. WARNING: Follow hospital policy and procedure for bilirubin, temperature, skin and eye assessments during use of phototherapy. WARNING: Never use flammable cleaning solutions to clean the Giraffe Blue Spot PT Lite.
-
Page 11: Contraindications
This section identifies the symbols that are displayed on the Giraffe Blue Spot PT Lite Phototherapy System: Symbol Description Consult accompanying documents. Do not place the Giraffe Blue Spot PT Lite in the path of radiant heat from another device. High voltage, electrical shock hazard Indicates alternating current European Union Representative... - Page 12 Important Operation Safety Information Symbol Description Potential equalization stud Recommended distance from the light shade to the patient This symbol indicates that the waste of electrical and electronic equipment must not be disposed as an unsorted municipal waste and must be collected separately. Please contact an authorized representative of the manufacturer for information concerning the decommissioning of your equipment.
-
Page 13: Chapter 1: Product Overview
A mounting bracket on the back of the device allows the device to be positioned and secured in the dovetail slot of an accessory rail. It can be mounted on any GE Healthcare system with dovetail rails. Tightening two socket head mounting screws holds the device in position. -
Page 14: Controls, Indicators, And Connections
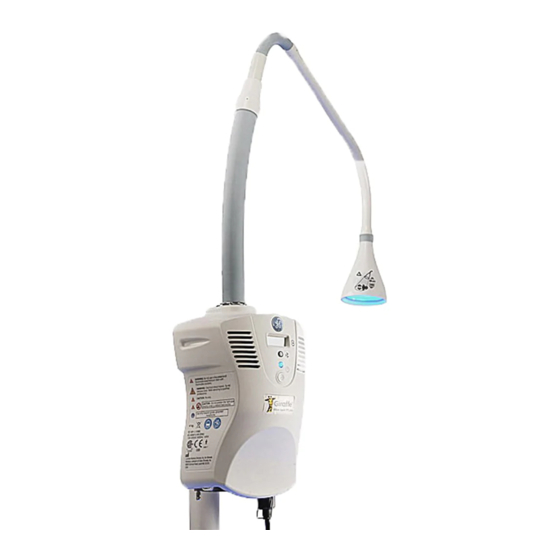
Chapter 1: Product Overview 1.3 Controls, Indicators, and Connections BOTTOM FRONT BACK Figure 1-1 1. Light shade 8. Light box 2. Light pipe 9. Power cord inlet* 3. Hour meter display 10. Fuses Compartment 4. Exhaust vents 11. Intake vents/air filter 5. - Page 15 Chapter 1: Product Overview The following table describes the meaning of each status for each indicator: Table 1-1: Indicators Indicator Status What it Normally Means The device has no power. Standby/on indicator Green The device is in standby and not emitting light. Blue The device is emitting light.
- Page 16 Chapter 1: Product Overview This page is intentionally left blank.
-
Page 17: Chapter 2: Product Setup And Operation
Chapter 2: Product Setup and Operation Upon shipment, the light pipe is detached from the light box. Prior to first use, the light pipe needs to be attached and secured to the light box and then the device needs to be mounted on the dovetail rail of a microenvironment or a portable roll stand. - Page 18 Chapter 2: Product Setup and Operation 8. Allow the Giraffe Blue Spot Pt Lite to warm-up 5 minutes. 9. Using a calibrated Biliblanket Light Meter II, measure the light at the 5 points indicated in Figure 2-1 and calculate their average. Confirm that the average is at least 27 μW · cm ·...
-
Page 19: Operation
Chapter 2: Product Setup and Operation 2.2 Operation WARNING: Prolonged exposure to any phototherapy light may cause eye damage. Prolonged stay in the area irradiated by the phototherapy equipment may cause some effects on the operator. Never look directly at the light. Infants should wear eye protection during therapy. Take care to protect the eyes of infants adjacent to the treatment area. - Page 20 Chapter 2: Product Setup and Operation WARNING: When using the device with a radiant warmer, make sure the light shade is not directly in the path of the radiant heat rays. If the light shade is in the path, it will block heat to the infant and may damage the light shade.
- Page 21 Chapter 2: Product Setup and Operation NOTE: For information on the indicators on the system and how to interpret them, refer to “Figure 7-4”. NOTE: It is recommended to monitor irradiance, according to hospital policy and procedure, during phototherapy . NOTE: The efficacy of phototherapy depends on the light intensity, patient surface coverage area, distance, and light spectrum of the phototherapy device use.
- Page 22 Chapter 2: Product Setup and Operation This page is intentionally left blank.
-
Page 23: Chapter 3: Operator's Maintenance
3.1 Cleaning and Maintenance 3.1.1 Cleaning Procedure WARNING: Never use flammable cleaning solutions to clean the Giraffe Blue Spot PT Lite. CAUTION: Clean the clear protective cover of the light shade with non-flammable optical cleaner and a lint-free soft cloth. If an alcohol solution is used, thoroughly dry the cover to make sure no residual cleaner remains. - Page 24 Chapter 3: Operator’s Maintenance Generic Formulation Maximum Concentration Hydrogen Peroxide 100% spray (sprayed on a cloth - not directly on the equipment) Cavicide ® Active ingredients: Diisobutylphenoxyethoxyethyl dimethyl benzyl ammonium chloride (0.28%), Isopropanol (17.20%), inert ingredients (82.54%) Quaternary Ammonium 0.28% Isopropyl Alcohol <15% Do not use the following cleaners;...
-
Page 25: Options
Do not fold the light pipe or bend it tighter than 60 degrees to avoid light pipe damage. 3.2 Options Portable Roll Stand ..............6600-0894-216 GE Healthcare BiliBlanket Meter II ........6600-0198-900 NOTE: Use only GE approved optional parts with the device. - Page 26 Chapter 3: Operator’s Maintenance This page intentionally left blank...
-
Page 27: Chapter 4: Operator Troubleshooting
Chapter 4: Operator Troubleshooting This chapter lists possible symptoms as well as the possible causes and solutions that an operator can implement. All other possible symptoms and causes require professional diagnostics (Professional service technicians may refer to Chapter 10). Symptom Description Possible Causes Actions &... - Page 28 Chapter 4: Operator Troubleshooting Symptom Description Possible Causes Actions & Solution Make sure the system is used in the recommended temperature range. Check whether the vents are blocked. Unblock vents if necessary. When the system is plugged Check filters. call service to clean or replace if into the power outlet, the The system temperature necessary.
-
Page 29: Chapter 5: Specifications
Chapter 5: Specifications 5.1 Electrical Specifications Device type: Class I • Operation: Continuous operation • Input Rating: 100-240VAC 50/60 Hz, 130-170VA Note: To isolate the device from the supply mains: - For a wall-connected device, unplug the power cord. - For a device connected to a microenvironment’s accessory outlet, switch off the mains switch on the back of the microenvironment. -
Page 30: Performance Specifications
Chapter 5: Specifications 5.3 Performance Specifications LED life 10000 hours* Noise level < 40 dB(A) (measured 90 cm from the system) Mode of operation: Continuous Product (light box and light pipe) size (HxWxD): 26.2 cm x 18.6 cm x 13.9cm Physical Characteristics Product weight: 4 Kg 45 µW ·... -
Page 31: Standards
• IEC 60601-2-50. GE Healthcare, a division of General Electric has declared that this product conforms with the European Council Directive 93/42/EEC Medical Device Directive when it is used in accordance with the instructions provided in the Operation and Maintenance Manual. - Page 32 This page intentionally left blank...
-
Page 33: Part Ii: Service
Part II: Service... - Page 34 Part II: Service This page is intentionally left blank.
-
Page 35: Important Service Safety Information
The information contained in this service manual pertains only to those models of products which are marketed by GE Healthcare as of the effective date of this manual or the latest revision thereof. This service manual was prepared for exclusive use by GE Healthcare service personnel in light of their training and experience as well as the availability to them of parts, proper tools, and test equipment. - Page 36 Important Service Safety Information WARNING: This service manual is available in English only. • If a customer’s service provider requires a language other than English, it is the customer’s responsibility to provide translation services. • Do not attempt to service the equipment unless this service manual has been consulted and is understood.
- Page 37 Important Service Safety Information UPOZORENJE Ovaj servisni priručnik dostupan je na engleskom jeziku. • Ako davatelj usluge klijenta treba neki drugi jezik, klijent je dužan osigurati prijevod. • Ne pokušavajte servisirati opremu ako niste u potpunosti pročitali i razumjeli ovaj servisni priručnik.
- Page 38 Versuchen Sie nicht diese Anlage zu warten, ohne diese Serviceanleitung gelesen und verstanden zu haben. • Wird diese Warnung nicht beachtet, so kann es zu Verletzungen des Kundendiensttechnikers, des Bedieners oder des Patienten durch Stromschläge, mechanische oder sonstige Gefahren kommen.
- Page 39 κινδύνους. FIGYELMEZTETÉS Ezen karbantartási kézikönyv kizárólag angol nyelven érhető el. • Ha a vevő szolgáltatója angoltól eltérő nyelvre tart igényt, akkor a vevő felelőssége a fordítás elkészíttetése. • Ne próbálja elkezdeni használni a berendezést, amíg a karbantartási kézikönyvben leírtakat nem értelmezték.
- Page 40 Important Service Safety Information このサービスマニュアルには英語版しかありません。 • サービスを担当される業者が英語以外の言語を要求される場合、翻訳作業はその業者 の責任で行うものとさせていただきます。 • このサービスマニュアルを熟読し理解せずに、装置のサービスを行わないでくださ い。 • この警告に従わない場合、サービスを担当される方、操作員あるいは患者 さんが、感 電や機械的又はその他の危険により負傷する可能性があります。 경고 본 서비스 매뉴얼은 영어로만 이용하실 수 있습니다. • 고객의 서비스 제공자가 영어 이외의 언어를 요구할 경우, 번역 서비스를 제공하는 것은 고객의 책임입니다. • 본 서비스 매뉴얼을 참조하여 숙지하지 않은 이상 해당 장비를 수리하려고 시도하지 마십시오.
- Page 41 Important Service Safety Information OSTRZEŻENIE Niniejszy podręcznik serwisowy dostępny jest jedynie w języku angielskim. • Jeśli serwisant klienta wymaga języka innego niż angielski, zapewnienie usługi tłumaczenia jest obowiązkiem klienta. • Nie próbować serwisować urządzenia bez zapoznania się z niniejszym podręcznikiem serwisowym i zrozumienia go.
- Page 42 Important Service Safety Information ОСТОРОЖНО! Данное руководство по техническому обслуживанию представлено только на английском языке. • Если сервисному персоналу клиента необходимо руководство не на английском, а на каком-то другом языке, клиенту следует самостоятельно обеспечить перевод. • Перед техническим обслуживанием оборудования обязательно обратитесь к данному руководству...
- Page 43 Important Service Safety Information VARNING Den här servicehandboken finns bara tillgänglig på engelska. • Om en kunds servicetekniker har behov av ett annat språk än engelska, ansvarar kunden för att tillhandahålla översättningstjänster. • Försök inte utföra service på utrustningen om du inte har läst och förstår den här servicehandboken.
- Page 44 Important Service Safety Information This page is intentionally left blank.
-
Page 45: Chapter 6: System Description
However, the wavelengths of light that actually provide therapy reside only between 410 and 460 nanometers. This light appears blue to the eye and is the specific output of the Giraffe Blue Spot PT Lite. The system is composed of a light box generating light and a light pipe through which the light from the LED is transmitted and projected upon patients. - Page 46 Chapter 6: System Description Component Description Colored indicators on the front face of the system provide information as to the device status. The standby/on indicator is illuminated in green whenever AC Power is applied and the system is in standby mode indicating there are no alarms/faults and the system is ready to operate.
-
Page 47: Chapter 7: Installation
7.4.1. 7.1 Time Required for Installation The average installation time for the Giraffe Blue Spot PT Lite is about 5 minutes. The required checkout procedures after installation take approximately 20 minutes. -
Page 48: Installation Procedure
Chapter 7: Installation 7.4 Installation Procedure 7.4.1 Light Pipe Attachment 1. Make sure that the system is unplugged from the power outlet. 2. Use the provided hex key to remove the top mounting screw on the back plate (Refer to Figure 7-1). 3. - Page 49 Chapter 7: Installation 7.4.2 Mounting the System WARNING: To avoid patient injury, do not mount the system while a patient occupies the bed. 1. Make sure the light pipe is securely attached to the system as instructed in section 7.4.1. 2.
- Page 50 Chapter 7: Installation This page is intentionally left blank.
-
Page 51: Chapter 8: Service Maintenance And Checkout
Annually * Service includes installation, repair, maintenance, or part replacement. WARNING: Do not service the Giraffe Blue Spot PT Lite while it is in clinical use, or attached to a warmer or incubator with a patient in the bed. CAUTION: Table 8-1 shows the minimum frequencies required for maintenance. -
Page 52: Tool Requirements
Chapter 8: Service Maintenance and Checkout 8.3 Tool Requirements The following table lists the service tools required to perform the planned maintenance and checkout procedures: Table 8-2: Tool Requirements Checkout Procedure Name Service Tools Needed Quantity Needed “8.4.1 Visual Inspection” None “8.4.2 Functional Checks”... - Page 53 Chapter 8: Service Maintenance and Checkout 8.4.2 Functional Checks 1. Move the light pipe to verify that it moves freely and stays in position. NOTE: The light pipe will typically experience some minor deflection (less than 1.3cm) after positioning. 2. Plug the power cord into the power outlet. Confirm that the hour meter display turns on and the standby/on indicator illuminates in green.
- Page 54 For a system plugged into an accessory outlet on a microenvironment, measure the resistance between the power cord ground terminal of the microenvironment and the potential equalization stud on the Giraffe Blue Spot PT Lite. The ground resistance must be less than 0.2 ohms. 8.4.4.2 Leakage Current Checks In normal conditions and in all possible operating modes: •...
-
Page 55: Chapter 9: Calibration
Chapter 9: Calibration No calibration is required for the Giraffe Blue Spot PT Lite. - Page 56 Chapter 9: Calibration This page is intentionally left blank.
-
Page 57: Chapter 10: Diagnostics And Troubleshooting
Chapter 10: Diagnostics and Troubleshooting This chapter lists possible symptoms as well as the possible causes and solutions. For any necessary part replacements or adjustments, follow the instructions provided in “Chapter 11”. Always read all the warnings, cautions, notes, and other information provided in the “Important Service Safety Information” before starting any troubleshooting. - Page 58 Chapter 10: Diagnostics and Troubleshooting Symptom Description Possible Causes Actions & Solution Confirm that the power cord is plugged into the power Power cord is not outlet and securely connected to the power inlet module properly connected. of the system. No power at the Confirm power is available at the power outlet.
- Page 59 Chapter 10: Diagnostics and Troubleshooting Symptom Description Possible Causes Actions & Solution When system is in standby mode, either the Control board is Replace the control board. Refer to section 11.5. standby/on indicator or defective. hour meter display is off. Hour meter display Control board is shows disordered or bad...
- Page 60 Chapter 10: Diagnostics and Troubleshooting Symptom Description Possible Causes Actions & Solution Make sure the system is used in the recommended temperature range. Check whether the vents are blocked. Unblock vents and replace the air filter if necessary. The system temperature is high NOTE: Once the air vents are unblocked, the fan will (over-temperature...
-
Page 61: Troubleshooting Fuses
Chapter 10: Diagnostics and Troubleshooting Symptom Description Possible Causes Actions & Solution Clean the cover or replace the light shade if necessary. Protective cover of Clean the cover gently using an optical cleaner and a lint- light shade is dirty or free wipe. -
Page 62: Test Points And Adjustment Point Locations
Chapter 10: Diagnostics and Troubleshooting 10.2 Test Points and Adjustment Point Locations Figure 10-1 Test points and adjustment points Callout Part Description V+ test point (LED driver board) GND test point (LED driver board) -12V test point (LED driver board) Fan+ test point (LED driver board) Fan- test point (LED driver board) R13 potentiometer adjustment point (power supply board) -
Page 63: Chapter 11: Replacement Procedures
Chapter 11: Replacement Procedures This chapter describes the procedures used for replacement of the Giraffe Blue Spot PT Lite service parts. After any replacement procedures, perform checkout procedures, as described in section “8.4”. Always read all the warnings, cautions, notes, and other information provided in “Important Service Safety Information”... -
Page 64: Air Filter Replacement
4. Remove the fuses. 5. Replace these fuses with the two fuses (T3.15A @ 250V~, slo-blo type) in fuse kit 6600-0730-214. 6. Reverse steps to re-install. CAUTION: Always use the fuse type recommended by GE Healthcare for fuse replacement. Figure 11-1 Figure 11-2... -
Page 65: Light Pipe / O-Ring / Ground Clip Replacement
Chapter 11: Replacement Procedures 11.3 Light Pipe / O-ring / Ground Clip Replacement 1. Make sure the system power cord is unplugged from the power outlet. 2. Use the provided hex key tool to loosen the two screws on the mounting bracket in the rear side of the system and detach the system from the dovetail rail of the bed (Refer to Figure 11-3). -
Page 66: Light Shade Replacement
Chapter 11: Replacement Procedures 11.4 Light Shade Replacement 1. Make sure the system power cord is unplugged from the power outlet. 2. Roll the shade sleeve up to access the orange tape underneath and remove the tape (Refer to Figure 11-5 which shows the shade with orange tape removed). -
Page 67: Unit Cover / Control Board Replacement
Chapter 11: Replacement Procedures 11.5 Unit Cover / Control Board Replacement SENSITIVE TO ELECTROSTATIC DISCHARGE CAUTION This procedure includes ESD sensitive parts. ESD control guidelines must be followed during this procedure to ensure that static charges are safely conducted to the ground and not through the sensitive device, to prevent damage to the equipment. -
Page 68: Power Inlet Module / Ac And Dc Harness Replacement
Chapter 11: Replacement Procedures 11.6 Power Inlet Module / AC and DC Harness Replacement SENSITIVE TO ELECTROSTATIC DISCHARGE CAUTION This procedure includes ESD sensitive parts. ESD control guidelines must be followed during this procedure to ensure that static charges are safely conducted to the ground and not through the sensitive device, to prevent damage to the equipment. -
Page 69: Led Module, Led Driver Board, Fan Replacement
Chapter 11: Replacement Procedures 11.7 LED Module, LED Driver Board, Fan Replacement WARNING: When replacing the LED module, always make sure the system power cord is unplugged from the power outlet. WARNING: Never look directly at the therapeutic-light LED. Exposure can cause eye damage. CAUTION: The LED driver board and the LED module shall always be replaced in pair with a new factory-set pair. - Page 70 Chapter 11: Replacement Procedures 6. Use a 5.5mm nut driver to remove the nut that attached the LED Ground Harness to the back plate to release the harness (Refer to Figure 11-10 ). 7. Use a 7mm nut driver to remove the nuts that attach the LED module to the back plate and pull out the whole module and fan assembly (Refer to Figure 11-13).
-
Page 71: Power Supply Replacement
Chapter 11: Replacement Procedures 11.8 Power Supply Replacement SENSITIVE TO ELECTROSTATIC DISCHARGE CAUTION This procedure includes ESD sensitive parts. ESD control guidelines must be followed during this procedure to ensure that static charges are safely conducted to the ground and not through the sensitive device, to prevent damage to the equipment. - Page 72 Chapter 11: Replacement Procedures This page is intentionally left blank.
-
Page 73: Chapter 12: Service Parts
Chapter 12: Service Parts This chapter illustrates the Giraffe Blue Spot PT Lite service parts and includes the orderable service kit/ component part numbers. A complete Field Replaceable Unit (FRU) list and a wiring diagram are also provided. The illustrations and part numbers begin on the next page. -
Page 74: Illustrated Parts
Chapter 12: Service Parts 12.1 Illustrated Parts 21, 22 (hidden) 13, 14 12 (hidden) Figure 12-1 Light Box Exploded View... - Page 75 Chapter 12: Service Parts Orderable Service Part Description Orderable Service Part Description Callout Part Number M1225847 Cover FRU Kit (English) M1225849 Cover FRU Kit (German) M1225851 Cover FRU Kit (Spain) M1225852 Cover FRU Kit (Italian) M1225853 Cover FRU Kit (Dutch) M1225855 Cover FRU Kit (French) M1225856...
- Page 76 Chapter 12: Service Parts Orderable Service Part Description Orderable Service Part Description Callout Part Number M1225817 or LED ground harness Harness FRU Kit or LED module FRU Kit M1225811 AC harness ground wire M1225817 Harness FRU Kit Nut, M3 Nylok M1225820 Hardware FRU Kit Spacer, nylon, 0.14”...
- Page 77 Chapter 12: Service Parts Figure 12-2 Light Pipe Orderable Part Description Service Part Orderable Service Part Description Callout Number Light pipe assembly M1225812 Light Pipe FRU Kit * M1225812 or Grounding Clip Light Pipe FRU Kit * or Grounding Clip FRU kit 2075264-001 M1225812 or O-RING, Dash #022 EP...
- Page 78 Chapter 12: Service Parts Figure 12-3 Light Shade Orderable Part Description Service Part Orderable Service Part Description Callout Number Sleeve, shade M1225813 Light Shade FRU Kit Tape, orange M1225813 Light Shade FRU Kit Retention pin, shade M1225813 Light Shade FRU Kit Light shade M1225813 Light Shade FRU Kit...
- Page 79 Chapter 12: Service Parts Figure 12-4 Control Board Orderable Part Description Service Part Orderable Service Part Description Callout Number LCD Cover M1225814 Control Board FRU Kit PCBA, control Board M1225814 Control Board FRU Kit M1225814 or Screw, M3 Control Board FRU Kit or Hardware Kit M1225820 Harness, Control M1225817...
- Page 80 Chapter 12: Service Parts Figure 12-5 LED Module Assembly Orderable Part Description Service Part Orderable Service Part Description Callout Number LED Heatsink Assembly M1225811 LED Module FRU Kit M1225811 or Cathode harness (black)* LED Module FRU Kit or Harness FRU Kit M1225817 Driver board M1225811...
- Page 81 Chapter 12: Service Parts Figure 12-6 Power Supply Board and Power Entry Module Orderable Part Description Service Part Orderable Service Part Description Callout Number LED driver board support Non-orderable Non-orderable Power supply M1226990 Power Supply FRU Kit DC harness M1225817 Harness FRU Kit Power entry module 2065981-001...
- Page 82 Chapter 12: Service Parts ANODE CATHODE (RED) (BLACK) CONTROL LED GROUND THERMISTER HARNESS AC HARNESS DC HARNESS Figure 12-7 Harnesses Orderable Part Description Service Part Orderable Service Part Description Callout Number LED Ground Harness Thermistor Harness DC Harness Anode (Red) M1225817 Harness FRU Kit Cathode (Black)
- Page 83 Chapter 12: Service Parts Figure 12-8 Labels Orderable Part Label Description Orderable Part Description Callout Number GE logo label M1231816 GE logo label Giraffe brand label M1229489 Giraffe brand label Warning Label Non-orderable Non-orderable Serial Number Label Non-orderable Non-orderable Date of Manufacture Label...
-
Page 84: Labels
12.2 Labels This section includes the Giraffe Blue Spot PT Lite labels. Labels are available in a variety of languages. If you do not see labels in your language, please contact your service representative. For the location of each label, refer to Figure 12-8. -
Page 85: Power Cords
Power cord - Italy 12.4 FRU List 12.4.1 Spare Parts - Components Service Part Number Service Part Description 6600-0714-200 Touchup paint, light gray M1231816 GE Logo Label M1229489 Giraffe Brand Label M1231448 Hex Key M1232009 Air filters (pack of 12) - Page 86 Chapter 12: Service Parts 12.4.2 Spare Parts - Service Kits Part Number Part Description 6600-0730-214 Fuse FRU Kit Fuse T3.15A 250V SLO-BLO 2065981-001 Power Entry Module FRU Kit Power entry module (EMI) 2075264-001 Grounding Clip FRU Kit Ground Clip Washer, M4, External Tooth Screw, M4, Socket Cap, 10 mm M1225811 LED Module FRU Kit...
- Page 87 Chapter 12: Service Parts Part Number Part Description M1225819 Power Cord Retention FRU Kit Bar, Retaining clip Retention spring Screw, M3X16, PAN HEAD Washer, M3, EXT. TOOTH M1225820 Hardware FRU Kit Washer, Lock 08.0704 Nut MV 08.0502 Bar, retaining clip Nut, Hex, M4, W/ EXT.
-
Page 88: Wiring Diagram
Chapter 12: Service Parts 12.5 Wiring Diagram... -
Page 89: Chapter 13: Electromagnetic Compatibility
Chapter 13: Electromagnetic Guidance and Declarations 13.1 Electromagnetic Compatibility (EMC) Guidance Safety Standards: IEC 60601-1, IEC 60601-2-50 EMC Standards: IEC 60601-1-2 WARNING: Medical Electrical Equipment needs special precautions regarding EMC and needs to be installed and put into service according to the EMC information provided in this appendix. WARNING: Portable and mobile RF communication equipment can affect Medical Electrical Equipment. - Page 90 The Giraffe Blue Spot PT Lite is intended for use in the electromagnetic environment specified below. The customer or the user of the Giraffe Blue Spot PT Lite should assure that it is used in such an environment. Emissions Test...
- Page 91 The Giraffe Blue Spot PT Lite is intended for use in the electromagnetic environment specified below. The customer or the user of the Giraffe Blue Spot PT Lite should assure that it is used in such an environment. Immunity Test...
- Page 92 The Giraffe Blue Spot PT Lite is intended for use in the electromagnetic environment specified below. The customer or the user of the Giraffe Blue Spot PT Lite should assure that it is used in such an environment. Immunity Test...
- Page 93 If the measured field strength in the location in which the Giraffe Blue Spot PT Lite unit is used exceeds the applicable RF compliance level above, the unit should be observed to verify normal operation. If abnormal performance is observed, additional measures may be necessary, such as reorienting or relocating the Giraffe Blue Spot PT Lite.
- Page 94 This page intentionally left blank...
- Page 96 地址:中国上海市浦东张江高科技园华佗路1号, 201203 Tel + (8621) 38777888 Fax + (8621) 38777402 Brazil Only Australia 1300 722 229 GE Healthcare Clinical Sytems Equipamentos Médicos Ltda China 800 810 8188 Av. Paulista, 37 - 13º andar India 1 800 425 7255 CEP: 01311-902 - Cerqueira César São Paulo, SP - Brasil...